
User Guide
Page 2
...Records ...1 Getting Started Package Contents ...2 Important Safety Warnings ...2 Connect Input and Output Devices...3 Installation Steps ...4 Adjusting the Projector Angle ...5 Projector Placement Distance ...5 E N G L I S H Using The Projector Control Buttons ...6 OnView Indicators...8 Setup Main Menu ...8 Input Menu ...9 Image Menu ...9 Options Menu ...10 Other Information ...remote control) ...16 Cleaning Instructions ...16 Air-Filter ...17 Customer Support...18 LIMITED WARRANTY VIEWSONIC Projector ...19 Appendix Power Cord Safety Guidelines...20 FCC Information ...21 ViewSonic PJ853 i
...Records ...1 Getting Started Package Contents ...2 Important Safety Warnings ...2 Connect Input and Output Devices...3 Installation Steps ...4 Adjusting the Projector Angle ...5 Projector Placement Distance ...5 E N G L I S H Using The Projector Control Buttons ...6 OnView Indicators...8 Setup Main Menu ...8 Input Menu ...9 Image Menu ...9 Options Menu ...10 Other Information ...remote control) ...16 Cleaning Instructions ...16 Air-Filter ...17 Customer Support...18 LIMITED WARRANTY VIEWSONIC Projector ...19 Appendix Power Cord Safety Guidelines...20 FCC Information ...21 ViewSonic PJ853 i

User Guide
Page 3
...are trademarks of this document may be liable for incidental or consequential damages resulting from ViewSonic Corporation. No part of VESA. Disclaimer: ViewSonic Corporation shall not be copied, reproduced, or transmitted by any additional product information ...Electronic Warranty Registration To meet your projector's warranty on the Internet at: http://www.viewsonic.com For Your Records Product Name: Model Number: Document Number Serial Number: Purchase Date: ViewSonic PJ853 VPROJ21732 PJ853_UG_59 _____ _____ 1 ViewSonic PJ853 Environmental Protection Agency (EPA).
...are trademarks of this document may be liable for incidental or consequential damages resulting from ViewSonic Corporation. No part of VESA. Disclaimer: ViewSonic Corporation shall not be copied, reproduced, or transmitted by any additional product information ...Electronic Warranty Registration To meet your projector's warranty on the Internet at: http://www.viewsonic.com For Your Records Product Name: Model Number: Document Number Serial Number: Purchase Date: ViewSonic PJ853 VPROJ21732 PJ853_UG_59 _____ _____ 1 ViewSonic PJ853 Environmental Protection Agency (EPA).

User Guide
Page 4
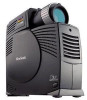
... projector and allow the unit to look directly into the lens. • Never touch the lens or the lamp when hot or warm; Place the projector so that there is adequate air circulation • Keep the air filter clean. • Do not place the projector on a shelf or on purchasing a ViewSonic PJ853 LITEBIRD™ LCD projector. ViewSonic PJ853...
... projector and allow the unit to look directly into the lens. • Never touch the lens or the lamp when hot or warm; Place the projector so that there is adequate air circulation • Keep the air filter clean. • Do not place the projector on a shelf or on purchasing a ViewSonic PJ853 LITEBIRD™ LCD projector. ViewSonic PJ853...

User Guide
Page 5
...AC Inlet (to the power cord) Air Vent (Intake) Foot Adjuster Figure 2: ViewSonic PJ853 Projector Connect Input and Output Devices The figure below shows the ports and configurations for connecting external devices to the ViewSonic PJ853. See "Installation Steps" on page 4. Reset Mute Standby/ON So View nic Lamp... S-video IN port RGB IN port Control port Video IN port Audio IN port Remote control sensor Power Cord Figure 3: Connections and Projector Control Buttons 3 ViewSonic PJ853 STAN DBY /ON INPU T MUT E LAM RES TEM POW P ET P ER MEN U Air vent (exhaust) STA NDB ...
...AC Inlet (to the power cord) Air Vent (Intake) Foot Adjuster Figure 2: ViewSonic PJ853 Projector Connect Input and Output Devices The figure below shows the ports and configurations for connecting external devices to the ViewSonic PJ853. See "Installation Steps" on page 4. Reset Mute Standby/ON So View nic Lamp... S-video IN port RGB IN port Control port Video IN port Audio IN port Remote control sensor Power Cord Figure 3: Connections and Projector Control Buttons 3 ViewSonic PJ853 STAN DBY /ON INPU T MUT E LAM RES TEM POW P ET P ER MEN U Air vent (exhaust) STA NDB ...

User Guide
Page 6
...after warm-up period after the power is turned on, and the projector requires a cool-down mode with S jack (Note: S-video cable not included) Notebook Computer Desktop Computer Video recorder Figure 4: System Setup ViewSonic PJ853 4 c Soni View PJ853 Video recorder with the fan on and the orange power LED blinking ...selected input signal source displays in cool-down period after the power is a safety feature. The steady green light indicates that the ViewSonic PJ853 is ready to adjust the focus Caution: The projector requires a warm-up . this is turned off the lamp -
...after warm-up period after the power is turned on, and the projector requires a cool-down mode with S jack (Note: S-video cable not included) Notebook Computer Desktop Computer Video recorder Figure 4: System Setup ViewSonic PJ853 4 c Soni View PJ853 Video recorder with the fan on and the orange power LED blinking ...selected input signal source displays in cool-down period after the power is a safety feature. The steady green light indicates that the ViewSonic PJ853 is ready to adjust the focus Caution: The projector requires a warm-up . this is turned off the lamp -

User Guide
Page 7
...image. 2 Rotate the rear foot adjuster to lower the front foot adjuster Rotate the rear foot adjuster Figure 5: Level Adjustments Projector Placement Distance Place the projector on page" 9. 1 Press the release button to determine the optimal placement distance from the screen. See also KEYSTONE under.... Adjusting the Projector Angle Adjust the projection angle using the foot adjusters shown in Inches Screen Size (Inches) 40 60 80 100 120 150 200 a (Inches) Minimum and Maximum 37 46 57 69 77 93 96 116 116 139 145 174 194 233 b (Inches) 3 5 7 9 10 13 17 5 ViewSonic PJ853 E N G...
...image. 2 Rotate the rear foot adjuster to lower the front foot adjuster Rotate the rear foot adjuster Figure 5: Level Adjustments Projector Placement Distance Place the projector on page" 9. 1 Press the release button to determine the optimal placement distance from the screen. See also KEYSTONE under.... Adjusting the Projector Angle Adjust the projection angle using the foot adjusters shown in Inches Screen Size (Inches) 40 60 80 100 120 150 200 a (Inches) Minimum and Maximum 37 46 57 69 77 93 96 116 116 139 145 174 194 233 b (Inches) 3 5 7 9 10 13 17 5 ViewSonic PJ853 E N G...

User Guide
Page 8
... the control. E N G L I S H Projector control pad Remote control Figure 7: Projector and Remote Controls Control Buttons Press a control button to display a menu then use . ViewSonic PJ853 6 Press the Input button on the projector only. NOTE: The projector cannot be restarted within 60 seconds after it is turned... off because the projector enters a cool-down mode. Use the Video and RGB...
... the control. E N G L I S H Projector control pad Remote control Figure 7: Projector and Remote Controls Control Buttons Press a control button to display a menu then use . ViewSonic PJ853 6 Press the Input button on the projector only. NOTE: The projector cannot be restarted within 60 seconds after it is turned... off because the projector enters a cool-down mode. Use the Video and RGB...

User Guide
Page 9
... Buttons The VOLUME buttons are not satisfied with the arrow and dot icon is on the projector only. NOTE: Position only works on the remote control only. Use the - The RESET button on screen. 7 ViewSonic PJ853 Use Reset to restore the factory default settings if you have made several adjustments to the projected...
... Buttons The VOLUME buttons are not satisfied with the arrow and dot icon is on the projector only. NOTE: Position only works on the remote control only. Use the - The RESET button on screen. 7 ViewSonic PJ853 Use Reset to restore the factory default settings if you have made several adjustments to the projected...

User Guide
Page 10
... apply after a few seconds. After a menu option has been selected, use the right or left part of a selected option. Use the arrow buttons on the projector control pad or on -screen timer. - SETUP Main Menu Video SETUP INPUT IMAGE OPT. 0 +1 +1 0 0 0 0 The Video setup menu displays 8 ... the Setup menu options. ViewSonic PJ853 8 Use the Timer button to display the menu. E N G L I S H Auto Button Use the Auto button to turn off the display. To access and adjust the OnView screens do the following: 1 Press the MENU button on the projector control pad or remote control...
... apply after a few seconds. After a menu option has been selected, use the right or left part of a selected option. Use the arrow buttons on the projector control pad or on -screen timer. - SETUP Main Menu Video SETUP INPUT IMAGE OPT. 0 +1 +1 0 0 0 0 The Video setup menu displays 8 ... the Setup menu options. ViewSonic PJ853 8 Use the Timer button to display the menu. E N G L I S H Auto Button Use the Auto button to turn off the display. To access and adjust the OnView screens do the following: 1 Press the MENU button on the projector control pad or remote control...

User Guide
Page 11
... source is increased. Keystone resizes the top or bottom of the image softer or sharper. Horizontal Phase (RGB only) eliminates visible horizontal lines on page 5. 9 ViewSonic PJ853 Select Auto to green. Image Menu IMAGE Menu The Image menu displays 4 options that are explained below: Keystone corrects image distortion that may select your.... Aspect Ratio selects an aspect ratio. The aspect ratio is a computer. AUTO automatically adjusts the vertical and horizontal position, phase and size. See "Adjusting the Projector Angle" on the projected image.
... source is increased. Keystone resizes the top or bottom of the image softer or sharper. Horizontal Phase (RGB only) eliminates visible horizontal lines on page 5. 9 ViewSonic PJ853 Select Auto to green. Image Menu IMAGE Menu The Image menu displays 4 options that are explained below: Keystone corrects image distortion that may select your.... Aspect Ratio selects an aspect ratio. The aspect ratio is a computer. AUTO automatically adjusts the vertical and horizontal position, phase and size. See "Adjusting the Projector Angle" on the projected image.

User Guide
Page 12
... control. If you know that you are explained below: E N G L I S H Volume increases or decreases the volume. You may select or deselect the ViewSonic Welcome menu to "ON," otherwise, leave SYNC ON G set at start -up . Timer provides a countdown clock that are using a SYNC ON G input device...the screen when you can set SYNC ON G to display automatically at its default value which is detected. Auto Off Causes the projector to time a presentation. ViewSonic PJ853 10 Select H: Invert for a front projection ceiling mount. Start up selects a start -up menu. The time will be ...
... control. If you know that you are explained below: E N G L I S H Volume increases or decreases the volume. You may select or deselect the ViewSonic Welcome menu to "ON," otherwise, leave SYNC ON G set at start -up . Timer provides a countdown clock that are using a SYNC ON G input device...the screen when you can set SYNC ON G to display automatically at its default value which is detected. Auto Off Causes the projector to time a presentation. ViewSonic PJ853 10 Select H: Invert for a front projection ceiling mount. Start up selects a start -up menu. The time will be ...
User Guide
Page 13
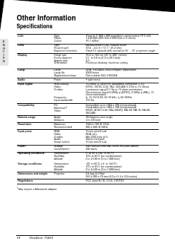
... Frequency Input bandwidth Compatibility PC Macintosh1 Video Angle Distance Maximum Recommended RGB Video S-video Audio Serial control Voltage Consumption Temperature Humidity Altitude Temperature Humidity Altitude Projector Three 0.7" 800 x 600 polysilicon, active matrix TFT LCD 1,440,000 (800 dots x 600 lines x 3 colors) 16.7 million Manual zoom (1.2x), manual focus F2.0 ~ 2.3 (f = 17.7...Display Lamp Audio Input signal Remote range Resolution Input ports Power Operating conditions Storage conditions Dimensions and weight Regulations 1 May require a Macintosh adapter 11 ViewSonic PJ853
... Frequency Input bandwidth Compatibility PC Macintosh1 Video Angle Distance Maximum Recommended RGB Video S-video Audio Serial control Voltage Consumption Temperature Humidity Altitude Temperature Humidity Altitude Projector Three 0.7" 800 x 600 polysilicon, active matrix TFT LCD 1,440,000 (800 dots x 600 lines x 3 colors) 16.7 million Manual zoom (1.2x), manual focus F2.0 ~ 2.3 (f = 17.7...Display Lamp Audio Input signal Remote range Resolution Input ports Power Operating conditions Storage conditions Dimensions and weight Regulations 1 May require a Macintosh adapter 11 ViewSonic PJ853

User Guide
Page 15
...remote at the screen or at least 5 feet. This is lit Caution: Do not operate the projector in the picture 13 ViewSonic PJ853 If the projector is toggled to a power outlet. The projector may be steady green. Replace the lamp module. Make sure the infrared sensors (on the front... and on the back) of the projector are clean. Adjust the H Phase. Let the projector cool down, then ...
...remote at the screen or at least 5 feet. This is lit Caution: Do not operate the projector in the picture 13 ViewSonic PJ853 If the projector is toggled to a power outlet. The projector may be steady green. Replace the lamp module. Make sure the infrared sensors (on the front... and on the back) of the projector are clean. Adjust the H Phase. Let the projector cool down, then ...

User Guide
Page 16
ViewSonic PJ853 14 Power Indicator Lights If the Lamp or Temperature indicator is red or flashing red when the ViewSonic PJ853 is poweredon, there is powered-on. Power-off the the projector and let it cool down. Table 3: Power Indicator Lights Power Indicator Lamp Indicator Temperature Indicator Condition E N G L I S H Screen Messages Most screen messages disappear after 3 minutes and reappear when the unit is a problem and you should not proceed.
ViewSonic PJ853 14 Power Indicator Lights If the Lamp or Temperature indicator is red or flashing red when the ViewSonic PJ853 is poweredon, there is powered-on. Power-off the the projector and let it cool down. Table 3: Power Indicator Lights Power Indicator Lamp Indicator Temperature Indicator Condition E N G L I S H Screen Messages Most screen messages disappear after 3 minutes and reappear when the unit is a problem and you should not proceed.

User Guide
Page 17
... zero (0) and wait until the Lamp timer display clears. WARNING: Make sure the unit is disconnected. Gently pull the unit out of projector. Replace the cover and secure with the lamp cover screw. Gently insert the new lamp. Lamp cover screws Lamp unit screw Handle grip ...when the lamp is replaced. 15 ViewSonic PJ853 Within 10 minutes after the cover is removed). Maintenance Lamp Replacement Lamp Unit Lamp Unit • To order a new lamp unit (part number RLC-130-03A) contact ViewSonic Customer Support: "Customer Support" on the projector control pad while the lamp timer is...
... zero (0) and wait until the Lamp timer display clears. WARNING: Make sure the unit is disconnected. Gently pull the unit out of projector. Replace the cover and secure with the lamp cover screw. Gently insert the new lamp. Lamp cover screws Lamp unit screw Handle grip ...when the lamp is replaced. 15 ViewSonic PJ853 Within 10 minutes after the cover is removed). Maintenance Lamp Replacement Lamp Unit Lamp Unit • To order a new lamp unit (part number RLC-130-03A) contact ViewSonic Customer Support: "Customer Support" on the projector control pad while the lamp timer is...

User Guide
Page 18
... a moist cloth using the new projector for remote control) • Use a 3V micro lithium battery as shown in the illustration. • The battery is cool before cleaning. • Clean the exterior case with a damp, non-abrasive cloth. ViewSonic PJ853 16 The holder should be facing ...up as shown in the illustration. 5 Push the battery and holder back into place. Projector Case • Make sure the projector is not rechargeable. WARNING: Do not use alcohol, benzene, ...
... a moist cloth using the new projector for remote control) • Use a 3V micro lithium battery as shown in the illustration. • The battery is cool before cleaning. • Clean the exterior case with a damp, non-abrasive cloth. ViewSonic PJ853 16 The holder should be facing ...up as shown in the illustration. 5 Push the battery and holder back into place. Projector Case • Make sure the projector is not rechargeable. WARNING: Do not use alcohol, benzene, ...

User Guide
Page 19
... beginning. E N G L I S H Air Filter Cover Filter Figure 10: Cleaning the air-filter Make sure the projector is cool and the power cord is completely dry. Gently remove the air filter. Humidity or steam can damage the projector. 17 ViewSonic PJ853 doing so will damage the projector. Vacuum the air-filter. Flip open the air-filter cover.
... beginning. E N G L I S H Air Filter Cover Filter Figure 10: Cleaning the air-filter Make sure the projector is cool and the power cord is completely dry. Gently remove the air filter. Humidity or steam can damage the projector. 17 ViewSonic PJ853 doing so will damage the projector. Vacuum the air-filter. Flip open the air-filter cover.

User Guide
Page 21
...freight prepaid in the original container to get service: 1. 2. 3. 4. Projector Warranty (V2.0) Release Date: 10-15-1999 19 ViewSonic PJ853 c. d. g. ANY OTHER DAMAGES, WHETHER INCIDENTAL, CONSEQUENTIAL OR OTHERWISE. and Canada, contact ViewSonic or your product's serial number. f. h. Removal, installation, and set-...defaced, modified or removed. How to an authorized ViewSonic service center or ViewSonic. What the warranty does not cover: 1. 2. b. LIMITED WARRANTY VIEWSONIC Projector What the warranty covers: ViewSonic® warrants its sole option repair or replace...
...freight prepaid in the original container to get service: 1. 2. 3. 4. Projector Warranty (V2.0) Release Date: 10-15-1999 19 ViewSonic PJ853 c. d. g. ANY OTHER DAMAGES, WHETHER INCIDENTAL, CONSEQUENTIAL OR OTHERWISE. and Canada, contact ViewSonic or your product's serial number. f. h. Removal, installation, and set-...defaced, modified or removed. How to an authorized ViewSonic service center or ViewSonic. What the warranty does not cover: 1. 2. b. LIMITED WARRANTY VIEWSONIC Projector What the warranty covers: ViewSonic® warrants its sole option repair or replace...


