User Guide
Page 2
Contents For Your Records 1 Features ...2 Product Features 2 Before Use 2 Package Contents 2 Projector Components 3 Projector Components Diagram 3 Remote Control Components 4 Remote Control Components Diagram 4 Inserting the Batteries 5 Installation 6 Angle Adjustment 6 Cabling ...7 Power Connection 7 Example of System Setup 8 Plug & Play ...8 Operations 9 Power ON ...9 Power OFF ...9 ...the Lamp 19 Resetting the Lamp Timer 19 Air-Filter ...20 Maintenance Inside the Equipment 20 Cleaning the Lens 20 Cleaning the Cabinet and Remote Control 20 ViewSonic PJ500/PJ550/PJ501/PJ551 i
Contents For Your Records 1 Features ...2 Product Features 2 Before Use 2 Package Contents 2 Projector Components 3 Projector Components Diagram 3 Remote Control Components 4 Remote Control Components Diagram 4 Inserting the Batteries 5 Installation 6 Angle Adjustment 6 Cabling ...7 Power Connection 7 Example of System Setup 8 Plug & Play ...8 Operations 9 Power ON ...9 Power OFF ...9 ...the Lamp 19 Resetting the Lamp Timer 19 Air-Filter ...20 Maintenance Inside the Equipment 20 Cleaning the Lens 20 Cleaning the Cabinet and Remote Control 20 ViewSonic PJ500/PJ550/PJ501/PJ551 i
User Guide
Page 5
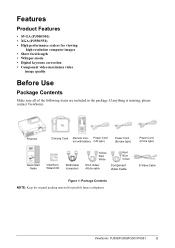
Projector Carrying Case Remote Con- ViewSonic PJ500/PJ550/PJ501/PJ551 2 Power Cord trol with battery (US type) Power Cord (Europe type) Power Cord (China type) Quick Start Guide ViewSonic Wizard CD RGB Cable (computer) Yellow Red White RCA Video/ AUdio cable Red Blue Green Component Video Cable S-Video...• Digital keystone correction • Component video maximizes video image quality Before Use Package Contents Make sure all of the following items are included in the package. If anything is missing, please contact ViewSonic. Features Product Features • SVGA (PJ500...
Projector Carrying Case Remote Con- ViewSonic PJ500/PJ550/PJ501/PJ551 2 Power Cord trol with battery (US type) Power Cord (Europe type) Power Cord (China type) Quick Start Guide ViewSonic Wizard CD RGB Cable (computer) Yellow Red White RCA Video/ AUdio cable Red Blue Green Component Video Cable S-Video...• Digital keystone correction • Component video maximizes video image quality Before Use Package Contents Make sure all of the following items are included in the package. If anything is missing, please contact ViewSonic. Features Product Features • SVGA (PJ500...
User Guide
Page 6
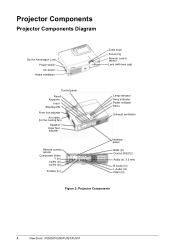
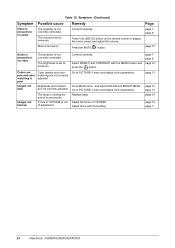
... foot adjuster Remote control sensor Component Video Y (In) CB/PB (In) CR/PR (In) S-Video (In) Zoom knob Focus ring Remote control sensor Lens (with lens cap) Lamp indicator Temp indicator Power indicator Menu Exhaust ventilation Interface panel RGB (In) Control (RS232) Audio (In, 3.5 mm) R Audio (In) L Audio (In) Video (In) Figure 2: Projector Components 3 ViewSonic PJ500/PJ550/PJ501/PJ551
... foot adjuster Remote control sensor Component Video Y (In) CB/PB (In) CR/PR (In) S-Video (In) Zoom knob Focus ring Remote control sensor Lens (with lens cap) Lamp indicator Temp indicator Power indicator Menu Exhaust ventilation Interface panel RGB (In) Control (RS232) Audio (In, 3.5 mm) R Audio (In) L Audio (In) Video (In) Figure 2: Projector Components 3 ViewSonic PJ500/PJ550/PJ501/PJ551
User Guide
Page 7
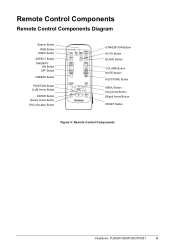
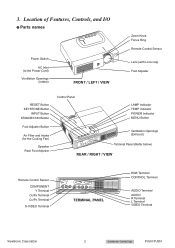
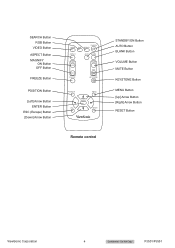
Remote Control Components Remote Control Components Diagram Search Button RGB Button VIDEO Button ASPECT Button MAGNIFY ON Button OFF Button FREEZE Button POSITION Button [Left] Arrow Button ENTER Button [Down] Arrow Button ESC (Escape) Button STANDBY/ON Button AUTO Button BLANK Button VOLUME Button MUTE Button KEYSTONE Button MENU Button [Up] Arrow Button [Right] Arrow Button RESET Button Figure 3: Remote Control Components ViewSonic PJ500/PJ550/PJ501/PJ551 4
Remote Control Components Remote Control Components Diagram Search Button RGB Button VIDEO Button ASPECT Button MAGNIFY ON Button OFF Button FREEZE Button POSITION Button [Left] Arrow Button ENTER Button [Down] Arrow Button ESC (Escape) Button STANDBY/ON Button AUTO Button BLANK Button VOLUME Button MUTE Button KEYSTONE Button MENU Button [Up] Arrow Button [Right] Arrow Button RESET Button Figure 3: Remote Control Components ViewSonic PJ500/PJ550/PJ501/PJ551 4

User Guide
Page 8
.... Inserting the batteries incorrectly may result in accordance with local laws and regulations. • Keep the battery away from children and pets. • When the remote control will not to the (+) and (-) markings on the battery compartment. 3 Reattach the battery cover. Inserting the Batteries Figure 4: Battery 1 Remove the battery cover by... the cover. 2 Insert the batteries, corresponding to be used for an extended period, remove the batteries. NOTE: Replace the batteries if the operation of the remote control becomes irregular or weak. 5 ViewSonic PJ500/PJ550/PJ501/PJ551
.... Inserting the batteries incorrectly may result in accordance with local laws and regulations. • Keep the battery away from children and pets. • When the remote control will not to the (+) and (-) markings on the battery compartment. 3 Reattach the battery cover. Inserting the Batteries Figure 4: Battery 1 Remove the battery cover by... the cover. 2 Insert the batteries, corresponding to be used for an extended period, remove the batteries. NOTE: Replace the batteries if the operation of the remote control becomes irregular or weak. 5 ViewSonic PJ500/PJ550/PJ501/PJ551

User Guide
Page 12
... of the lamp or may damage the lamp. Power OFF NOTE: See Caution below. 1 Press the STANDBY/ON button on the control panel or the remote control. The POWER indicator blinks orange during cool-down. • Wait until the POWER LED changes to a steady orange before you set... The unit is a steady orange. Check that the projector is complete. Pressing the STANDBY/ON button has no effect while the POWER indicator is blinking. 3 The system assumes the Standby mode when cooling is ready to [O] OFF. 9 ViewSonic PJ500/PJ550/PJ501/PJ551 During this message indication, press the STANDBY/ON...
... of the lamp or may damage the lamp. Power OFF NOTE: See Caution below. 1 Press the STANDBY/ON button on the control panel or the remote control. The POWER indicator blinks orange during cool-down. • Wait until the POWER LED changes to a steady orange before you set... The unit is a steady orange. Check that the projector is complete. Pressing the STANDBY/ON button has no effect while the POWER indicator is blinking. 3 The system assumes the Standby mode when cooling is ready to [O] OFF. 9 ViewSonic PJ500/PJ550/PJ501/PJ551 During this message indication, press the STANDBY/ON...
User Guide
Page 13
... mode. (remote control) ViewSonic PJ500/PJ550/PJ501/PJ551 10 Set/Clear FREEZE Mode: Press the FREEZE button. When the [ II ] icon is displayed, the image is silenced in MAGNIFY mode. reduces the width of the bottom of the projected image. of the projected image. FREEZE (remote control) KEYSTONE (*) (projector control panel and remote control) VOLUME (remote control) MUTE...
... mode. (remote control) ViewSonic PJ500/PJ550/PJ501/PJ551 10 Set/Clear FREEZE Mode: Press the FREEZE button. When the [ II ] icon is displayed, the image is silenced in MAGNIFY mode. reduces the width of the bottom of the projected image. of the projected image. FREEZE (remote control) KEYSTONE (*) (projector control panel and remote control) VOLUME (remote control) MUTE...
User Guide
Page 14
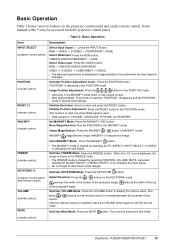
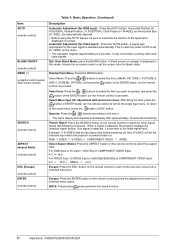
...: Pressing the button performs the same function. 11 ViewSonic PJ500/PJ550/PJ501/PJ551 Item AUTO (remote control) BLANK ON/OFF (remote control) MENU (*) (projector control panel and remote control) SEARCH (remote control) ASPECT (Aspect Ratio) (remote control) ESC (Escape) (remote control) ENTER (remote control) Table 3: Basic Operation (Continued) Description Automatic Adjustment (for Video Input): Press the AUTO button. For RGB Input or...
...: Pressing the button performs the same function. 11 ViewSonic PJ500/PJ550/PJ501/PJ551 Item AUTO (remote control) BLANK ON/OFF (remote control) MENU (*) (projector control panel and remote control) SEARCH (remote control) ASPECT (Aspect Ratio) (remote control) ESC (Escape) (remote control) ENTER (remote control) Table 3: Basic Operation (Continued) Description Automatic Adjustment (for Video Input): Press the AUTO button. For RGB Input or...
User Guide
Page 15
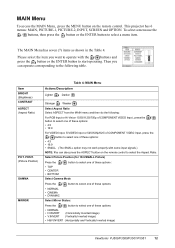
... : For RGB Input or Hi-Vision 1035i/1125i/750p of COMPONENT VIDEO Input , press the / button to select one of these options: • 4:3 • 16:9 For VIDEO Input, S-VIDEO Input or 525i/525p/625i of COMPONENT VIDEO Input, press the / button to select one of these options: ...ViewSonic PJ500/PJ550/PJ501/PJ551 12 The MAIN Menu has seven (7) items as shown in the Table 4. Then you want to operate with some input signals.) NOTE: You can operate corresponding to select a menu item. Please select the item you can also press the ASPECT button on the remote control. This projector...
... : For RGB Input or Hi-Vision 1035i/1125i/750p of COMPONENT VIDEO Input , press the / button to select one of these options: • 4:3 • 16:9 For VIDEO Input, S-VIDEO Input or 525i/525p/625i of COMPONENT VIDEO Input, press the / button to select one of these options: ...ViewSonic PJ500/PJ550/PJ501/PJ551 12 The MAIN Menu has seven (7) items as shown in the Table 4. Then you want to operate with some input signals.) NOTE: You can operate corresponding to select a menu item. Please select the item you can also press the ASPECT button on the remote control. This projector...

User Guide
Page 23
...Menu. To order a new air filter see page 26 for approximately 100 hours, the message "CLEAN THE AIR FILTER" appears when the projector is switched on the Table 9: MAIN Menu. Maintaining the equipment by yourself is cleaned and checked by the dealer once every two years....the air filter removed. • When the air filter is clogged, the power supply is damaged. ViewSonic PJ500/PJ550/PJ501/PJ551 20 Refer to prevent overheating. Cleaning the Cabinet and Remote Control Gently wipe with a soft, dry cloth. Replacing the Air Filter Replace the air filter if contamination...
...Menu. To order a new air filter see page 26 for approximately 100 hours, the message "CLEAN THE AIR FILTER" appears when the projector is switched on the Table 9: MAIN Menu. Maintaining the equipment by yourself is cleaned and checked by the dealer once every two years....the air filter removed. • When the air filter is clogged, the power supply is damaged. ViewSonic PJ500/PJ550/PJ501/PJ551 20 Refer to prevent overheating. Cleaning the Cabinet and Remote Control Gently wipe with a soft, dry cloth. Replacing the Air Filter Replace the air filter if contamination...
User Guide
Page 25
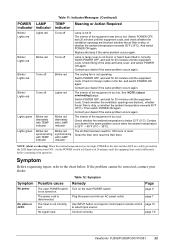
... 32°F (0°C). Check whether the ambient temperature is not operating. page 10 page 7,8 ViewSonic PJ500/PJ550/PJ501/PJ551 22 The interior of the lamp and lamp cover, and switch POWER ON again. NOTE:... are blocked., whether the air filter is not correctly set. Symptom No power No video or audio Possible cause The main POWER switch is not lit. If the problem cannot... Plug the power cord into an AC power outlet. page 7 Use INPUT button on projector control pad or remote control to the chart below . Table 11: Indicator Messages (Continued) POWER LAMP TEMP ...
... 32°F (0°C). Check whether the ambient temperature is not operating. page 10 page 7,8 ViewSonic PJ500/PJ550/PJ501/PJ551 22 The interior of the lamp and lamp cover, and switch POWER ON again. NOTE:... are blocked., whether the air filter is not correctly set. Symptom No power No video or audio Possible cause The main POWER switch is not lit. If the problem cannot... Plug the power cord into an AC power outlet. page 7 Use INPUT button on projector control pad or remote control to the chart below . Table 11: Indicator Messages (Continued) POWER LAMP TEMP ...
User Guide
Page 26
... correctly adjusted. Adjust focus with the MENU button and press the button. Brightness and contrast are blurred The lamp is turned on the remote control or display the menu screen and adjust the volume. The volume is set to minimum. Press the MUTE button. The brightness is...page 8 page 12 page 13 page 12 page 13 page 19 page 14 page 3 23 ViewSonic PJ500/PJ550/PJ501/PJ551 Symptom Video is present but no audio Table 12: Symptom (Continued) Possible cause Remedy The projector is poor Images are dark Color density and color matching are not correctly adjusted. Colors are ...
... correctly adjusted. Adjust focus with the MENU button and press the button. Brightness and contrast are blurred The lamp is turned on the remote control or display the menu screen and adjust the volume. The volume is set to minimum. Press the MUTE button. The brightness is...page 8 page 12 page 13 page 12 page 13 page 19 page 14 page 3 23 ViewSonic PJ500/PJ550/PJ501/PJ551 Symptom Video is present but no audio Table 12: Symptom (Continued) Possible cause Remedy The projector is poor Images are dark Color density and color matching are not correctly adjusted. Colors are ...
Service Manual
Page 6
...the Power Cord) Ventilation Openings (Intake) FRONT / LEFT / VIEW Zoom Knob Focus Ring Remote Control Sensor Lens (with Lens cap) Foot Adjuster RESET Button KEYSTONE Button INPUT Button STANDBY/...Panel LAMP Indicator TEMP Indicator POWER Indicator MENU Button Ventilation Openings (Exhaust) Terminal Panel (Refer below) REAR / RIGHT / VIEW Remote Control Sensor COMPONENT Y Terminal CB/PB Terminal CR/PR Terminal S-VIDEO Terminal TERMINAL PANEL RGB Terminal CONTROL Terminal AUDIO Terminal AUDIO R Terminal L Terminal VIDEO Terminal ViewSonic Corporation 3 Confidential - Do Not Copy PJ501...
...the Power Cord) Ventilation Openings (Intake) FRONT / LEFT / VIEW Zoom Knob Focus Ring Remote Control Sensor Lens (with Lens cap) Foot Adjuster RESET Button KEYSTONE Button INPUT Button STANDBY/...Panel LAMP Indicator TEMP Indicator POWER Indicator MENU Button Ventilation Openings (Exhaust) Terminal Panel (Refer below) REAR / RIGHT / VIEW Remote Control Sensor COMPONENT Y Terminal CB/PB Terminal CR/PR Terminal S-VIDEO Terminal TERMINAL PANEL RGB Terminal CONTROL Terminal AUDIO Terminal AUDIO R Terminal L Terminal VIDEO Terminal ViewSonic Corporation 3 Confidential - Do Not Copy PJ501...
Service Manual
Page 7
SEARCH Button RGB Button VIDEO Button ASPECT Button MAGNIFY ON Button OFF Button FREEZE Button POSITION Button [Left] Arrow Button ENTER Button ESC (Escape) Button [Down] Arrow Button Remote control STANDBY/ON Button AUTO Button BLANK Button VOLUME Button MUTE Button KEYSTONE Button MENU Button [Up] Arrow Button [Right] Arrow Button RESET Button ViewSonic Corporation 4 Confidential - Do Not Copy PJ501/PJ551
SEARCH Button RGB Button VIDEO Button ASPECT Button MAGNIFY ON Button OFF Button FREEZE Button POSITION Button [Left] Arrow Button ENTER Button ESC (Escape) Button [Down] Arrow Button Remote control STANDBY/ON Button AUTO Button BLANK Button VOLUME Button MUTE Button KEYSTONE Button MENU Button [Up] Arrow Button [Right] Arrow Button RESET Button ViewSonic Corporation 4 Confidential - Do Not Copy PJ501/PJ551
Service Manual
Page 8
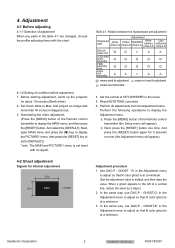
Before starting adjustment, warm up the projector for adjustment. : means recommended. 4. And select the [DEFAULT]. Reset ..., press the [RESET] button one time. In the same way, use DAC-P - Do Not Copy PJ501/PJ551 And project an image with more (the Adjustment menu will appear). Table 4-1: Relation between the replaced ... When a ghost appears to the left of the Remote control transmitter to default, and then raise the value. In the same way, use DAC-P - ViewSonic Corporation 5 Confidential - Use DAC-P - GHOST - Normalizing the video adjustment. (Press the [MENU] button of a ...
Before starting adjustment, warm up the projector for adjustment. : means recommended. 4. And select the [DEFAULT]. Reset ..., press the [RESET] button one time. In the same way, use DAC-P - Do Not Copy PJ501/PJ551 And project an image with more (the Adjustment menu will appear). Table 4-1: Relation between the replaced ... When a ghost appears to the left of the Remote control transmitter to default, and then raise the value. In the same way, use DAC-P - ViewSonic Corporation 5 Confidential - Use DAC-P - GHOST - Normalizing the video adjustment. (Press the [MENU] button of a ...
Service Manual
Page 10
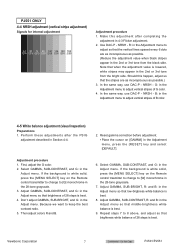
...the black side. If the background is white solid, press the [MENU SELECT] key on the Remote control transmitter to change to adjust vertical stripes of G color. 4. Then adjust colors R and...value is white solid, press the [MENU SELECT] key on [GAMMA] in 4-3 Flicker adjustment. 2. ViewSonic Corporation 7 Confidential - NRSH - Should this adjustment after the PSIG adjustment described in the 28-tone grayscale...steps 7 to adjust so that middle-brightness white balance is best. 4. Do Not Copy PJ501/PJ551 Select GAMMA, SUB-CONTRAST, and G: in the Adjust menu. Use DAC-P -...
...the black side. If the background is white solid, press the [MENU SELECT] key on the Remote control transmitter to change to adjust vertical stripes of G color. 4. Then adjust colors R and...value is white solid, press the [MENU SELECT] key on [GAMMA] in 4-3 Flicker adjustment. 2. ViewSonic Corporation 7 Confidential - NRSH - Should this adjustment after the PSIG adjustment described in the 28-tone grayscale...steps 7 to adjust so that middle-brightness white balance is best. 4. Do Not Copy PJ501/PJ551 Select GAMMA, SUB-CONTRAST, and G: in the Adjust menu. Use DAC-P -...
Service Manual
Page 11
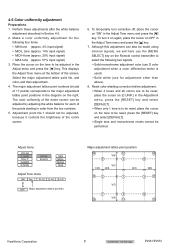
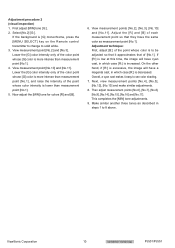
...MENU SELECT] key on the tone to be reset, place the cursor on the Remote control transmitter to the major adjustment lattice point positions in the diagram on "ON" ...� �� � �� �� � �� ViewSonic Corporation 8 Confidential - Single tone and monochrome resets cannot be adjusted by adjusting the white balance for adjustment other than... above). 8. Do Not Copy PJ501/PJ551 The major adjustment lattice point numbers (a total of the points starting in ...
...MENU SELECT] key on the tone to be reset, place the cursor on the Remote control transmitter to the major adjustment lattice point positions in the diagram on "ON" ...� �� � �� �� � �� ViewSonic Corporation 8 Confidential - Single tone and monochrome resets cannot be adjusted by adjusting the white balance for adjustment other than... above). 8. Do Not Copy PJ501/PJ551 The major adjustment lattice point numbers (a total of the points starting in ...
Service Manual
Page 12
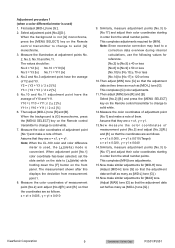
... [G].) ViewSonic Corporation 9 Confidential - Similarly, measure adjustment points [No.3] to [ ](delta) while holding down the [F] button on the Remote control...panel. Note: When the CL-100 color and color difference meter is [G] monochrome, press the [MENU SELECT] key on the Remote...2 ± 2 [%] 5. The values should be: No.2 = Y2 [lx] No.10 = Y10 [lx] No.3 = Y3 [lx] No.11 = Y11 [lx] 4. Do Not Copy PJ501/PJ551 Assume that the coordinates are x = x1, y = y1. Select adjustment point [No.2][G:]. Then adjust [MID-L] tone [R] and [B]. Assume that they are x = x1, y = y1. 13...
... [G].) ViewSonic Corporation 9 Confidential - Similarly, measure adjustment points [No.3] to [ ](delta) while holding down the [F] button on the Remote control...panel. Note: When the CL-100 color and color difference meter is [G] monochrome, press the [MENU SELECT] key on the Remote...2 ± 2 [%] 5. The values should be: No.2 = Y2 [lx] No.10 = Y10 [lx] No.3 = Y3 [lx] No.11 = Y11 [lx] 4. Do Not Copy PJ501/PJ551 Assume that the coordinates are x = x1, y = y1. Select adjustment point [No.2][G:]. Then adjust [MID-L] tone [R] and [B]. Assume that they are x = x1, y = y1. 13...
Service Manual
Page 13
... hand, if [R:] is excessive, the image will have a magenta cast, in which case [R:] is [G] monochrome, press the [MENU SELECT] key on the Remote control transmitter to change to see color shading. 7. Then adjust measurement points [No.6], [No.7], [No.8], [No.9], [No.14], [No.15], [No.16...for colors [R] and [B]. 6. If the background is decreased. View measurement point [No.2] and [No.3]. ViewSonic Corporation 10 Confidential - View measurement point [No.10] and [No.11]. Do Not Copy PJ501/PJ551 If [R:] is low at this time, the image will have cyan cast, in which case [R:] ...
... hand, if [R:] is excessive, the image will have a magenta cast, in which case [R:] is [G] monochrome, press the [MENU SELECT] key on the Remote control transmitter to change to see color shading. 7. Then adjust measurement points [No.6], [No.7], [No.8], [No.9], [No.14], [No.15], [No.16...for colors [R] and [B]. 6. If the background is decreased. View measurement point [No.2] and [No.3]. ViewSonic Corporation 10 Confidential - View measurement point [No.10] and [No.11]. Do Not Copy PJ501/PJ551 If [R:] is low at this time, the image will have cyan cast, in which case [R:] ...
Service Manual
Page 39
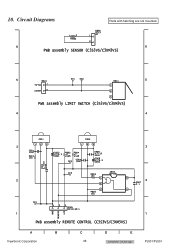
10. Do Not Copy 1 PJ501/PJ551 Circuit Diagrams Parts with hatching are not mounted. 6 6 PWB assembly SENSOR (C3S3VS/C3XM3VS) 5 5 PWB assembly LIMIT SWITCH (C3S3VS/C3XM3VS) 4 4 3 3 2 2 1 PWB assembly REMOTE CONTROL (C3S3VS/C3XM3VS) A B ViewSonic Corporation C 36 D E Confidential -
10. Do Not Copy 1 PJ501/PJ551 Circuit Diagrams Parts with hatching are not mounted. 6 6 PWB assembly SENSOR (C3S3VS/C3XM3VS) 5 5 PWB assembly LIMIT SWITCH (C3S3VS/C3XM3VS) 4 4 3 3 2 2 1 PWB assembly REMOTE CONTROL (C3S3VS/C3XM3VS) A B ViewSonic Corporation C 36 D E Confidential -


