User Guide
Page 4
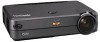
... directly into the laser light emitted from the projector. Place the projector so that emits radiation. • Do not look directly into anyone's eyes. Figure 1: ViewSonic PJ350 Projector Important Safety Warnings • Unplug the projector immediately if you detect an abnormal smell or see...• Do not block the ventilation openings on any other unstable surface. • When connecting a computer to the projector, make sure the projector is adequate air circulation. 2 ViewSonic PJ350 R l o r t n o C doing so will cause severe eye injury. • Never touch the lens...
... directly into the laser light emitted from the projector. Place the projector so that emits radiation. • Do not look directly into anyone's eyes. Figure 1: ViewSonic PJ350 Projector Important Safety Warnings • Unplug the projector immediately if you detect an abnormal smell or see...• Do not block the ventilation openings on any other unstable surface. • When connecting a computer to the projector, make sure the projector is adequate air circulation. 2 ViewSonic PJ350 R l o r t n o C doing so will cause severe eye injury. • Never touch the lens...
User Guide
Page 7
Refer to the Timing Charts on pages 17-18 to the ViewSonic PJ350. Connecting Input and Output Devices The illustration below shows the ports and different configurations for the optimal projected image. NOTE: When using a computer as the ... 1024 x 768 for connecting external devices to verify that the video signal timing (resolution and refresh rate) of your graphics card is supported by the PJ350 projector. 2 Figure 3: Projector Connection Ports ViewSonic PJ350 5 Mouse port ViewSonic The Package Contents illustration above shows the appropriate cables for various devices.
Refer to the Timing Charts on pages 17-18 to the ViewSonic PJ350. Connecting Input and Output Devices The illustration below shows the ports and different configurations for the optimal projected image. NOTE: When using a computer as the ... 1024 x 768 for connecting external devices to verify that the video signal timing (resolution and refresh rate) of your graphics card is supported by the PJ350 projector. 2 Figure 3: Projector Connection Ports ViewSonic PJ350 5 Mouse port ViewSonic The Package Contents illustration above shows the appropriate cables for various devices.
User Guide
Page 8
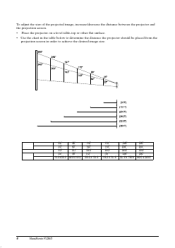
... a level table-top or other flat surface. • Use the chart in the table below to determine the distance the projector should be placed from the projection screen in order to achieve the desired image size. Table 1: Projection Distances Maximum Screen Screen Size Minimum Distance inches ....8 x 78.4 172" 143" 23.0' 172" 103.2 x 137.6 197" 163" 26.2' 197" 118.2 x 157.6 246" 204" 32.8' 246" 147.6 x 196.8 300" 245" 39.4' 300" 180.0 x 240.0 6 ViewSonic PJ350 Distan ceImage ,,
... a level table-top or other flat surface. • Use the chart in the table below to determine the distance the projector should be placed from the projection screen in order to achieve the desired image size. Table 1: Projection Distances Maximum Screen Screen Size Minimum Distance inches ....8 x 78.4 172" 143" 23.0' 172" 103.2 x 137.6 197" 163" 26.2' 197" 118.2 x 157.6 246" 204" 32.8' 246" 147.6 x 196.8 300" 245" 39.4' 300" 180.0 x 240.0 6 ViewSonic PJ350 Distan ceImage ,,
User Guide
Page 9
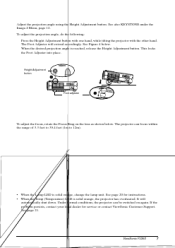
... Adjuster will automatically shut down. This locks the Foot Adjuster into place. ViewSonic PJ350 7 Z To adjust the projection angle, do the following: 1 Press the Height Adjustment button with one hand, while tilting the projector with the other hand. See page 21. See also KEYSTONE under the ... to 39.4 feet (1m to 12m). See page 20 for service or contact ViewSonic Customer Support. It will extend accordingly. Warning Indicators • When the Lamp LED is solid orange, the projector has overheated. See Figure 4 below . Adjusting the Projection Angle Adjust the projection ...
... Adjuster will automatically shut down. This locks the Foot Adjuster into place. ViewSonic PJ350 7 Z To adjust the projection angle, do the following: 1 Press the Height Adjustment button with one hand, while tilting the projector with the other hand. See page 21. See also KEYSTONE under the ... to 39.4 feet (1m to 12m). See page 20 for service or contact ViewSonic Customer Support. It will extend accordingly. Warning Indicators • When the Lamp LED is solid orange, the projector has overheated. See Figure 4 below . Adjusting the Projection Angle Adjust the projection ...
User Guide
Page 10
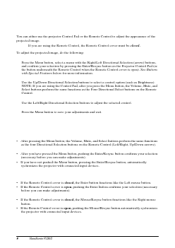
...connected input devices. 8 ViewSonic PJ350 Mouse/Resync button • If the Remote Control cover is open ). NOTE: If you are using the Control Pad, after you have not pushed the Menu button, pressing the Enter/Resync button, automatically sychronizes the projector with the Right/Left Directional... selected control. 4 Save your adjustments. Press the Menu button, select a menu with connected input devices. Buttons with Special Features Projector Control Pad: Directional Select buttons • After pressing the Menu button, the Volume, Mute, and Select buttons perform the same ...
...connected input devices. 8 ViewSonic PJ350 Mouse/Resync button • If the Remote Control cover is open ). NOTE: If you are using the Control Pad, after you have not pushed the Menu button, pressing the Enter/Resync button, automatically sychronizes the projector with the Right/Left Directional... selected control. 4 Save your adjustments. Press the Menu button, select a menu with connected input devices. Buttons with Special Features Projector Control Pad: Directional Select buttons • After pressing the Menu button, the Volume, Mute, and Select buttons perform the same ...


