User Guide
Page 3
... © ViewSonic Corporation, 2001. Microsoft, Windows, Windows NT, and the Windows logo are registered trademarks of its useful life. Your local waste disposal company may be liable for any additional product information as it becomes available, please register your product on the Internet at: www.viewsonic.com For Your Records Product Name: Model Number: Document Number: Serial Number: Purchase Date: ViewSonic PJ350 VPROJ22535-1W...
... © ViewSonic Corporation, 2001. Microsoft, Windows, Windows NT, and the Windows logo are registered trademarks of its useful life. Your local waste disposal company may be liable for any additional product information as it becomes available, please register your product on the Internet at: www.viewsonic.com For Your Records Product Name: Model Number: Document Number: Serial Number: Purchase Date: ViewSonic PJ350 VPROJ22535-1W...
User Guide
Page 4
... future shipping needs. This remote control is power-OFF first. • After using the projector let the cooling fan run for a few minutes before replacing the lamp or storing the projector. • Keep small children away from the aperture on any other unstable surface. • When connecting a computer to the eyes, do not point the laser light into the lighted lens; Children can cause...
... future shipping needs. This remote control is power-OFF first. • After using the projector let the cooling fan run for a few minutes before replacing the lamp or storing the projector. • Keep small children away from the aperture on any other unstable surface. • When connecting a computer to the eyes, do not point the laser light into the lighted lens; Children can cause...
User Guide
Page 7
... input device, set the resolution of your computer's graphics card to verify that the video signal timing (resolution and refresh rate) of your graphics card is supported by the PJ350 projector. 2 Figure 3: Projector Connection Ports ViewSonic PJ350 5 Mouse port ViewSonic The Package Contents illustration above shows the appropriate cables for connecting external devices to the ViewSonic PJ350. Refer to the Timing Charts on pages 17-18 to 1024 x 768 for the optimal projected image. Connecting Input...
... input device, set the resolution of your computer's graphics card to verify that the video signal timing (resolution and refresh rate) of your graphics card is supported by the PJ350 projector. 2 Figure 3: Projector Connection Ports ViewSonic PJ350 5 Mouse port ViewSonic The Package Contents illustration above shows the appropriate cables for connecting external devices to the ViewSonic PJ350. Refer to the Timing Charts on pages 17-18 to 1024 x 768 for the optimal projected image. Connecting Input...
User Guide
Page 8
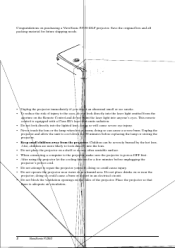
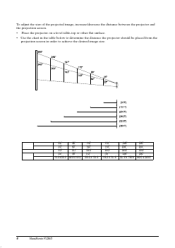
..." 39.4' 300" 180.0 x 240.0 6 ViewSonic PJ350 Distan ceImage ,, Positioning the Projector To adjust the size of the projected image, increase/decrease the distance between the projector and the projection screen. • Place the projector on a level table-top or other flat surface. • Use the chart in the table below to determine the distance the projector should be placed from the projection screen in order to achieve...
..." 39.4' 300" 180.0 x 240.0 6 ViewSonic PJ350 Distan ceImage ,, Positioning the Projector To adjust the size of the projected image, increase/decrease the distance between the projector and the projection screen. • Place the projector on a level table-top or other flat surface. • Use the chart in the table below to determine the distance the projector should be placed from the projection screen in order to achieve...
User Guide
Page 9
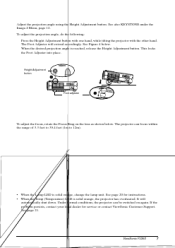
... automatically shut down. Height Adjustment button Foot adjuster Figure 4: Projection Angle Adjustment Adjusting the Focus To adjust the focus, rotate the Focus Ring on again. Warning Indicators • When the Lamp LED is reached, release the Height Adjustment button. If the problem persists, contact your local dealer for instructions. • When the Temp (Temperature) LED is solid orange, the projector has overheated. It will extend accordingly. ViewSonic PJ350 7 Z Adjusting the Projection Angle Adjust the projection angle using the Height Adjustment button. See...
... automatically shut down. Height Adjustment button Foot adjuster Figure 4: Projection Angle Adjustment Adjusting the Focus To adjust the focus, rotate the Focus Ring on again. Warning Indicators • When the Lamp LED is reached, release the Height Adjustment button. If the problem persists, contact your local dealer for instructions. • When the Temp (Temperature) LED is solid orange, the projector has overheated. It will extend accordingly. ViewSonic PJ350 7 Z Adjusting the Projection Angle Adjust the projection angle using the Height Adjustment button. See...
User Guide
Page 10
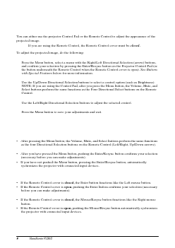
... the Remote Control cover is open , pushing the Mouse/Resync button automatically sychronizes the projector with the Right/Left Directional Selection (arrow) buttons, and confirm your adjustments. To adjust the projected image, do the following: 1 Select a menu. Enter/Resync button • After you can make adjustments). • If you have not pushed the Menu button, pressing the Enter/Resync button, automatically sychronizes the projector with connected input devices. Press the Menu button...
... the Remote Control cover is open , pushing the Mouse/Resync button automatically sychronizes the projector with the Right/Left Directional Selection (arrow) buttons, and confirm your adjustments. To adjust the projected image, do the following: 1 Select a menu. Enter/Resync button • After you can make adjustments). • If you have not pushed the Menu button, pressing the Enter/Resync button, automatically sychronizes the projector with connected input devices. Press the Menu button...


