User Guide
Page 2
Contents Product Registration...2 Important Product Safety Instructions 3 Antenna Installation Instructions 4 Cleaning the LCD ...4 Getting Started Package Contents ...5 Front View of the Product 6 Card Reader...7 Rear View of the Product 8 Remote Control ...9 Notes on the Remote Control...11 Teletext...11 Installation ...12 OSD Functions Source Input: TV/AV/S-video 15 Appendix Specifications ...25 Troubleshooting...27 Customer Support ...28 Limited Warranty ...29 Safety Guidelines ...30 ViewSonic N3200w 1
Contents Product Registration...2 Important Product Safety Instructions 3 Antenna Installation Instructions 4 Cleaning the LCD ...4 Getting Started Package Contents ...5 Front View of the Product 6 Card Reader...7 Rear View of the Product 8 Remote Control ...9 Notes on the Remote Control...11 Teletext...11 Installation ...12 OSD Functions Source Input: TV/AV/S-video 15 Appendix Specifications ...25 Troubleshooting...27 Customer Support ...28 Limited Warranty ...29 Safety Guidelines ...30 ViewSonic N3200w 1
User Guide
Page 4
... warranty does not cover repairs or attempted repairs by anyone not authorized by ViewSonic. • If your product. Orient your LCD away from the product. 4 Ventilation Slots and openings on a bed, sofa, rug or other ). ViewSonic N3200w 3 If the plug should be used for a long period of moisture...the remote control. 6 Precautions Sit at least two metres from overheating, these openings must not be blocked or covered. • Do not block the openings by placing the product on the cabinet is present, immediately switch the LCD off and call your dealer or ViewSonic. Your LCD ...
... warranty does not cover repairs or attempted repairs by anyone not authorized by ViewSonic. • If your product. Orient your LCD away from the product. 4 Ventilation Slots and openings on a bed, sofa, rug or other ). ViewSonic N3200w 3 If the plug should be used for a long period of moisture...the remote control. 6 Precautions Sit at least two metres from overheating, these openings must not be blocked or covered. • Do not block the openings by placing the product on the cabinet is present, immediately switch the LCD off and call your dealer or ViewSonic. Your LCD ...
User Guide
Page 6
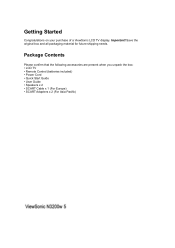
Important! Getting Started Congratulations on your purchase of a ViewSonic LCD TV display. Package Contents Please confirm that the following accessories are present when you unpack the box: • LCD TV • Remote Control (batteries included) • Power Cord • Quick Start Guide • User Guide • Speakers x 2 • SCART Cable x 1 (For Europe) • SCART Adapters x 2 (For Asia Pacific) Save the original box and all packaging material for future shipping needs.
Important! Getting Started Congratulations on your purchase of a ViewSonic LCD TV display. Package Contents Please confirm that the following accessories are present when you unpack the box: • LCD TV • Remote Control (batteries included) • Power Cord • Quick Start Guide • User Guide • Speakers x 2 • SCART Cable x 1 (For Europe) • SCART Adapters x 2 (For Asia Pacific) Save the original box and all packaging material for future shipping needs.
User Guide
Page 10
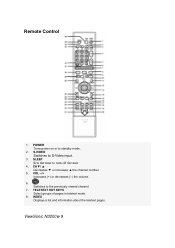
S-VIDEO Switches to turn off the unit. 4. CH▼/ ▲ Decreases ▼ or increases ▲ the channel number. 5. SLEEP Sets the time to S-Video input. 3. TELETEXT HOT KEYS Select groups of pages in teletext mode. 8. POWER Turns power on or to the previously viewed channel. 7. Remote Control 1. Switches to standby mode. 2. INDEX Displays a list and information about the teletext pages. ViewSonic N3200w 9 VOL -/+ Increases (+) or decreases (-) the volume. 6.
S-VIDEO Switches to turn off the unit. 4. CH▼/ ▲ Decreases ▼ or increases ▲ the channel number. 5. SLEEP Sets the time to S-Video input. 3. TELETEXT HOT KEYS Select groups of pages in teletext mode. 8. POWER Turns power on or to the previously viewed channel. 7. Remote Control 1. Switches to standby mode. 2. INDEX Displays a list and information about the teletext pages. ViewSonic N3200w 9 VOL -/+ Increases (+) or decreases (-) the volume. 6.
User Guide
Page 12
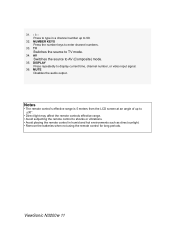
Press to 99. 32. NUMBER KEYS Press the number keys to TV mode. 34. ViewSonic N3200w 11 TV Switches the source to enter channel numbers. 33. AV Switches the source to display current time, channel number, or video input signal. 36. Notes • The remote control's effective range is 5 meters from the LCD screen at an angle of up...
Press to 99. 32. NUMBER KEYS Press the number keys to TV mode. 34. ViewSonic N3200w 11 TV Switches the source to enter channel numbers. 33. AV Switches the source to display current time, channel number, or video input signal. 36. Notes • The remote control's effective range is 5 meters from the LCD screen at an angle of up...
User Guide
Page 14
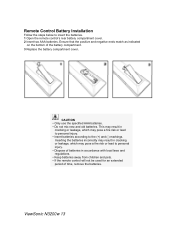
...This may result in accordance with local laws and regulations. • Keep batteries away from children and pets. • If the remote control will not be used for an extended period of the battery compartment. 3 Replace the battery compartment cover. Inserting the batteries incorrectly may... remote control's rear battery compartment cover. 2 Insert two AAA batteries. CAUTION • Only use the specified AAA batteries. • Do not mix new and old batteries. Ensure that the positive and negative ends match as indicated on the bottom of time, remove the batteries. ViewSonic N3200w ...
...This may result in accordance with local laws and regulations. • Keep batteries away from children and pets. • If the remote control will not be used for an extended period of the battery compartment. 3 Replace the battery compartment cover. Inserting the batteries incorrectly may... remote control's rear battery compartment cover. 2 Insert two AAA batteries. CAUTION • Only use the specified AAA batteries. • Do not mix new and old batteries. Ensure that the positive and negative ends match as indicated on the bottom of time, remove the batteries. ViewSonic N3200w ...
User Guide
Page 16
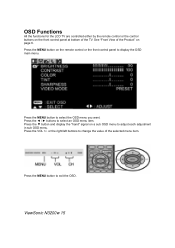
Press the MENU button to change the value of the TV. or the right/left buttons to select the OSD menu you want. See "Front View of the Product" on the front control panel at bottom of the selected menu item. ViewSonic N3200w 15 Press the ◄ / ► buttons to ... menu to display the OSD main menu. Press the ▼ button and display the "hand" signal on the remote control or the front control panel to adjust each adjustment in sub OSD menu. OSD Functions All the functions for the LCD TV are controlled either by the remote control or the control buttons on page 6.
Press the MENU button to change the value of the TV. or the right/left buttons to select the OSD menu you want. See "Front View of the Product" on the front control panel at bottom of the selected menu item. ViewSonic N3200w 15 Press the ◄ / ► buttons to ... menu to display the OSD main menu. Press the ▼ button and display the "hand" signal on the remote control or the front control panel to adjust each adjustment in sub OSD menu. OSD Functions All the functions for the LCD TV are controlled either by the remote control or the control buttons on page 6.
User Guide
Page 27
...has been done correctly after first turning on the power of the LCD and the AVC System, or unplug the AC cord for the operation you want to perform. Replace batteries. • Is a fluorescent light illuminated near the remote control sensor? • The path of the unit has increased. In...interrupted; Remove any objects blocking the vent or clean as necessary. please check all the CATV connections. • The cable TV service is supplying the proper voltage. ViewSonic N3200w 26 Power is cut off suddenly • Is the sleep timer set the AIR/CABLE option to CABLE (see also pages...
...has been done correctly after first turning on the power of the LCD and the AVC System, or unplug the AC cord for the operation you want to perform. Replace batteries. • Is a fluorescent light illuminated near the remote control sensor? • The path of the unit has increased. In...interrupted; Remove any objects blocking the vent or clean as necessary. please check all the CATV connections. • The cable TV service is supplying the proper voltage. ViewSonic N3200w 26 Power is cut off suddenly • Is the sleep timer set the AIR/CABLE option to CABLE (see also pages...

