User Guide
Page 2
Contents Product Registration...2 Important Product Safety Instructions 3 Antenna Installation Instructions 4 Cleaning the LCD ...4 Getting Started Package Contents ...5 Front View of the Product 6 Card Reader...7 Rear View of the Product 8 Remote Control ...9 Notes on the Remote Control...11 Teletext...11 Installation ...12 OSD Functions Source Input: TV/AV/S-video 15 Appendix Specifications ...25 Troubleshooting...27 Customer Support ...28 Limited Warranty ...29 Safety Guidelines ...30 ViewSonic N3200w 1
Contents Product Registration...2 Important Product Safety Instructions 3 Antenna Installation Instructions 4 Cleaning the LCD ...4 Getting Started Package Contents ...5 Front View of the Product 6 Card Reader...7 Rear View of the Product 8 Remote Control ...9 Notes on the Remote Control...11 Teletext...11 Installation ...12 OSD Functions Source Input: TV/AV/S-video 15 Appendix Specifications ...25 Troubleshooting...27 Customer Support ...28 Limited Warranty ...29 Safety Guidelines ...30 ViewSonic N3200w 1
User Guide
Page 4
... on the LCD, video cable, or power cord. • If smoke, abnormal noise, or strange odor is clean and free of the product and to remove. This is dangerous to direct sunlight or another heat source. You may be equipped with care when moving it from your LCD to continue using the LCD. If you touch them . Never remove the rear cover. Installation 1 Grounding...
... on the LCD, video cable, or power cord. • If smoke, abnormal noise, or strange odor is clean and free of the product and to remove. This is dangerous to direct sunlight or another heat source. You may be equipped with care when moving it from your LCD to continue using the LCD. If you touch them . Never remove the rear cover. Installation 1 Grounding...
User Guide
Page 5
... electric light or power circuits. Use a soft, dry cloth. 2. To clean the case: 1. If still not clean, apply a small amount of non-ammonia, non-alcohol based glass cleaner onto a clean, soft, lint-free cloth, and wipe the screen. ViewSonic will prevent damage to the product due to lightning and power-line surges. Do not disconnect the antenna or the power cord...
... electric light or power circuits. Use a soft, dry cloth. 2. To clean the case: 1. If still not clean, apply a small amount of non-ammonia, non-alcohol based glass cleaner onto a clean, soft, lint-free cloth, and wipe the screen. ViewSonic will prevent damage to the product due to lightning and power-line surges. Do not disconnect the antenna or the power cord...
User Guide
Page 6
Package Contents Please confirm that the following accessories are present when you unpack the box: • LCD TV • Remote Control (batteries included) • Power Cord • Quick Start Guide • User Guide • Speakers x 2 • SCART Cable x 1 (For Europe) • SCART Adapters x 2 (For Asia Pacific) Save the original box and all packaging material for future shipping needs. Getting Started Congratulations on your purchase of a ViewSonic LCD TV display. Important!
Package Contents Please confirm that the following accessories are present when you unpack the box: • LCD TV • Remote Control (batteries included) • Power Cord • Quick Start Guide • User Guide • Speakers x 2 • SCART Cable x 1 (For Europe) • SCART Adapters x 2 (For Asia Pacific) Save the original box and all packaging material for future shipping needs. Getting Started Congratulations on your purchase of a ViewSonic LCD TV display. Important!
User Guide
Page 7
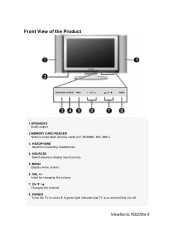
HEADPHONE MENU VOL CH POWER SOURCES CF 6. A green light indicates that TV is off . POWER 5 8 7 6 Turns the TV on and red that it is on and off . 1 ViewSonic N3200w 6 Front View of the Product 1.SPEAKERS Audio output. 2.MEMORY CARD READER Slots to insert flash memory cards (CF, SD/MMC, MS, SMC). 3. HEADPHONE Used for connecting headphones. 4. SOURCES Switch between display input sources. 5. MENU Display menu screen. VOL +/- SD/MUMsCedSMforMcShanging the volume. 4 7. CH ▼ /▲ Changes the channel. 8.
HEADPHONE MENU VOL CH POWER SOURCES CF 6. A green light indicates that TV is off . POWER 5 8 7 6 Turns the TV on and red that it is on and off . 1 ViewSonic N3200w 6 Front View of the Product 1.SPEAKERS Audio output. 2.MEMORY CARD READER Slots to insert flash memory cards (CF, SD/MMC, MS, SMC). 3. HEADPHONE Used for connecting headphones. 4. SOURCES Switch between display input sources. 5. MENU Display menu screen. VOL +/- SD/MUMsCedSMforMcShanging the volume. 4 7. CH ▼ /▲ Changes the channel. 8.
User Guide
Page 9
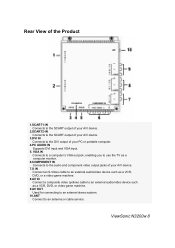
... video game machine. 9.AV OUT Used for connecting to an external stereo system. 10.ANT Connect to the DVI output of your PC or portable computer. 4.PC AUDIO IN Supports DVI input and VGA input. 5. Rear View of the Product R ANT L1 1.SCART1-IN Connects to the SCART output of your A/V device. 2.SCART2-IN Connects to the SCART output of your A/V device. 3.DVI IN Connects to an antenna or cable service. 2 3 8 ViewSonic N3200w...
... video game machine. 9.AV OUT Used for connecting to an external stereo system. 10.ANT Connect to the DVI output of your PC or portable computer. 4.PC AUDIO IN Supports DVI input and VGA input. 5. Rear View of the Product R ANT L1 1.SCART1-IN Connects to the SCART output of your A/V device. 2.SCART2-IN Connects to the SCART output of your A/V device. 3.DVI IN Connects to an antenna or cable service. 2 3 8 ViewSonic N3200w...
User Guide
Page 10
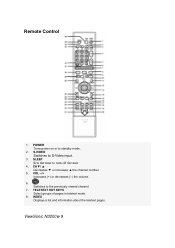
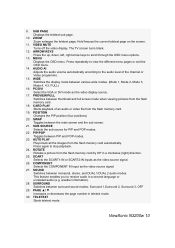
TELETEXT HOT KEYS Select groups of pages in teletext mode. 8. SLEEP Sets the time to the previously viewed channel. 7. Switches to turn off the unit. 4. CH▼/ ▲ Decreases ▼ or increases ▲ the channel number. 5. Remote Control 1. POWER Turns power on or to S-Video input. 3. INDEX Displays a list and information about the teletext pages. S-VIDEO Switches to standby mode. 2. ViewSonic N3200w 9 VOL -/+ Increases (+) or decreases (-) the volume. 6.
TELETEXT HOT KEYS Select groups of pages in teletext mode. 8. SLEEP Sets the time to the previously viewed channel. 7. Switches to turn off the unit. 4. CH▼/ ▲ Decreases ▼ or increases ▲ the channel number. 5. Remote Control 1. POWER Turns power on or to S-Video input. 3. INDEX Displays a list and information about the teletext pages. S-VIDEO Switches to standby mode. 2. ViewSonic N3200w 9 VOL -/+ Increases (+) or decreases (-) the volume. 6.
User Guide
Page 11
... the flash memory card by 90º in teletext mode. 30. This feature enables you to stop playback. 24. SOUND Switches between various wide modes. (Mode 1, Mode 2, Mode 3, Mode 4, 4:3, FULL) 16. The TV screen turns blank. 12. WIDE Switches the display mode between monaural, stereo, and DUAL 1/DUAL 2 audio modes. ViewSonic N3200w 10 SUB SOURCE Selects the sub source for PIP and POP modes. 22. weather information). 28. Press repeatedly to view the different menu...
... the flash memory card by 90º in teletext mode. 30. This feature enables you to stop playback. 24. SOUND Switches between various wide modes. (Mode 1, Mode 2, Mode 3, Mode 4, 4:3, FULL) 16. The TV screen turns blank. 12. WIDE Switches the display mode between monaural, stereo, and DUAL 1/DUAL 2 audio modes. ViewSonic N3200w 10 SUB SOURCE Selects the sub source for PIP and POP modes. 22. weather information). 28. Press repeatedly to view the different menu...
User Guide
Page 12
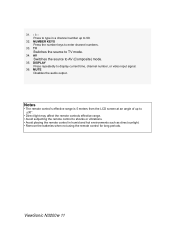
... source to TV mode. 34. ViewSonic N3200w 11 31. - /- Notes • The remote control's effective range is 5 meters from the LCD screen at an angle of up to shocks or vibrations. • Avoid placing the remote control in a channel number up to ±30°. • Direct light may affect the remote controls effective range. • Avoid subjecting the remote control to 99. 32. DISPLAY Press repeatedly to enter channel numbers. 33. NUMBER...
... source to TV mode. 34. ViewSonic N3200w 11 31. - /- Notes • The remote control's effective range is 5 meters from the LCD screen at an angle of up to shocks or vibrations. • Avoid placing the remote control in a channel number up to ±30°. • Direct light may affect the remote controls effective range. • Avoid subjecting the remote control to 99. 32. DISPLAY Press repeatedly to enter channel numbers. 33. NUMBER...
User Guide
Page 13
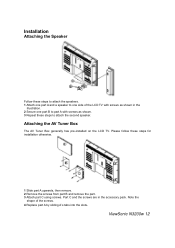
... Tuner Box generally has pre-installed on the LCD TV. Note the shape of the LCD TV with screws as shown in the accessory pack. Please follow these steps for installation otherwise. 1 Slide part A upwards, then remove. 2 Remove the screws from part B and remove the part. 3 Attach part C using screws. ViewSonic N3200w 12 Part C and the screws are in the illustration. 2 Secure one part B to part A with screws as shown. 3 Repeat these steps to one part A and a speaker...
... Tuner Box generally has pre-installed on the LCD TV. Note the shape of the LCD TV with screws as shown in the accessory pack. Please follow these steps for installation otherwise. 1 Slide part A upwards, then remove. 2 Remove the screws from part B and remove the part. 3 Attach part C using screws. ViewSonic N3200w 12 Part C and the screws are in the illustration. 2 Secure one part B to part A with screws as shown. 3 Repeat these steps to one part A and a speaker...
User Guide
Page 14
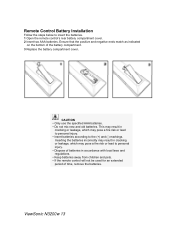
.... • Keep batteries away from children and pets. • If the remote control will not be used for an extended period of the battery compartment. 3 Replace the battery compartment cover. Inserting the batteries incorrectly may result in cracking or leakage... the remote control's rear battery compartment cover. 2 Insert two AAA batteries. Remote Control Battery Installation Follow the steps below to the (+) and (-) markings. ViewSonic N3200w 13 Ensure that the positive and negative ends match as indicated on the bottom of time, remove the batteries. CAUTION • Only use the...
.... • Keep batteries away from children and pets. • If the remote control will not be used for an extended period of the battery compartment. 3 Replace the battery compartment cover. Inserting the batteries incorrectly may result in cracking or leakage... the remote control's rear battery compartment cover. 2 Insert two AAA batteries. Remote Control Battery Installation Follow the steps below to the (+) and (-) markings. ViewSonic N3200w 13 Ensure that the positive and negative ends match as indicated on the bottom of time, remove the batteries. CAUTION • Only use the...
User Guide
Page 15
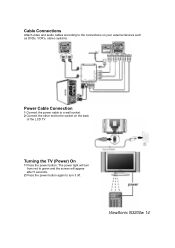
ViewSonic N3200w 14 The power light will turn it off. Cable Connections Attach video and audio cables according to the connections on your external devices such as DVDs, VCR's, stereo systems. Power Cable Connection 1 Connect the power cable to a wall socket. 2 Connect the other end to turn from red to green and the screen will appear after 5 seconds. 2 Press the power button again to the socket on the back of the LCD TV Turning the TV (Power) On 1 Press the power button.
ViewSonic N3200w 14 The power light will turn it off. Cable Connections Attach video and audio cables according to the connections on your external devices such as DVDs, VCR's, stereo systems. Power Cable Connection 1 Connect the power cable to a wall socket. 2 Connect the other end to turn from red to green and the screen will appear after 5 seconds. 2 Press the power button again to the socket on the back of the LCD TV Turning the TV (Power) On 1 Press the power button.
User Guide
Page 17
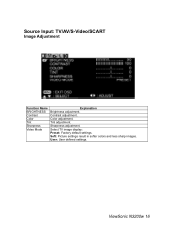
Soft: Picture settings result in softer colors and less sharp images. Source Input: TV/AV/S-Video/SCART Image Adjustment Function Name BRIGHTNESS Contrast Color Tint Sharpness Video Mode Explanation Brightness adjustment. Sharpness adjustment. ViewSonic N3200w 16 User: User defined settings. Tint adjustment. Color adjustment. Select TV image display: Preset: Factory default settings. Contrast adjustment.
Soft: Picture settings result in softer colors and less sharp images. Source Input: TV/AV/S-Video/SCART Image Adjustment Function Name BRIGHTNESS Contrast Color Tint Sharpness Video Mode Explanation Brightness adjustment. Sharpness adjustment. ViewSonic N3200w 16 User: User defined settings. Tint adjustment. Color adjustment. Select TV image display: Preset: Factory default settings. Contrast adjustment.
User Guide
Page 18
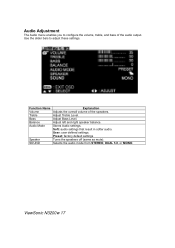
... speaker balance. Preset: factory default settings Turns the speakers off (same as mute). Function Name Volume Treble Bass Balance Audio Mode Speaker SOUND Explanation Adjusts the overall volume of the audio output. Selects the audio mode from STEREO, DUAL 1/2, or MONO. Use the slider bars to configure the volume, treble, and bass of the speakers. ViewSonic N3200w 17 User: user defined settings. Adjust Bass Level. Soft: audio settings that result in softer audio. Stores Audio settings. Audio Adjustment The Audio menu enables you to adjust these settings...
... speaker balance. Preset: factory default settings Turns the speakers off (same as mute). Function Name Volume Treble Bass Balance Audio Mode Speaker SOUND Explanation Adjusts the overall volume of the audio output. Selects the audio mode from STEREO, DUAL 1/2, or MONO. Use the slider bars to configure the volume, treble, and bass of the speakers. ViewSonic N3200w 17 User: user defined settings. Adjust Bass Level. Soft: audio settings that result in softer audio. Stores Audio settings. Audio Adjustment The Audio menu enables you to adjust these settings...
User Guide
Page 20
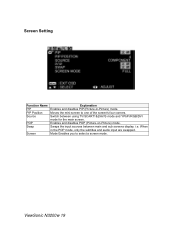
When in -Picture) mode. ViewSonic N3200w 19 Switch between main and sub screens display. Moves the mini-screen to select a screen mode. Screen Setting Function Name PIP PIP Position Source POP Swap Screen Explanation Enables and disables PIP (Picture-in the POP mode, only the subtitles and audio input are swapped. Enables and disables POP (Picture-on-Picture) mode. i.e. Mode Enables you to one of the screen's four corners. Swaps the input sources between using TV/SCART1&2/AV/S mode and YPbPr/RGB/DVI mode for the main screen.
When in -Picture) mode. ViewSonic N3200w 19 Switch between main and sub screens display. Moves the mini-screen to select a screen mode. Screen Setting Function Name PIP PIP Position Source POP Swap Screen Explanation Enables and disables PIP (Picture-in the POP mode, only the subtitles and audio input are swapped. Enables and disables POP (Picture-on-Picture) mode. i.e. Mode Enables you to one of the screen's four corners. Swaps the input sources between using TV/SCART1&2/AV/S mode and YPbPr/RGB/DVI mode for the main screen.
User Guide
Page 21
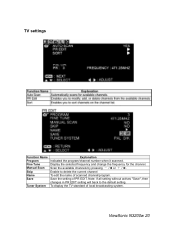
... the default setting. Manual Scan Scan the available channels by pressing Ñ /◄ or Ð / ►. Note: If all setting without actives "Save", then changes in PR EDIT setting will back to delete the current channel Name To edit the name of local broadcasting system. Tuner System To display the TV standard of scanned channel/program. Save Save the setting of PR EDIT. ViewSonic N3200w 20 Fine Tune Display the...
... the default setting. Manual Scan Scan the available channels by pressing Ñ /◄ or Ð / ►. Note: If all setting without actives "Save", then changes in PR EDIT setting will back to delete the current channel Name To edit the name of local broadcasting system. Tuner System To display the TV standard of scanned channel/program. Save Save the setting of PR EDIT. ViewSonic N3200w 20 Fine Tune Display the...
User Guide
Page 26
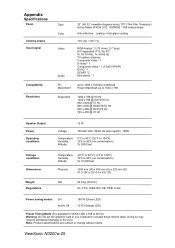
Appendix Specifications Panel Viewing angles Input signal Compatibility Resolution Type Color Video Audio 32" (full 32" viewable diagonal area), TFT (Thin Film Transistor), Active Matrix WXGA LCD, 1280RGB * 768 vertical stripe Anti-reflective coating + Anti-glare coating 170° (H) / 170° (V) RGB Analog * 1 (75 ohms, 0.7 Vp-p) H/V separated (TTL) for PC fh: 30-70 KHz, fv: 50-85 Hz TV system antenna Composite Video * 1 S-Video * 1 Component Video * 1 (YCbCr/YPbPr) DVI-D * 1 SCART *2 Mini-stereo...
Appendix Specifications Panel Viewing angles Input signal Compatibility Resolution Type Color Video Audio 32" (full 32" viewable diagonal area), TFT (Thin Film Transistor), Active Matrix WXGA LCD, 1280RGB * 768 vertical stripe Anti-reflective coating + Anti-glare coating 170° (H) / 170° (V) RGB Analog * 1 (75 ohms, 0.7 Vp-p) H/V separated (TTL) for PC fh: 30-70 KHz, fv: 50-85 Hz TV system antenna Composite Video * 1 S-Video * 1 Component Video * 1 (YCbCr/YPbPr) DVI-D * 1 SCART *2 Mini-stereo...
User Guide
Page 27
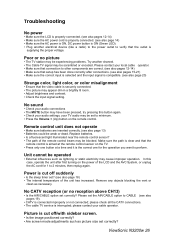
... power button is ON (Green LED). • Plug another channel. • The Cable TV signal may be scrambled or encoded. Replace batteries. • Is a fluorescent light illuminated near the remote control sensor? • The path of the remote control beam may cause improper operation. Power is cut off /with sidebar screen. • Is the image positioned correctly? • Are screen mode adjustments such as necessary. No CATV reception (or no picture • The TV...
... power button is ON (Green LED). • Plug another channel. • The Cable TV signal may be scrambled or encoded. Replace batteries. • Is a fluorescent light illuminated near the remote control sensor? • The path of the remote control beam may cause improper operation. Power is cut off /with sidebar screen. • Is the image positioned correctly? • Are screen mode adjustments such as necessary. No CATV reception (or no picture • The TV...
User Guide
Page 29
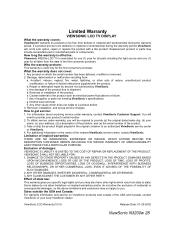
... external to shipment. Use of implied warranties: THERE ARE NO WARRANTIES, EXPRESSED OR IMPLIED, WHICH EXTEND BEYOND THE DESCRIPTION CONTAINED HEREIN INCLUDING THE IMPLIED WARRANTY OF MERCHANTABILITY AND FITNESS FOR A PARTICULAR PURPOSE. g. h. Any other cause which the serial number has been defaced, modified or removed. 2. Removal, installation, and set-up service charges. To obtain service under warranty, contact ViewSonic Customer Support. Limitation of supplies or parts not meeting ViewSonic's specifications...
... external to shipment. Use of implied warranties: THERE ARE NO WARRANTIES, EXPRESSED OR IMPLIED, WHICH EXTEND BEYOND THE DESCRIPTION CONTAINED HEREIN INCLUDING THE IMPLIED WARRANTY OF MERCHANTABILITY AND FITNESS FOR A PARTICULAR PURPOSE. g. h. Any other cause which the serial number has been defaced, modified or removed. 2. Removal, installation, and set-up service charges. To obtain service under warranty, contact ViewSonic Customer Support. Limitation of supplies or parts not meeting ViewSonic's specifications...
User Guide
Page 30
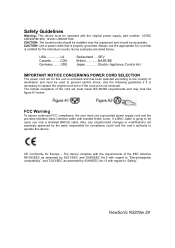
... unauthorized changes or modifications not expressly approved by 93/68/EEC Art.13 with regard to operate this unit is properly grounded. CAUTION: Use a power cable that is not enclosed. Some examples are listed below: USA UL Canada ..........CSA Germany ........VDE Switzerland ....SEV Britain BASE/BS Japan Electric Appliance Control Act IMPORTANT NOTICE CONCERNING POWER CORD SELECTION The power cord set must meed...
... unauthorized changes or modifications not expressly approved by 93/68/EEC Art.13 with regard to operate this unit is properly grounded. CAUTION: Use a power cable that is not enclosed. Some examples are listed below: USA UL Canada ..........CSA Germany ........VDE Switzerland ....SEV Britain BASE/BS Japan Electric Appliance Control Act IMPORTANT NOTICE CONCERNING POWER CORD SELECTION The power cord set must meed...


