User Guide
Page 11
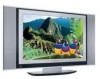
... feature enables you to receive audio in teletext mode. 30. weather information). 28. ViewSonic N3200w 10 AUDIO AI Adjusts the audio volume automatically according to view the different menu pages ...9650;/ ▼ Increases or decreases the page number in a second language or unrelated audio (e.g. The TV screen turns blank. 12. COMPONENT Selects the COMPONENT IN input as the video display source. 17...., and DUAL 1/DUAL 2 audio modes. MENU Displays the OSD menu. ROTATE Rotates a picture from the flash memory card automatically. VIDEO MUTE Turns off the video display. AUTO PLAY ...
... feature enables you to receive audio in teletext mode. 30. weather information). 28. ViewSonic N3200w 10 AUDIO AI Adjusts the audio volume automatically according to view the different menu pages ...9650;/ ▼ Increases or decreases the page number in a second language or unrelated audio (e.g. The TV screen turns blank. 12. COMPONENT Selects the COMPONENT IN input as the video display source. 17...., and DUAL 1/DUAL 2 audio modes. MENU Displays the OSD menu. ROTATE Rotates a picture from the flash memory card automatically. VIDEO MUTE Turns off the video display. AUTO PLAY ...
User Guide
Page 17
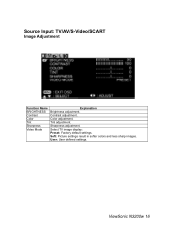
Contrast adjustment. Sharpness adjustment. Soft: Picture settings result in softer colors and less sharp images. ViewSonic N3200w 16 Tint adjustment. User: User defined settings. Source Input: TV/AV/S-Video/SCART Image Adjustment Function Name BRIGHTNESS Contrast Color Tint Sharpness Video Mode Explanation Brightness adjustment. Color adjustment. Select TV image display: Preset: Factory default settings.
Contrast adjustment. Sharpness adjustment. Soft: Picture settings result in softer colors and less sharp images. ViewSonic N3200w 16 Tint adjustment. User: User defined settings. Source Input: TV/AV/S-Video/SCART Image Adjustment Function Name BRIGHTNESS Contrast Color Tint Sharpness Video Mode Explanation Brightness adjustment. Color adjustment. Select TV image display: Preset: Factory default settings.
User Guide
Page 20
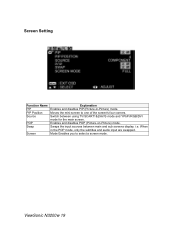
When in -Picture) mode. Moves the mini-screen to select a screen mode. Swaps the input sources between using TV/SCART1&2/AV/S mode and YPbPr/RGB/DVI mode for the main screen. i.e. ViewSonic N3200w 19 Mode Enables you to one of the screen's four corners. Switch between main and sub screens display. Screen Setting Function Name PIP PIP Position Source POP Swap Screen Explanation Enables and disables PIP (Picture-in the POP mode, only the subtitles and audio input are swapped. Enables and disables POP (Picture-on-Picture) mode.
When in -Picture) mode. Moves the mini-screen to select a screen mode. Swaps the input sources between using TV/SCART1&2/AV/S mode and YPbPr/RGB/DVI mode for the main screen. i.e. ViewSonic N3200w 19 Mode Enables you to one of the screen's four corners. Switch between main and sub screens display. Screen Setting Function Name PIP PIP Position Source POP Swap Screen Explanation Enables and disables PIP (Picture-in the POP mode, only the subtitles and audio input are swapped. Enables and disables POP (Picture-on-Picture) mode.
User Guide
Page 27
...8226; Is the image positioned correctly? • Are screen mode adjustments such as necessary. ViewSonic N3200w 26 Remove any objects blocking the vent or clean as picture size set correctly? No sound • Check your TV audio may cause improper operation. Unit cannot be weak or dead. Remote control unit does...one button at a time and it is the correct one for 1 to 2 minutes, then replug again. Troubleshooting No power • Make sure the LCD is properly connected. (see also pages 12-14) • Make sure the AC power cord is properly connected. (see also pages 12-14) &#...
...8226; Is the image positioned correctly? • Are screen mode adjustments such as necessary. ViewSonic N3200w 26 Remove any objects blocking the vent or clean as picture size set correctly? No sound • Check your TV audio may cause improper operation. Unit cannot be weak or dead. Remote control unit does...one button at a time and it is the correct one for 1 to 2 minutes, then replug again. Troubleshooting No power • Make sure the LCD is properly connected. (see also pages 12-14) • Make sure the AC power cord is properly connected. (see also pages 12-14) &#...


