User Manual
Page 2
Contents Product Registration 2 For Your Records 2 Important Product Safety Instructions 3 Antenna Installation Instructions 4 Cleaning the LCD Display 4 Getting Started Package Contents 5 Front View of the Product 6 Rear View of the Product 7 Remote Control 8 Installation 9 OSD Functions Source Input-TV Mode 13 E N Source Input-YPbPr, AV, S-Video Mode 18 G L Other Information I S Specifications 20 H Troubleshooting 21 Customer Support 22 Limited Warranty 23 Appendix Safety Guidelines 24 Compliance Information for U.S.A 25 ViewSonic N2010 1
Contents Product Registration 2 For Your Records 2 Important Product Safety Instructions 3 Antenna Installation Instructions 4 Cleaning the LCD Display 4 Getting Started Package Contents 5 Front View of the Product 6 Rear View of the Product 7 Remote Control 8 Installation 9 OSD Functions Source Input-TV Mode 13 E N Source Input-YPbPr, AV, S-Video Mode 18 G L Other Information I S Specifications 20 H Troubleshooting 21 Customer Support 22 Limited Warranty 23 Appendix Safety Guidelines 24 Compliance Information for U.S.A 25 ViewSonic N2010 1
User Manual
Page 6
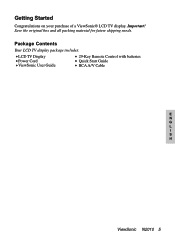
Save the original box and all packing material for future shipping needs. Getting Started Congratulations on your purchase of a ViewSonic® LCD TV display. Package Contents Your LCD TV display package includes: LCD TV Display Power Cord ViewSonic User Guide 29-Key Remote Control with batteries Quick Start Guide RCA A/V Cable E N G L I S H ViewSonic N2010 5 Important!
Save the original box and all packing material for future shipping needs. Getting Started Congratulations on your purchase of a ViewSonic® LCD TV display. Package Contents Your LCD TV display package includes: LCD TV Display Power Cord ViewSonic User Guide 29-Key Remote Control with batteries Quick Start Guide RCA A/V Cable E N G L I S H ViewSonic N2010 5 Important!
User Manual
Page 7
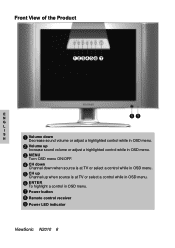
Front View of the Product 123456 7 E N 89 G L I S H 1 Volume down Decrease sound volume or adjust a highlighted control while in OSD menu. 2 Volume up Increase sound volume or adjust a highlighted control while in OSD menu. 3 MENU Turn OSD menu ON/OFF. 4 CH down Channel down when source is at TV or select a control while in OSD menu. 5 CH up Channel up when source is at TV or select a control while in OSD menu. 6 ENTER To highlight a control in OSD menu. 7 Power button 8 Remote control receiver 9 Power LED indicator ViewSonic N2010 6
Front View of the Product 123456 7 E N 89 G L I S H 1 Volume down Decrease sound volume or adjust a highlighted control while in OSD menu. 2 Volume up Increase sound volume or adjust a highlighted control while in OSD menu. 3 MENU Turn OSD menu ON/OFF. 4 CH down Channel down when source is at TV or select a control while in OSD menu. 5 CH up Channel up when source is at TV or select a control while in OSD menu. 6 ENTER To highlight a control in OSD menu. 7 Power button 8 Remote control receiver 9 Power LED indicator ViewSonic N2010 6
User Manual
Page 8
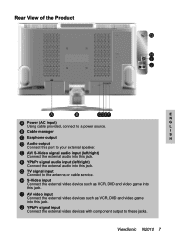
J YPbPr signal input Connect the external video devices with component output to the antenna or cable service. G TV signal input Connect to these jacks. E AV/ S-Video signal audio input (left /right) Connect the external audio into this jack. F YPbPr... H D Audio output Connect this jack. H S-Video input Connect the external video device such as VCR, DVD and video game into this port to a power source. ViewSonic N2010 7 I AV video input Connect the external video devices such as VCR, DVD and video game into this jack. L B Cable manager I J A B CDEF E N A ...
J YPbPr signal input Connect the external video devices with component output to the antenna or cable service. G TV signal input Connect to these jacks. E AV/ S-Video signal audio input (left /right) Connect the external audio into this jack. F YPbPr... H D Audio output Connect this jack. H S-Video input Connect the external video device such as VCR, DVD and video game into this port to a power source. ViewSonic N2010 7 I AV video input Connect the external video devices such as VCR, DVD and video game into this jack. L B Cable manager I J A B CDEF E N A ...
User Manual
Page 9
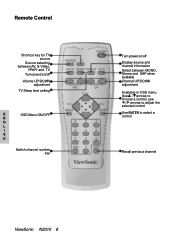
Remote Control Shortcut key for TV source Source selecting between AV, S-Video, YPbPr and TV Turn sound on/off Volume UP/DOWN adjustment TV Sleep time setting E OSD Menu ON/OFF N G L I S H Switch channel number key Turn power on/off Display source and channel information Select between MONO, Stereo and SAP when available Channel UP/DOWN adjustment Available in OSD menu Use / arrows to choose a control, use / arrows to adjust the selected control Use ENTER to select a control Recall previous channel ViewSonic N2010 8
Remote Control Shortcut key for TV source Source selecting between AV, S-Video, YPbPr and TV Turn sound on/off Volume UP/DOWN adjustment TV Sleep time setting E OSD Menu ON/OFF N G L I S H Switch channel number key Turn power on/off Display source and channel information Select between MONO, Stereo and SAP when available Channel UP/DOWN adjustment Available in OSD menu Use / arrows to choose a control, use / arrows to adjust the selected control Use ENTER to select a control Recall previous channel ViewSonic N2010 8
User Manual
Page 10
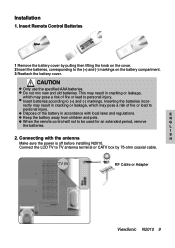
... the remote control will not to (+) and (-) markings. Connect the LCD TV to TV antenna terminal or CATV box by pulling then lifting the knob on the cover. 2 Insert the batteries, corresponding to personal injury. Installation 1. RF Cable or Adapter ViewSonic N2010 9 CAUTION Only use the specified AAA batteries. This may result in accordance...
... the remote control will not to (+) and (-) markings. Connect the LCD TV to TV antenna terminal or CATV box by pulling then lifting the knob on the cover. 2 Insert the batteries, corresponding to personal injury. Installation 1. RF Cable or Adapter ViewSonic N2010 9 CAUTION Only use the specified AAA batteries. This may result in accordance...
User Manual
Page 11
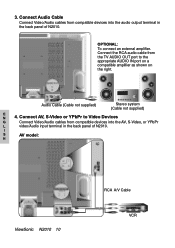
...supplied) Stereo system (Cable not supplied) E N 4. OPTIONAL: To connect an external amplifier. I S AV model: H ViewSonic N2010 10 RCA A/V Cable VCR Connect the RCA audio cable from the TV AUDIO OUT port to Video Devices G Connect Video/Audio cables from compatible devices into the AV, S-Video, or YPbPr L... video/Audio input terminal in the back panel of N2010. Connect AV, S-Video or YPbPr to the ...
...supplied) Stereo system (Cable not supplied) E N 4. OPTIONAL: To connect an external amplifier. I S AV model: H ViewSonic N2010 10 RCA A/V Cable VCR Connect the RCA audio cable from the TV AUDIO OUT port to Video Devices G Connect Video/Audio cables from compatible devices into the AV, S-Video, or YPbPr L... video/Audio input terminal in the back panel of N2010. Connect AV, S-Video or YPbPr to the ...
User Manual
Page 13
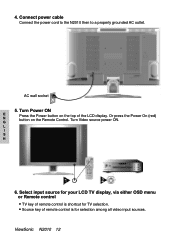
Select input source for your LCD TV display, via either OSD menu or Remote control TV key of remote control is shortcut for selection among all video input sources. Connect power cable Connect the power cord to the N2010 then to a properly grounded AC outlet. Turn Video source power ON. Source key of remote control is for TV selection. ViewSonic N2010 12 L I S H 6. AC wall socket 5. Or press the Power On (red) button on the top of the LCD display. Turn Power ON E N G Press the Power button on the Remote Control. 4.
Select input source for your LCD TV display, via either OSD menu or Remote control TV key of remote control is shortcut for selection among all video input sources. Connect power cable Connect the power cord to the N2010 then to a properly grounded AC outlet. Turn Video source power ON. Source key of remote control is for TV selection. ViewSonic N2010 12 L I S H 6. AC wall socket 5. Or press the Power On (red) button on the top of the LCD display. Turn Power ON E N G Press the Power button on the Remote Control. 4.
User Manual
Page 14
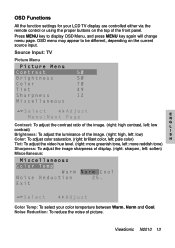
... are controlled either via the remote control or using the proper buttons on the current source input. Source Input: TV Picture Menu E N G Contrast: To adjust the contrast ratio of the image. (right: high contrast, left: low L contrast) I Brightness: To adjust the ... video hue level. (right: more greenish tone, left : soften) Miscellaneous: Color Temp: To select your color temperture between Warm, Norm and Cool. ViewSonic N2010 13 Press MENU key to be different, depending on the top of display. (right: sharpen, left : more reddish tone) Sharpness: To adjust the image...
... are controlled either via the remote control or using the proper buttons on the current source input. Source Input: TV Picture Menu E N G Contrast: To adjust the contrast ratio of the image. (right: high contrast, left: low L contrast) I Brightness: To adjust the ... video hue level. (right: more greenish tone, left : soften) Miscellaneous: Color Temp: To select your color temperture between Warm, Norm and Cool. ViewSonic N2010 13 Press MENU key to be different, depending on the top of display. (right: sharpen, left : more reddish tone) Sharpness: To adjust the image...
User Manual
Page 15
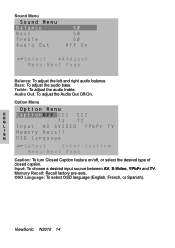
Input: To choose a desired input source between AV, S-Video, YPbPr and TV. ViewSonic N2010 14 Option Menu E N G L I S H Caption: To turn Closed Caption feature on/off, or select the desired type of closed caption. Memory Recall: Recall factory pre-sets. Audio Out: To adjust the Audio Out Off/On. Treble: To adjust the audio treble. OSD Language: To select OSD language (English, French, or Spanish). Bass: To adjust the audio bass. Sound Menu Balance: To adjust the left and right audio balance.
Input: To choose a desired input source between AV, S-Video, YPbPr and TV. ViewSonic N2010 14 Option Menu E N G L I S H Caption: To turn Closed Caption feature on/off, or select the desired type of closed caption. Memory Recall: Recall factory pre-sets. Audio Out: To adjust the Audio Out Off/On. Treble: To adjust the audio treble. OSD Language: To select OSD language (English, French, or Spanish). Bass: To adjust the audio bass. Sound Menu Balance: To adjust the left and right audio balance.
User Manual
Page 16
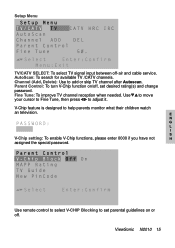
...guidelines on or off -air and cable service. ViewSonic N2010 15 E N G L I S V-Chip setting: To enable V-Chip functions, please enter 0000 if you have not H assigned the special password. AutoScan: To search for available TV /CATV channels. Fine Tune: To improve TV channel reception when needed. Channel (Add, Delete.... V-Chip feature is designed to add or skip TV channel after Autoscan. Use to move your cursor to Fine Tune, then press to set desired rating(s) and change password. Setup Menu TV/CATV SELECT: To select TV signal input between off . Use remote control to ...
...guidelines on or off -air and cable service. ViewSonic N2010 15 E N G L I S V-Chip setting: To enable V-Chip functions, please enter 0000 if you have not H assigned the special password. AutoScan: To search for available TV /CATV channels. Fine Tune: To improve TV channel reception when needed. Channel (Add, Delete.... V-Chip feature is designed to add or skip TV channel after Autoscan. Use to move your cursor to Fine Tune, then press to set desired rating(s) and change password. Setup Menu TV/CATV SELECT: To select TV signal input between off . Use remote control to ...
User Manual
Page 17
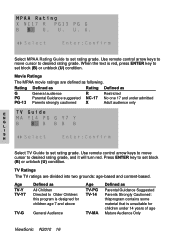
... to Older Children: this program is designed for children under 14 years of age Mature Audience Only ViewSonic N2010 16 Rating Defined as Rating Defined as following. Age TV-Y TV-Y7 TV-G Defined as Parental Guidance Suggested Parents Strongly Cautioned: thisprogram contains some material that is red, press ENTER key to set block (B) or unblock...: age-based and content-based. Press ENTER key to set rating grade. When the text is unsuitable for children age 7 and above General Audience Age TV-PG TV-14 TV-MA Defined as All Children Directed to set rating grade.
... to Older Children: this program is designed for children under 14 years of age Mature Audience Only ViewSonic N2010 16 Rating Defined as Rating Defined as following. Age TV-Y TV-Y7 TV-G Defined as Parental Guidance Suggested Parents Strongly Cautioned: thisprogram contains some material that is red, press ENTER key to set block (B) or unblock...: age-based and content-based. Press ENTER key to set rating grade. When the text is unsuitable for children age 7 and above General Audience Age TV-PG TV-14 TV-MA Defined as All Children Directed to set rating grade.

User Manual
Page 20
Sound Menu Balance: To adjust the left and right audio balance. Input: To choose a desired input source among AV, S-Video, YPbPr and TV. OSD Language: To select OSD language (English, French, or Spanish). Bass: To adjust the audio bass. Option Menu E N G L I S H Caption: To turn Closed Caption feature on/off, or select the desired type of closed caption. Memory Recall: Recall factory pre-sets. Treble: To adjust the audio treble. ViewSonic N2010 19 Audio Out: To adjust the Audio Out Off/On.
Sound Menu Balance: To adjust the left and right audio balance. Input: To choose a desired input source among AV, S-Video, YPbPr and TV. OSD Language: To select OSD language (English, French, or Spanish). Bass: To adjust the audio bass. Option Menu E N G L I S H Caption: To turn Closed Caption feature on/off, or select the desired type of closed caption. Memory Recall: Recall factory pre-sets. Treble: To adjust the audio treble. ViewSonic N2010 19 Audio Out: To adjust the Audio Out Off/On.
User Manual
Page 21
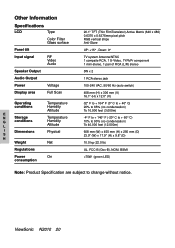
... Physical Net On 20.1" TFT (Thin FilmTransistor) Active Matrix (640 x 480) 0.6375 x 0.6375mm pixel pitch RGB vertical stripe Anti-Glare UP: +15° , Down: 0° TV system Antenna/NTSC 1 compsite RCA, 1 S-Video, 1YPbPr component 1 mini-stereo, 1 pair of RCA (L/R) stereo 5W x 2 1 RCA stereo jack 100-240 VAC, 50/60 Hz (auto...
... Physical Net On 20.1" TFT (Thin FilmTransistor) Active Matrix (640 x 480) 0.6375 x 0.6375mm pixel pitch RGB vertical stripe Anti-Glare UP: +15° , Down: 0° TV system Antenna/NTSC 1 compsite RCA, 1 S-Video, 1YPbPr component 1 mini-stereo, 1 pair of RCA (L/R) stereo 5W x 2 1 RCA stereo jack 100-240 VAC, 50/60 Hz (auto...
User Manual
Page 22
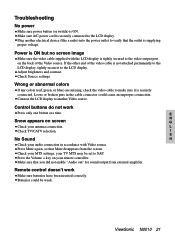
...are missing, check the video cable to make sure it to the LCD display. ViewSonic N2010 21 Plug another Video source. If the other end of the Video source. Check Source settings. E N Snow appears on your TV MTS may be weak. Check your MTS settings, your remote controller. Control buttons do... port on the back of the video cable is ON but no screen image Make sure the video cable supplied with Video source. L Check TV/CATV selection. Press Mute again, so that the outlet is securely connected. Press the Volume + key on screen G Check your audio connection ...
...are missing, check the video cable to make sure it to the LCD display. ViewSonic N2010 21 Plug another Video source. If the other end of the Video source. Check Source settings. E N Snow appears on your TV MTS may be weak. Check your MTS settings, your remote controller. Control buttons do... port on the back of the video cable is ON but no screen image Make sure the video cable supplied with Video source. L Check TV/CATV selection. Press Mute again, so that the outlet is securely connected. Press the Volume + key on screen G Check your audio connection ...
User Manual
Page 26
...user must use only a shielded BNC(5) cable. Increase the separation between the equipment and receiver. E N G L I S H ViewSonic N2010 25 This equipment has been tested and found to comply with the instructions, may cause harmful interference to part 15 of the following measures... power supply cord and the provided shielded video interface cable with bonded ferrite cores. Consult the dealer or an experienced radio/TV technician for U.S.A. However, there is going to provide reasonable protection against harmful interference in a particular installation. Compliance Information for...
...user must use only a shielded BNC(5) cable. Increase the separation between the equipment and receiver. E N G L I S H ViewSonic N2010 25 This equipment has been tested and found to comply with the instructions, may cause harmful interference to part 15 of the following measures... power supply cord and the provided shielded video interface cable with bonded ferrite cores. Consult the dealer or an experienced radio/TV technician for U.S.A. However, there is going to provide reasonable protection against harmful interference in a particular installation. Compliance Information for...
Brochure
Page 1
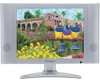
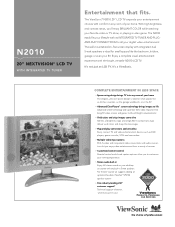
...in case. The wall-mountable slim, flat-screen display with the bright, versatile N2010 LCD TV. It's not just an LCD TV. With high brightness and contrast ratios, you to customize your digital video entertainment. ...Enjoy a complete visual entertainment experience with integrated dual 5-watt speakers is ideal for all your viewing experience. > Stereo audio built-in 5-watt speakers. The ViewSonic® N2010 20" LCD TV expands your favorite video or TV...
...in case. The wall-mountable slim, flat-screen display with the bright, versatile N2010 LCD TV. It's not just an LCD TV. With high brightness and contrast ratios, you to customize your digital video entertainment. ...Enjoy a complete visual entertainment experience with integrated dual 5-watt speakers is ideal for all your viewing experience. > Stereo audio built-in 5-watt speakers. The ViewSonic® N2010 20" LCD TV expands your favorite video or TV...
Brochure
Page 2
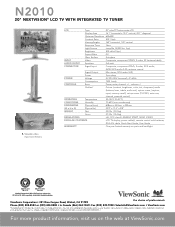
...of their respective companies. Copyright © 2005 ViewSonic Corporation. OnView® Picture (contrast, brightness, color, tint, sharpness), audio (balance, bass, treble, audio out), option menu, (caption, input, memory recall), set-up menu (TV/CATV, auto scan, channel, parental control)...8888 • In Canada (866) 262-1967• Fax (909) 839-7922• SalesInfo@ViewSonic.com • ViewSonic.com *Excluding major U.S. N2010 20" NEXTVISION® LCD TV WITH INTEGRATED TV TUNER 1 1. Versatile video input connections LCD Type 20" color TFT active matrix LCD Display Area...
...of their respective companies. Copyright © 2005 ViewSonic Corporation. OnView® Picture (contrast, brightness, color, tint, sharpness), audio (balance, bass, treble, audio out), option menu, (caption, input, memory recall), set-up menu (TV/CATV, auto scan, channel, parental control)...8888 • In Canada (866) 262-1967• Fax (909) 839-7922• SalesInfo@ViewSonic.com • ViewSonic.com *Excluding major U.S. N2010 20" NEXTVISION® LCD TV WITH INTEGRATED TV TUNER 1 1. Versatile video input connections LCD Type 20" color TFT active matrix LCD Display Area...


