User Manual
Page 2
Contents Product Registration 2 For Your Records 2 Important Product Safety Instructions 3 Antenna Installation Instructions 4 Cleaning the LCD Display 4 Getting Started Package Contents 5 Front View of the Product 6 Rear View of the Product 7 Remote Control 8 Installation 9 OSD Functions Source Input-TV Mode 13 E N Source Input-YPbPr, AV, S-Video Mode 18 G L Other Information I S Specifications 20 H Troubleshooting 21 Customer Support 22 Limited Warranty 23 Appendix Safety Guidelines 24 Compliance Information for U.S.A 25 ViewSonic N2010 1
Contents Product Registration 2 For Your Records 2 Important Product Safety Instructions 3 Antenna Installation Instructions 4 Cleaning the LCD Display 4 Getting Started Package Contents 5 Front View of the Product 6 Rear View of the Product 7 Remote Control 8 Installation 9 OSD Functions Source Input-TV Mode 13 E N Source Input-YPbPr, AV, S-Video Mode 18 G L Other Information I S Specifications 20 H Troubleshooting 21 Customer Support 22 Limited Warranty 23 Appendix Safety Guidelines 24 Compliance Information for U.S.A 25 ViewSonic N2010 1
User Manual
Page 4
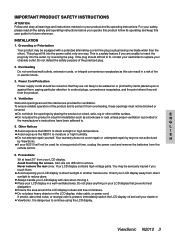
... not authorized H by placing the product on the LCD display, video cable, or power cord. You may be routed so that prevents heat dissipation. IMPORTANT PRODUCT SAFETY INSTRUCTIONS ATTENTION: Follow and obey all the safety and operating instructions before you operate this product follow its operating instructions. Avoid touching the screen. If the plug should be equipped with care when moving it from the remote control. 6.
... not authorized H by placing the product on the LCD display, video cable, or power cord. You may be routed so that prevents heat dissipation. IMPORTANT PRODUCT SAFETY INSTRUCTIONS ATTENTION: Follow and obey all the safety and operating instructions before you operate this product follow its operating instructions. Avoid touching the screen. If the plug should be equipped with care when moving it from the remote control. 6.

User Manual
Page 5
... the wall outlet and disconnect the antenna or cable system. ANTENNA INSTALLATION INSTRUCTIONS 1. Disclaimer ViewSonic® does not recommend the use of any liquid directly onto the screen or case. This will not be located in wire to an antenna discharge unit, connection to damage the screen and/or case of a non-ammonia, non-alcohol based, mild non-abrasive detergent onto a clean, soft, lint-free...
... the wall outlet and disconnect the antenna or cable system. ANTENNA INSTALLATION INSTRUCTIONS 1. Disclaimer ViewSonic® does not recommend the use of any liquid directly onto the screen or case. This will not be located in wire to an antenna discharge unit, connection to damage the screen and/or case of a non-ammonia, non-alcohol based, mild non-abrasive detergent onto a clean, soft, lint-free...
User Manual
Page 7
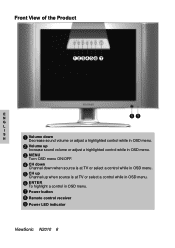
Front View of the Product 123456 7 E N 89 G L I S H 1 Volume down Decrease sound volume or adjust a highlighted control while in OSD menu. 2 Volume up Increase sound volume or adjust a highlighted control while in OSD menu. 3 MENU Turn OSD menu ON/OFF. 4 CH down Channel down when source is at TV or select a control while in OSD menu. 5 CH up Channel up when source is at TV or select a control while in OSD menu. 6 ENTER To highlight a control in OSD menu. 7 Power button 8 Remote control receiver 9 Power LED indicator ViewSonic N2010 6
Front View of the Product 123456 7 E N 89 G L I S H 1 Volume down Decrease sound volume or adjust a highlighted control while in OSD menu. 2 Volume up Increase sound volume or adjust a highlighted control while in OSD menu. 3 MENU Turn OSD menu ON/OFF. 4 CH down Channel down when source is at TV or select a control while in OSD menu. 5 CH up Channel up when source is at TV or select a control while in OSD menu. 6 ENTER To highlight a control in OSD menu. 7 Power button 8 Remote control receiver 9 Power LED indicator ViewSonic N2010 6
User Manual
Page 8
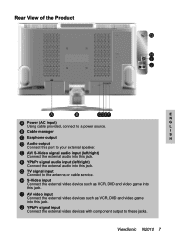
... antenna or cable service. ViewSonic N2010 7 E AV/ S-Video signal audio input (left /right) Connect the external audio into this jack. H S-Video input Connect the external video device such as VCR, DVD and video game into this jack. G TV signal input Connect to these jacks. F YPbPr signal audio input (left /right) Connect the external audio into this jack. I AV video input Connect the external video devices such as VCR, DVD and video game into this jack. Rear View of the Product G H I S C Earphone output H D Audio output Connect this port to your external speaker...
... antenna or cable service. ViewSonic N2010 7 E AV/ S-Video signal audio input (left /right) Connect the external audio into this jack. H S-Video input Connect the external video device such as VCR, DVD and video game into this jack. G TV signal input Connect to these jacks. F YPbPr signal audio input (left /right) Connect the external audio into this jack. I AV video input Connect the external video devices such as VCR, DVD and video game into this jack. Rear View of the Product G H I S C Earphone output H D Audio output Connect this port to your external speaker...
User Manual
Page 9
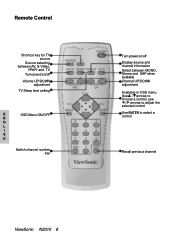
Remote Control Shortcut key for TV source Source selecting between AV, S-Video, YPbPr and TV Turn sound on/off Volume UP/DOWN adjustment TV Sleep time setting E OSD Menu ON/OFF N G L I S H Switch channel number key Turn power on/off Display source and channel information Select between MONO, Stereo and SAP when available Channel UP/DOWN adjustment Available in OSD menu Use / arrows to choose a control, use / arrows to adjust the selected control Use ENTER to select a control Recall previous channel ViewSonic N2010 8
Remote Control Shortcut key for TV source Source selecting between AV, S-Video, YPbPr and TV Turn sound on/off Volume UP/DOWN adjustment TV Sleep time setting E OSD Menu ON/OFF N G L I S H Switch channel number key Turn power on/off Display source and channel information Select between MONO, Stereo and SAP when available Channel UP/DOWN adjustment Available in OSD menu Use / arrows to choose a control, use / arrows to adjust the selected control Use ENTER to select a control Recall previous channel ViewSonic N2010 8
User Manual
Page 10
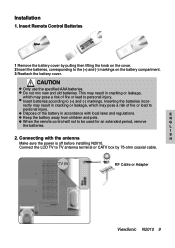
... LCD TV to be used for an extended period, remove G the batteries. Insert Remote Control Batteries 1 Remove the battery cover by 75-ohm coaxial cable. Insert batteries according to the (+) and (-) markings on the cover. 2 Insert the batteries, corresponding to (+) and (-) markings. Installation 1. Dispose of fire or lead to personal injury. Connecting with local laws and regulations. RF Cable or Adapter ViewSonic N2010...
... LCD TV to be used for an extended period, remove G the batteries. Insert Remote Control Batteries 1 Remove the battery cover by 75-ohm coaxial cable. Insert batteries according to the (+) and (-) markings on the cover. 2 Insert the batteries, corresponding to (+) and (-) markings. Installation 1. Dispose of fire or lead to personal injury. Connecting with local laws and regulations. RF Cable or Adapter ViewSonic N2010...
User Manual
Page 11
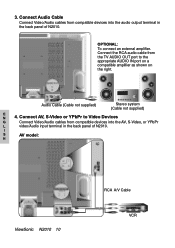
..., S-Video, or YPbPr L video/Audio input terminal in the back panel of N2010. I S AV model: H ViewSonic N2010 10 RCA A/V Cable VCR OPTIONAL: To connect an external amplifier. Connect AV, S-Video or YPbPr to the appropriate AUDIO IN port on a compatible amplifier as shown on the right. Connect Audio Cable Connect Video/Audio cables from the TV AUDIO OUT port to Video Devices G Connect Video/Audio cables from compatible devices into the audio output terminal in the back panel of N2010. 3. Audio Cable (Cable not supplied) Stereo system (Cable not supplied) E N 4.
..., S-Video, or YPbPr L video/Audio input terminal in the back panel of N2010. I S AV model: H ViewSonic N2010 10 RCA A/V Cable VCR OPTIONAL: To connect an external amplifier. Connect AV, S-Video or YPbPr to the appropriate AUDIO IN port on a compatible amplifier as shown on the right. Connect Audio Cable Connect Video/Audio cables from the TV AUDIO OUT port to Video Devices G Connect Video/Audio cables from compatible devices into the audio output terminal in the back panel of N2010. 3. Audio Cable (Cable not supplied) Stereo system (Cable not supplied) E N 4.
User Manual
Page 13
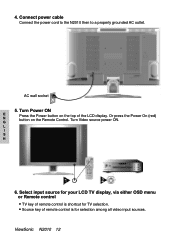
Turn Video source power ON. L I S H 6. Or press the Power On (red) button on the top of remote control is shortcut for selection among all video input sources. Select input source for your LCD TV display, via either OSD menu or Remote control TV key of remote control is for TV selection. ViewSonic N2010 12 Connect power cable Connect the power cord to the N2010 then to a properly grounded AC outlet. AC wall socket 5. Source key of the LCD display. Turn Power ON E N G Press the Power button on the Remote Control. 4.
Turn Video source power ON. L I S H 6. Or press the Power On (red) button on the top of remote control is shortcut for selection among all video input sources. Select input source for your LCD TV display, via either OSD menu or Remote control TV key of remote control is for TV selection. ViewSonic N2010 12 Connect power cable Connect the power cord to the N2010 then to a properly grounded AC outlet. AC wall socket 5. Source key of the LCD display. Turn Power ON E N G Press the Power button on the Remote Control. 4.
User Manual
Page 14
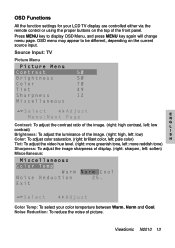
..., left: low) S Color: To adjust color saturation. (right: brilliant color, left: pale color) H Tint: To adjust the video hue level. (right: more greenish tone, left : soften) Miscellaneous: Color Temp: To select your LCD TV display are controlled either via the remote control or using the proper buttons on the current source input. OSD Functions All the function settings for your color temperture between Warm, Norm and Cool. ViewSonic N2010 13 Noise...
..., left: low) S Color: To adjust color saturation. (right: brilliant color, left: pale color) H Tint: To adjust the video hue level. (right: more greenish tone, left : soften) Miscellaneous: Color Temp: To select your LCD TV display are controlled either via the remote control or using the proper buttons on the current source input. OSD Functions All the function settings for your color temperture between Warm, Norm and Cool. ViewSonic N2010 13 Noise...
User Manual
Page 15
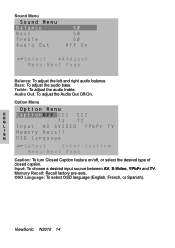
Memory Recall: Recall factory pre-sets. OSD Language: To select OSD language (English, French, or Spanish). Option Menu E N G L I S H Caption: To turn Closed Caption feature on/off, or select the desired type of closed caption. ViewSonic N2010 14 Treble: To adjust the audio treble. Audio Out: To adjust the Audio Out Off/On. Sound Menu Balance: To adjust the left and right audio balance. Bass: To adjust the audio bass. Input: To choose a desired input source between AV, S-Video, YPbPr and TV.
Memory Recall: Recall factory pre-sets. OSD Language: To select OSD language (English, French, or Spanish). Option Menu E N G L I S H Caption: To turn Closed Caption feature on/off, or select the desired type of closed caption. ViewSonic N2010 14 Treble: To adjust the audio treble. Audio Out: To adjust the Audio Out Off/On. Sound Menu Balance: To adjust the left and right audio balance. Bass: To adjust the audio bass. Input: To choose a desired input source between AV, S-Video, YPbPr and TV.
User Manual
Page 16
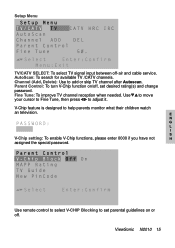
... is designed to set desired rating(s) and change password. Use remote control to select V-CHIP Blocking to help parents monitor what their children watch an television. Fine Tune: To improve TV channel reception when needed. ViewSonic N2010 15 Parent Control: To turn V-Chip function on or off. Channel (Add, Delete): Use to adjust it. Use to move your cursor to Fine Tune, then press to add or skip TV channel after Autoscan...
... is designed to set desired rating(s) and change password. Use remote control to select V-CHIP Blocking to help parents monitor what their children watch an television. Fine Tune: To improve TV channel reception when needed. ViewSonic N2010 15 Parent Control: To turn V-Chip function on or off. Channel (Add, Delete): Use to adjust it. Use to move your cursor to Fine Tune, then press to add or skip TV channel after Autoscan...

User Manual
Page 20
Option Menu E N G L I S H Caption: To turn Closed Caption feature on/off, or select the desired type of closed caption. Input: To choose a desired input source among AV, S-Video, YPbPr and TV. Treble: To adjust the audio treble. Bass: To adjust the audio bass. Audio Out: To adjust the Audio Out Off/On. OSD Language: To select OSD language (English, French, or Spanish). Memory Recall: Recall factory pre-sets. ViewSonic N2010 19 Sound Menu Balance: To adjust the left and right audio balance.
Option Menu E N G L I S H Caption: To turn Closed Caption feature on/off, or select the desired type of closed caption. Input: To choose a desired input source among AV, S-Video, YPbPr and TV. Treble: To adjust the audio treble. Bass: To adjust the audio bass. Audio Out: To adjust the Audio Out Off/On. OSD Language: To select OSD language (English, French, or Spanish). Memory Recall: Recall factory pre-sets. ViewSonic N2010 19 Sound Menu Balance: To adjust the left and right audio balance.
User Manual
Page 21
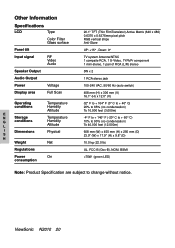
... Specifications LCD Type Color Filter Glass surface Panel tilt Input signal RF Video Audio Speaker Output Audio Output Power Voltage Display area Full Scan Operating conditions E N Storage G conditions L I Dimensions S H Weight Regulations Power consumption Temperature Humidity Altitude Temperature Humidity Altitude Physical Net On 20.1" TFT (Thin FilmTransistor) Active Matrix (640 x 480) 0.6375 x 0.6375mm pixel pitch RGB vertical stripe Anti-Glare UP: +15° , Down: 0° TV system Antenna/NTSC 1 compsite RCA, 1 S-Video, 1YPbPr component...
... Specifications LCD Type Color Filter Glass surface Panel tilt Input signal RF Video Audio Speaker Output Audio Output Power Voltage Display area Full Scan Operating conditions E N Storage G conditions L I Dimensions S H Weight Regulations Power consumption Temperature Humidity Altitude Temperature Humidity Altitude Physical Net On 20.1" TFT (Thin FilmTransistor) Active Matrix (640 x 480) 0.6375 x 0.6375mm pixel pitch RGB vertical stripe Anti-Glare UP: +15° , Down: 0° TV system Antenna/NTSC 1 compsite RCA, 1 S-Video, 1YPbPr component...
User Manual
Page 22
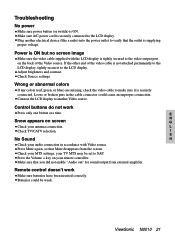
... settings, your audio connection in the cable connector could be set to verify that you did not enable "Audio out" for sound output from the screen. Press the Volume + key on screen G Check your remote controller. Make sure that the outlet is securely connected. ViewSonic N2010 21 Connect the LCD display to the LCD display. Plug another Video source. Power is ON but no screen image Make sure the video cable supplied with Video source. Check Source settings. Wrong or abnormal colors If any colors (red, green...
... settings, your audio connection in the cable connector could be set to verify that you did not enable "Audio out" for sound output from the screen. Press the Volume + key on screen G Check your remote controller. Make sure that the outlet is securely connected. ViewSonic N2010 21 Connect the LCD display to the LCD display. Plug another Video source. Power is ON but no screen image Make sure the video cable supplied with Video source. Check Source settings. Wrong or abnormal colors If any colors (red, green...
User Manual
Page 24
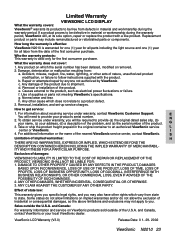
... of the problem, and (e) the serial number of the U.S.A. Removal or installation of supplies or parts not meeting ViewSonic's specifications. h. How to provide your product's serial number. 2. E You will need to get service: 1. For additional information or the name of damages: VIEWSONIC'S LIABILITY IS LIMITED TO THE COST OF REPAIR OR REPLACEMENT OF THE PRODUCT. Exclusion of the nearest ViewSonic service center, contact ViewSonic. Limited Warranty VIEWSONIC LCD DISPLAY What the warranty covers: ViewSonic®...
... of the problem, and (e) the serial number of the U.S.A. Removal or installation of supplies or parts not meeting ViewSonic's specifications. h. How to provide your product's serial number. 2. E You will need to get service: 1. For additional information or the name of damages: VIEWSONIC'S LIABILITY IS LIMITED TO THE COST OF REPAIR OR REPLACEMENT OF THE PRODUCT. Exclusion of the nearest ViewSonic service center, contact ViewSonic. Limited Warranty VIEWSONIC LCD DISPLAY What the warranty covers: ViewSonic®...

User Manual
Page 25
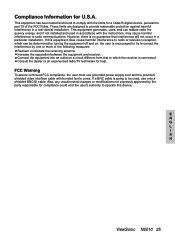
... proper power cord to the terminal in the plug which are coloured in the plug which is coloured GREEN-AND-YELLOW must be connected to the current rating for this appliance do not correspond with the following guidelines if it is necessary to prevent electric shock. If you have purchased the produc ViewSonic N2010 24 Please consult the table...
... proper power cord to the terminal in the plug which are coloured in the plug which is coloured GREEN-AND-YELLOW must be connected to the current rating for this appliance do not correspond with the following guidelines if it is necessary to prevent electric shock. If you have purchased the produc ViewSonic N2010 24 Please consult the table...
User Manual
Page 26
... installed and used , use grounded power supply cord and the provided shielded video interface cable with the instructions, may cause harmful interference to radio communications. If a BNC cable is going to be determined by one or more of the FCC Rules. FCC Warning To assure continued FCC compliance, the user must use only a shielded BNC(5) cable. Increase the separation between the equipment and receiver...
... installed and used , use grounded power supply cord and the provided shielded video interface cable with the instructions, may cause harmful interference to radio communications. If a BNC cable is going to be determined by one or more of the FCC Rules. FCC Warning To assure continued FCC compliance, the user must use only a shielded BNC(5) cable. Increase the separation between the equipment and receiver...
Brochure
Page 1
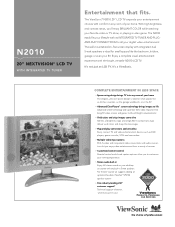
...™ SP2104 speaker system. > Free industry-leading 24/7 customer support* Technical support wherever, whenever, just in any room of your home The elegant, ultra-slim panel design is ideal for small spaces like images. > Plug-and-play connections add versatility Easily connect TV and video entertainment devices such as DVD players, game consoles, VCRs and camcorders. > Multiple video input options RCA, S-video and component video connections and audio connections let you...
...™ SP2104 speaker system. > Free industry-leading 24/7 customer support* Technical support wherever, whenever, just in any room of your home The elegant, ultra-slim panel design is ideal for small spaces like images. > Plug-and-play connections add versatility Easily connect TV and video entertainment devices such as DVD players, game consoles, VCRs and camcorders. > Multiple video input options RCA, S-video and component video connections and audio connections let you...
Brochure
Page 2
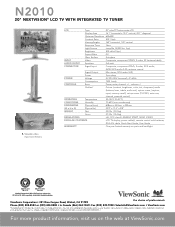
... recall), set-up menu (TV/CATV, auto scan, channel, parental control) OPERATING Temperature 32-104°F (0-40°C) CONDITIONS Humidity 10-65% (non-condensing) DIMENSIONS Physical (mm) 608mm x 443mm x 250mm (W x H x D) Physical (in) 23.9" x 17.4" x 9.8" WEIGHT Net 22.0 lb. (10.0 kg) Gross 27.3 lb. (12.4 kg) REGULATIONS cUL, FCC class B, ENERGY STAR®, NOM, ICS003 PACKAGE CONTENTS LCD TV display, power cable(s), remote control with batteries, RCA A/V cable, Quick Start Guide, User Guide WARRANTY...
... recall), set-up menu (TV/CATV, auto scan, channel, parental control) OPERATING Temperature 32-104°F (0-40°C) CONDITIONS Humidity 10-65% (non-condensing) DIMENSIONS Physical (mm) 608mm x 443mm x 250mm (W x H x D) Physical (in) 23.9" x 17.4" x 9.8" WEIGHT Net 22.0 lb. (10.0 kg) Gross 27.3 lb. (12.4 kg) REGULATIONS cUL, FCC class B, ENERGY STAR®, NOM, ICS003 PACKAGE CONTENTS LCD TV display, power cable(s), remote control with batteries, RCA A/V cable, Quick Start Guide, User Guide WARRANTY...


