User Manual
Page 2
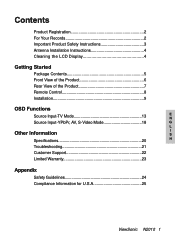
Contents Product Registration 2 For Your Records 2 Important Product Safety Instructions 3 Antenna Installation Instructions 4 Cleaning the LCD Display 4 Getting Started Package Contents 5 Front View of the Product 6 Rear View of the Product 7 Remote Control 8 Installation 9 OSD Functions Source Input-TV Mode 13 E N Source Input-YPbPr, AV, S-Video Mode 18 G L Other Information I S Specifications 20 H Troubleshooting 21 Customer Support 22 Limited Warranty 23 Appendix Safety Guidelines 24 Compliance Information for U.S.A 25 ViewSonic N2010 1
Contents Product Registration 2 For Your Records 2 Important Product Safety Instructions 3 Antenna Installation Instructions 4 Cleaning the LCD Display 4 Getting Started Package Contents 5 Front View of the Product 6 Rear View of the Product 7 Remote Control 8 Installation 9 OSD Functions Source Input-TV Mode 13 E N Source Input-YPbPr, AV, S-Video Mode 18 G L Other Information I S Specifications 20 H Troubleshooting 21 Customer Support 22 Limited Warranty 23 Appendix Safety Guidelines 24 Compliance Information for U.S.A 25 ViewSonic N2010 1
User Manual
Page 4
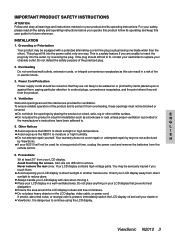
... screen. Your LCD display contains high-voltage parts. Orient your LCD display away from your LCD display to direct sunlight or high temperature. ViewSonic N2010 3 This plug will not be blocked or covered. This is provided or N the manufacturer's instructions have been adhered to reduce glare.... may be equipped with care when moving it from the remote control. 6. If smoke, abnormal noise, or strange odor is dangerous to protect it . For your safety, please read all warnings and instructions marked on your N2010 will fit into the outlet, try reversing the plug. ...
... screen. Your LCD display contains high-voltage parts. Orient your LCD display away from your LCD display to direct sunlight or high temperature. ViewSonic N2010 3 This plug will not be blocked or covered. This is provided or N the manufacturer's instructions have been adhered to reduce glare.... may be equipped with care when moving it from the remote control. 6. If smoke, abnormal noise, or strange odor is dangerous to protect it . For your safety, please read all warnings and instructions marked on your N2010 will fit into the outlet, try reversing the plug. ...
User Manual
Page 6
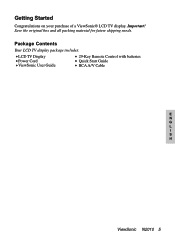
Getting Started Congratulations on your purchase of a ViewSonic® LCD TV display. Package Contents Your LCD TV display package includes: LCD TV Display Power Cord ViewSonic User Guide 29-Key Remote Control with batteries Quick Start Guide RCA A/V Cable E N G L I S H ViewSonic N2010 5 Important! Save the original box and all packing material for future shipping needs.
Getting Started Congratulations on your purchase of a ViewSonic® LCD TV display. Package Contents Your LCD TV display package includes: LCD TV Display Power Cord ViewSonic User Guide 29-Key Remote Control with batteries Quick Start Guide RCA A/V Cable E N G L I S H ViewSonic N2010 5 Important! Save the original box and all packing material for future shipping needs.
User Manual
Page 7
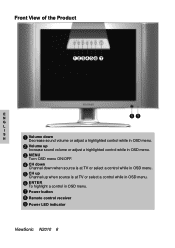
Front View of the Product 123456 7 E N 89 G L I S H 1 Volume down Decrease sound volume or adjust a highlighted control while in OSD menu. 2 Volume up Increase sound volume or adjust a highlighted control while in OSD menu. 3 MENU Turn OSD menu ON/OFF. 4 CH down Channel down when source is at TV or select a control while in OSD menu. 5 CH up Channel up when source is at TV or select a control while in OSD menu. 6 ENTER To highlight a control in OSD menu. 7 Power button 8 Remote control receiver 9 Power LED indicator ViewSonic N2010 6
Front View of the Product 123456 7 E N 89 G L I S H 1 Volume down Decrease sound volume or adjust a highlighted control while in OSD menu. 2 Volume up Increase sound volume or adjust a highlighted control while in OSD menu. 3 MENU Turn OSD menu ON/OFF. 4 CH down Channel down when source is at TV or select a control while in OSD menu. 5 CH up Channel up when source is at TV or select a control while in OSD menu. 6 ENTER To highlight a control in OSD menu. 7 Power button 8 Remote control receiver 9 Power LED indicator ViewSonic N2010 6
User Manual
Page 9
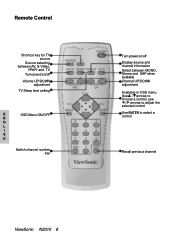
Remote Control Shortcut key for TV source Source selecting between AV, S-Video, YPbPr and TV Turn sound on/off Volume UP/DOWN adjustment TV Sleep time setting E OSD Menu ON/OFF N G L I S H Switch channel number key Turn power on/off Display source and channel information Select between MONO, Stereo and SAP when available Channel UP/DOWN adjustment Available in OSD menu Use / arrows to choose a control, use / arrows to adjust the selected control Use ENTER to select a control Recall previous channel ViewSonic N2010 8
Remote Control Shortcut key for TV source Source selecting between AV, S-Video, YPbPr and TV Turn sound on/off Volume UP/DOWN adjustment TV Sleep time setting E OSD Menu ON/OFF N G L I S H Switch channel number key Turn power on/off Display source and channel information Select between MONO, Stereo and SAP when available Channel UP/DOWN adjustment Available in OSD menu Use / arrows to choose a control, use / arrows to adjust the selected control Use ENTER to select a control Recall previous channel ViewSonic N2010 8
User Manual
Page 10
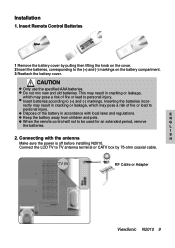
...regulations. CAUTION Only use the specified AAA batteries. N When the remote control will not to the (+) and (-) markings on the battery compartment. 3 Reattach the battery cover. RF Cable or Adapter ViewSonic N2010 9 Insert Remote Control Batteries 1 Remove the battery cover by 75-ohm coaxial cable. Inserting... L I S 2. Installation 1. This may result in accordance with the antenna H Make sure the power is off before installing N2010. Do not mix new and old batteries. Insert batteries according to TV antenna terminal or CATV box by pulling then lifting the ...
...regulations. CAUTION Only use the specified AAA batteries. N When the remote control will not to the (+) and (-) markings on the battery compartment. 3 Reattach the battery cover. RF Cable or Adapter ViewSonic N2010 9 Insert Remote Control Batteries 1 Remove the battery cover by 75-ohm coaxial cable. Inserting... L I S 2. Installation 1. This may result in accordance with the antenna H Make sure the power is off before installing N2010. Do not mix new and old batteries. Insert batteries according to TV antenna terminal or CATV box by pulling then lifting the ...
User Manual
Page 13
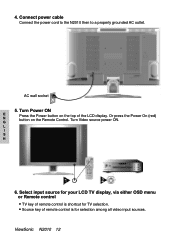
Connect power cable Connect the power cord to the N2010 then to a properly grounded AC outlet. Turn Power ON E N G Press the Power button on the Remote Control. Or press the Power On (red) button on the top of remote control is shortcut for selection among all video input sources. Select input source for your LCD TV display, via either OSD menu or Remote control TV key of remote control is for TV selection. 4. ViewSonic N2010 12 L I S H 6. Source key of the LCD display. Turn Video source power ON. AC wall socket 5.
Connect power cable Connect the power cord to the N2010 then to a properly grounded AC outlet. Turn Power ON E N G Press the Power button on the Remote Control. Or press the Power On (red) button on the top of remote control is shortcut for selection among all video input sources. Select input source for your LCD TV display, via either OSD menu or Remote control TV key of remote control is for TV selection. 4. ViewSonic N2010 12 L I S H 6. Source key of the LCD display. Turn Video source power ON. AC wall socket 5.
User Manual
Page 14
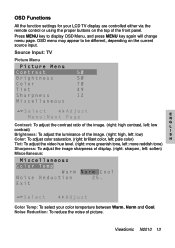
ViewSonic N2010 13 Noise Reduction: To reduce the noise of the front panel. OSD Functions All the function settings for your color temperture between Warm, Norm and ... tone) Sharpness: To adjust the image sharpness of display. (right: sharpen, left: soften) Miscellaneous: Color Temp: To select your LCD TV display are controlled either via the remote control or using the proper buttons on the current source input. OSD menu may appear to display OSD Menu, and press MENU key again will...
ViewSonic N2010 13 Noise Reduction: To reduce the noise of the front panel. OSD Functions All the function settings for your color temperture between Warm, Norm and ... tone) Sharpness: To adjust the image sharpness of display. (right: sharpen, left: soften) Miscellaneous: Color Temp: To select your LCD TV display are controlled either via the remote control or using the proper buttons on the current source input. OSD menu may appear to display OSD Menu, and press MENU key again will...
User Manual
Page 16
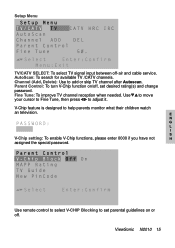
... press to help parents monitor what their children watch an television. Parent Control: To turn V-Chip function on or off. ViewSonic N2010 15 E N G L I S V-Chip setting: To enable V-Chip functions, please enter 0000 if you have not H assigned the special password. Use remote control to select V-CHIP Blocking to add or skip TV channel after Autoscan...
... press to help parents monitor what their children watch an television. Parent Control: To turn V-Chip function on or off. ViewSonic N2010 15 E N G L I S V-Chip setting: To enable V-Chip functions, please enter 0000 if you have not H assigned the special password. Use remote control to select V-CHIP Blocking to add or skip TV channel after Autoscan...
User Manual
Page 17
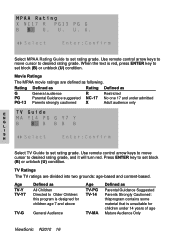
...Suggested Parents Strongly Cautioned: thisprogram contains some material that is red, press ENTER key to set block (B) or unblock (U) condition. Use remote control arrow keys to move cursor to desired rating grade. Movie Ratings The MPAA movie ratings are divided into two grounds: age-based and ... cautioned R NC-17 X Restricted No one 17 and under 14 years of age Mature Audience Only ViewSonic N2010 16 Press ENTER key to set block (B) or unblock (U) condition. Use remote control arrow keys to move cursor to desired rating grade, and it will turn red. Select MPAA Rating ...
...Suggested Parents Strongly Cautioned: thisprogram contains some material that is red, press ENTER key to set block (B) or unblock (U) condition. Use remote control arrow keys to move cursor to desired rating grade. Movie Ratings The MPAA movie ratings are divided into two grounds: age-based and ... cautioned R NC-17 X Restricted No one 17 and under 14 years of age Mature Audience Only ViewSonic N2010 16 Press ENTER key to set block (B) or unblock (U) condition. Use remote control arrow keys to move cursor to desired rating grade, and it will turn red. Select MPAA Rating ...
User Manual
Page 18
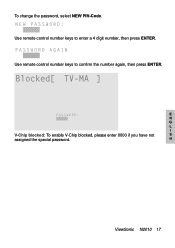
To change the password, select NEW PIN-Code. E N G L I V-Chip blocked: To enable V-Chip blocked, please enter 0000 if you have not S assigned the special password. H ViewSonic N2010 17 Use remote control number keys to enter a 4 digit number, then press ENTER. Use remote control number keys to confirm the number again, then press ENTER.
To change the password, select NEW PIN-Code. E N G L I V-Chip blocked: To enable V-Chip blocked, please enter 0000 if you have not S assigned the special password. H ViewSonic N2010 17 Use remote control number keys to enter a 4 digit number, then press ENTER. Use remote control number keys to confirm the number again, then press ENTER.
User Manual
Page 22
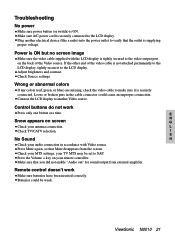
... the LCD display to verify that the outlet is securely connected to the LCD display. E N Snow appears on screen G Check your remote controller. L Check TV/CATV selection. Press Mute again, so that you did not enable "Audio out" for sound output from the screen....ViewSonic N2010 21 Plug another electrical device (like a radio) into the power outlet to another Video source. Wrong or abnormal colors If any colors (red, green, or blue) are missing, check the video cable to the video output port on your antenna connection. Adjust brightness and contrast. Remote control...
... the LCD display to verify that the outlet is securely connected to the LCD display. E N Snow appears on screen G Check your remote controller. L Check TV/CATV selection. Press Mute again, so that you did not enable "Audio out" for sound output from the screen....ViewSonic N2010 21 Plug another electrical device (like a radio) into the power outlet to another Video source. Wrong or abnormal colors If any colors (red, green, or blue) are missing, check the video cable to the video output port on your antenna connection. Adjust brightness and contrast. Remote control...
Brochure
Page 2
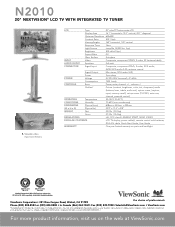
holidays. All rights reserved. [12360-02B-10/05] N2010-1 For more product information, visit us on parts and backlight ViewSonic Corporation's QMS & EMS have been registered to change without notice. Versatile video input connections LCD Type 20" color TFT active... class B, ENERGY STAR®, NOM, ICS003 PACKAGE CONTENTS LCD TV display, power cable(s), remote control with batteries, RCA A/V cable, Quick Start Guide, User Guide WARRANTY One-year limited warranty on the web at ViewSonic.com ViewSonic Corporation • 381 Brea Canyon Road, Walnut, CA 91789 Phone (800) 888-8583 ...
holidays. All rights reserved. [12360-02B-10/05] N2010-1 For more product information, visit us on parts and backlight ViewSonic Corporation's QMS & EMS have been registered to change without notice. Versatile video input connections LCD Type 20" color TFT active... class B, ENERGY STAR®, NOM, ICS003 PACKAGE CONTENTS LCD TV display, power cable(s), remote control with batteries, RCA A/V cable, Quick Start Guide, User Guide WARRANTY One-year limited warranty on the web at ViewSonic.com ViewSonic Corporation • 381 Brea Canyon Road, Walnut, CA 91789 Phone (800) 888-8583 ...

