Owners Manual
Page 2
... for use in not only shortening the product-life, but also malfunctions, fire hazard, or other accidents. If the projector is not to manage those features and maintains it may result in a computer room as possible. TO THE OWNER Before operating this projector, read this manual again, check operations and cable connections and try the solutions in the "Trouble-shooting...
... for use in not only shortening the product-life, but also malfunctions, fire hazard, or other accidents. If the projector is not to manage those features and maintains it may result in a computer room as possible. TO THE OWNER Before operating this projector, read this manual again, check operations and cable connections and try the solutions in the "Trouble-shooting...

Owners Manual
Page 3
... on an unstable cart, stand, or table. When the power cord or plug is left unattended and unused for service. If the projector has been exposed to persons. Adjust only those controls that have the same characteristics as the original part. When the projector exhibits a distinct change in performance-this projector from AC power supply before the product is operated. Unauthorized substitutions may...
... on an unstable cart, stand, or table. When the power cord or plug is left unattended and unused for service. If the projector has been exposed to persons. Adjust only those controls that have the same characteristics as the original part. When the projector exhibits a distinct change in performance-this projector from AC power supply before the product is operated. Unauthorized substitutions may...

Owners Manual
Page 4
... flexible cord should be unable to insert the plug into the power outlet. This equipment generates, uses, and can radiate radio frequency energy and, if not installed and used in accordance with the instruction manual, may not correspond with the coloured markings identifying the terminals in your plug proceed as that the plug will be asked to take adequate countermeasures. Operation...
... flexible cord should be unable to insert the plug into the power outlet. This equipment generates, uses, and can radiate radio frequency energy and, if not installed and used in accordance with the instruction manual, may not correspond with the coloured markings identifying the terminals in your plug proceed as that the plug will be asked to take adequate countermeasures. Operation...
Owners Manual
Page 5
... OF REMOTE CONTROL 18 TECHNICAL SPECIFICATIONS 48 REMOTE CONTROL CODE CHANGE CONFIGURATIONS OF TERMINALS 49 AND OPERATING RANGE 19 COMPATIBLE COMPUTER SPECIFICATIONS 50 REMOTE CONTROL BATTERIES INSTALLATION 19 OPTIONAL PARTS 51 OPERATING ON-SCREEN MENU 20 HOW TO OPERATE ON-SCREEN MENU 20 FLOW OF ON-SCREEN MENU OPERATION 20 MENU BAR 21 BASIC OPERATION 22 TURNING ON / OFF PROJECTOR 22 ADJUSTING SCREEN 23 ZOOM ADJUSTMENT 23 FOCUS ADJUSTMENT 23 LENS SHIFT ADJUSTMENT 23 PICTURE FREEZE FUNCTION 23 NO SHOW FUNCTION 23 SOUND ADJUSTMENT 24 SELECTING INPUT SOURCE...
... OF REMOTE CONTROL 18 TECHNICAL SPECIFICATIONS 48 REMOTE CONTROL CODE CHANGE CONFIGURATIONS OF TERMINALS 49 AND OPERATING RANGE 19 COMPATIBLE COMPUTER SPECIFICATIONS 50 REMOTE CONTROL BATTERIES INSTALLATION 19 OPTIONAL PARTS 51 OPERATING ON-SCREEN MENU 20 HOW TO OPERATE ON-SCREEN MENU 20 FLOW OF ON-SCREEN MENU OPERATION 20 MENU BAR 21 BASIC OPERATION 22 TURNING ON / OFF PROJECTOR 22 ADJUSTING SCREEN 23 ZOOM ADJUSTMENT 23 FOCUS ADJUSTMENT 23 LENS SHIFT ADJUSTMENT 23 PICTURE FREEZE FUNCTION 23 NO SHOW FUNCTION 23 SOUND ADJUSTMENT 24 SELECTING INPUT SOURCE...
Owners Manual
Page 6
... Menu Display Operation menu is displayed in multimedia features, a palette of over than 1600 x 1200, reset a computer output for troublesome manual adjustment of use . This function makes it easy to arrange any button is not pressed. There is no need for lower resolution. Projection Lamp is automatically turned on your computer is over 1600 x 1200 dots. N Network board (Optional) Network board is an optional product to diversity of input...
... Menu Display Operation menu is displayed in multimedia features, a palette of over than 1600 x 1200, reset a computer output for troublesome manual adjustment of use . This function makes it easy to arrange any button is not pressed. There is no need for lower resolution. Projection Lamp is automatically turned on your computer is over 1600 x 1200 dots. N Network board (Optional) Network board is an optional product to diversity of input...

Owners Manual
Page 8
... Power Cord (supplied) to work with peripheral equipment before turning a projector on a projector. PREPARATION SETTING-UP PROJECTOR CONNECTING AC POWER CORD This projector uses nominal input voltages of power system. This projector automatically selects correct input voltage. It is designed to a projector. Connect a projector with singlephase power systems having a grounded neutral conductor. AC outlet must be near this equipment and must be easily accessible. Confirm AC plug...
... Power Cord (supplied) to work with peripheral equipment before turning a projector on a projector. PREPARATION SETTING-UP PROJECTOR CONNECTING AC POWER CORD This projector uses nominal input voltages of power system. This projector automatically selects correct input voltage. It is designed to a projector. Connect a projector with singlephase power systems having a grounded neutral conductor. AC outlet must be near this equipment and must be easily accessible. Confirm AC plug...
Owners Manual
Page 9
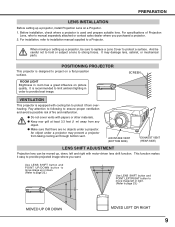
... (REAR SIDE) LENS SHIFT ADJUSTMENT Projection lens can be moved up, down . (Refer to page 23.) Use LENS SHIFT button and POINT LEFT/RIGHT button to move image up a projector, be careful not to hold or subject a lens to a Projector. This function makes it from any object. For installation, refer to installation manual supplied to strong forces. And be sure to replace...
... (REAR SIDE) LENS SHIFT ADJUSTMENT Projection lens can be moved up, down . (Refer to page 23.) Use LENS SHIFT button and POINT LEFT/RIGHT button to move image up a projector, be careful not to hold or subject a lens to a Projector. This function makes it from any object. For installation, refer to installation manual supplied to strong forces. And be sure to replace...

Owners Manual
Page 11
... Guide to fit Plug into Socket. 4 Tighten screws to arrange desired combinations of input sources just by holding handle. 3 Replace terminal. INPUT/OUTPUT TERMINALS 3 TERMINAL SLOTS (Factory set) SERIAL PORT IN SDI IN1 SDI IN2 SDI OUT SERIAL PORT OUT R/C JACK USB AUDIO OUT R L RESET (MONO) R/Pr G/Y B/Pb H/HV V AUDIO R L CONTROL PORT (MONO) DVI AUDIO CONTROL PORT R L (MONO) INPUT 4 INPUT 3 INPUT 2 INPUT 1 SDI Terminal 5 BNC Terminal DVI Terminal REPLACEMENT OF TERMINAL NOTE; NOTES ON ORDERING OR USING...
... Guide to fit Plug into Socket. 4 Tighten screws to arrange desired combinations of input sources just by holding handle. 3 Replace terminal. INPUT/OUTPUT TERMINALS 3 TERMINAL SLOTS (Factory set) SERIAL PORT IN SDI IN1 SDI IN2 SDI OUT SERIAL PORT OUT R/C JACK USB AUDIO OUT R L RESET (MONO) R/Pr G/Y B/Pb H/HV V AUDIO R L CONTROL PORT (MONO) DVI AUDIO CONTROL PORT R L (MONO) INPUT 4 INPUT 3 INPUT 2 INPUT 1 SDI Terminal 5 BNC Terminal DVI Terminal REPLACEMENT OF TERMINAL NOTE; NOTES ON ORDERING OR USING...

Owners Manual
Page 14
... IN2 SDI OUT INPUT 1 AUDIO OUT SERIAL PORT OUT R/C JACK USB AUDIO OUT R L RESET (MONO) R/Pr G/Y B/Pb H/HV V AUDIO R L CONTROL PORT (MONO) DVI AUDIO CONTROL PORT R L (MONO) INPUT 4 INPUT 3 INPUT 2 Terminals of a Projector MAC/VGA ADAPTER Audio Cable (stereo) ✽ Audio Input External Audio Equipment Audio Amplifier Audio Speaker (stereo) Switches of both a projector and external equipment should be disconnected from AC outlet. CONNECTING PROJECTOR CONNECTING TO COMPUTER Cables used for connection (✽ = Cables are not supplied with this projector...
... IN2 SDI OUT INPUT 1 AUDIO OUT SERIAL PORT OUT R/C JACK USB AUDIO OUT R L RESET (MONO) R/Pr G/Y B/Pb H/HV V AUDIO R L CONTROL PORT (MONO) DVI AUDIO CONTROL PORT R L (MONO) INPUT 4 INPUT 3 INPUT 2 Terminals of a Projector MAC/VGA ADAPTER Audio Cable (stereo) ✽ Audio Input External Audio Equipment Audio Amplifier Audio Speaker (stereo) Switches of both a projector and external equipment should be disconnected from AC outlet. CONNECTING PROJECTOR CONNECTING TO COMPUTER Cables used for connection (✽ = Cables are not supplied with this projector...

Owners Manual
Page 18
... using as Wired Remote Control. !2 POWER ON-OFF button Turns the projector on or off. (P22) !3 AUTO PC button Operates the Auto PC adjustment function. (P29) !4 NO SHOW button Turns the picture into black image. (P23) !5 MENU button Opens or closes the On-Screen Menu. (P20) !6 LENS SHIFT button Select LENS SHIFT function. (P23) !7 INPUT 1-4 buttons Select input source (INPUT 1-INPUT 4). (P25) !8 IMAGE button Selects image levels. (P32) !9 RESET switch Slide this switch to the "RESET" to this jack. e SCREEN button Select image screen. (P28) r ZOOM button Adjust...
... using as Wired Remote Control. !2 POWER ON-OFF button Turns the projector on or off. (P22) !3 AUTO PC button Operates the Auto PC adjustment function. (P29) !4 NO SHOW button Turns the picture into black image. (P23) !5 MENU button Opens or closes the On-Screen Menu. (P20) !6 LENS SHIFT button Select LENS SHIFT function. (P23) !7 INPUT 1-4 buttons Select input source (INPUT 1-INPUT 4). (P25) !8 IMAGE button Selects image levels. (P32) !9 RESET switch Slide this switch to the "RESET" to this jack. e SCREEN button Select image screen. (P28) r ZOOM button Adjust...

Owners Manual
Page 19
... MENU button IMAGE button RESET Operating Range Point Remote Control Unit toward projector (Receiver Window) whenever pressing any button. Two AA size batteries For correct polarity (+ and -), be sure battery terminals are in contact with water or liquid. G Do not expose Remote Control Unit to the ON. G If a battery has leaked on page 37.) 1 While pressing the MENU button, press the IMAGE button number of times corresponding to Code 8). This switching function prevents remote control...
... MENU button IMAGE button RESET Operating Range Point Remote Control Unit toward projector (Receiver Window) whenever pressing any button. Two AA size batteries For correct polarity (+ and -), be sure battery terminals are in contact with water or liquid. G Do not expose Remote Control Unit to the ON. G If a battery has leaked on page 37.) 1 While pressing the MENU button, press the IMAGE button number of times corresponding to Code 8). This switching function prevents remote control...

Owners Manual
Page 25
... When connect a computer output [5 BNC Type (Red, Green, Blue, Horiz. RGB(AV HDCP) If a HDCP-compatible signal source is delivered by Digital Content Protection, LLC. HDCP (High-bandwidth Digital Content Protection) is a system for protecting digital entertainment content which is connected to INPUT 3 (ANALOG) terminal, select RGB(Scart). MENU OPERATION 1 Press MENU button and ON-SCREEN MENU will appear. Sync and Vert. Sync.)] from video equipment to INPUT 3 (DIGITAL...
... When connect a computer output [5 BNC Type (Red, Green, Blue, Horiz. RGB(AV HDCP) If a HDCP-compatible signal source is delivered by Digital Content Protection, LLC. HDCP (High-bandwidth Digital Content Protection) is a system for protecting digital entertainment content which is connected to INPUT 3 (ANALOG) terminal, select RGB(Scart). MENU OPERATION 1 Press MENU button and ON-SCREEN MENU will appear. Sync and Vert. Sync.)] from video equipment to INPUT 3 (DIGITAL...
Owners Manual
Page 26
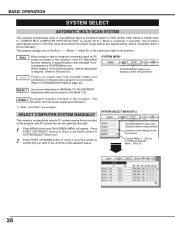
..., this projector, Auto PC Adjustment function operates to adjust projector and message "Auto" is set manually.) The projector displays one of the Auto, -----, Mode 1 ~ Mode 20, or the system provided in the Mode 1-20. Mode 1 User preset adjustment in this projector automatically tunes to incoming signal and projects the proper image without any special setting. (Some computers need to be selected. Auto ---- BASIC OPERATION SYSTEM SELECT AUTOMATIC MULTI-SCAN SYSTEM This projector...
..., this projector, Auto PC Adjustment function operates to adjust projector and message "Auto" is set manually.) The projector displays one of the Auto, -----, Mode 1 ~ Mode 20, or the system provided in the Mode 1-20. Mode 1 User preset adjustment in this projector automatically tunes to incoming signal and projects the proper image without any special setting. (Some computers need to be selected. Auto ---- BASIC OPERATION SYSTEM SELECT AUTOMATIC MULTI-SCAN SYSTEM This projector...
Owners Manual
Page 34
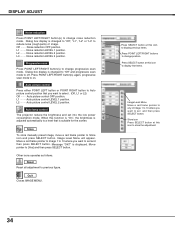
... 2 position. L2 Auto picture control LEVEL 2 position. When this icon to display previous items. Press POINT LEFT/RIGHT buttons to change position. Store icon Press SELECT button at this function is "On", the brightness is adjusted automatically to a level that you want to set and then press SELECT button. Dialog box display is suitable for the screen. is changed to "Off" and progressive scan mode to off...
... 2 position. L2 Auto picture control LEVEL 2 position. When this icon to display previous items. Press POINT LEFT/RIGHT buttons to change position. Store icon Press SELECT button at this function is "On", the brightness is adjusted automatically to a level that you want to set and then press SELECT button. Dialog box display is suitable for the screen. is changed to "Off" and progressive scan mode to off...

Owners Manual
Page 35
... turned off ?" Display This function decides whether to page 11. message G P-TIMER G "No signal" message G "Wait a moment" message Move a pointer to item Optional Control Number and then press POINT Refer to display On-Screen Displays. Double ··· Shows double size the On-Screen Displays. 35 When pressing SELECT button at Language, Language Menu appears. To change over Lamp Mode 1. Press POINT LEFT/RIGHT buttons to display On-Screen Displays...
... turned off ?" Display This function decides whether to page 11. message G P-TIMER G "No signal" message G "Wait a moment" message Move a pointer to item Optional Control Number and then press POINT Refer to display On-Screen Displays. Double ··· Shows double size the On-Screen Displays. 35 When pressing SELECT button at Language, Language Menu appears. To change over Lamp Mode 1. Press POINT LEFT/RIGHT buttons to display On-Screen Displays...

Owners Manual
Page 37
... "TURNING OFF PROJECTOR" on just by connecting AC Power cord to 30 minutes). To change the Remote control code of times corresponding to each remote control code number. (Refer to Code 8). The factory default settings for the time being input or the projector is elapsed, the lamp will be switched off and lamp cooling starts. If "Ready" is selected 2) When the set time is equipped with a power management function. Use the POINT LEFT/RIGHT button(s) to select the power management function mode...
... "TURNING OFF PROJECTOR" on just by connecting AC Power cord to 30 minutes). To change the Remote control code of times corresponding to each remote control code number. (Refer to Code 8). The factory default settings for the time being input or the projector is elapsed, the lamp will be switched off and lamp cooling starts. If "Ready" is selected 2) When the set time is equipped with a power management function. Use the POINT LEFT/RIGHT button(s) to select the power management function mode...

Owners Manual
Page 38
... then press SELECT button. SETTING Key lock This function locks the operation of the projector's control panel and the remote control. This cancels the Key lock function. If the projector's control panel accidentally becomes locked and you do not have the remote control nearby, turn the MAIN ON/OFF switch to ON again. Message "Lamp replace counter Reset?" Do not reset Lamp Replace Counter except after Projection lamp is displayed. is replaced. Another confirmation dialog box appears and...
... then press SELECT button. SETTING Key lock This function locks the operation of the projector's control panel and the remote control. This cancels the Key lock function. If the projector's control panel accidentally becomes locked and you do not have the remote control nearby, turn the MAIN ON/OFF switch to ON again. Message "Lamp replace counter Reset?" Do not reset Lamp Replace Counter except after Projection lamp is displayed. is replaced. Another confirmation dialog box appears and...
Owners Manual
Page 43
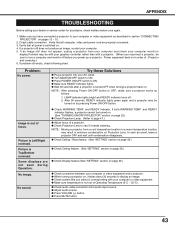
... power cord are not seen during Operation. Verify that all power is switched on. 4. Problem: No power. G Press POWER ON/OFF switch to see if it takes about 30 seconds to turn a computer and monitor off . 2. LAMP indicator lights bright and READY indicator turns off before you have connected a projector to a warm temperature location may result in moisture condensation on by pressing Power ON-OFF button. Picture...
... power cord are not seen during Operation. Verify that all power is switched on. 4. Problem: No power. G Press POWER ON/OFF switch to see if it takes about 30 seconds to turn a computer and monitor off . 2. LAMP indicator lights bright and READY indicator turns off before you have connected a projector to a warm temperature location may result in moisture condensation on by pressing Power ON-OFF button. Picture...
Owners Manual
Page 44
... 43-44. APPENDIX Problem: Remote Control Unit does not work properly, see "TROUBLESHOOTING" section on the nameplate means the product is Listed by Underwriters Laboratories Inc. G Check transmitted signal mode from Remote Control Unit. (See "SETTING" section on page 37.) SERVICE WARNING: High voltages are not too far from a projector when using Remote Control Unit. If a projector fails to operate this projector. G Make sure you purchased unit...
... 43-44. APPENDIX Problem: Remote Control Unit does not work properly, see "TROUBLESHOOTING" section on the nameplate means the product is Listed by Underwriters Laboratories Inc. G Check transmitted signal mode from Remote Control Unit. (See "SETTING" section on page 37.) SERVICE WARNING: High voltages are not too far from a projector when using Remote Control Unit. If a projector fails to operate this projector. G Make sure you purchased unit...

Owners Manual
Page 47
.../Off Language Lamp mode Blue back Display Menu size Menu position Logo Ceiling Rear Power management On start Remote control code Key lock Lamp counter reset Factory default Quit English German French Italian Spanish Portuguese Dutch Swedish Russian Chinese Korean Japanese Quit 4 Lamp/2 Lamp On/Off On/Off Normal/Double On/Off On/Off On/Off Off/Ready/Shut down 1 ~ 30 minutes Quit On/Off Code 1 Code 2 Code 3 Code 4 Code 5 Code 6 Code 7 Code 8 Quit Off Control panel Remote control Lamp...
.../Off Language Lamp mode Blue back Display Menu size Menu position Logo Ceiling Rear Power management On start Remote control code Key lock Lamp counter reset Factory default Quit English German French Italian Spanish Portuguese Dutch Swedish Russian Chinese Korean Japanese Quit 4 Lamp/2 Lamp On/Off On/Off Normal/Double On/Off On/Off On/Off Off/Ready/Shut down 1 ~ 30 minutes Quit On/Off Code 1 Code 2 Code 3 Code 4 Code 5 Code 6 Code 7 Code 8 Quit Off Control panel Remote control Lamp...

