E70fB, E70fSB User Guide, English
Page 2
Content Compliance Information 1 Copyright Information 2 Product Registration 2 Geeting Started Package Contents ...3 Precautions ...3 Quick Installation ...4 Using the Monitor Setting the Timing Mode 5 Adjusting the Screen Image 6 OSD Lock Settings 7 Main Menu Controls 8 Other Information Specifications ...10 Troubleshooting...11 Cusomer Support...12 Cleaning the Monitor 13 Limited Warranty ...14 ViewSonic E70fB/E70fSB i
Content Compliance Information 1 Copyright Information 2 Product Registration 2 Geeting Started Package Contents ...3 Precautions ...3 Quick Installation ...4 Using the Monitor Setting the Timing Mode 5 Adjusting the Screen Image 6 OSD Lock Settings 7 Main Menu Controls 8 Other Information Specifications ...10 Troubleshooting...11 Cusomer Support...12 Cleaning the Monitor 13 Limited Warranty ...14 ViewSonic E70fB/E70fSB i
E70fB, E70fSB User Guide, English
Page 5
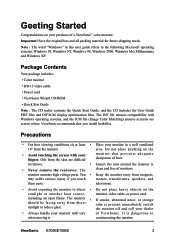
...-15 video cable • Power cord • ViewSonic Wizard CD-ROM • Quick Star Guide Note : The CD jacket contains the Quick Start Guide, and the CD includes the User Guide PDF files and INF/ICM display optimization files. Do not place anything on the • Avoid touching the screen with your monitor with Windows operating systems, and the ICM file (Image Color Matching) ensures accurate onscreen colors. including an open flame...
...-15 video cable • Power cord • ViewSonic Wizard CD-ROM • Quick Star Guide Note : The CD jacket contains the Quick Start Guide, and the CD includes the User Guide PDF files and INF/ICM display optimization files. Do not place anything on the • Avoid touching the screen with your monitor with Windows operating systems, and the ICM file (Image Color Matching) ensures accurate onscreen colors. including an open flame...
E70fB, E70fSB User Guide, English
Page 6
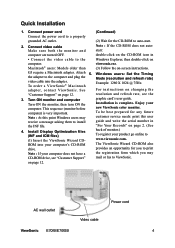
... your new ViewSonic color monitor. on page 2. (See 4. Quick Installation 1. G3 require a Macintosh adapter. resolution and refresh rate, see "Customer Support" mail or fax to the computer and plug the Mode (resolution and refresh rate) video cable into your computer does not have a the registration form which you to www.viewsonic.com. Connect power cord (Continued) Connect the power cord to a properly grounded AC outlet. (2) Wait for you may customer service needs: print this point Windows users may...
... your new ViewSonic color monitor. on page 2. (See 4. Quick Installation 1. G3 require a Macintosh adapter. resolution and refresh rate, see "Customer Support" mail or fax to the computer and plug the Mode (resolution and refresh rate) video cable into your computer does not have a the registration form which you to www.viewsonic.com. Connect power cord (Continued) Connect the power cord to a properly grounded AC outlet. (2) Wait for you may customer service needs: print this point Windows users may...

E70fB, E70fSB User Guide, English
Page 7
... screen image and minimizing eye strain. Click the Settings tab. 4. example 85 Hz). Note : The refresh rate should already be set the Resolution: 1. After setting the timing mode, use the OnView® controls to adjust the screen image. Click Properties on the Windows desktop. 2. ViewSonic E70fB/E70fSB 5 To set if you have done the CD installation (or refer to : VESA 1024 x 768 @ 85 Hz. Right-click on the drop-down menu...
... screen image and minimizing eye strain. Click the Settings tab. 4. example 85 Hz). Note : The refresh rate should already be set the Resolution: 1. After setting the timing mode, use the OnView® controls to adjust the screen image. Click Properties on the Windows desktop. 2. ViewSonic E70fB/E70fSB 5 To set if you have done the CD installation (or refer to : VESA 1024 x 768 @ 85 Hz. Right-click on the drop-down menu...
E70fB, E70fSB User Guide, English
Page 8
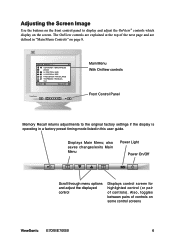
... and are defined in this user guide. Also, toggles between pairs of controls). also saves changes/exits Main Menu Power Light Power On/Off Scroll through menu options and adjust the displayed control Displays control screen for highlighted control (or pair of controls on page 8. Adjusting the Screen Image Use the buttons on the front control panel to the original factory settings if the display is operating in a factory preset timing mode listed in "Main Menu Controls" on some control screens ViewSonic E70fB/E70fSB 6 POSITION / SIZE V.
... and are defined in this user guide. Also, toggles between pairs of controls). also saves changes/exits Main Menu Power Light Power On/Off Scroll through menu options and adjust the displayed control Displays control screen for highlighted control (or pair of controls on page 8. Adjusting the Screen Image Use the buttons on the front control panel to the original factory settings if the display is operating in a factory preset timing mode listed in "Main Menu Controls" on some control screens ViewSonic E70fB/E70fSB 6 POSITION / SIZE V.
E70fB, E70fSB User Guide, English
Page 9
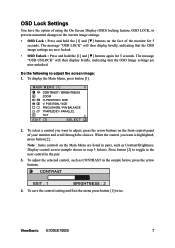
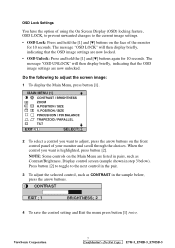
... message "OSD LOCK" will then display briefly, indicating that the OSD image settings are now unlocked. MAIN MENU (1) CONTRAST / BRIGHTNESS ZOOM H. When the control you want is highlighted, press button [2]. To adjust the selected control, such as Contrast/Brightness. CONTRAST EXIT : 1 BRIGHTNESS : 2 4. Display control screen (sample shown in step 3 below , press the arrow buttons. ViewSonic E70fB/E70fSB 7 Do the following to the next control in the sample below ). POSITION / SIZE V. POSITION / SIZE PINCUSHION / PIN BALANCE TRAPEZOID / PARALLEL TILT EXIT...
... message "OSD LOCK" will then display briefly, indicating that the OSD image settings are now unlocked. MAIN MENU (1) CONTRAST / BRIGHTNESS ZOOM H. When the control you want is highlighted, press button [2]. To adjust the selected control, such as Contrast/Brightness. CONTRAST EXIT : 1 BRIGHTNESS : 2 4. Display control screen (sample shown in step 3 below , press the arrow buttons. ViewSonic E70fB/E70fSB 7 Do the following to the next control in the sample below ). POSITION / SIZE V. POSITION / SIZE PINCUSHION / PIN BALANCE TRAPEZOID / PARALLEL TILT EXIT...

E70fB, E70fSB User Guide, English
Page 10
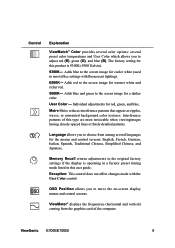
... vertical edges of the screen image to degauss the display: automatically by turning the monitor on, or manually by using the up and down . Tilt rotates the entire screen image. There are parallel. Horizontal Size adjusts width of the screen image. Parallel slants the vertical edges of screen images. With Degauss selected from the menu. ViewSonic E70fB/E70fSB 8 Main Menu Controls Adjust the menu items shown below by selecting the Degauss control from the menu, press button [2] to the display...
... vertical edges of the screen image to degauss the display: automatically by turning the monitor on, or manually by using the up and down . Tilt rotates the entire screen image. There are parallel. Horizontal Size adjusts width of the screen image. Parallel slants the vertical edges of screen images. With Degauss selected from the menu. ViewSonic E70fB/E70fSB 8 Main Menu Controls Adjust the menu items shown below by selecting the Degauss control from the menu, press button [2] to the display...
E70fB, E70fSB User Guide, English
Page 11
...- ViewSonic E70fB/E70fSB 9 Memory Recall returns adjustments to the screen image for a darker color. ViewMeter® displays the frequencies (horizontal and vertical) coming from among several preset color temperatures and User Color which allows you to the screen image for warmer white and richer red. 5000K- Adds blue and green to move the on-screen display menus and control screens. The factory setting for red, green, and blue. Individual adjustments for this product is operating in a factory preset timing mode listed...
...- ViewSonic E70fB/E70fSB 9 Memory Recall returns adjustments to the screen image for a darker color. ViewMeter® displays the frequencies (horizontal and vertical) coming from among several preset color temperatures and User Color which allows you to the screen image for warmer white and richer red. 5000K- Adds blue and green to move the on-screen display menus and control screens. The factory setting for red, green, and blue. Individual adjustments for this product is operating in a factory preset timing mode listed...

E70fB, E70fSB User Guide, English
Page 12
... adapter. Macintosh models prior to provide the product serial number. To order a ViewSonic® Macintosh adapter, contact Customer Support. Other Information Specifications CRT Input Signal Compatibility Resolution Power Display Area Operating Conditions Storage Conditions Dimensions Weight Regulations Power Consumption Modes Type Dot Pitch Phosphor Glass suface Video Sync PC Macintosh1 Recommended and supported Voltage Default Full scan Temperature Humidity Altitude Temperature Humidity Altitude Physical (monitor) Net On Sleep Off 17"(16...
... adapter. Macintosh models prior to provide the product serial number. To order a ViewSonic® Macintosh adapter, contact Customer Support. Other Information Specifications CRT Input Signal Compatibility Resolution Power Display Area Operating Conditions Storage Conditions Dimensions Weight Regulations Power Consumption Modes Type Dot Pitch Phosphor Glass suface Video Sync PC Macintosh1 Recommended and supported Voltage Default Full scan Temperature Humidity Altitude Temperature Humidity Altitude Physical (monitor) Net On Sleep Off 17"(16...
E70fB, E70fSB User Guide, English
Page 13
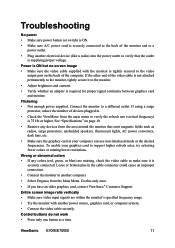
...; Make sure the video cable supplied with another power source, graphics card, or computer system. • Connect the video cable securely. See "Specifications" on the back of the computer. Entire screen image rolls vertically • Make sure video input signals are missing, check the video cable to make sure it to the monitor. • Adjust brightness and contrast. • Verify whether an adapter is tightly secured to the video output port on page 10. • Remove any colors (red, green...
...; Make sure the video cable supplied with another power source, graphics card, or computer system. • Connect the video cable securely. See "Specifications" on the back of the computer. Entire screen image rolls vertically • Make sure video input signals are missing, check the video cable to make sure it to the monitor. • Adjust brightness and contrast. • Verify whether an adapter is tightly secured to the video output port on page 10. • Remove any colors (red, green...
E70fB, E70fSB User Guide, English
Page 16
... for the first consumer purchaser. To obtain warranted service, you . If a product proves to follow instructions supplied with a like product. Any other rights which the serial number has been defaced, modified or removed. 2. Damage to get service: 1. Limited Warranty VIEWSONIC® CRT MONITORS What the warranty covers: ViewSonic® warrants its sole option repair or replace the product with the product.
... for the first consumer purchaser. To obtain warranted service, you . If a product proves to follow instructions supplied with a like product. Any other rights which the serial number has been defaced, modified or removed. 2. Damage to get service: 1. Limited Warranty VIEWSONIC® CRT MONITORS What the warranty covers: ViewSonic® warrants its sole option repair or replace the product with the product.
Service Manual
Page 4
... the plug. 4-2 Turn the CRT display power switch "on". 4-3 Measure the resistance value with an ohmmeter between the jumpered AC plug and each exposed metallic part and a good earth ground (as a result of the high voltage used in the high voltage circuit. When the exposed metallic part has a return path to service or repair the product or products dealt within this check. 5-2 Connect a 1500...
... the plug. 4-2 Turn the CRT display power switch "on". 4-3 Measure the resistance value with an ohmmeter between the jumpered AC plug and each exposed metallic part and a good earth ground (as a result of the high voltage used in the high voltage circuit. When the exposed metallic part has a return path to service or repair the product or products dealt within this check. 5-2 Connect a 1500...
Service Manual
Page 5
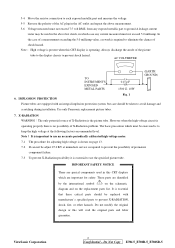
... installation. Always discharge the anode of X-Radiation problem. AC VOLTMETER TO INSTRUMENT'S EXPOSED METAL PARTS 0.15 F 1500 10W (EARTH GROUND) 6. These parts are equipped with manufacture's specified parts to prevent X-RADIATION, shock, fire, or other hazards. ViewSonic Corporation 2 Confidential - Do Not Copy E70f-5_E70fB-5_E70fSB-5 Use only Panasonic replacement picture tubes. 7. Note: High voltage is present when this CRT display...
... installation. Always discharge the anode of X-Radiation problem. AC VOLTMETER TO INSTRUMENT'S EXPOSED METAL PARTS 0.15 F 1500 10W (EARTH GROUND) 6. These parts are equipped with manufacture's specified parts to prevent X-RADIATION, shock, fire, or other hazards. ViewSonic Corporation 2 Confidential - Do Not Copy E70f-5_E70fB-5_E70fSB-5 Use only Panasonic replacement picture tubes. 7. Note: High voltage is present when this CRT display...

Service Manual
Page 8
... your signal system device and lock both screws on the desired operation and plug the power cord into a convenient AC outlet. ViewSonic Corporation 5 Confidential - DESCRIPTION RED GREEN BLUE GND GND GND-R GND-G GND-B 9. 5V From PC 10. SYNC 14. Connect the 15-pin color display shielded signal cable to ensure firm grounding. This monitor has power saving function following the VESA DPMS. Be sure to connect the signal cable to the "ON" position and...
... your signal system device and lock both screws on the desired operation and plug the power cord into a convenient AC outlet. ViewSonic Corporation 5 Confidential - DESCRIPTION RED GREEN BLUE GND GND GND-R GND-G GND-B 9. 5V From PC 10. SYNC 14. Connect the 15-pin color display shielded signal cable to ensure firm grounding. This monitor has power saving function following the VESA DPMS. Be sure to connect the signal cable to the "ON" position and...

Service Manual
Page 9
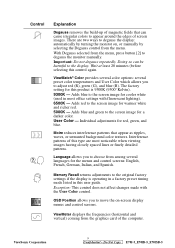
... Panel Function Control Description Adjusting the Screen Image Use the buttons on the front control panel to the original factory settings if the display is operating in a factory preset timing mode listed in "Main Menu Controls" on page 8. The OnView controls are explained at the top of the next page and are defined in this user guide. also saves changes/exits Main Menu Power Light Power On/Off Scroll through menu options and adjust the displayed control Displays control screen for highlighted control...
... Panel Function Control Description Adjusting the Screen Image Use the buttons on the front control panel to the original factory settings if the display is operating in a factory preset timing mode listed in "Main Menu Controls" on page 8. The OnView controls are explained at the top of the next page and are defined in this user guide. also saves changes/exits Main Menu Power Light Power On/Off Scroll through menu options and adjust the displayed control Displays control screen for highlighted control...
Service Manual
Page 10
..., such as CONTRAST in the sample below ). ViewSonic Corporation 7 Confidential - BRIGHTNESS 4 To save the control setting and Exit the menu press button [1] twice. Do the following to adjust the screen image: 1 To display the Main Menu, press button [1]. 2 To select a control you want to adjust, press the arrow buttons on the face of the monitor for 10 seconds. NOTE: Some controls on the Main Menu are now locked. • OSD Unlock: Press and...
..., such as CONTRAST in the sample below ). ViewSonic Corporation 7 Confidential - BRIGHTNESS 4 To save the control setting and Exit the menu press button [1] twice. Do the following to adjust the screen image: 1 To display the Main Menu, press button [1]. 2 To select a control you want to adjust, press the arrow buttons on the face of the monitor for 10 seconds. NOTE: Some controls on the Main Menu are now locked. • OSD Unlock: Press and...
Service Manual
Page 12
... a factory preset timing mode listed in most noticeable when viewing images having closely spaced lines or finely detailed patterns. Adds blue and green to degauss the monitor manually. Moire reduces interference patterns that can be harmful to the screen image for a darker color. OSD Position allows you to move the on , or manually by selecting the Degauss control from the menu, press button [2] to the screen image for cooler white (used...
... a factory preset timing mode listed in most noticeable when viewing images having closely spaced lines or finely detailed patterns. Adds blue and green to degauss the monitor manually. Moire reduces interference patterns that can be harmful to the screen image for a darker color. OSD Position allows you to move the on , or manually by selecting the Degauss control from the menu, press button [2] to the screen image for cooler white (used...

Service Manual
Page 13
.... Pin12 is displaying characters or windows. On Screen Display Controller The IC801 is enabled. dog timer preventing system from micro controller to output the OSD (B.G.R) video signal. When no signal input, the Pin32 will output a 48KHz H-SYNC free run signal. 4. Pin5 is used to cut off external R.G.B signals of VGA while this pin to internal display registers and control registers Pin8 the clock-input pin is input the horizontal fly back pulse...
.... Pin12 is displaying characters or windows. On Screen Display Controller The IC801 is enabled. dog timer preventing system from micro controller to output the OSD (B.G.R) video signal. When no signal input, the Pin32 will output a 48KHz H-SYNC free run signal. 4. Pin5 is used to cut off external R.G.B signals of VGA while this pin to internal display registers and control registers Pin8 the clock-input pin is input the horizontal fly back pulse...

Service Manual
Page 18
...°K white Balance, May follow step A-B, with character full page. Adjust brightness to center and contrast to observe their respective color purity. This is done by moving the two tabs in such a manner that the spacing between the two tabs of the 6-pole magnets. Check the complete blue and complete green patterns to max. Make minor adjustments if needed. Horizontal red and blue lines...
...°K white Balance, May follow step A-B, with character full page. Adjust brightness to center and contrast to observe their respective color purity. This is done by moving the two tabs in such a manner that the spacing between the two tabs of the 6-pole magnets. Check the complete blue and complete green patterns to max. Make minor adjustments if needed. Horizontal red and blue lines...

Service Manual
Page 103
... & Processes (marc.maupin@viewsonic.com) ViewSonic Corporation 100 Confidential - Assessment A. Front Panel Function Control Description 4. * Reader's Response* Dear Readers: Thank you in the USA at facsimile 1-909-839-7943. Precautions and Safety Notices 2. Troubleshooting Flow Chart 7. Block Diagrams 10. Service Manual Content 2. Item Excellent Good Fair Bad 1. Specification 3. Recommended Spare Parts List 8. Exploded Diagram and Exploded Parts List 9. Circuit Description 5. Adjustment Procedure 6. Are...
... & Processes (marc.maupin@viewsonic.com) ViewSonic Corporation 100 Confidential - Assessment A. Front Panel Function Control Description 4. * Reader's Response* Dear Readers: Thank you in the USA at facsimile 1-909-839-7943. Precautions and Safety Notices 2. Troubleshooting Flow Chart 7. Block Diagrams 10. Service Manual Content 2. Item Excellent Good Fair Bad 1. Specification 3. Recommended Spare Parts List 8. Exploded Diagram and Exploded Parts List 9. Circuit Description 5. Adjustment Procedure 6. Are...


