
English Owners Manual
Page 4
... Information 32 Deleting Caller Information 32 Adding Caller ID Information to the Address Book 32 Dialing From the Caller ID Menu 32 Using Your Phone 33 Receiving Calls 33 Making Calls 33 Storing Memory Numbers (H/O 200 34 Erasing a Stored Number (H/O 200 34 Dialing Memory Numbers (H/O ...200 34 Chain Dialing (H/O 200 34 Redialing the last Number Called (H/O 200 35 Using Your Phone With Call Waiting (H/O 100 and H/O 200 35 Paging the Handset (H/O 200 35 Changing Channels (H/O 200 35 Changing the Handset Ring Type and Ring ...
... Information 32 Deleting Caller Information 32 Adding Caller ID Information to the Address Book 32 Dialing From the Caller ID Menu 32 Using Your Phone 33 Receiving Calls 33 Making Calls 33 Storing Memory Numbers (H/O 200 34 Erasing a Stored Number (H/O 200 34 Dialing Memory Numbers (H/O ...200 34 Chain Dialing (H/O 200 34 Redialing the last Number Called (H/O 200 35 Using Your Phone With Call Waiting (H/O 100 and H/O 200 35 Paging the Handset (H/O 200 35 Changing Channels (H/O 200 35 Changing the Handset Ring Type and Ring ...
English Owners Manual
Page 9
The Cordless Home Organizer helps keep track of your H/O 100/200 , contact Uniden at www.uniden.com 6 Or, visit our web site at 888-777-2947. Introduction Congratulations on the purchase of all your family functions with features like these: t 900 MHz Cordless Phone t Electronic Calendar t Caller ID t Speakerphone t Dual Keypad t Electronic Notepad t Easy-to-Use Menu System t Electronic Address book t QWERTY Keyboard t Large Flip-top LCD Screen For assistance with set up, or any other questions regarding your new H/O 100/200 Home Organizer.
The Cordless Home Organizer helps keep track of your H/O 100/200 , contact Uniden at www.uniden.com 6 Or, visit our web site at 888-777-2947. Introduction Congratulations on the purchase of all your family functions with features like these: t 900 MHz Cordless Phone t Electronic Calendar t Caller ID t Speakerphone t Dual Keypad t Electronic Notepad t Easy-to-Use Menu System t Electronic Address book t QWERTY Keyboard t Large Flip-top LCD Screen For assistance with set up, or any other questions regarding your new H/O 100/200 Home Organizer.
English Owners Manual
Page 10
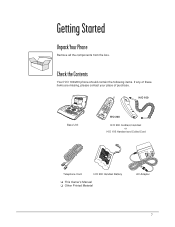
Getting Started Unpack Your Phone Remove all the components from the box. H/O 100 Base Unit H/O 200 H/O 200 Cordless Handset or H/O 100 Handset and Coiled Cord Telephone Cord H/O 200 Handset Battery t This Owner's Manual t Other Printed Material AC Adapter 7 Check the Contents Your H/O 100/200 phone should contain the following items. If any of these items are missing, please contact your place of purchase.
Getting Started Unpack Your Phone Remove all the components from the box. H/O 100 Base Unit H/O 200 H/O 200 Cordless Handset or H/O 100 Handset and Coiled Cord Telephone Cord H/O 200 Handset Battery t This Owner's Manual t Other Printed Material AC Adapter 7 Check the Contents Your H/O 100/200 phone should contain the following items. If any of these items are missing, please contact your place of purchase.
English Owners Manual
Page 11
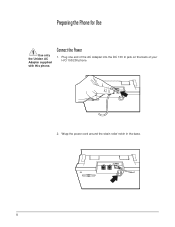
Wrap the power cord around the strain relief notch in the base. Connect the Power 1. Plug one end of the AC Adapter into the DC 13V In jack on the back of your H/O 100/200 phone LINE TEL DC 13V IN 2. LINE TEL DC 13V IN +- 8 Preparing the Phone for Use Use only the Uniden AC Adapter supplied with this phone.
Wrap the power cord around the strain relief notch in the base. Connect the Power 1. Plug one end of the AC Adapter into the DC 13V In jack on the back of your H/O 100/200 phone LINE TEL DC 13V IN 2. LINE TEL DC 13V IN +- 8 Preparing the Phone for Use Use only the Uniden AC Adapter supplied with this phone.
English Owners Manual
Page 12
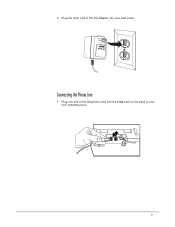
LINE TEL DC 13V IN +- 9 Connecting the Phone Line 1. Plug the other end of the AC Adapter into the Line Jack on the back of the telephone cord into your H/O 100/200 phone. 3. Plug one end of your wall outlet.
LINE TEL DC 13V IN +- 9 Connecting the Phone Line 1. Plug the other end of the AC Adapter into the Line Jack on the back of the telephone cord into your H/O 100/200 phone. 3. Plug one end of your wall outlet.
English Owners Manual
Page 13
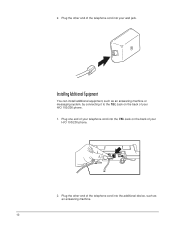
Installing Additional Equipment You can install additional equipment, such as an answering machine. 10 2. Plug the other end of the telephone cord into the additional device, such as an answering machine or messaging system, by connecting it to the TEL Jack on the back of your H/O 100/200 phone. Plug the other end of the telephone cord into the TEL Jack on the back of your telephone cord into your H/O 100/200 phone. 1. LINE TEL DC 13V IN +- 2. Plug one end of your wall jack.
Installing Additional Equipment You can install additional equipment, such as an answering machine. 10 2. Plug the other end of the telephone cord into the additional device, such as an answering machine or messaging system, by connecting it to the TEL Jack on the back of your H/O 100/200 phone. Plug the other end of the telephone cord into the TEL Jack on the back of your telephone cord into your H/O 100/200 phone. 1. LINE TEL DC 13V IN +- 2. Plug one end of your wall jack.
English Owners Manual
Page 16
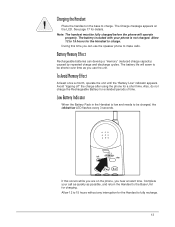
.... Also, do not charge the Rechargeable Battery for a short time. The battery included with your call as quickly as you use the speaker phone to be shorter over time as possible, and return the Handset to charge. Battery Memory Effect Rechargeable batteries can use the unit. To Avoid... this time you hear an alert tone. Allow 12 to 15 hours without any interruption for details. During this occurs while you are on the phone, you can develop a "memory" (reduced charge capacity) caused by repeated charge and discharge cycles. See page 17 for the Handset to charge....
.... Also, do not charge the Rechargeable Battery for a short time. The battery included with your call as quickly as you use the speaker phone to be shorter over time as possible, and return the Handset to charge. Battery Memory Effect Rechargeable batteries can use the unit. To Avoid... this time you hear an alert tone. Allow 12 to 15 hours without any interruption for details. During this occurs while you are on the phone, you can develop a "memory" (reduced charge capacity) caused by repeated charge and discharge cycles. See page 17 for the Handset to charge....
English Owners Manual
Page 20
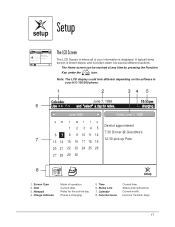
...21 22 23 24 25 26 27 28 29 30 8m setup 1. Status and instructions. Icons for the current day. Calendar 8. Phone is Charging 5. Note: The LCD display could look different depending on the software in your information is broken down into several different ...sections. Date 3. Charge Indicator Mode of your H/O 100/200 phone. 1 2 34 5 Calendar 6 June 7, 1999 10:55pm June 1999 Notes: June 7, 1999 sm t wt f s Dentist appointment 1 2 345 7:30 Dinner @ Grandma's 6 8...
...21 22 23 24 25 26 27 28 29 30 8m setup 1. Status and instructions. Icons for the current day. Calendar 8. Phone is Charging 5. Note: The LCD display could look different depending on the software in your information is broken down into several different ...sections. Date 3. Charge Indicator Mode of your H/O 100/200 phone. 1 2 34 5 Calendar 6 June 7, 1999 10:55pm June 1999 Notes: June 7, 1999 sm t wt f s Dentist appointment 1 2 345 7:30 Dinner @ Grandma's 6 8...
English Owners Manual
Page 21
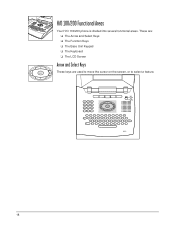
These are: t The Arrow and Select Keys t The Function Keys t The Base Unit Keypad t The Keyboard t The LCD Screen Arrow and Select Keys These keys are used to move the cursor on the screen, or to select a feature. 18 H/O 100/200 Functional Areas Your H/O 100/200 phone is divided into several functional areas.
These are: t The Arrow and Select Keys t The Function Keys t The Base Unit Keypad t The Keyboard t The LCD Screen Arrow and Select Keys These keys are used to move the cursor on the screen, or to select a feature. 18 H/O 100/200 Functional Areas Your H/O 100/200 phone is divided into several functional areas.
English Owners Manual
Page 23
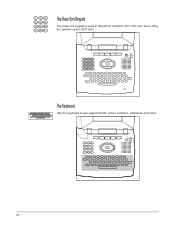
The Base Unit Keypad The base unit keypad is used to type appointments, phone numbers, addresses and notes. 20 The Keyboard Use the keyboard to dial phone numbers (H/O 100) and when using the speaker option (H/O 200).
The Base Unit Keypad The base unit keypad is used to type appointments, phone numbers, addresses and notes. 20 The Keyboard Use the keyboard to dial phone numbers (H/O 100) and when using the speaker option (H/O 200).
English Owners Manual
Page 24
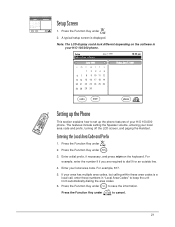
... on the keyboard. H 2. Enter your local area code and prefix, turning off the LCD screen, and paging the Handset. Setup Cordless phone is a local call, enter those numbers in your area has multiple area codes, but calling within these area codes is charging June 7, ... features include setting the Speaker volume, entering your local area code. Press the Function Key under . 2. For example, 817. 5. If your H/O 100/200 phone. For example, enter the number 9 if you are required to cancel. 21 h Press the Function Key under to dial 9 for an outside line. 4....
... on the keyboard. H 2. Enter your local area code and prefix, turning off the LCD screen, and paging the Handset. Setup Cordless phone is a local call, enter those numbers in your area has multiple area codes, but calling within these area codes is charging June 7, ... features include setting the Speaker volume, entering your local area code. Press the Function Key under . 2. For example, 817. 5. If your H/O 100/200 phone. For example, enter the number 9 if you are required to cancel. 21 h Press the Function Key under to dial 9 for an outside line. 4....
English Owners Manual
Page 25
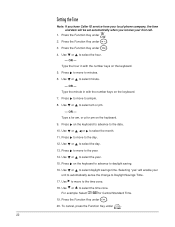
... > to move to am/pm. 8. To cancel, press the Function Key under . Setting the Time Note: If you have Caller ID service from your local phone company, the time and date will enable your first call. Use ; Press > to move to the year. 14. Press the Function Key under . Press > on...
... > to move to am/pm. 8. To cancel, press the Function Key under . Setting the Time Note: If you have Caller ID service from your local phone company, the time and date will enable your first call. Use ; Press > to move to the year. 14. Press the Function Key under . Press > on...

English Owners Manual
Page 26
B 1. Setting the Speaker Volume k 1. d 4. From the Setup Phone Screen press until the cursor is on or off . Use the left or right arrow keys to save the information. H 2. V 2. B 3. Press on the Base. Turn ... off when pressing the keys on and off , low, and high. Press the Function Key under to toggle between on the base. Exiting Phone Setup h To exit the Phone Setup Screen, press the Function Key under . Note: The LCD backlight automatically turns off after ten minutes if you the choice of turning...
B 1. Setting the Speaker Volume k 1. d 4. From the Setup Phone Screen press until the cursor is on or off . Use the left or right arrow keys to save the information. H 2. V 2. B 3. Press on the Base. Turn ... off when pressing the keys on and off , low, and high. Press the Function Key under to toggle between on the base. Exiting Phone Setup h To exit the Phone Setup Screen, press the Function Key under . Note: The LCD backlight automatically turns off after ten minutes if you the choice of turning...
English Owners Manual
Page 27
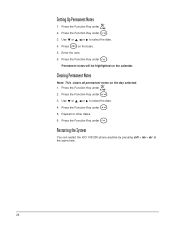
... ; w 4. d 6. Press the Function Key under . 3. or : < or > to select the date. Press the Function Key under . Restarting the System You can restart the H/O 100/200 phone anytime by pressing shift + tab + del at the same time. 24 Press the Function Key under . 5. Repeat for other dates. Press the Function Key under...
... ; w 4. d 6. Press the Function Key under . 3. or : < or > to select the date. Press the Function Key under . Restarting the System You can restart the H/O 100/200 phone anytime by pressing shift + tab + del at the same time. 24 Press the Function Key under . 5. Repeat for other dates. Press the Function Key under...
English Owners Manual
Page 28
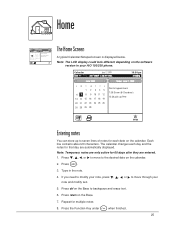
.... 5. If you need to modify your note, press ;, :, to move to the desired date on the Base. 7. Press . 3. Press ;, :, to move through your H/O 100/200 phone. Home < < < < Calendar June 7, 1999 10:50 pm sm t wt f s 1 2 345 6 8 9 10 11 12 13 14 15 16 17 18 19 20 21 22 23 24...
.... 5. If you need to modify your note, press ;, :, to move to the desired date on the Base. 7. Press . 3. Press ;, :, to move through your H/O 100/200 phone. Home < < < < Calendar June 7, 1999 10:50 pm sm t wt f s 1 2 345 6 8 9 10 11 12 13 14 15 16 17 18 19 20 21 22 23 24...
English Owners Manual
Page 30
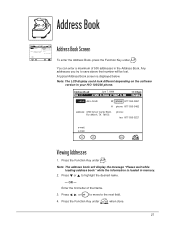
...The LCD display could look different depending on the software version in the Address Book. Press the Function Key under . Fort Worth, TX 76155 phone: fax: 817-555-3221 e-mail: e-mail: new edit erase Address Book Screen a To enter the Address Book, press the Function Key ...mail: new edit erase Viewing Addresses a 1. Note: The address book will be lost. Enter the first letter of 500 addresses in your H/O 100/200 phone. B 3. h 4. or : to save above that number will display the message "Please wait while loading address book" while the information is displayed below...
...The LCD display could look different depending on the software version in the Address Book. Press the Function Key under . Fort Worth, TX 76155 phone: fax: 817-555-3221 e-mail: e-mail: new edit erase Address Book Screen a To enter the Address Book, press the Function Key ...mail: new edit erase Viewing Addresses a 1. Note: The address book will be lost. Enter the first letter of 500 addresses in your H/O 100/200 phone. B 3. h 4. or : to save above that number will display the message "Please wait while loading address book" while the information is displayed below...

English Owners Manual
Page 31
Press ; e 3. Note: The field in front of the phone number can use H for (H)ome or W for (W)ork. Press del on the keyboard, or use < and > to move to the field you could use any ...
Press ; e 3. Note: The field in front of the phone number can use H for (H)ome or W for (W)ork. Press del on the keyboard, or use < and > to move to the field you could use any ...

English Owners Manual
Page 32
... highlight the desired entry. 3. Press the Function Key under to exit. Press the Function Key under when finished. l 5. N 2. Press on the keyboard to highlight the phone number. 4. Speed Dialing From the Address Book a 1. OR - h 6. or : to modify. 4. Pick up the handset and press the talk key. - Pick up handset - Press on...
... highlight the desired entry. 3. Press the Function Key under to exit. Press the Function Key under when finished. l 5. N 2. Press on the keyboard to highlight the phone number. 4. Speed Dialing From the Address Book a 1. OR - h 6. or : to modify. 4. Pick up the handset and press the talk key. - Pick up handset - Press on...
English Owners Manual
Page 34
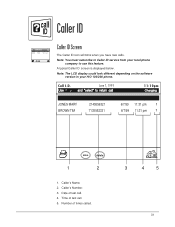
...The LCD display could look different depending on the software version in your local phone company to Caller ID service from your H/O 100/200 phone. Time of last call . 4. June 7, 1999 11:10pm UNIDEN CORP JONES MARY BROWN TIM 8175556162 2145556321 7135552331 4/7/97 11:31 pm 1 ... .D. Caller's Name. 2. Note: You must subscribe to use this feature. Date of times called. 3 4 5 31 Caller's Number. 3. June 7, 1999 11:10pm UNIDEN CORP JONES MARY BROWN TIM 8175556162 2145556321 7135552331 4/7/97 11:31 pm 6/7/99 11:31 pm 1 6/7/99 11:31 pm 1 save delete Caller ID Screen...
...The LCD display could look different depending on the software version in your local phone company to Caller ID service from your H/O 100/200 phone. Time of last call . 4. June 7, 1999 11:10pm UNIDEN CORP JONES MARY BROWN TIM 8175556162 2145556321 7135552331 4/7/97 11:31 pm 1 ... .D. Caller's Name. 2. Note: You must subscribe to use this feature. Date of times called. 3 4 5 31 Caller's Number. 3. June 7, 1999 11:10pm UNIDEN CORP JONES MARY BROWN TIM 8175556162 2145556321 7135552331 4/7/97 11:31 pm 6/7/99 11:31 pm 1 6/7/99 11:31 pm 1 save delete Caller ID Screen...

English Owners Manual
Page 35
... Note: If the area code is dialed. 32 Press ; l 4. The selected number is the same as yours, or it's entered in "Local Area, Codes," the phone will not dial the area code, only the last seven digits. Press ; Press the Function Key under . Press the Function Key under to the Address...
... Note: If the area code is dialed. 32 Press ; l 4. The selected number is the same as yours, or it's entered in "Local Area, Codes," the phone will not dial the area code, only the last seven digits. Press ; Press the Function Key under . Press the Function Key under to the Address...


