English Owners Manual
Page 2
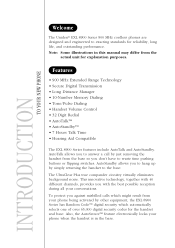
... waste time pushing buttons or flipping switches. To protect you against misbilled calls which might result from the base so you to the base. Features • 900 MHz Extended Range Technology • Secure Digital Transmission • Long Distance Manager • 10-Number Memory Dialing • Tone/Pulse Dialing • Handset Volume Control • 32 Digit Redial • AutoTalk™ • AutoStandby™ • 7 Hours Talk Time • Hearing Aid Compatible...
... waste time pushing buttons or flipping switches. To protect you against misbilled calls which might result from the base so you to the base. Features • 900 MHz Extended Range Technology • Secure Digital Transmission • Long Distance Manager • 10-Number Memory Dialing • Tone/Pulse Dialing • Handset Volume Control • 32 Digit Redial • AutoTalk™ • AutoStandby™ • 7 Hours Talk Time • Hearing Aid Compatible...
English Owners Manual
Page 5
... base unit 5 Mounting the base unit on a wall ...........8 Step 3: Charging the battery pack 10 Adjusting the volume control 12 Using your New Phone Making and receiving calls 13 Using the LDM (Long Distance Manager) ..........14 Storing a number in memory 15 Entering a pause in memory dialing 15 Storing mixed tone/pulse number 16 Dialing a stored number 16 Chain dialing 17 Erasing a stored number 17 Replacing a stored number 17 Selecting a different channel 18 Using the flash button 18 Mute 19 Page/find 19 Traveling out-of-range...
... base unit 5 Mounting the base unit on a wall ...........8 Step 3: Charging the battery pack 10 Adjusting the volume control 12 Using your New Phone Making and receiving calls 13 Using the LDM (Long Distance Manager) ..........14 Storing a number in memory 15 Entering a pause in memory dialing 15 Storing mixed tone/pulse number 16 Dialing a stored number 16 Chain dialing 17 Erasing a stored number 17 Replacing a stored number 17 Selecting a different channel 18 Using the flash button 18 Mute 19 Page/find 19 Traveling out-of-range...
English Owners Manual
Page 6
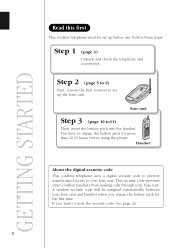
... the base unit. This security code prevents other cordless handsets from making calls through your base unit. GETTING STARTED Read this first This cordless telephone must be assigned automatically between your base unit and handset when you want to reset the security code, see page 20. 3 You have to your base unit. Step 1 (page 4) Unpack and check the telephone and accessories. Handset About the digital security code This cordless telephone uses a digital security code to prevent unauthorized access to charge the battery pack for the first time. Base unit...
... the base unit. This security code prevents other cordless handsets from making calls through your base unit. GETTING STARTED Read this first This cordless telephone must be assigned automatically between your base unit and handset when you want to reset the security code, see page 20. 3 You have to your base unit. Step 1 (page 4) Unpack and check the telephone and accessories. Handset About the digital security code This cordless telephone uses a digital security code to prevent unauthorized access to charge the battery pack for the first time. Base unit...

English Owners Manual
Page 7
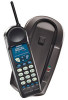
... or damaged, contact the Uniden Parts Department (see below). • Base unit • Handset • AC adapter (AD-420) • Rechargeable battery pack (BT-905) • Telephone line cord (2) • Wall mount adapter • This Owner's Manual • Precautions and Important Safety Instructions • Registration Card • Beltclip Uniden Parts Department (800) 554-3988 Hours: M-F 8:30 AM to 7:00 PM Central. Checking the package contents Make sure you have received the...
... or damaged, contact the Uniden Parts Department (see below). • Base unit • Handset • AC adapter (AD-420) • Rechargeable battery pack (BT-905) • Telephone line cord (2) • Wall mount adapter • This Owner's Manual • Precautions and Important Safety Instructions • Registration Card • Beltclip Uniden Parts Department (800) 554-3988 Hours: M-F 8:30 AM to 7:00 PM Central. Checking the package contents Make sure you have received the...
English Owners Manual
Page 8
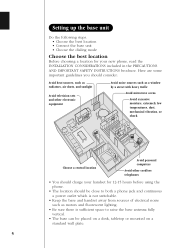
... mounted on a standard wall plate. 5 Setting up the base unit Do the following steps. • Choose the best location • Connect the base unit • Choose the dialing mode Choose the best location Before choosing a location for 12-15 hours before using the phone. • The location should be close to both a phone jack and continuous a power outlet which is not switchable. • Keep the base...
... mounted on a standard wall plate. 5 Setting up the base unit Do the following steps. • Choose the best location • Connect the base unit • Choose the dialing mode Choose the best location Before choosing a location for 12-15 hours before using the phone. • The location should be close to both a phone jack and continuous a power outlet which is not switchable. • Keep the base...
English Owners Manual
Page 9
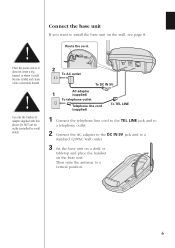
... TEL LINE 1 Connect the telephone line cord to the TEL LINE jack and to a telephone outlet. 2 Connect the AC adapter to the DC IN 9V jack and to a vertical position. 6 Route the cord. Then raise the antenna to a standard 120VAC wall outlet. 3 Set the base unit on a desk or tabletop and place the handset on the wall, see page 8. Use only the Uniden AC adapter supplied with this phone. Place the power cord so...
... TEL LINE 1 Connect the telephone line cord to the TEL LINE jack and to a telephone outlet. 2 Connect the AC adapter to the DC IN 9V jack and to a vertical position. 6 Route the cord. Then raise the antenna to a standard 120VAC wall outlet. 3 Set the base unit on a desk or tabletop and place the handset on the wall, see page 8. Use only the Uniden AC adapter supplied with this phone. Place the power cord so...

English Owners Manual
Page 13
... is properly Black alighned. Charge the battery for charging the battery. status LED 10 Red 3 Slide the battery cover forward until it snaps into the battery compartment. Use only the Uniden Battery pack (model BT-905) supplied with your phone. 1 Press the battery cover release. Make sure that the "status" LED of the base unit lights, and charging begins. The plastic connectors will fit together only one way. You...
... is properly Black alighned. Charge the battery for charging the battery. status LED 10 Red 3 Slide the battery cover forward until it snaps into the battery compartment. Use only the Uniden Battery pack (model BT-905) supplied with your phone. 1 Press the battery cover release. Make sure that the "status" LED of the base unit lights, and charging begins. The plastic connectors will fit together only one way. You...
English Owners Manual
Page 14
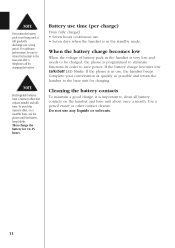
... the handset to the base unit after a telephone call for charging the battery. Cleaning the battery contacts To maintain a good charge, it will gradually discharge over a long period. Even when the battery pack is not being used, it is important to clean all battery contacts on a monthly basis, use the phone until the Battery lamp blinks. If the phone is programmed to eliminate functions in the standby mode. For...
... the handset to the base unit after a telephone call for charging the battery. Cleaning the battery contacts To maintain a good charge, it will gradually discharge over a long period. Even when the battery pack is not being used, it is important to clean all battery contacts on a monthly basis, use the phone until the Battery lamp blinks. If the phone is programmed to eliminate functions in the standby mode. For...

English Owners Manual
Page 15
... volume level you want . ª Handset ringer switch This switch turns the handset ringer on a call, press • or ª . 2 The phone has four earpiece volume levels, Normal, Medium, High and Loud. ringer off on ringer off on ª Setting the Handset Earpiece Volume 1 While you are on or off. Adjusting the volume control ª Ringer Tone and Volume 1 While the phone is not in use, press ringer . 2 The phone has two ringer tones...
... volume level you want . ª Handset ringer switch This switch turns the handset ringer on a call, press • or ª . 2 The phone has four earpiece volume levels, Normal, Medium, High and Loud. ringer off on ringer off on ª Setting the Handset Earpiece Volume 1 While you are on or off. Adjusting the volume control ª Ringer Tone and Volume 1 While the phone is not in use, press ringer . 2 The phone has two ringer tones...
English Owners Manual
Page 16
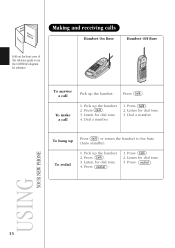
... this reference guide to the base (Auto standby). Listen for reference. USING YOUR NEW PHONE 13 Listen for dial tone. 3. Press talk . 2. Listen for dial tone. 3. Press talk . 2. Listen for dial tone. 4. Pick up the handset. 2. Press talk . 3. Pick up the handset. 2. Dial a number. Press redial . 1. Press talk . 1. To answer a call To make a call Pick up Press talk or return the handset to use the CONTROLS diagram for dial tone. 4. Press talk . 3. Dial a number. 1. To...
... this reference guide to the base (Auto standby). Listen for reference. USING YOUR NEW PHONE 13 Listen for dial tone. 3. Press talk . 2. Listen for dial tone. 3. Press talk . 2. Listen for dial tone. 4. Pick up the handset. 2. Press talk . 3. Pick up the handset. 2. Dial a number. Press redial . 1. Press talk . 1. To answer a call To make a call Pick up Press talk or return the handset to use the CONTROLS diagram for dial tone. 4. Press talk . 3. Dial a number. 1. To...
English Owners Manual
Page 17
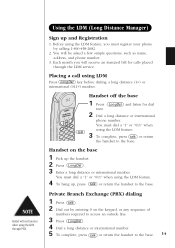
... register your phone by entering 9 on the base 1 Pick up and Registration 1. Using the LDM (Long Distance Manager) Sign up the handset 2 Press LongDst . 3 Enter a long distance or international number. Handset on the keypad, or any sequence of numbers required to access an outside line. 3 Press LongDst . 4 Dial a long distance or international number. 5 To complete, press talk or return the handset to the base. Placing a call using...
... register your phone by entering 9 on the base 1 Pick up and Registration 1. Using the LDM (Long Distance Manager) Sign up the handset 2 Press LongDst . 3 Enter a long distance or international number. Handset on the keypad, or any sequence of numbers required to access an outside line. 3 Press LongDst . 4 Dial a long distance or international number. 5 To complete, press talk or return the handset to the base. Placing a call using...
English Owners Manual
Page 18
... handset will beep rapidly and no number will sound. Entering a pause in lost savings. pause To use the LongDsktey for placing local calls, contacting your local phone company for repair or customer service, accessing emergency service or for the memory location you wish to store. Otherwise, an error tone will be charged at the applicable toll rate for the specific call. • Failure to use . Remember, the phone number...
... handset will beep rapidly and no number will sound. Entering a pause in lost savings. pause To use the LongDsktey for placing local calls, contacting your local phone company for repair or customer service, accessing emergency service or for the memory location you wish to store. Otherwise, an error tone will be charged at the applicable toll rate for the specific call. • Failure to use . Remember, the phone number...
English Owners Manual
Page 19
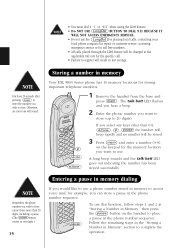
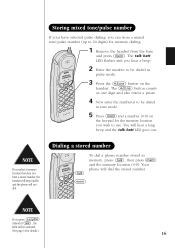
... a mixed tone/pulse number (up to be activated. (See page 14 for memory dialing. 1 Remove the handset from the base and press mem . Your phone will hear a long beep and the talk/batt LED goes out. talk mem If you hear a beep. 2 Enter the number to 20 digits) for details.) 16 The * /tone button counts as one digit and also enters a pause. 4 New enter the number(s) to use. If...
... a mixed tone/pulse number (up to be activated. (See page 14 for memory dialing. 1 Remove the handset from the base and press mem . Your phone will hear a long beep and the talk/batt LED goes out. talk mem If you hear a beep. 2 Enter the number to 20 digits) for details.) 16 The * /tone button counts as one digit and also enters a pause. 4 New enter the number(s) to use. If...

English Owners Manual
Page 20
... EXL 8900 Series phone has 10 memory locations, represented by the numbers (0-9) on the keypad. If you store a phone number in the same location later, the new number will replace the previous one of the access code at the appropriate time. Erasing a stored number 1 Remove the handset from the base. 2 Press mem twice. 3 Select the memory location number (0-9) you want to store a different number in one . 17 Chain dialing After dialing a number you...
... EXL 8900 Series phone has 10 memory locations, represented by the numbers (0-9) on the keypad. If you store a phone number in the same location later, the new number will replace the previous one of the access code at the appropriate time. Erasing a stored number 1 Remove the handset from the base. 2 Press mem twice. 3 Select the memory location number (0-9) you want to store a different number in one . 17 Chain dialing After dialing a number you...
English Owners Manual
Page 21
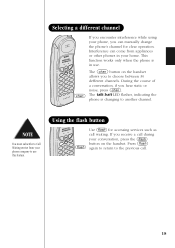
... to use . Using the flash button flash Use flash for clear operation. Interference can manually change the phone's channel for accessing services such as call waiting. The chan button on the handset. You must subscribe to Call Waiting service from appliances or other phones in use this feature. During the course of a conversation, if you hear static or noise, press chan . If you receive a call . 18 Selecting a different channel chan If you encounter interference while using your...
... to use . Using the flash button flash Use flash for clear operation. Interference can manually change the phone's channel for accessing services such as call waiting. The chan button on the handset. You must subscribe to Call Waiting service from appliances or other phones in use this feature. During the course of a conversation, if you hear static or noise, press chan . If you receive a call . 18 Selecting a different channel chan If you encounter interference while using your...
English Owners Manual
Page 23
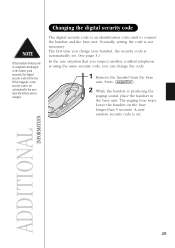
... suspect another cordless telephone is using the same security code, you charge your handset, the security code is automatically set automatically the next time the battery pack is completely discharged or the battery pack removed, the digital security code will be lost. ADDITIONAL INFORMATION 20 Changing the digital security code The digital security code is set. The first time you can change the code. 1 Remove the handset from the base unit. A new random security code is an identification code used to connect the handset and the base unit. Normally, setting the code is...
... suspect another cordless telephone is using the same security code, you charge your handset, the security code is automatically set automatically the next time the battery pack is completely discharged or the battery pack removed, the digital security code will be lost. ADDITIONAL INFORMATION 20 Changing the digital security code The digital security code is set. The first time you can change the code. 1 Remove the handset from the base unit. A new random security code is an identification code used to connect the handset and the base unit. Normally, setting the code is...

English Owners Manual
Page 25
...; Use the specified battery pack. • Do not remove the battery from the handset to charge it. • Never throw the battery into a fire, disassemble it, or heat it. • Do not remove or damage the battery casing. When the charging terminals become dirty Wipe with a pencil eraser or other chemical products. Power Failure During the period that the power is recharged, please replace...
...; Use the specified battery pack. • Do not remove the battery from the handset to charge it. • Never throw the battery into a fire, disassemble it, or heat it. • Do not remove or damage the battery casing. When the charging terminals become dirty Wipe with a pencil eraser or other chemical products. Power Failure During the period that the power is recharged, please replace...
English Owners Manual
Page 26
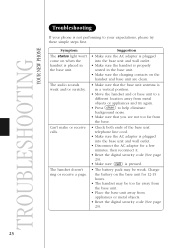
.... TROUBLESHOOTING YOUR NEW PHONE Troubleshooting If your phone is not performing to your expectations, please try again. • Press chan to a different location away from appliances or metal objects. • Reset the digital security code (See page 20). 23 Symptom The status light won't come on the handset and base unit are not too far from the base. • Check both ends of the base unit telephone line cord. • Make...
.... TROUBLESHOOTING YOUR NEW PHONE Troubleshooting If your phone is not performing to your expectations, please try again. • Press chan to a different location away from appliances or metal objects. • Reset the digital security code (See page 20). 23 Symptom The status light won't come on the handset and base unit are not too far from the base. • Check both ends of the base unit telephone line cord. • Make...
English Owners Manual
Page 27
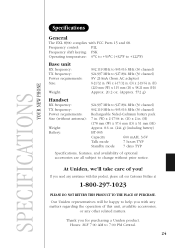
.../64 in. (H) (220 mm (W) x 115 mm (D) x 58.21 mm (H)) Approx. 20.2 oz. (Approx. 572 g) Handset RX frequency: TX frequency: Power requirements: Size (without antenna): Weight: Battery: 924.997 MHz to 927.894 MHz (30 channel) 902.119 MHz to 7:00 PM Central. 24 SPECIFICATIONS YOUR NEW PHONE Specifications General The EXL 8900 complies with this unit, available accessories, or any assistance with FCC Parts 15 and 68.
.../64 in. (H) (220 mm (W) x 115 mm (D) x 58.21 mm (H)) Approx. 20.2 oz. (Approx. 572 g) Handset RX frequency: TX frequency: Power requirements: Size (without antenna): Weight: Battery: 924.997 MHz to 927.894 MHz (30 channel) 902.119 MHz to 7:00 PM Central. 24 SPECIFICATIONS YOUR NEW PHONE Specifications General The EXL 8900 complies with this unit, available accessories, or any assistance with FCC Parts 15 and 68.

English Owners Manual
Page 28
... mode 7 Digital security code 3,20 E, F, G Earpiece volume 12 H Headset installation 21 I, J, K, L Installing the beltclip 21 Long Distant Manager 14 M, N, O Maintenance 22 Making a call 13 Memory dialing Chain dialing 17 Dialing a stored number...16 Entering a pause in memory dialing 15 Erasing a stored number 17 Replacing a stored number 17 Storing a number in memory 15 Storing mixed tone/pulse number............16 Mounting the base unit to a wall 8 Mute 19 P, Q Package contents 4 Page/find 19 R Receiving a call 13 Redialing a call 13 Handset ringer tone 12 S Setup Base...
... mode 7 Digital security code 3,20 E, F, G Earpiece volume 12 H Headset installation 21 I, J, K, L Installing the beltclip 21 Long Distant Manager 14 M, N, O Maintenance 22 Making a call 13 Memory dialing Chain dialing 17 Dialing a stored number...16 Entering a pause in memory dialing 15 Erasing a stored number 17 Replacing a stored number 17 Storing a number in memory 15 Storing mixed tone/pulse number............16 Mounting the base unit to a wall 8 Mute 19 P, Q Package contents 4 Page/find 19 R Receiving a call 13 Redialing a call 13 Handset ringer tone 12 S Setup Base...


