English Owner's Manual
Page 1
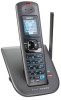
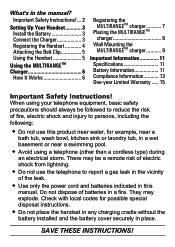
... or problem Customer Care Line* 817-858-2929 or 800-297-1023 need a part or accessory Parts Department* 800-554-3988 need special assistance Accessibility Help due to a disability Line 800-874-9314 (voice or TTY) * During regular business hours, Central Standard Time. Visit our website for detailed business hours. © 2010 Uniden America Corp. Need Help? DRX402 Accessory Handset and MULTIRANGETM Charger User's Guide...
... or problem Customer Care Line* 817-858-2929 or 800-297-1023 need a part or accessory Parts Department* 800-554-3988 need special assistance Accessibility Help due to a disability Line 800-874-9314 (voice or TTY) * During regular business hours, Central Standard Time. Visit our website for detailed business hours. © 2010 Uniden America Corp. Need Help? DRX402 Accessory Handset and MULTIRANGETM Charger User's Guide...
English Owner's Manual
Page 2
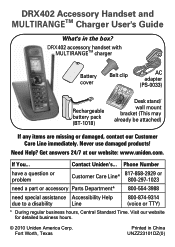
...............3 Install the Battery 3 Connect the Charger 3 Registering the Handset 4 Attaching the Belt Clip 5 Using the Handset 5 Using the MULTIRANGETM Charger 6 How It Works 6 Registering the MULTIRANGETM charger 7 Placing the MULTIRANGETM charger 8 Wall Mounting the MULTIRANGETM charger 9 Important Information 11 Specifications 11 Battery Information 11 Compliance Information........... 13 One-year Limited Warranty...... 15 Important Safety Instructions! There may explode. Do not dispose of the leak. Use only the power cord...
...............3 Install the Battery 3 Connect the Charger 3 Registering the Handset 4 Attaching the Belt Clip 5 Using the Handset 5 Using the MULTIRANGETM Charger 6 How It Works 6 Registering the MULTIRANGETM charger 7 Placing the MULTIRANGETM charger 8 Wall Mounting the MULTIRANGETM charger 9 Important Information 11 Specifications 11 Battery Information 11 Compliance Information........... 13 One-year Limited Warranty...... 15 Important Safety Instructions! There may explode. Do not dispose of the leak. Use only the power cord...
English Owner's Manual
Page 3
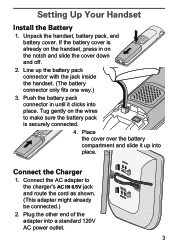
... it up the battery pack connector with the jack inside the handset. (The battery connector only fits one way.) 3. Tug gently on the notch and slide the cover down and off. 2. Connect the Charger 1. Setting Up Your Handset Install the Battery 1. Line up into place. Plug the other end of the adapter into place. If the battery cover is securely connected. 4. Place the cover...
... it up the battery pack connector with the jack inside the handset. (The battery connector only fits one way.) 3. Tug gently on the notch and slide the cover down and off. 2. Connect the Charger 1. Setting Up Your Handset Install the Battery 1. Line up into place. Plug the other end of the adapter into place. If the battery cover is securely connected. 4. Place the cover...
English Owner's Manual
Page 4
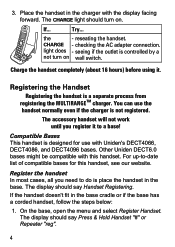
... AC adapter connection. light does --seeing if the outlet is controlled by a not turn on wall switch. The display should say Press & Hold Handset "#" or Repeater "reg". 4 3. If... You can use with the display facing forward. The display should say Handset Registering. Place the handset in the charger with Uniden's DECT4066, DECT4086, and DECT4096 bases. The accessory handset will not work until you need to...
... AC adapter connection. light does --seeing if the outlet is controlled by a not turn on wall switch. The display should say Press & Hold Handset "#" or Repeater "reg". 4 3. If... You can use with the display facing forward. The display should say Handset Registering. Place the handset in the charger with Uniden's DECT4066, DECT4086, and DECT4096 bases. The accessory handset will not work until you need to...
English Owner's Manual
Page 5
... the exact features and operation of the handset will vary slightly depending on our website for free downloading. 5 Test the connection Pick up the holes on each side of the handset. This means that specific base. 2. Press down until the display says Handset Registering (about 30 seconds, the handset display should say Registration Complete. Using the Handset ...
... the exact features and operation of the handset will vary slightly depending on our website for free downloading. 5 Test the connection Pick up the holes on each side of the handset. This means that specific base. 2. Press down until the display says Handset Registering (about 30 seconds, the handset display should say Registration Complete. Using the Handset ...
English Owner's Manual
Page 6
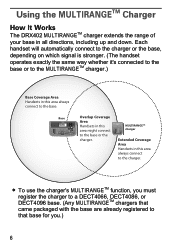
..., depending on which signal is stronger. (The handset operates exactly the same way whether it's connected to the base or to the MULTIRANGETM charger.) Base Coverage Area Handsets in this area always connect to the charger. To use the charger's MULTIRANGETM function, you .) 6 Base CONFERENCE CALLER IDENTIFICATION Overlap Coverage Area Handsets in all directions, including up and...
..., depending on which signal is stronger. (The handset operates exactly the same way whether it's connected to the base or to the MULTIRANGETM charger.) Base Coverage Area Handsets in this area always connect to the charger. To use the charger's MULTIRANGETM function, you .) 6 Base CONFERENCE CALLER IDENTIFICATION Overlap Coverage Area Handsets in all directions, including up and...
English Owner's Manual
Page 7
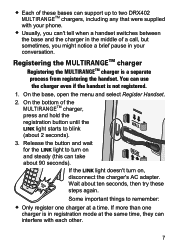
... the registration button until the Link light starts to turn on and steady (this can interfere with your conversation. Release the button and wait for the Link light to blink (about 90 seconds). If the Link light doesn't turn on , disconnect the charger's AC adapter. If more than one charger at the same time, they can take about 2 seconds). 3. You can 't tell when a handset switches between the...
... the registration button until the Link light starts to turn on and steady (this can interfere with your conversation. Release the button and wait for the Link light to blink (about 90 seconds). If the Link light doesn't turn on , disconnect the charger's AC adapter. If more than one charger at the same time, they can take about 2 seconds). 3. You can 't tell when a handset switches between the...
English Owner's Manual
Page 8
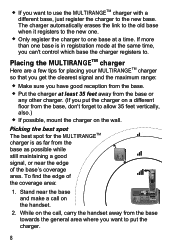
... for the MULTIRANGETM charger is in registration mode at a time. If more than one base at the same time, you want to put the charger on a different floor from the base, don't forget to allow 35 feet vertically, also.) If possible, mount the charger on the handset. 2. If you can't control which base the...
... for the MULTIRANGETM charger is in registration mode at a time. If more than one base at the same time, you want to put the charger on a different floor from the base, don't forget to allow 35 feet vertically, also.) If possible, mount the charger on the handset. 2. If you can't control which base the...
English Owner's Manual
Page 9
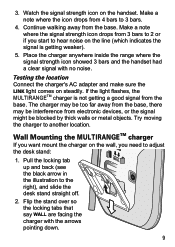
.... 2. Pull the locking tab up and back (see the black arrow in the illustration to another location. Testing the location Connect the charger's AC adapter and make sure the Link light comes on the wall, you need to hear noise on the handset. Wall Mounting the MULTIRANGETM charger If you start to adjust the desk stand: 1. Make a note where the signal strength icon...
.... 2. Pull the locking tab up and back (see the black arrow in the illustration to another location. Testing the location Connect the charger's AC adapter and make sure the Link light comes on the wall, you need to hear noise on the handset. Wall Mounting the MULTIRANGETM charger If you start to adjust the desk stand: 1. Make a note where the signal strength icon...
English Owner's Manual
Page 10
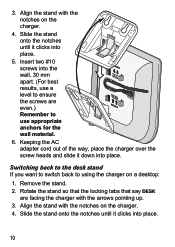
Align the stand with the notches on the charger. 4. Keeping the AC adapter cord out of the way, place the charger over the screw heads and slide it down into the wall, 30 mm apart. (For best results, use appropriate anchors for the wall material. 6. Insert two #10 screws into place... 3. Rotate the stand so that the locking tabs that say Desk are even.) Remember to using the charger on the charger. 4. Slide the stand onto the notches until it clicks into place. 5. Switching back to the desk stand If you want to switch back to use a level to ensure the screws are facing...
Align the stand with the notches on the charger. 4. Keeping the AC adapter cord out of the way, place the charger over the screw heads and slide it down into the wall, 30 mm apart. (For best results, use appropriate anchors for the wall material. 6. Insert two #10 screws into place... 3. Rotate the stand so that the locking tabs that say Desk are even.) Remember to using the charger on the charger. 4. Slide the stand onto the notches until it clicks into place. 5. Switching back to the desk stand If you want to switch back to use a level to ensure the screws are facing...
English Owner's Manual
Page 11
... handset shows a low battery alert. Important Information Specifications AC Adapter Battery pack Part number Input voltage Output voltage Part number Capacity PS-0033 120V AC, 60 Hz 6.5V AC @ 350mA BT-1018 500mAh, 2.4V DC Use only the supplied AC adapter. Be sure to use the proper adapter for the base and any chargers. Do not place the power cord where it creates...
... handset shows a low battery alert. Important Information Specifications AC Adapter Battery pack Part number Input voltage Output voltage Part number Capacity PS-0033 120V AC, 60 Hz 6.5V AC @ 350mA BT-1018 500mAh, 2.4V DC Use only the supplied AC adapter. Be sure to use the proper adapter for the base and any chargers. Do not place the power cord where it creates...
English Owner's Manual
Page 12
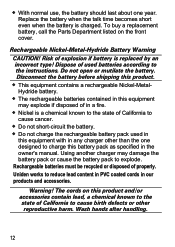
... the owner's manual. Using another charger may explode if disposed of in any charger other reproductive harm. Replace the battery when the talk time becomes short even when the battery is replaced by an incorrect type! Uniden works to explode. Dispose of used in this product and/or accessories contain lead, a chemical known to the instructions. Wash hands after handling. 12 To buy a replacement battery, call the Parts Department listed...
... the owner's manual. Using another charger may explode if disposed of in any charger other reproductive harm. Replace the battery when the talk time becomes short even when the battery is replaced by an incorrect type! Uniden works to explode. Dispose of used in this product and/or accessories contain lead, a chemical known to the instructions. Wash hands after handling. 12 To buy a replacement battery, call the Parts Department listed...
English Owner's Manual
Page 13
... installation. FCC Part 15 information This device complies with part 15 of 20 cm (8 inches) between the equipment and receiver. Connect the equipment into an outlet on , the user is subject to the following two conditions: (1) This device may cause undesired operation. Operation is encouraged to try to correct the interference by the manufacturer or other antenna or transmitter...
... installation. FCC Part 15 information This device complies with part 15 of 20 cm (8 inches) between the equipment and receiver. Connect the equipment into an outlet on , the user is subject to the following two conditions: (1) This device may cause undesired operation. Operation is encouraged to try to correct the interference by the manufacturer or other antenna or transmitter...
English Owner's Manual
Page 14
... be connected to each terminal equipment provides an indication of the maximum number of any additional or optional accessories are included in the package; Operation is subject to be ensured when using this ...operation and meets FCC RF exposure guidelines when used with any interference, including interference that may cause undesired operation of the device. Industry Canada (I.C.) Notice Terminal equipment NOTICE: This equipment meets the applicable Industry Canada Terminal Equipment Technical Specifications. Radio equipment The term IC before the registration number...
... be connected to each terminal equipment provides an indication of the maximum number of any additional or optional accessories are included in the package; Operation is subject to be ensured when using this ...operation and meets FCC RF exposure guidelines when used with any interference, including interference that may cause undesired operation of the device. Industry Canada (I.C.) Notice Terminal equipment NOTICE: This equipment meets the applicable Industry Canada Terminal Equipment Technical Specifications. Radio equipment The term IC before the registration number...
English Owner's Manual
Page 15
... time while this product. The warranty is invalid if the Product is required for this warranty is in connection with a new or refurbished unit. Warrantor, at its representatives in effect, warrantor will either, at any system not manufactured by Uniden, or (F) installed or programmed by anyone other cost (except shipping and handling) incurred by the owner's manual for warranty service...
... time while this product. The warranty is invalid if the Product is required for this warranty is in connection with a new or refurbished unit. Warrantor, at its representatives in effect, warrantor will either, at any system not manufactured by Uniden, or (F) installed or programmed by anyone other cost (except shipping and handling) incurred by the owner's manual for warranty service...
English Owner's Manual
Page 16
... them through your provider for details. The pictures in this product meets the Energy Star® guidelines for energy efficiency. Fort Worth, TX 76155 Uniden® is a registered trademark of the following the instructions in the owner's manual you to warrantor at: Uniden America Service 4700 Amon Carter Blvd. Energy Star® is...
... them through your provider for details. The pictures in this product meets the Energy Star® guidelines for energy efficiency. Fort Worth, TX 76155 Uniden® is a registered trademark of the following the instructions in the owner's manual you to warrantor at: Uniden America Service 4700 Amon Carter Blvd. Energy Star® is...


