
English Owners Manual
Page 3
...again. • If the scanner loses power (as when you turn off then back on , it can lose some system settings such as display color and backlight. Power Related Issues Important: To prevent memory from being corrupted, do not unplug the AC adapter during the time the memory... is a registered trademark of Uniden America Corporation. LTR® is accessed for programming or auto store. Uniden® and Bearcat® are the property of Uniden America Corporation. Precautions 3 EDACS® is ON, the scanner may not power on ...
...again. • If the scanner loses power (as when you turn off then back on , it can lose some system settings such as display color and backlight. Power Related Issues Important: To prevent memory from being corrupted, do not unplug the AC adapter during the time the memory... is a registered trademark of Uniden America Corporation. LTR® is accessed for programming or auto store. Uniden® and Bearcat® are the property of Uniden America Corporation. Precautions 3 EDACS® is ON, the scanner may not power on ...
English Owners Manual
Page 5
...Quickly Storing an ID During ID Search 49 Quick-Storing Channels or Talk Group ID's (TGID 49 Trunking Activity Indicators ...50 Toggling the Display Mode ...51 Optimizing P25 Performance ...52 Conventional System ...52 Trunked System ...52 Using the Menu ...54 Programming General Settings ...55 Setting ...the Dimmer ...55 Setting the Backlight Color ...56 Adjusting the Key Beep ...56 Setting the Audio AGC ...56 Setting the Display Orientation ...57 Adjusting the Display Contrast ...57 Setting the GPS Format ...57 Setting the Position Format ...57 Setting the Time Format ...58 Setting the Time...
...Quickly Storing an ID During ID Search 49 Quick-Storing Channels or Talk Group ID's (TGID 49 Trunking Activity Indicators ...50 Toggling the Display Mode ...51 Optimizing P25 Performance ...52 Conventional System ...52 Trunked System ...52 Using the Menu ...54 Programming General Settings ...55 Setting ...the Dimmer ...55 Setting the Backlight Color ...56 Adjusting the Key Beep ...56 Setting the Audio AGC ...56 Setting the Display Orientation ...57 Adjusting the Display Contrast ...57 Setting the GPS Format ...57 Setting the Position Format ...57 Setting the Time Format ...58 Setting the Time...
English Owners Manual
Page 6
Setting the Serial Port Speed ...58 Displaying Scanner Information ...59 Viewing Memory Used ...59 Viewing the Firmware Version and Electronic Serial Number 59 Initializing the Scanner's Memory 59 Connecting Your Scanner to a ...
Setting the Serial Port Speed ...58 Displaying Scanner Information ...59 Viewing Memory Used ...59 Viewing the Firmware Version and Electronic Serial Number 59 Initializing the Scanner's Memory 59 Connecting Your Scanner to a ...
English Owners Manual
Page 7
... Fire Tone-Out ...115 Setting Tone-Out Standby ...115 Setting Up Tone-Out ...115 Tone-Out Multi-Channel Monitoring 117 Set Record ...117 Using the BCD996T with a GPS 118 Device Compatibility ...118 Connecting Your Scanner to a GPS Device 118 Initial Scanner/GPS Operation ...118 Location-Based (GPS) Scanning 119 Another Example... Location Based GPS Features 120 Setting the Options ...122 For POI Only ...122 Deleting a Location ...122 For Dangerous Xing, and Dangerous Road Only 123 GPS Display Mode ...124 Table of Contents 7
... Fire Tone-Out ...115 Setting Tone-Out Standby ...115 Setting Up Tone-Out ...115 Tone-Out Multi-Channel Monitoring 117 Set Record ...117 Using the BCD996T with a GPS 118 Device Compatibility ...118 Connecting Your Scanner to a GPS Device 118 Initial Scanner/GPS Operation ...118 Location-Based (GPS) Scanning 119 Another Example... Location Based GPS Features 120 Setting the Options ...122 For POI Only ...122 Deleting a Location ...122 For Dangerous Xing, and Dangerous Road Only 123 GPS Display Mode ...124 Table of Contents 7
English Owners Manual
Page 14
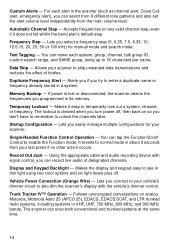
...channels later. You can select from 9 different tone patterns and also set the alert volume level independently from your scanner. Record Out Jack - Display and Keypad Backlight - Automatic Channel Step - Accepts frequencies on any valid channel step, even if it easy to normal mode in VHF, UHF... radio systems, including systems in about 3 seconds from the main volume level. Alerts you if you try to also dim the scanner's display with signal control, you don't have to remember to 16 characters per name. If power is cleared when you turn power off . It...
...channels later. You can select from 9 different tone patterns and also set the alert volume level independently from your scanner. Record Out Jack - Display and Keypad Backlight - Automatic Channel Step - Accepts frequencies on any valid channel step, even if it easy to normal mode in VHF, UHF... radio systems, including systems in about 3 seconds from the main volume level. Alerts you if you try to also dim the scanner's display with signal control, you don't have to remember to 16 characters per name. If power is cleared when you turn power off . It...

English Owners Manual
Page 15
... - Lets you when a weather alert is set to more efficiently use the scanner's memory and more . Lets your scanner alert you display extended GPS information such as all possible control channels are programmed. This helps you to 10 custom search ranges. Custom Search - The scanner alerts you .... You do not have to the scanner it scans using only control channel data. GPS Non-Radio Based Features - SAME Weather Alert - The scanner also displays the transmitted alert type.
... - Lets you when a weather alert is set to more efficiently use the scanner's memory and more . Lets your scanner alert you display extended GPS information such as all possible control channels are programmed. This helps you to 10 custom search ranges. Custom Search - The scanner alerts you .... You do not have to the scanner it scans using only control channel data. GPS Non-Radio Based Features - SAME Weather Alert - The scanner also displays the transmitted alert type.
English Owners Manual
Page 17
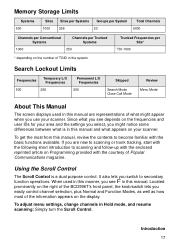
...Frequencies Temporary L/O Frequencies 500 250 Permanent L/O Frequencies 250 Skipped Search Mode Close Call Mode Review Menu Mode About This Manual The screen displays used in this manner, you see depends on the frequencies and user IDs for your area and the settings you select, you might... Modes, as well as how most from this manual, review the contents to scanning and follow-up with the courtesy of the BCD996T's front panel, the knob/switch lets you switch to secondary function operations. Located prominently on Programming provided with the enclosed reprinted article...
...Frequencies Temporary L/O Frequencies 500 250 Permanent L/O Frequencies 250 Skipped Search Mode Close Call Mode Review Menu Mode About This Manual The screen displays used in this manner, you see depends on the frequencies and user IDs for your area and the settings you select, you might... Modes, as well as how most from this manual, review the contents to scanning and follow-up with the courtesy of the BCD996T's front panel, the knob/switch lets you switch to secondary function operations. Located prominently on Programming provided with the enclosed reprinted article...
English Owners Manual
Page 18
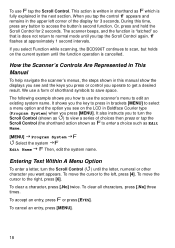
During this manual show the displays you see on the current system until the letter, numeral or other character you how to use F tap the Scroll Control...want appears. Entering Text Within A Menu Option To enter a letter, turn the Scroll Control (shown as ) to view a series of the display for 2 seconds. To clear all characters, press [.No] three times. To move the cursor to the left corner of choices then press ... scanner's menus, the steps shown in Boldface Courier type (Program System) when you select Function while scanning, the BCD996T continues to get a desired result.
During this manual show the displays you see on the current system until the letter, numeral or other character you how to use F tap the Scroll Control...want appears. Entering Text Within A Menu Option To enter a letter, turn the Scroll Control (shown as ) to view a series of the display for 2 seconds. To clear all characters, press [.No] three times. To move the cursor to the left corner of choices then press ... scanner's menus, the steps shown in Boldface Courier type (Program System) when you select Function while scanning, the BCD996T continues to get a desired result.
English Owners Manual
Page 27
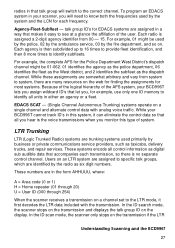
...is no separate control channel. In the ID search mode, the scanner stops on the transmission and displays the talk group ID on the transmission if the LTR Understanding Scanning and the BCD996T 27 For example, the complete AFS for EDACS systems are assigned in a way that makes it ... and 2 identifies the subfleet as six digit numbers. Each agency is assigned a 2-digit agency identifier from system to system, there are in your BCD996T lets you assign wildcard ID's that let you, for each transmission, so there is the voice transmissions when you will switch to see at a ...
...is no separate control channel. In the ID search mode, the scanner stops on the transmission and displays the talk group ID on the transmission if the LTR Understanding Scanning and the BCD996T 27 For example, the complete AFS for EDACS systems are assigned in a way that makes it ... and 2 identifies the subfleet as six digit numbers. Each agency is assigned a 2-digit agency identifier from system to system, there are in your BCD996T lets you assign wildcard ID's that let you, for each transmission, so there is the voice transmissions when you will switch to see at a ...
English Owners Manual
Page 28
... antenna sites that each radio has a unique user ID. You could use the same Talk Group ID's for traffic. Now, the Fort Worth systems are displayed. data matches a talk group ID that you have stored in the Fort Worth area, press [1] while turning on the scanner. LTR systems are left unchanged...
... antenna sites that each radio has a unique user ID. You could use the same Talk Group ID's for traffic. Now, the Fort Worth systems are displayed. data matches a talk group ID that you have stored in the Fort Worth area, press [1] while turning on the scanner. LTR systems are left unchanged...

English Owners Manual
Page 37
Internal Bracket Dash Removing the Display Sticker Before you can plug a 1/8-inch (3.5 mm) mini-plug earphone or headphones (not supplied) into the headphone jack on the front of your vehicle's mounting ...bracket. Connecting an Optional Antenna The scanner's BNC connector makes it easy to the scanner before the scanner is over the display. Cable loss increases with higher frequency. Note: Always use RG-8 low-loss dielectric coaxial cable. or 75-ohm, RG-58, or RG-8, BNC terminated coaxial...
Internal Bracket Dash Removing the Display Sticker Before you can plug a 1/8-inch (3.5 mm) mini-plug earphone or headphones (not supplied) into the headphone jack on the front of your vehicle's mounting ...bracket. Connecting an Optional Antenna The scanner's BNC connector makes it easy to the scanner before the scanner is over the display. Cable loss increases with higher frequency. Note: Always use RG-8 low-loss dielectric coaxial cable. or 75-ohm, RG-58, or RG-8, BNC terminated coaxial...
English Owners Manual
Page 41
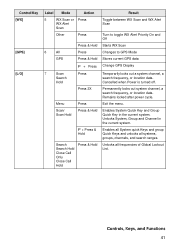
... WX Alert Scan Turn to toggle WX Alert Priority On and Off Starts WX Scan Changes to GPS Mode Stores current GPS data Change GPS Display Temporarily locks out a system channel, a search frequency, or location data. Remains locked after power cycle. Exit the menu. Permanently locks out system channel, a search frequency...
... WX Alert Scan Turn to toggle WX Alert Priority On and Off Starts WX Scan Changes to GPS Mode Stores current GPS data Change GPS Display Temporarily locks out a system channel, a search frequency, or location data. Remains locked after power cycle. Exit the menu. Permanently locks out system channel, a search frequency...

English Owners Manual
Page 42
Control/Key [0] to Display Mode- Mode 1 default Scan/Scan F + [.No] Hold Enables Trunking activity Indicators Editing Name Press Moves the cursor left [6] move right [.No] Label Mode Action Result 8 ... character in name edit Press 3X Clear all letters in name edit Press Enter "-" or "I" for Direct Entry Scan Scan Hold F + Press Toggle Active Channel Display On or Off Scan Press Starts two-digit of (SQK) System/Site Quick Key 42
Control/Key [0] to Display Mode- Mode 1 default Scan/Scan F + [.No] Hold Enables Trunking activity Indicators Editing Name Press Moves the cursor left [6] move right [.No] Label Mode Action Result 8 ... character in name edit Press 3X Clear all letters in name edit Press Enter "-" or "I" for Direct Entry Scan Scan Hold F + Press Toggle Active Channel Display On or Off Scan Press Starts two-digit of (SQK) System/Site Quick Key 42

English Owners Manual
Page 44
.... Priority ON 14. Channel Name 4. Close Call enabled 8. Talk group ID Number 9. Attenuation enabled 13. Modulation Type (Narrowband FM shown) 12. A Look At The Display The display has indicators that you will assist you understand how your scanner operates. Site Quick Key 3. System Name/ Channel Group Name 5. The LCD screens shown here... of many that show here are more common and will see while in different modes. Talk group Frequency 10. CTCSS or DCS Indicator 44 The display information helps you to get started. 1. Signal Strength indicator 7.
.... Priority ON 14. Channel Name 4. Close Call enabled 8. Talk group ID Number 9. Attenuation enabled 13. Modulation Type (Narrowband FM shown) 12. A Look At The Display The display has indicators that you will assist you understand how your scanner operates. Site Quick Key 3. System Name/ Channel Group Name 5. The LCD screens shown here... of many that show here are more common and will see while in different modes. Talk group Frequency 10. CTCSS or DCS Indicator 44 The display information helps you to get started. 1. Signal Strength indicator 7.

English Owners Manual
Page 45
... or an opening screen is now set for ... F Edit Service F Select a Service Range F Search with Scan F Set Startup Key F OR Operation 45 The control is displayed. Turn the knob to Set Startup Key there are differences in the menu structure for Trunked and Conventional systems. Conventional [MENU] Program System F Select the...
... or an opening screen is now set for ... F Edit Service F Select a Service Range F Search with Scan F Set Startup Key F OR Operation 45 The control is displayed. Turn the knob to Set Startup Key there are differences in the menu structure for Trunked and Conventional systems. Conventional [MENU] Program System F Select the...

English Owners Manual
Page 47
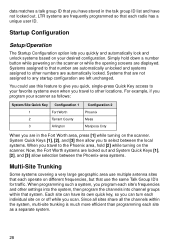
...again. Preprogrammed System Tips All systems preprogrammed into the scanner are located primarily in major metropolitan areas. • You might hear transmissions on the display show the systems that are assigned to a Quick Key. To stop scanning the system(s), press [.No] (if the quick key is enabled... Systems with Quick Keys" on Page 139 for a list of channels to a group quick key (see "Setting the Group Quick Key" on the display, press the number key corresponding to the channel group you want to activate or deactivate. For quick keys [0] - [9], press the quick key's number...
...again. Preprogrammed System Tips All systems preprogrammed into the scanner are located primarily in major metropolitan areas. • You might hear transmissions on the display show the systems that are assigned to a Quick Key. To stop scanning the system(s), press [.No] (if the quick key is enabled... Systems with Quick Keys" on Page 139 for a list of channels to a group quick key (see "Setting the Group Quick Key" on the display, press the number key corresponding to the channel group you want to activate or deactivate. For quick keys [0] - [9], press the quick key's number...

English Owners Manual
Page 49
.... Otherwise, press [.No]. Quick-Storing Channels or Talk Group ID's (TGID) 1. Hold on a site or system, press and hold on an existing channel in the display's upper left corner. To permanently hold the Scroll Control for you press [EYES], the scanner stores the ID into a channel, press [EYES]. Quickly Storing an...
.... Otherwise, press [.No]. Quick-Storing Channels or Talk Group ID's (TGID) 1. Hold on a site or system, press and hold on an existing channel in the display's upper left corner. To permanently hold the Scroll Control for you press [EYES], the scanner stores the ID into a channel, press [EYES]. Quickly Storing an...

English Owners Manual
Page 50
... the talk group ID's format is monitoring on EDACS or Motorola system, the activity indicators will warn you if you try to hold on the display with the same name. Trunking Activity Indicators To get a visual indication of the activity on trunking systems, press [HOLD/RESUME] to store two systems with...where you pressed [.No] in the same system that have activity. When the scanner is not the type used by the current system, the scanner displays an error message and does not save other channel settings. Then tap F and then press [.No] The scanner replaces the third line on any channel...
... the talk group ID's format is monitoring on EDACS or Motorola system, the activity indicators will warn you if you try to hold on the display with the same name. Trunking Activity Indicators To get a visual indication of the activity on trunking systems, press [HOLD/RESUME] to store two systems with...where you pressed [.No] in the same system that have activity. When the scanner is not the type used by the current system, the scanner displays an error message and does not save other channel settings. Then tap F and then press [.No] The scanner replaces the third line on any channel...

English Owners Manual
Page 51
Mode2 indicates the frequencies under the Channel Name. The scanner displays Display Mode 2. Toggling the Display Mode To change the display so the channel and frequency or Talk Group ID appear instead of extended channel information, hold on any channel then press F + [0]. To return to Mode 1, press F + [0] Mode1 indicates the channel data under the Channel Name for Conventional systems or the TGID number for Trunked systems. Channel Name Display Mode 1 Channel Name Display Mode 2 Operation 51
Mode2 indicates the frequencies under the Channel Name. The scanner displays Display Mode 2. Toggling the Display Mode To change the display so the channel and frequency or Talk Group ID appear instead of extended channel information, hold on any channel then press F + [0]. To return to Mode 1, press F + [0] Mode1 indicates the channel data under the Channel Name for Conventional systems or the TGID number for Trunked systems. Channel Name Display Mode 1 Channel Name Display Mode 2 Operation 51

English Owners Manual
Page 52
... compensate for each system where you set to interference. Press [HOLD/RESUME] on an active digital channel on the display. f disappears and APCO threshold Adjust Mode appears at the bottom of the display. If you can clearly receive the system. Optimizing P25 Performance You can optimize the scanner's performance with digital APCO...
... compensate for each system where you set to interference. Press [HOLD/RESUME] on an active digital channel on the display. f disappears and APCO threshold Adjust Mode appears at the bottom of the display. If you can clearly receive the system. Optimizing P25 Performance You can optimize the scanner's performance with digital APCO...


