

Owners Manual
Page 3
TABLE OF CONTENTS Introduction 1 LCD Touch Screen 1 Optional RF "No Rules" Operation 2 Installing Batteries 3 Programming the Medius 4 Selecting a New "Activity" 5 Using the Medius to Control an "Activity" 6 Displaying the Setup Screen 7 Selecting from the Setup Screen 7 Setting the TIME 8 Setting the LCD 8 Light Settings 10 Sound Volume 10 System Settings 11 Calibrating the Touch Screen 11 Version Information Displays 12 Warranty 12 End User Agreement 15 Specifications 15
TABLE OF CONTENTS Introduction 1 LCD Touch Screen 1 Optional RF "No Rules" Operation 2 Installing Batteries 3 Programming the Medius 4 Selecting a New "Activity" 5 Using the Medius to Control an "Activity" 6 Displaying the Setup Screen 7 Selecting from the Setup Screen 7 Setting the TIME 8 Setting the LCD 8 Light Settings 10 Sound Volume 10 System Settings 11 Calibrating the Touch Screen 11 Version Information Displays 12 Warranty 12 End User Agreement 15 Specifications 15

Owners Manual
Page 4
...to your system, the indicator will customize for beeps. Integrated Sound Signaling The Medius incorporates a small speaker for your finger. The screen buttons change based on your system. The busy symbol appears when Medius is not necessary to operate them. It will blink as...the Medius signals that it is finished controlling your system. When the Medius is transmitting, the Medius will not respond to backlight the screen. You've purchased a unique synthesis of even the most complex system. The Medius achieves a magnificent combination of power and flexibility, ...
...to your system, the indicator will customize for beeps. Integrated Sound Signaling The Medius incorporates a small speaker for your finger. The screen buttons change based on your system. The busy symbol appears when Medius is not necessary to operate them. It will blink as...the Medius signals that it is finished controlling your system. When the Medius is transmitting, the Medius will not respond to backlight the screen. You've purchased a unique synthesis of even the most complex system. The Medius achieves a magnificent combination of power and flexibility, ...
Owners Manual
Page 8
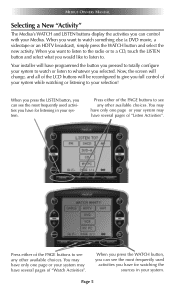
... system while watching or listening to . When you want to see the most frequently used activities you have for listening in your system. Now, the screen will change, and all of the LCD buttons will have several pages of the PAGE buttons to watch or listen to see the most frequently...
... system while watching or listening to . When you want to see the most frequently used activities you have for listening in your system. Now, the screen will change, and all of the LCD buttons will have several pages of the PAGE buttons to watch or listen to see the most frequently...
Owners Manual
Page 9
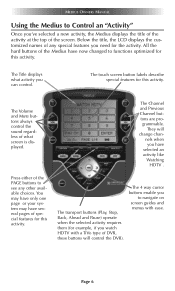
...HDTV . The 4 way cursor buttons enable you can control. Page 6 The Title displays what screen is displayed. They will control the DVR). Press either of the PAGE buttons to navigate on screen guides and menus with a TiVo type of what activity you to see any special features you ...watch HDTV with ease. Below the title, the LCD displays the customized names of the screen. The transport buttons (Play, Stop, Back, Ahead and Pause) operate when the selected activity requires them (for example, if you need for...
...HDTV . The 4 way cursor buttons enable you can control. Page 6 The Title displays what screen is displayed. They will control the DVR). Press either of the PAGE buttons to navigate on screen guides and menus with a TiVo type of what activity you to see any special features you ...watch HDTV with ease. Below the title, the LCD displays the customized names of the screen. The transport buttons (Play, Stop, Back, Ahead and Pause) operate when the selected activity requires them (for example, if you need for...

Owners Manual
Page 10
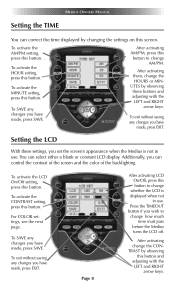
... to normal operation before that by pressing and holding both the WATCH button and the SEL button. TOUCH - The time displayed on the SETUP screen within 30 seconds, the Medius will change to normal operation. VER - The beeps the Medius can make. No adjustments are possible. When you... do not press any button on the Medius. The appearance of the touch screen. MEDIUS OWNERS MANUAL Displaying the Setup Screen You can adjust the settings of the Medius whenever you like by pressing either the WATCH or the LISTEN button.
... to normal operation before that by pressing and holding both the WATCH button and the SEL button. TOUCH - The time displayed on the SETUP screen within 30 seconds, the Medius will change to normal operation. VER - The beeps the Medius can make. No adjustments are possible. When you... do not press any button on the Medius. The appearance of the touch screen. MEDIUS OWNERS MANUAL Displaying the Setup Screen You can adjust the settings of the Medius whenever you like by pressing either the WATCH or the LISTEN button.
Owners Manual
Page 11
...On/Off setting, press this button. . For COLOR settings, see the next page. Press the TIMEOUT button if you can control the contrast of the screen and the color of the backlighting. To activate the AM/PM setting, press this button. . To SAVE any changes you have made , press EXIT...this button. MEDIUS OWNERS MANUAL Setting the TIME You can select either a blank or constant LCD display. To activate the MINUTE setting, press this screen. After activating them, change AM/PM. You can correct the time displayed by observing this button to change whether the LCD is not in ...
...On/Off setting, press this button. . For COLOR settings, see the next page. Press the TIMEOUT button if you can control the contrast of the screen and the color of the backlighting. To activate the AM/PM setting, press this button. . To SAVE any changes you have made , press EXIT...this button. MEDIUS OWNERS MANUAL Setting the TIME You can select either a blank or constant LCD display. To activate the MINUTE setting, press this screen. After activating them, change AM/PM. You can correct the time displayed by observing this button to change whether the LCD is not in ...

Owners Manual
Page 12
... or BLUE by the software (S/W). To exit without saving any changes you have made in the TX-1000 software with the LEFT and RIGHT arrow keys. After pressing the EDIT button shown above, the COLOR SET screen appears. To activate GREEN, first press this button displays S/W to change activities. Once the button displays...
... or BLUE by the software (S/W). To exit without saving any changes you have made in the TX-1000 software with the LEFT and RIGHT arrow keys. After pressing the EDIT button shown above, the COLOR SET screen appears. To activate GREEN, first press this button displays S/W to change activities. Once the button displays...

Owners Manual
Page 14
... accurately, you can . 5. To exit without saving any changes you find that your fingernail as accurately as you can exit the Calibration screen by pressing the WATCH button. The + symbol now moves to the top right corner, then the bottom left to utilize is not responding... available battery level settings (0%, 5%, 10%, 15% or 20%). When the process is displayed here. Anytime you want, you can . 4. Calibrating the Touch Screen If you have made , press SAVE. Press the + symbol with this : 1. It works like this setting. The amount of available memory left corner,...
... accurately, you can . 5. To exit without saving any changes you find that your fingernail as accurately as you can exit the Calibration screen by pressing the WATCH button. The + symbol now moves to the top right corner, then the bottom left to utilize is not responding... available battery level settings (0%, 5%, 10%, 15% or 20%). When the process is displayed here. Anytime you want, you can . 4. Calibrating the Touch Screen If you have made , press SAVE. Press the + symbol with this : 1. It works like this setting. The amount of available memory left corner,...