
Spec Sheet
Page 1
... Universal Remote Control, Inc. Custom on-screen menus feature large vibrant text and simple up/down navigation. • Programmable Wi-Fi handheld remote for MX HomePro™ system • Controls entertainment plus popular smart home devices throughout the home - with 2" LCD OVERVIEW High-performance handheld remote controls one room of Universal Remote Control, Inc. Specifications subject to Wi-Fi network when lifted, preserves battery charge Battery Indicator On-screen indicator displays battery charge level SPECIFICATIONS...
... Universal Remote Control, Inc. Custom on-screen menus feature large vibrant text and simple up/down navigation. • Programmable Wi-Fi handheld remote for MX HomePro™ system • Controls entertainment plus popular smart home devices throughout the home - with 2" LCD OVERVIEW High-performance handheld remote controls one room of Universal Remote Control, Inc. Specifications subject to Wi-Fi network when lifted, preserves battery charge Battery Indicator On-screen indicator displays battery charge level SPECIFICATIONS...
Owners Manual
Page 2
URC - Connecting the Lithium Polymer Battery 2 Using the Charging Cradle 2 Universal Remote Control SHALL NOT BE LIABLE FOR OPERATIONAL, TECHNICAL, OR EDITORIAL ERRORS/OMISSIONS MADE IN THIS MANUAL. The information in any form without prior notice. No part of this manual is copyright protected. Settings Menu...5 MX HomePro Editor...13 Specifications...13 Limited Warranty Statement 13 End User Agreement...13 Displaying the Settings...4 MXHP-R700 Owner's Manual © 2018 Universal Remote Control, Inc. all rights reserved...
URC - Connecting the Lithium Polymer Battery 2 Using the Charging Cradle 2 Universal Remote Control SHALL NOT BE LIABLE FOR OPERATIONAL, TECHNICAL, OR EDITORIAL ERRORS/OMISSIONS MADE IN THIS MANUAL. The information in any form without prior notice. No part of this manual is copyright protected. Settings Menu...5 MX HomePro Editor...13 Specifications...13 Limited Warranty Statement 13 End User Agreement...13 Displaying the Settings...4 MXHP-R700 Owner's Manual © 2018 Universal Remote Control, Inc. all rights reserved...
Owners Manual
Page 3
... and turns on the LCD screen. Congratulations! Enjoy the following features: Parts List: ● Quick Connect Wi-Fi Included in the MXHP-R700 box: When picked up, the remote automatically connects to Wi-Fi within moments to control the home's audio/video system and devices. ● MXHP-R700 Wi-Fi Remote ● Two-way Meta-data Feedback: Experience real-time two-way feedback right on the remote's LCD screen when used with URC's ever expanding list of...
... and turns on the LCD screen. Congratulations! Enjoy the following features: Parts List: ● Quick Connect Wi-Fi Included in the MXHP-R700 box: When picked up, the remote automatically connects to Wi-Fi within moments to control the home's audio/video system and devices. ● MXHP-R700 Wi-Fi Remote ● Two-way Meta-data Feedback: Experience real-time two-way feedback right on the remote's LCD screen when used with URC's ever expanding list of...
Owners Manual
Page 4
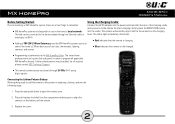
... connects to program all inquires please contact URC Technical Support. ● This remote communicates exclusively through an Ethernet cable or base. The smart home professional must log into the cradle. Connecting the Lithium Polymer Battery: When getting ready to add the remote to control the home's Z-Wave devices such as locks, thermostats, lighting, ● Blue indicates the remote is fully charged. The status light immediately illuminates: wirelessly...
... connects to program all inquires please contact URC Technical Support. ● This remote communicates exclusively through an Ethernet cable or base. The smart home professional must log into the cradle. Connecting the Lithium Polymer Battery: When getting ready to add the remote to control the home's Z-Wave devices such as locks, thermostats, lighting, ● Blue indicates the remote is fully charged. The status light immediately illuminates: wirelessly...
Owners Manual
Page 5
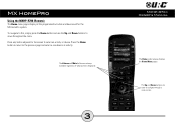
..., simply press the Home button and use the Up and Down buttons to the previous page and select a new device or activity. The Up and Down buttons are always available regardless of what screen is displayed. 3 The Home button always displays the Home Menu pages. Press any button adjacent to the screen to navigate through a menu screen. Using the MXHP-R700 (Remote): The Home menu pages display all the programmed activities and devices within the MX HomePro...
..., simply press the Home button and use the Up and Down buttons to the previous page and select a new device or activity. The Up and Down buttons are always available regardless of what screen is displayed. 3 The Home button always displays the Home Menu pages. Press any button adjacent to the screen to navigate through a menu screen. Using the MXHP-R700 (Remote): The Home menu pages display all the programmed activities and devices within the MX HomePro...
Owners Manual
Page 6
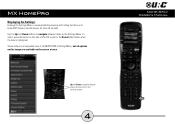
Shown below is an expanded view of the LCD screen or the Select (SEL) button when the item is accomplished by pressing and holding the Home and Enter (ENT) buttons simultaneously for three (3) seconds. Displaying the Settings: Entering the Settings Menu is highlighted. Up and Down navigation buttons reveal the entire list on the screen at once. To select, press the button on the Settings Menu. Use the Up and Down buttons to navigate between items on the side of the MXHP-R700's Settings Menu, not all options on this image are available on the Settings screen. 4
Shown below is an expanded view of the LCD screen or the Select (SEL) button when the item is accomplished by pressing and holding the Home and Enter (ENT) buttons simultaneously for three (3) seconds. Displaying the Settings: Entering the Settings Menu is highlighted. Up and Down navigation buttons reveal the entire list on the screen at once. To select, press the button on the Settings Menu. Use the Up and Down buttons to navigate between items on the side of the MXHP-R700's Settings Menu, not all options on this image are available on the Settings screen. 4
Owners Manual
Page 7
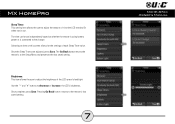
... Owner's manual). 5 This can be found within the Settings Menu: Network Settings: This menu displays the network information about the MXHP-R700 and the network it is connected to. Settings Menu: The following sections cover the sub-menus found on the underside of the hubs that are identified by their Wired MAC Address. Remember, hubs are currently connected to the network. From this screen, it is possible to scan...
... Owner's manual). 5 This can be found within the Settings Menu: Network Settings: This menu displays the network information about the MXHP-R700 and the network it is connected to. Settings Menu: The following sections cover the sub-menus found on the underside of the hubs that are identified by their Wired MAC Address. Remember, hubs are currently connected to the network. From this screen, it is possible to scan...
Owners Manual
Page 8
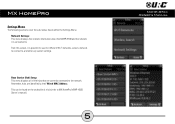
The Accessory Account info item allows the entry of a URC TRF-ZW account username and password. The screens displayed at the right show how this looks when the Accessory Account information has been entered and verified. TRF-ZW Z-Wave Accessory Account Info: When using smart home devices that use with your smart home professional installer to acquire Z-Wave home lighting, comfort, and security products for use Z-Wave, it is necessary to log the Accessory Account info onto the remote (see MX HomePro Installation Guide). Contact your MX HomePro system. 6
The Accessory Account info item allows the entry of a URC TRF-ZW account username and password. The screens displayed at the right show how this looks when the Accessory Account information has been entered and verified. TRF-ZW Z-Wave Accessory Account Info: When using smart home devices that use with your smart home professional installer to acquire Z-Wave home lighting, comfort, and security products for use Z-Wave, it is necessary to log the Accessory Account info onto the remote (see MX HomePro Installation Guide). Contact your MX HomePro system. 6
Owners Manual
Page 9
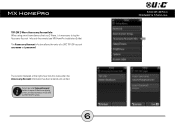
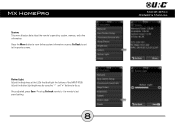
... not in use. Pressing Go Back button returns to the Setup Menu and preserves the last saved setting. Once complete, press Save. Use the "-" and "+" buttons to the charger. Selecting an item on whether the remote is using battery power or is connected to decrease or increase the LCD's brightness. The time can be set independently based on this screen allows for the settings of each Sleep Timer value.
... not in use. Pressing Go Back button returns to the Setup Menu and preserves the last saved setting. Once complete, press Save. Use the "-" and "+" buttons to the charger. Selecting an item on whether the remote is using battery power or is connected to decrease or increase the LCD's brightness. The time can be set independently based on this screen allows for the settings of each Sleep Timer value.
Owners Manual
Page 10
Once adjusted, press Save. Press the More button to view further system information or press Go Back to exit to the remote's last saved setting. 8 Pressing Go back reverts to the previous menu. Adjust the button light brightness by using the "-" and "+" buttons to do so. System: This menu displays data about the remote's operating system, memory, and other information. Button Light: Adjust the brightness of the LEDs that backlight the buttons of the MXHP-R700.
Once adjusted, press Save. Press the More button to view further system information or press Go Back to exit to the remote's last saved setting. 8 Pressing Go back reverts to the previous menu. Adjust the button light brightness by using the "-" and "+" buttons to do so. System: This menu displays data about the remote's operating system, memory, and other information. Button Light: Adjust the brightness of the LEDs that backlight the buttons of the MXHP-R700.
Owners Manual
Page 11
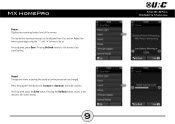
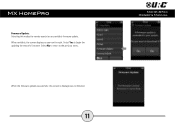
Power: Displays the remaining battery level of the remote. The low battery warning message can be adjusted from this menu, adjusting the sound on button presses can be changed. Adjust the battery percentage using the "-" and "+" buttons to increase or decrease the button volume. Once adjusted, press the Save button. Press the adjacent hard buttons to do so. Pressing the Go Back button returns to the remote's last saved setting. Pressing Go back reverts to the remote's last saved setting. 9 Once adjusted, press Save. Sound: Through this section.
Power: Displays the remaining battery level of the remote. The low battery warning message can be adjusted from this menu, adjusting the sound on button presses can be changed. Adjust the battery percentage using the "-" and "+" buttons to increase or decrease the button volume. Once adjusted, press the Save button. Press the adjacent hard buttons to do so. Pressing the Go Back button returns to the remote's last saved setting. Pressing Go back reverts to the remote's last saved setting. 9 Once adjusted, press Save. Sound: Through this section.
Owners Manual
Page 12
Increase or decrease the sensitivity using the "-" and "+" buttons. Pressing the Go Back button returns to being picked up. Once adjusted, press the Save button. Pickup: This menu allows the user to adjust the sensitivity of the remote when reacting to the remote's last saved setting 10
Increase or decrease the sensitivity using the "-" and "+" buttons. Pressing the Go Back button returns to being picked up. Once adjusted, press the Save button. Pickup: This menu allows the user to adjust the sensitivity of the remote when reacting to the remote's last saved setting 10
Owners Manual
Page 13
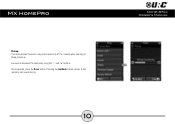
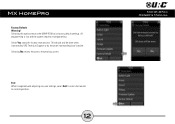
When the firmware updates successfully, this makes the remote search for any available firmware update. Select Yes to the previous menu. When available, the screen displays as confirmation. 11 Select No to return to begin the updating the remote's firmware. Firmware Update: Selecting this screen is displayed as seen on the right.
When the firmware updates successfully, this makes the remote search for any available firmware update. Select Yes to the previous menu. When available, the screen displays as confirmation. 11 Select No to return to begin the updating the remote's firmware. Firmware Update: Selecting this screen is displayed as seen on the right.
Owners Manual
Page 14
All programming is lost and the system requires re-programming. Select Yes starts the factory reset process. Exit: When completed with adjusting any user settings, select Exit to return the remote to the previous screen. Selecting No returns the user to normal operation. 12 Factory Default: Warning! This should only be done when instructed by URC Technical Support or by the smart home professional installer. Selecting this options returns the MXHP-R700 to its factory default settings.
All programming is lost and the system requires re-programming. Select Yes starts the factory reset process. Exit: When completed with adjusting any user settings, select Exit to return the remote to the previous screen. Selecting No returns the user to normal operation. 12 Factory Default: Warning! This should only be done when instructed by URC Technical Support or by the smart home professional installer. Selecting this options returns the MXHP-R700 to its factory default settings.
Owners Manual
Page 15
... interference to radio or television reception, which the receiver is connected. ● Consult the dealer or an experienced radio/TV technical for a Class B digital device, pursuant to radio communications. Federal Communication Commission Interference Statement: This equipment has been tested and found to comply with the instructions, may cause harmful interference to part 15 of the End User Agreement. Specifications: LCD: 2 inch screen (240 x 320) LCD Backlighting...
... interference to radio or television reception, which the receiver is connected. ● Consult the dealer or an experienced radio/TV technical for a Class B digital device, pursuant to radio communications. Federal Communication Commission Interference Statement: This equipment has been tested and found to comply with the instructions, may cause harmful interference to part 15 of the End User Agreement. Specifications: LCD: 2 inch screen (240 x 320) LCD Backlighting...
Owners Manual
Page 16
... any Radio or TV interference caused by unauthorized modifications to the following two conditions: 1. Federal Communication Commissions (FCC) Radiation Exposure Statement: This remote device is approved as a hand-held and hand-operated only portable (relative to operate the equipment. FCC Caution: This device complies with any interference received, including interference that may not cause harmful interference. 2. Any changes or...
... any Radio or TV interference caused by unauthorized modifications to the following two conditions: 1. Federal Communication Commissions (FCC) Radiation Exposure Statement: This remote device is approved as a hand-held and hand-operated only portable (relative to operate the equipment. FCC Caution: This device complies with any interference received, including interference that may not cause harmful interference. 2. Any changes or...


