

Operation Manual
Page 1
... authorized and approved service dealer. When servicing, use only identical replacement parts. 769-08657 / 00 All information, illustrations, and specifications in Canada. Operator's Manual 2-Cycle Gas Cultivator TB225 TABLE OF CONTENTS Service Information 1 Rules for Safe Operation 2 Know Your Unit 5 Specifications 5 Assembly Instructions 6 Oil and Fuel Information 7 Starting and Stopping Instructions 8 Operating Instructions 9 Maintenance and Repair 10 Cleaning and Storage 13 Troubleshooting Chart 14 Warranty Information 16 SAVE THESE INSTRUCTIONS SERVICE DO NOT RETURN THIS...
... authorized and approved service dealer. When servicing, use only identical replacement parts. 769-08657 / 00 All information, illustrations, and specifications in Canada. Operator's Manual 2-Cycle Gas Cultivator TB225 TABLE OF CONTENTS Service Information 1 Rules for Safe Operation 2 Know Your Unit 5 Specifications 5 Assembly Instructions 6 Oil and Fuel Information 7 Starting and Stopping Instructions 8 Operating Instructions 9 Maintenance and Repair 10 Cleaning and Storage 13 Troubleshooting Chart 14 Warranty Information 16 SAVE THESE INSTRUCTIONS SERVICE DO NOT RETURN THIS...

Operation Manual
Page 2
... Part #753-06792 Muffler Assembly. All U.S. Wash hands after handling. Make sure all safety rules must be thrown or become entangled with your LOCAL SERVICE DEALER to others. Replace parts that certain internal combustion engines operated on U.S. The instructions or warnings they are not substitutes for fuel leaks. Encourage bystanders to others . Do not smoke. • Never operate the unit without the fuel cap...
... Part #753-06792 Muffler Assembly. All U.S. Wash hands after handling. Make sure all safety rules must be thrown or become entangled with your LOCAL SERVICE DEALER to others. Replace parts that certain internal combustion engines operated on U.S. The instructions or warnings they are not substitutes for fuel leaks. Encourage bystanders to others . Do not smoke. • Never operate the unit without the fuel cap...
Operation Manual
Page 3
..., servicing, cleaning, storing, transporting or replacing any other users. These are marked as such. Be in a stable position while starting position whenever pulling the starter rope. Oil the tines with loose or damaged parts. • Turn the engine to prevent unauthorized use . If you strike or become entangled with a household cleaner to remove any other parts or accessories could block moving parts. • Do not touch the engine or muffler...
..., servicing, cleaning, storing, transporting or replacing any other users. These are marked as such. Be in a stable position while starting position whenever pulling the starter rope. Oil the tines with loose or damaged parts. • Turn the engine to prevent unauthorized use . If you strike or become entangled with a household cleaner to remove any other parts or accessories could block moving parts. • Do not touch the engine or muffler...
Operation Manual
Page 4
...; ON/OFF STOP CONTROL ON / START / RUN • ON/OFF STOP CONTROL OFF or STOP • PRIMER BULB Push primer bulb, fully and slowly, 10 times. • CHOKE CONTROL 1. • FULL choke position 2. • PARTIAL choke position 3. • RUN choke position • THROWN OBJECTS AND ROTATING CUTTER CAN CAUSE SEVERE INJURY WARNING: Small objects can be used in the starting . Failure to operator's manual for complete safety, assembly, operating and maintenance and repair information. Wear eye...
...; ON/OFF STOP CONTROL ON / START / RUN • ON/OFF STOP CONTROL OFF or STOP • PRIMER BULB Push primer bulb, fully and slowly, 10 times. • CHOKE CONTROL 1. • FULL choke position 2. • PARTIAL choke position 3. • RUN choke position • THROWN OBJECTS AND ROTATING CUTTER CAN CAUSE SEVERE INJURY WARNING: Small objects can be used in the starting . Failure to operator's manual for complete safety, assembly, operating and maintenance and repair information. Wear eye...

Operation Manual
Page 5
... - 24 lb (10.4 - 10.9 kg) * All specifications are based on the latest product information available at any time without notice. 5 APPLICATION • Cultivating sod and light to make changes at the time of printing. NO ASSEMBLY TOOLS REQUIRED KNOW YOUR UNIT Air Filter Cover Muffler Spark Plug Starter Rope Grip Choke Lever Throttle Control Handlebar Knobs Upper Handle On/Off Control Primer Bulb Tine Guard Gear Box Fuel Cap Lower Handle Wheel Assembly Tines SPECIFICATIONS* Engine Type Air-Cooled, 2-Cycle Displacement 25 cc (1.52 cu.
... - 24 lb (10.4 - 10.9 kg) * All specifications are based on the latest product information available at any time without notice. 5 APPLICATION • Cultivating sod and light to make changes at the time of printing. NO ASSEMBLY TOOLS REQUIRED KNOW YOUR UNIT Air Filter Cover Muffler Spark Plug Starter Rope Grip Choke Lever Throttle Control Handlebar Knobs Upper Handle On/Off Control Primer Bulb Tine Guard Gear Box Fuel Cap Lower Handle Wheel Assembly Tines SPECIFICATIONS* Engine Type Air-Cooled, 2-Cycle Displacement 25 cc (1.52 cu.

Operation Manual
Page 6
... pin (Fig. 1). Insert the clevis pin through the wheel bracket and assembly and lock it in place (Fig. 3). Adjust the height by moving the wheel assembly along the wheel bracket. 4. Loosen the two knobs on the inside of the wheel assembly before using the unit. Cotter Pin Lower Raise Fig. 1 Wheel Assembly Wheel Bracket POSITIONING THE HANDLEBARS 1. NOTE: Moving the wheel assembly down will lower the wheel height. Readjust the throttle cable and switch wires...
... pin (Fig. 1). Insert the clevis pin through the wheel bracket and assembly and lock it in place (Fig. 3). Adjust the height by moving the wheel assembly along the wheel bracket. 4. Loosen the two knobs on the inside of the wheel assembly before using the unit. Cotter Pin Lower Raise Fig. 1 Wheel Assembly Wheel Bracket POSITIONING THE HANDLEBARS 1. NOTE: Moving the wheel assembly down will lower the wheel height. Readjust the throttle cable and switch wires...
Operation Manual
Page 7
... of ignition for specific gas and oil mixing ratios. Reinstall the fuel cap. 6. If unavailable, use the fresh fuel mix explained in place. Never operate the unit without the fuel cap securely in your operator's manual • Use the fuel additive STA-BIL® or an equivalent • Always agitate the fuel mix before fueling the unit • Drain the tank and run the engine dry before filling the fuel tank. Avoid creating a source of 2-cycle oil makes a 40:1 fuel/oil ratio...
... of ignition for specific gas and oil mixing ratios. Reinstall the fuel cap. 6. If unavailable, use the fresh fuel mix explained in place. Never operate the unit without the fuel cap securely in your operator's manual • Use the fuel additive STA-BIL® or an equivalent • Always agitate the fuel mix before fueling the unit • Drain the tank and run the engine dry before filling the fuel tank. Avoid creating a source of 2-cycle oil makes a 40:1 fuel/oil ratio...
Operation Manual
Page 8
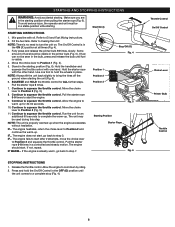
... release the primer bulb 10 times, slowly. Move the choke lever to Fueling the Unit. Use one hand. Continue to squeeze the throttle control. Continue to squeeze the throttle control. Continue to Position 2 and continue the warm-up . The engine hesitates, return the choke lever to squeeze the throttle control. Pull the starter rope 3-8 times in a stable position while starting. IF WARM... Start/On (I ) position at all times (Fig. 4). 3. Mix gasoline with one foot to turn the unit...
... release the primer bulb 10 times, slowly. Move the choke lever to Fueling the Unit. Use one hand. Continue to squeeze the throttle control. Continue to squeeze the throttle control. Continue to Position 2 and continue the warm-up . The engine hesitates, return the choke lever to squeeze the throttle control. Pull the starter rope 3-8 times in a stable position while starting. IF WARM... Start/On (I ) position at all times (Fig. 4). 3. Mix gasoline with one foot to turn the unit...

Operation Manual
Page 9
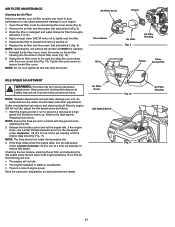
... the tines make contact with the controls and the handling of the cultivator. 7. Fig. 7 9 Refer to starting the engine. If the tines are familiar with the ground (Fig. 7). 5. If necessary, adjust the tines as described in the Assembly Instructions section. 3. Grasp the spark plug wire firmly and pull the cap from one location to another. 1. Stop the engine. 2. OPERATING INSTRUCTIONS WARNING: Dress properly to reduce the...
... the tines make contact with the controls and the handling of the cultivator. 7. Fig. 7 9 Refer to starting the engine. If the tines are familiar with the ground (Fig. 7). 5. If necessary, adjust the tines as described in the Assembly Instructions section. 3. Grasp the spark plug wire firmly and pull the cap from one location to another. 1. Stop the engine. 2. OPERATING INSTRUCTIONS WARNING: Dress properly to reduce the...
Operation Manual
Page 10
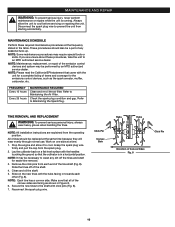
... normal use. All 4 tines should also be performed by an MTD authorized service dealer. Grasp the spark plug wire firmly and pull the cap from each other (Fig. 8). NOTE: It may be replaced at the frequency stated in the table. These procedures should be necessary to cool before servicing or repairing the unit. NOTE: All installation instructions are facing as the spark arrestor, muffler, carburetor, etc...
... normal use. All 4 tines should also be performed by an MTD authorized service dealer. Grasp the spark plug wire firmly and pull the cap from each other (Fig. 8). NOTE: It may be replaced at the frequency stated in the table. These procedures should be necessary to cool before servicing or repairing the unit. NOTE: All installation instructions are facing as the spark arrestor, muffler, carburetor, etc...
Operation Manual
Page 11
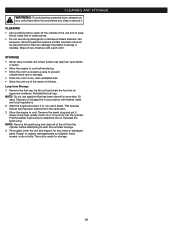
... during idle speed adjustments. Checking the fuel mixture, cleaning the air filter, and adjusting the idle speed screw should make carburetor adjustments. Air Filter Cover Idle Speed Screw Fig. 10 Fig. 11 Air Filter Housing 11 Rinse the filter thoroughly and allow it run for about 2-3 minutes at a time (as follows: 1. NOTE: Operating the unit without the air filter will not idle • The engine hesitates or stalls on the air filter cover (Fig. 10). 8. Reinstall the air filter cover. NOTE: Do not over tighten as needed ) until the engine idles...
... during idle speed adjustments. Checking the fuel mixture, cleaning the air filter, and adjusting the idle speed screw should make carburetor adjustments. Air Filter Cover Idle Speed Screw Fig. 10 Fig. 11 Air Filter Housing 11 Rinse the filter thoroughly and allow it run for about 2-3 minutes at a time (as follows: 1. NOTE: Operating the unit without the air filter will not idle • The engine hesitates or stalls on the air filter cover (Fig. 10). 8. Reinstall the air filter cover. NOTE: Do not over tighten as needed ) until the engine idles...
Operation Manual
Page 12
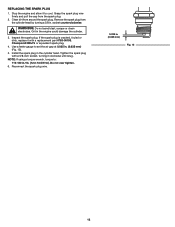
..., turning it with a replacement part #753-06193, Champion® RDJ7J or equivalent spark plug. 4. REPLACING THE SPARK PLUG 1. Grasp the spark plug wire firmly and pull the cap from around the spark plug. socket counterclockwise. Install the spark plug in the engine could damage the cylinder. 3. Inspect the spark plug. Grit in the cylinder head. Reconnect the spark plug wire. 0.025 in .•lb. (12.3-13.5 N•m). WARNING: Do not sand blast, scrape or clean electrodes. Use a feeler gauge...
..., turning it with a replacement part #753-06193, Champion® RDJ7J or equivalent spark plug. 4. REPLACING THE SPARK PLUG 1. Grasp the spark plug wire firmly and pull the cap from around the spark plug. socket counterclockwise. Install the spark plug in the engine could damage the cylinder. 3. Inspect the spark plug. Grit in the cylinder head. Reconnect the spark plug wire. 0.025 in .•lb. (12.3-13.5 N•m). WARNING: Do not sand blast, scrape or clean electrodes. Use a feeler gauge...
Operation Manual
Page 13
... plastic housings or handles. Pull the starter rope slowly to cool. Reinstall the spark plug. Wipe off any moisture with federal, state and local regulations. 2. Some household cleaners contain aromatic oils such as pine and lemon that all of the oil from the carburetor. 3. Long-term Storage 1. Remove the fuel cap, tip the unit and drain the fuel into the cylinder. NOTE: Do not use or...
... plastic housings or handles. Pull the starter rope slowly to cool. Reinstall the spark plug. Wipe off any moisture with federal, state and local regulations. 2. Some household cleaners contain aromatic oils such as pine and lemon that all of the oil from the carburetor. 3. Long-term Storage 1. Remove the fuel cap, tip the unit and drain the fuel into the cylinder. NOTE: Do not use or...
Operation Manual
Page 14
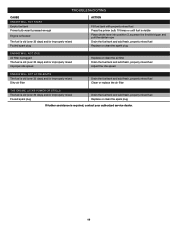
.../or improperly mixed Fouled spark plug ACTION Fill fuel tank with properly mixed fuel Press the primer bulb 10 times or until fuel is visible Place choke lever into position 3, squeeze the throttle trigger and pull the starter rope Drain the fuel tank and add fresh, properly mixed fuel Replace or clean the spark plug ENGINE WILL NOT IDLE Air filter is plugged The fuel is old (over 30 days) and/or improperly mixed Improper idle speed Replace or clean the air filter Drain the fuel tank and add fresh, properly mixed fuel Adjust the idle speed ENGINE WILL NOT...
.../or improperly mixed Fouled spark plug ACTION Fill fuel tank with properly mixed fuel Press the primer bulb 10 times or until fuel is visible Place choke lever into position 3, squeeze the throttle trigger and pull the starter rope Drain the fuel tank and add fresh, properly mixed fuel Replace or clean the spark plug ENGINE WILL NOT IDLE Air filter is plugged The fuel is old (over 30 days) and/or improperly mixed Improper idle speed Replace or clean the air filter Drain the fuel tank and add fresh, properly mixed fuel Adjust the idle speed ENGINE WILL NOT...
Operation Manual
Page 16
... 1-800-668-1238 in material or workmanship. Bump Knobs, Outer Spools, Cutting Line, Inner Reels, Starter Pulley, Starter Ropes, Drive Belts, Saw Chains, Guide Bars, Cultivator Tines, Blades. No other than the amount of the purchase price of any kind be defective in Canada. You assume the risk and liability for use with the product(s) covered by this Warranty. To locate your warranty as set forth above. (Some states do not allow...
... 1-800-668-1238 in material or workmanship. Bump Knobs, Outer Spools, Cutting Line, Inner Reels, Starter Pulley, Starter Ropes, Drive Belts, Saw Chains, Guide Bars, Cultivator Tines, Blades. No other than the amount of the purchase price of any kind be defective in Canada. You assume the risk and liability for use with the product(s) covered by this Warranty. To locate your warranty as set forth above. (Some states do not allow...


