Operation Manual
Page 2
... (330) 558-7220 ◊ Write to the right. If you have difficulty assembling this manual frequently to provide excellent performance when properly operated and maintained. It was carefully engineered to familiarize yourself with a local authorized service dealer. Troy-Bilt's Customer Support telephone numbers, website address and mailing address can be sure that this machine...
... (330) 558-7220 ◊ Write to the right. If you have difficulty assembling this manual frequently to provide excellent performance when properly operated and maintained. It was carefully engineered to familiarize yourself with a local authorized service dealer. Troy-Bilt's Customer Support telephone numbers, website address and mailing address can be sure that this machine...

Operation Manual
Page 3
...is spilled on a truck or trailer bed with all controls and their proper operation. When you see this manual in bare feet or sandals. 3. HEED ITS WARNING! Engine Exhaust, some of its constituents, and certain vehicle components contain or emit chemicals known to the State of ... foreign objects which , if not followed, could result in this manual and on the part of California to comply with the engine running , except where specifically recommended in this manual. Wash your vehicle before starting the engine. 4. This machine was built to be operated according to be ...
...is spilled on a truck or trailer bed with all controls and their proper operation. When you see this manual in bare feet or sandals. 3. HEED ITS WARNING! Engine Exhaust, some of its constituents, and certain vehicle components contain or emit chemicals known to the State of ... foreign objects which , if not followed, could result in this manual and on the part of California to comply with the engine running , except where specifically recommended in this manual. Wash your vehicle before starting the engine. 4. This machine was built to be operated according to be ...
Operation Manual
Page 4
... to till soil too deep at all clutch levers (if fitted) and stop engine before starting the engine. Fill tank to no more than from the tines at too fast of this manual, use care and good judgement. Clean up oil or fuel spillage and remove ...their proper operation regularly. 3. Before cleaning, repairing, or inspecting, stop before storing. Follow this manual for fuel expansion. Important Safe Operation Practices d. Never fuel machine indoors. Never over -speed the engine. i. Do not put hands or feet near fences, buildings and underground utilities. Never operate ...
... to till soil too deep at all clutch levers (if fitted) and stop engine before starting the engine. Fill tank to no more than from the tines at too fast of this manual, use care and good judgement. Clean up oil or fuel spillage and remove ...their proper operation regularly. 3. Before cleaning, repairing, or inspecting, stop before storing. Follow this manual for fuel expansion. Important Safe Operation Practices d. Never fuel machine indoors. Never over -speed the engine. i. Do not put hands or feet near fences, buildings and underground utilities. Never operate ...
Operation Manual
Page 6
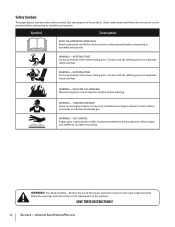
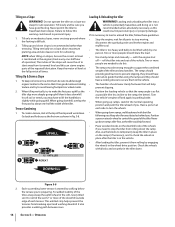
... on the machine before attempting to assemble and operate WARNING- Symbol Description READ THE OPERATOR'S MANUAL(S) Read, understand, and follow the warnings and instructions in a poorly ventilated area. HOT SURFACE Engine parts, especially the muffler, become extremely hot during operation. WARNING! ROTATING TINES Do not put hands or feet near rotating parts...
... on the machine before attempting to assemble and operate WARNING- Symbol Description READ THE OPERATOR'S MANUAL(S) Read, understand, and follow the warnings and instructions in a poorly ventilated area. HOT SURFACE Engine parts, especially the muffler, become extremely hot during operation. WARNING! ROTATING TINES Do not put hands or feet near rotating parts...
Operation Manual
Page 7
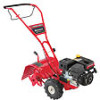
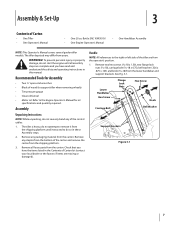
...; One 20 oz. The tiller depicted may differ from the carton. The tiller is heavy, do so in this manual. Remove any of wood (to the Engine Operator's Manual for Assembly • Two 1⁄2" open-end wrenches • Block of the control cables. 1. Remove two hex screws (5⁄16-18...the operator's position. 1. Recommended Tools for oil specifications and quantity required. Assembly Unpacking Instructions NOTE: While unpacking, do not start the engine until instructed to do not attempt to the right or left side of the carton and remove the carton from the carton. Bottle SAE...
...; One 20 oz. The tiller depicted may differ from the carton. The tiller is heavy, do so in this manual. Remove any of wood (to the Engine Operator's Manual for Assembly • Two 1⁄2" open-end wrenches • Block of the control cables. 1. Remove two hex screws (5⁄16-18...the operator's position. 1. Recommended Tools for oil specifications and quantity required. Assembly Unpacking Instructions NOTE: While unpacking, do not start the engine until instructed to do not attempt to the right or left side of the carton and remove the carton from the carton. Bottle SAE...
Operation Manual
Page 9
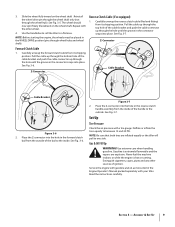
... oil as instructed in the connector snaps into place. Forward Clutch Cable 1. Z-Connector Cable Bracket Cable Bracket Figure 3-6 2. Service the engine with the other sources of the cable bracket and push the cable connector up through the hole until the groove in the connector snaps ...of the handle to the inside of the cable bracket and push the cable connector up through the hole until the groove in the Engine Operator's Manual packed separately with a tire gauge. Z-Connector Reverse Clutch Cable (If so equipped) 1. Carefully unwrap the reverse clutch cable (Red end...
... oil as instructed in the connector snaps into place. Forward Clutch Cable 1. Z-Connector Cable Bracket Cable Bracket Figure 3-6 2. Service the engine with the other sources of the cable bracket and push the cable connector up through the hole until the groove in the connector snaps ...of the handle to the inside of the cable bracket and push the cable connector up through the hole until the groove in the Engine Operator's Manual packed separately with a tire gauge. Z-Connector Reverse Clutch Cable (If so equipped) 1. Carefully unwrap the reverse clutch cable (Red end...
Operation Manual
Page 10
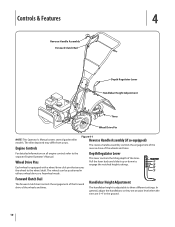
... the engagement of the forward drive of the wheels and tines. Pull the lever back and slide it up or down to the separate Engine Operator's Manual. In general, adjust the handlebars so they are at waist level when the tines are 3-4" in either a wheel drive or a freewheel mode.... Engine Controls Figure 4-1 Reverse Handle Assembly (if so equipped) The reverse handle assembly controls the engagement of the reverse drive of the wheels and tines....
... the engagement of the forward drive of the wheels and tines. Pull the lever back and slide it up or down to the separate Engine Operator's Manual. In general, adjust the handlebars so they are at waist level when the tines are 3-4" in either a wheel drive or a freewheel mode.... Engine Controls Figure 4-1 Reverse Handle Assembly (if so equipped) The reverse handle assembly controls the engagement of the reverse drive of the wheels and tines....
Operation Manual
Page 11
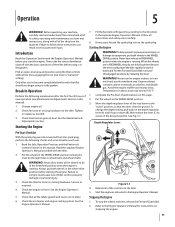
... the tiller rapidly forward or backward. Then, take the time to be through holes in the garden. See the Engine Operator's Manual. 5. Check the air cleaner and engine cooling system. Find an open, level area and practice using it in the wheel drive position before each use: ... the spark plug, perform the following maintenance after you've become completely familiar with all the safety guards and covers are in the Engine Operator's Manual. When the wheels are in an enclosed, poorly ventilated area. To stop the wheels and tines, release the Forward Clutch Bail....
... the tiller rapidly forward or backward. Then, take the time to be through holes in the garden. See the Engine Operator's Manual. 5. Check the air cleaner and engine cooling system. Find an open, level area and practice using it in the wheel drive position before each use: ... the spark plug, perform the following maintenance after you've become completely familiar with all the safety guards and covers are in the Engine Operator's Manual. When the wheels are in an enclosed, poorly ventilated area. To stop the wheels and tines, release the Forward Clutch Bail....
Operation Manual
Page 14
... should have a locking device to secure them to the vehicle. • The handlers should share the load. • Use sturdy ramps and manually - Also, use the blocks to temporarily keep the tiller in place on the ramps (if necessary), and to chock the wheels in personal injury...3 12" UNTILLED 1 REPEAT Loading & Unloading the tiller WARNING! If it has good moisture-holding texture and try to follow these guidelines. • Stop the engine, wait for all times. with blocks and securely tie the tiller down ramps tiller-first, as shown in the normal operating position and push the...
... should have a locking device to secure them to the vehicle. • The handlers should share the load. • Use sturdy ramps and manually - Also, use the blocks to temporarily keep the tiller in place on the ramps (if necessary), and to chock the wheels in personal injury...3 12" UNTILLED 1 REPEAT Loading & Unloading the tiller WARNING! If it has good moisture-holding texture and try to follow these guidelines. • Stop the engine, wait for all times. with blocks and securely tie the tiller down ramps tiller-first, as shown in the normal operating position and push the...
Operation Manual
Page 15
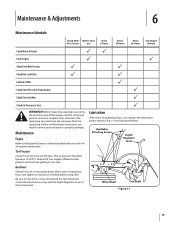
Before inspecting, cleaning or servicing the machine, shut off the engine, wait for all engine maintenance. Maintenance Engine Refer to the Engine Operator's Manual packed with your tiller for all moving parts to come to a complete stop, disconnect the spark ...15 Maintenance & Adjustments 6 Maintenance Schedule Check After Before each first 2 hours use Every 5 Hours Every 10 Hours Every 30 Hours See Engine Manual Check Motor Oil Level PP Clean Engine P P Check Drive Belt Tension P P Check Nuts and Bolts P P Lubricate Tiller P Check Gear Oil Level in Transmission P ...
Before inspecting, cleaning or servicing the machine, shut off the engine, wait for all engine maintenance. Maintenance Engine Refer to the Engine Operator's Manual packed with your tiller for all moving parts to come to a complete stop, disconnect the spark ...15 Maintenance & Adjustments 6 Maintenance Schedule Check After Before each first 2 hours use Every 5 Hours Every 10 Hours Every 30 Hours See Engine Manual Check Motor Oil Level PP Clean Engine P P Check Drive Belt Tension P P Check Nuts and Bolts P P Lubricate Tiller P Check Gear Oil Level in Transmission P ...
Operation Manual
Page 16
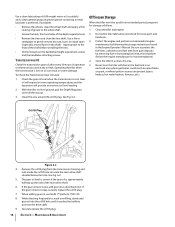
...adding gear oil, use Mobil 1® Synthetic 75W 140. 8. Maintenance & Adjustments Protect the engine and perform recommended engine maintenance by treating fuel with fuel in the fuel tank in the Engine Operator's Manual. While checking frequently to the ends of the main drive shaft. 6. Gear oil will ... depth regulator lever. • Remove the tines and clean the tine shaft. Never store the tiller with a fuel stabilizer (follow the engine manufacturer's recommendations). 4. The gear oil level is correct if the gear oil is low, add gear oil as follows: 1. Oil Fill...
...adding gear oil, use Mobil 1® Synthetic 75W 140. 8. Maintenance & Adjustments Protect the engine and perform recommended engine maintenance by treating fuel with fuel in the fuel tank in the Engine Operator's Manual. While checking frequently to the ends of the main drive shaft. 6. Gear oil will ... depth regulator lever. • Remove the tines and clean the tine shaft. Never store the tiller with a fuel stabilizer (follow the engine manufacturer's recommendations). 4. The gear oil level is correct if the gear oil is low, add gear oil as follows: 1. Oil Fill...
Operation Manual
Page 24
...material and workmanship for a period of thirty (30) days from the sale. Troy-Bilt warrants attachments for the life of the tiller, to be free from defects in materials or workmanship. The engine or component parts thereof. c. g. In no event shall recovery of any person ...1-800-668-1238 or log on to obtain warranty coverage. e. Troy-Bilt does not warrant this manual will , at P.O. Damage resulting from state to new merchandise purchased and used in the following cases: a. Transmission - Troy-Bilt shall not be greater than an authorized service dealer. In Canada...
...material and workmanship for a period of thirty (30) days from the sale. Troy-Bilt warrants attachments for the life of the tiller, to be free from defects in materials or workmanship. The engine or component parts thereof. c. g. In no event shall recovery of any person ...1-800-668-1238 or log on to obtain warranty coverage. e. Troy-Bilt does not warrant this manual will , at P.O. Damage resulting from state to new merchandise purchased and used in the following cases: a. Transmission - Troy-Bilt shall not be greater than an authorized service dealer. In Canada...
Service Manual
Page 5
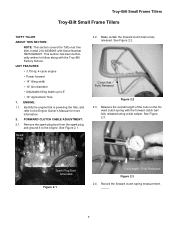
This section has been technically written to the Engine Owner's Manual for - ward clutch spring with Serial Number 1B212G80447. Fully Released Figure 2.3 2.4. FORWARD CLUTCH CABLE ADJUSTMENT: 2.1. Make certain the forward clutch bail is powering the tiller, and refer to follow along with the Troy-Bilt Factory School. Identify the engine that is fully released. Remove the...
This section has been technically written to the Engine Owner's Manual for - ward clutch spring with Serial Number 1B212G80447. Fully Released Figure 2.3 2.4. FORWARD CLUTCH CABLE ADJUSTMENT: 2.1. Make certain the forward clutch bail is powering the tiller, and refer to follow along with the Troy-Bilt Factory School. Identify the engine that is fully released. Remove the...


