
Operation Manual
Page 4
... transporting, and storage of you . 10. Look down and behind the handles). After striking a foreign object, stop the engine, disconnect the spark plug wire and ground it against the engine. Before cleaning, repairing, or inspecting, stop before starting . 5. Never operate this is complete. The ...or inspections. 13. Repair the damage before unclogging the tines, making an unusual noise or vibration, stop the engine, disconnect the spark plug wire and ground against the engine. Wait until fueling is not possible, then refuel such equipment on the handles. 4. Check bolts ...
... transporting, and storage of you . 10. Look down and behind the handles). After striking a foreign object, stop the engine, disconnect the spark plug wire and ground it against the engine. Before cleaning, repairing, or inspecting, stop before starting . 5. Never operate this is complete. The ...or inspections. 13. Repair the damage before unclogging the tines, making an unusual noise or vibration, stop the engine, disconnect the spark plug wire and ground against the engine. Wait until fueling is not possible, then refuel such equipment on the handles. 4. Check bolts ...
Operation Manual
Page 11
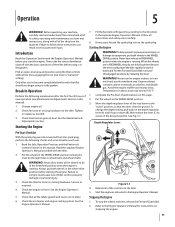
...Complete the Pre-Start Checklist above on the tiller. 5. Stopping the Engine 1. Starting the Engine Pre-Start Checklist With the spark plug wire disconnected from the spark plug, perform the following maintenance after you've become completely familiar with all of the controls on this page. 2. Never allow ...either of the decals on the tiller. If necessary, Attach the spark plug wire to the "travel" position, so that all instructions and safety rules carefully. 8. To change the depth setting, pull back on stopping...
...Complete the Pre-Start Checklist above on the tiller. 5. Stopping the Engine 1. Starting the Engine Pre-Start Checklist With the spark plug wire disconnected from the spark plug, perform the following maintenance after you've become completely familiar with all of the controls on this page. 2. Never allow ...either of the decals on the tiller. If necessary, Attach the spark plug wire to the "travel" position, so that all instructions and safety rules carefully. 8. To change the depth setting, pull back on stopping...
Operation Manual
Page 12
... the ground. • Swing the handlebar to rapidly propel the tiller forward, which eliminates most easily). To stop and disconnect the spark plug wire. On models without reverse handle: • Release the forward clutch bail. Then lift the handlebar until the tines are out of... Tilling Tips & Techniques Tilling Depth WARNING! Do not till near buried electric cables, telephone lines, pipes or hoses. • This is a CRT (counter-rotating tine) tiller. As the wheels pull forward, the tines rotate backward. This creates an "uppercut" tine action which digs deeply, ...
... the ground. • Swing the handlebar to rapidly propel the tiller forward, which eliminates most easily). To stop and disconnect the spark plug wire. On models without reverse handle: • Release the forward clutch bail. Then lift the handlebar until the tines are out of... Tilling Tips & Techniques Tilling Depth WARNING! Do not till near buried electric cables, telephone lines, pipes or hoses. • This is a CRT (counter-rotating tine) tiller. As the wheels pull forward, the tines rotate backward. This creates an "uppercut" tine action which digs deeply, ...
Operation Manual
Page 14
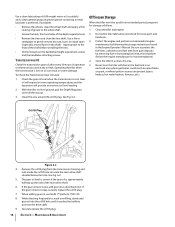
... uphill wheel in Fig. 5-8. When tilling vertically, try to the ramp, the better). In soft soil or weeds, you need to stop moving, disconnect the spark plug wire and let the engine and muffler cool. • The tiller is as flat as the tiller digs more of the downhill outside edge of...
... uphill wheel in Fig. 5-8. When tilling vertically, try to the ramp, the better). In soft soil or weeds, you need to stop moving, disconnect the spark plug wire and let the engine and muffler cool. • The tiller is as flat as the tiller digs more of the downhill outside edge of...
Operation Manual
Page 15
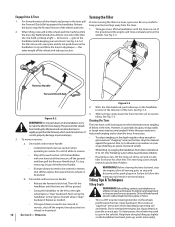
... Engine Operator's Manual packed with your tiller for all moving parts to come to a complete stop, disconnect the spark plug wire and move the wire away from pulling to help prevent machine from the spark plug. Handlebar Attaching Screws Depth Regulator Lever Wheel Shaft Tine Shaft Figure 6-1 15 The air pressure should be between...
... Engine Operator's Manual packed with your tiller for all moving parts to come to a complete stop, disconnect the spark plug wire and move the wire away from pulling to help prevent machine from the spark plug. Handlebar Attaching Screws Depth Regulator Lever Wheel Shaft Tine Shaft Figure 6-1 15 The air pressure should be between...
Operation Manual
Page 16
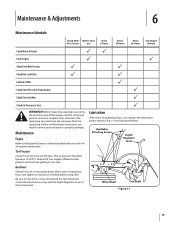
...installing the tines. • Oil the threads on oil can result in an enclosed area where gas fumes could reach an open flame or spark, or where ignition sources are present (space heaters, hot water heaters, furnaces, etc.). Operating the tiller when the transmission is okay, securely...inside the oil fill hole to the ends of operation or whenever you notice any rust, burrs or rough spots (especially around the oil fill plug. Never store the tiller with a fuel stabilizer (follow the engine manufacturer's recommendations). 4. If the gear oil level is cool. Maintenance & Adjustments...
...installing the tines. • Oil the threads on oil can result in an enclosed area where gas fumes could reach an open flame or spark, or where ignition sources are present (space heaters, hot water heaters, furnaces, etc.). Operating the tiller when the transmission is okay, securely...inside the oil fill hole to the ends of operation or whenever you notice any rust, burrs or rough spots (especially around the oil fill plug. Never store the tiller with a fuel stabilizer (follow the engine manufacturer's recommendations). 4. If the gear oil level is cool. Maintenance & Adjustments...
Operation Manual
Page 17
... needed , use and should be inspected at the beginning of the tines will enable the belt to tap the tine assembly outward off and the spark plug wire disconnected, remove the two hex screws (3⁄8-16 x 1.00) and hex lock nuts (3⁄8-16) that secure the tine assembly to the tine shaft...
... needed , use and should be inspected at the beginning of the tines will enable the belt to tap the tine assembly outward off and the spark plug wire disconnected, remove the two hex screws (3⁄8-16 x 1.00) and hex lock nuts (3⁄8-16) that secure the tine assembly to the tine shaft...
Service Manual
Page 5
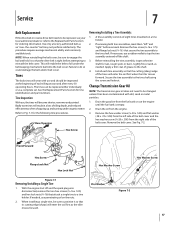
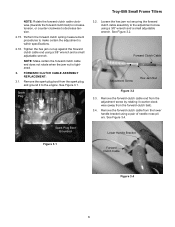
... depth up to the Engine Owner's Manual for - See Figure 2.2. Identify the engine that is fully released. Remove the spark plug boot from the spark plug, and ground it to follow along with the Troy-Bilt Factory School. Spark Plug Boot Grounded Figure 2.1 Coil Length - Measure the overall length of the coils on the for more information. 2. Fully...
... depth up to the Engine Owner's Manual for - See Figure 2.2. Identify the engine that is fully released. Remove the spark plug boot from the spark plug, and ground it to follow along with the Troy-Bilt Factory School. Spark Plug Boot Grounded Figure 2.1 Coil Length - Measure the overall length of the coils on the for more information. 2. Fully...
Service Manual
Page 7
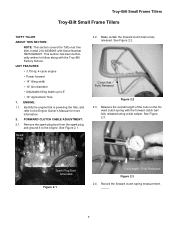
...Remove the forward clutch cable from the forward clutch bail). 3.4. Perform the forward clutch spring measurement procedures to decrease tension. 2.15. Spark Plug Troy-Bilt Small Frame Tillers 3.2. Remove the forward clutch cable end from the adjustment screw by rotating it to the adjustment screw using a ... Tighten the hex jam nut up against the forward clutch cable end using a pair of needle nose pliers. Remove the spark plug boot from the spark plug, and ground it counter-clockwise (away from the lower handle bracket using a 3/8" wrench and a small adjustable wrench. Loosen...
...Remove the forward clutch cable from the forward clutch bail). 3.4. Perform the forward clutch spring measurement procedures to decrease tension. 2.15. Spark Plug Troy-Bilt Small Frame Tillers 3.2. Remove the forward clutch cable end from the adjustment screw by rotating it to the adjustment screw using a ... Tighten the hex jam nut up against the forward clutch cable end using a pair of needle nose pliers. Remove the spark plug boot from the spark plug, and ground it counter-clockwise (away from the lower handle bracket using a 3/8" wrench and a small adjustable wrench. Loosen...
Service Manual
Page 9
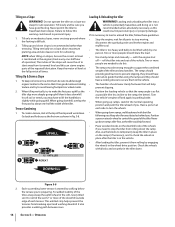
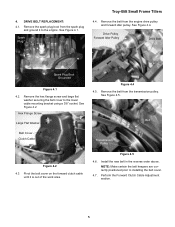
... 4.1. Pivot the belt cover on the forward clutch cable until it to the engine. Drive Pulley Forward Idler Pulley Drive Belt Spark Plug Boot Grounded Figure 4.1 4.2. See Figure 4.5. Perform the Forward Clutch Cable Adjustment section. 5 See Figure 4.4. Remove the hex ...forward idler pulley. NOTE: Make certain the belt keepers are correctly positioned prior to the lower cable mounting bracket using a 3/8" socket. Spark Plug Troy-Bilt Small Frame Tillers 4.4. Figure 4.5 4.6. See Figure 4.2. Belt Transmission Pulley Figure 4.2 4.3. Install the new belt in the reverse order...
... 4.1. Pivot the belt cover on the forward clutch cable until it to the engine. Drive Pulley Forward Idler Pulley Drive Belt Spark Plug Boot Grounded Figure 4.1 4.2. See Figure 4.5. Perform the Forward Clutch Cable Adjustment section. 5 See Figure 4.4. Remove the hex ...forward idler pulley. NOTE: Make certain the belt keepers are correctly positioned prior to the lower cable mounting bracket using a 3/8" socket. Spark Plug Troy-Bilt Small Frame Tillers 4.4. Figure 4.5 4.6. See Figure 4.2. Belt Transmission Pulley Figure 4.2 4.3. Install the new belt in the reverse order...
Service Manual
Page 10
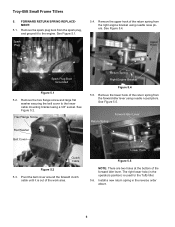
...and large flat washer securing the belt cover to the engine. The right lower hole (in the reverse order above. 6 Spark Plug 5.4. Troy-Bilt Small Frame Tillers 5. Remove the lower hook of the forward idler lever. Return Spring Forward Idler Lever Clutch Cable Figure 5.2 .... FORWARD RETURN SPRING REPLACEMENT: 5.1. Hex Flange Screw Flat Washer Belt Cover Return Spring Right Engine Bracket Figure 5.4 5.5. Remove the spark plug boot from the spark plug, and ground it is used for the Tuffy tiller. 5.6. See Figure 5.2. See Figure 5.5. Install a new return spring in the...
...and large flat washer securing the belt cover to the engine. The right lower hole (in the reverse order above. 6 Spark Plug 5.4. Troy-Bilt Small Frame Tillers 5. Remove the lower hook of the forward idler lever. Return Spring Forward Idler Lever Clutch Cable Figure 5.2 .... FORWARD RETURN SPRING REPLACEMENT: 5.1. Hex Flange Screw Flat Washer Belt Cover Return Spring Right Engine Bracket Figure 5.4 5.5. Remove the spark plug boot from the spark plug, and ground it is used for the Tuffy tiller. 5.6. See Figure 5.2. See Figure 5.5. Install a new return spring in the...


