

User Guide
Page 2
...without the prior written permission of Microsoft Corporation. Copyright Information © 2003 by Microsoft Licensing, Inc., a wholly owned subsidiary of Toshiba. ment to the use of this document, keep it in the United States and/or other countries. No patent liability is ...assumed, with respect to learn about important safety issues. • After reading this Toshiba Pocket PC. They also provide information on the safe handling of this docu- Toshiba Pocket PC e350/e355 User's Guide First edition March 2003 Trademarks Microsoft, ActiveSync, Outlook, Pocket Outlook, Windows...
...without the prior written permission of Microsoft Corporation. Copyright Information © 2003 by Microsoft Licensing, Inc., a wholly owned subsidiary of Toshiba. ment to the use of this document, keep it in the United States and/or other countries. No patent liability is ...assumed, with respect to learn about important safety issues. • After reading this Toshiba Pocket PC. They also provide information on the safe handling of this docu- Toshiba Pocket PC e350/e355 User's Guide First edition March 2003 Trademarks Microsoft, ActiveSync, Outlook, Pocket Outlook, Windows...

User Guide
Page 16
Toshiba Pocket PC e350/e355 User's Guide Where to Find Information This book describes your Pocket PC hardware, provides an overview of the programs on your Toshiba Pocket PC See this source: This User's Guide and device Help. To view Help, tap and then Help. To view Help, click Help and then ...
Toshiba Pocket PC e350/e355 User's Guide Where to Find Information This book describes your Pocket PC hardware, provides an overview of the programs on your Toshiba Pocket PC See this source: This User's Guide and device Help. To view Help, tap and then Help. To view Help, click Help and then ...

User Guide
Page 17
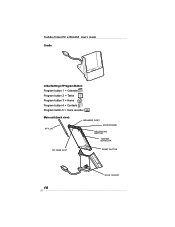
This chapter describes the use . Parts Names and Function Main unit (front view) SD CARD SLOT POWER BUTTON / SCREEN LIGHT STEREO HEADPHONE JACK BATTERY / ALARM LED RECORDING BUTTON ( PROGRAM BUTTON 5 ) TOUCH SCREEN PROGRAM BUTTON 1, 2, 3 & 4 ( FROM THE LEFT ) SPEAKER CURSOR BUTTON / NAVIGATION BUTTON BATTERY SWITCH CRADLE CONNECTION PORT DC-IN SOCKET 17 Chapter 2: Basic Skills Chapter 2: Basic Skills Your Toshiba Pocket PC e350/e355 is easy to learn how to use and customization of your Toshiba Pocket PC e350/e355.
This chapter describes the use . Parts Names and Function Main unit (front view) SD CARD SLOT POWER BUTTON / SCREEN LIGHT STEREO HEADPHONE JACK BATTERY / ALARM LED RECORDING BUTTON ( PROGRAM BUTTON 5 ) TOUCH SCREEN PROGRAM BUTTON 1, 2, 3 & 4 ( FROM THE LEFT ) SPEAKER CURSOR BUTTON / NAVIGATION BUTTON BATTERY SWITCH CRADLE CONNECTION PORT DC-IN SOCKET 17 Chapter 2: Basic Skills Chapter 2: Basic Skills Your Toshiba Pocket PC e350/e355 is easy to learn how to use and customization of your Toshiba Pocket PC e350/e355.
User Guide
Page 18
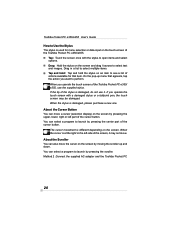
Toshiba Pocket PC e350/e355 User's Guide Cradle Initial Setting of Program Button Program button 1 = Calendar Program button 2 = Tasks Program button 3 = Home Program button 4 = Contacts Program button 5 = Voice recorder Main unit (back view) STYLUS INFRARED PORT MICROPHONE RECORDING BUTTON TOSHIBA SCROLLER SD CARD SLOT RESET BUTTON DC-IN SOCKET 18
Toshiba Pocket PC e350/e355 User's Guide Cradle Initial Setting of Program Button Program button 1 = Calendar Program button 2 = Tasks Program button 3 = Home Program button 4 = Contacts Program button 5 = Voice recorder Main unit (back view) STYLUS INFRARED PORT MICROPHONE RECORDING BUTTON TOSHIBA SCROLLER SD CARD SLOT RESET BUTTON DC-IN SOCKET 18

User Guide
Page 19
...41°F to the left (the "supply" side) with the stylus. Press it quickly. The power turns on . Before using the Toshiba Pocket PC e350/e355, slide this switch at any time will lead to the ambient temperature being too high or low. Chapter 2: Basic Skills Power Button The .... Indicates charging of the battery. 19 The power turns off the battery power to the "stop ." Switching the battery switch to the Toshiba Pocket PC e350/e355. The battery charging process is on The power turns on . Battery Switch The battery switch supplies/cuts off . Flashing orange Orange Yellow ...
...41°F to the left (the "supply" side) with the stylus. Press it quickly. The power turns on . Before using the Toshiba Pocket PC e350/e355, slide this switch at any time will lead to the ambient temperature being too high or low. Chapter 2: Basic Skills Power Button The .... Indicates charging of the battery. 19 The power turns off the battery power to the "stop ." Switching the battery switch to the Toshiba Pocket PC e350/e355. The battery charging process is on The power turns on . Battery Switch The battery switch supplies/cuts off . Flashing orange Orange Yellow ...
User Guide
Page 20
... touch screen with the stylus to launch by pressing the scroller. When the cursor is at the right or the left part of the Toshiba Pocket PC e350/ e355, use it may be damaged. You can select a program to open items and select options. Drag in a list to select multiple items. Tap... Cursor Button You can also move a cursor (selection display) on the screen by pressing the upper, lower, right or left side of the Toshiba Pocket PC e350/e355. About the Scroller You can move the cursor on the screen by moving the scroller up menu that item. Tap: Touch the screen once...
... touch screen with the stylus to launch by pressing the scroller. When the cursor is at the right or the left part of the Toshiba Pocket PC e350/ e355, use it may be damaged. You can select a program to open items and select options. Drag in a list to select multiple items. Tap... Cursor Button You can also move a cursor (selection display) on the screen by pressing the upper, lower, right or left side of the Toshiba Pocket PC e350/e355. About the Scroller You can move the cursor on the screen by moving the scroller up menu that item. Tap: Touch the screen once...

User Guide
Page 21
When using the Toshiba Pocket PC for the first time, set the battery switch to Charge the Battery You can use two charging methods. How to the supply side, and then charge the built-in battery with the supplied AC adapter. Method1: Connect the supplied AC adapter and the cradle as shown in the Toshiba Pocket PC e350/e355. Turn the unit off before connecting the AC Adapter. Chapter 2: Basic Skills Battery Charging A built-in battery is installed in the figure below, and then insert the Toshiba Pocket PC 340 into the cradle. 21
When using the Toshiba Pocket PC for the first time, set the battery switch to Charge the Battery You can use two charging methods. How to the supply side, and then charge the built-in battery with the supplied AC adapter. Method1: Connect the supplied AC adapter and the cradle as shown in the Toshiba Pocket PC e350/e355. Turn the unit off before connecting the AC Adapter. Chapter 2: Basic Skills Battery Charging A built-in battery is installed in the figure below, and then insert the Toshiba Pocket PC 340 into the cradle. 21

User Guide
Page 22
When the lamp is completely charged, the LED alarm lamp color will change to 104°F. When the battery is lit in the figure below. Toshiba Pocket PC e350/e355 User's Guide Method 2: Connect the supplied AC adapter and the Toshiba Pocket PC e350/e355 as shown in orange during the battery charging, you can use the Toshiba Pocket PC e350/e355. For charging the battery, maintain an ambient temperature from approx. 41°F to green. 22
When the lamp is completely charged, the LED alarm lamp color will change to 104°F. When the battery is lit in the figure below. Toshiba Pocket PC e350/e355 User's Guide Method 2: Connect the supplied AC adapter and the Toshiba Pocket PC e350/e355 as shown in orange during the battery charging, you can use the Toshiba Pocket PC e350/e355. For charging the battery, maintain an ambient temperature from approx. 41°F to green. 22

User Guide
Page 23
... time is operated while connected to the decrease of the battery capacity. For more information, see "Customize Your Toshiba Pocket PC" on if not used the Toshiba Pocket PC e350/e355 for the battery. When you have not used . Battery Life The built-in a place of the battery ...high or low temperature. Fully recharge the battery before using. 23 Chapter 2: Basic Skills How to power saving mode. Use the Toshiba Pocket PC e350/e355 with any other optional equipment. It may be high. This temperature range is operated with storage card or with an ambient temperature...
... time is operated while connected to the decrease of the battery capacity. For more information, see "Customize Your Toshiba Pocket PC" on if not used the Toshiba Pocket PC e350/e355 for the battery. When you have not used . Battery Life The built-in a place of the battery ...high or low temperature. Fully recharge the battery before using. 23 Chapter 2: Basic Skills How to power saving mode. Use the Toshiba Pocket PC e350/e355 with any other optional equipment. It may be high. This temperature range is operated with storage card or with an ambient temperature...

User Guide
Page 24
... connect the AC adapter to a storage card. As a precaution, it is recommended to save the Toshiba Pocket PC e350/e355/e355's memory data to your computer or to the Toshiba Pocket PC e350/e355 and charge the battery. The manufacturer is not responsible for a long time, the built-in battery ...may completely discharge. The built-in the Toshiba Pocket PC e350/e355 could be lost. Toshiba Pocket PC e350/e355 User's Guide Battery Charge Level and Stored Data Protection If the battery charge level becomes extremely low, or is ...
... connect the AC adapter to a storage card. As a precaution, it is recommended to save the Toshiba Pocket PC e350/e355/e355's memory data to your computer or to the Toshiba Pocket PC e350/e355 and charge the battery. The manufacturer is not responsible for a long time, the built-in battery ...may completely discharge. The built-in the Toshiba Pocket PC e350/e355 could be lost. Toshiba Pocket PC e350/e355 User's Guide Battery Charge Level and Stored Data Protection If the battery charge level becomes extremely low, or is ...

User Guide
Page 26
...operation. Tap NEXT. 5. When you finish the paste operation, this stage is completed. Move the battery switch to use the Toshiba Pocket PC e350/e355. Tap the screen to the Stylus screen. Five taps completes the positioning correction. The screen then changes to start the following ...cross target with the stylus. Repeat the correction procedure. 3. After you tap the Complete screen, the Today screen appears. The Toshiba Pocket PC e350/e355 powers on -screen explanation and then follow the initial setup procedures below, after the battery has been charged. 1. The next...
...operation. Tap NEXT. 5. When you finish the paste operation, this stage is completed. Move the battery switch to use the Toshiba Pocket PC e350/e355. Tap the screen to the Stylus screen. Five taps completes the positioning correction. The screen then changes to start the following ...cross target with the stylus. Repeat the correction procedure. 3. After you tap the Complete screen, the Today screen appears. The Toshiba Pocket PC e350/e355 powers on -screen explanation and then follow the initial setup procedures below, after the battery has been charged. 1. The next...

User Guide
Page 27
Chapter 2: Basic Skills Inserting an SD Card 1. Press down until a clicking sound is heard. 27 Insert the card with its contact surface (metal contact surface) facing the back of the Toshiba Pocket PC e350/e355. 4. Remove the dummy card. 3. Turn off the power. 2.
Chapter 2: Basic Skills Inserting an SD Card 1. Press down until a clicking sound is heard. 27 Insert the card with its contact surface (metal contact surface) facing the back of the Toshiba Pocket PC e350/e355. 4. Remove the dummy card. 3. Turn off the power. 2.

User Guide
Page 28
Pull the card straight up to remove. 28 Lightly press down the card until a clicking sound is heard. The card will pop out slightly from the slot. 3. Turn off the power. 2. Toshiba Pocket PC e350/e355 User's Guide To remove a card: 1.
Pull the card straight up to remove. 28 Lightly press down the card until a clicking sound is heard. The card will pop out slightly from the slot. 3. Turn off the power. 2. Toshiba Pocket PC e350/e355 User's Guide To remove a card: 1.

User Guide
Page 29
Chapter 2: Basic Skills Connecting to a Computer Before connecting your computer. (See Chapter 3) The position of connecting port on your Toshiba Pocket PC e350/e355 to a computer, check the following. Insert the Pocket PC into the cradle. 29 ActiveSync has been installed on the computer may differ according to your computer as shown in the illustration below. 2. Connect the USB cradle to the computer type. To Connect Using The Supplied Cradle: 1.
Chapter 2: Basic Skills Connecting to a Computer Before connecting your computer. (See Chapter 3) The position of connecting port on your Toshiba Pocket PC e350/e355 to a computer, check the following. Insert the Pocket PC into the cradle. 29 ActiveSync has been installed on the computer may differ according to your computer as shown in the illustration below. 2. Connect the USB cradle to the computer type. To Connect Using The Supplied Cradle: 1.

User Guide
Page 30
When the Toshiba Pocket PC e350/e355 is connected to another device via a USB Client Cable do not plug the AC adapter directly into the port on the USB Client cable connector. 30 Toshiba Pocket PC e350/e355 User's Guide To connect directly using a connection cable: Connect the Toshiba Pocket PC e350/e355 directly to interference. Instead, plug the AC adapter into the Pocket PC as this may lead to your computer using an optional USB Client Cable.
When the Toshiba Pocket PC e350/e355 is connected to another device via a USB Client Cable do not plug the AC adapter directly into the port on the USB Client cable connector. 30 Toshiba Pocket PC e350/e355 User's Guide To connect directly using a connection cable: Connect the Toshiba Pocket PC e350/e355 directly to interference. Instead, plug the AC adapter into the Pocket PC as this may lead to your computer using an optional USB Client Cable.

User Guide
Page 32
Toshiba Pocket PC e350/e355 User's Guide Status Icon Meaning Turns all notification icons. Tap the icon to view all sounds on and off the label so that you see ... beginning or ending Sy nchronization is occurring Notif ication that one or more e-mail messages were receiv ed If more program buttons located on the Toshiba Pocket PC Companion CD for check boxes and drop-down menus. Programs You can switch from one or more notification icons need to some programs...
Toshiba Pocket PC e350/e355 User's Guide Status Icon Meaning Turns all notification icons. Tap the icon to view all sounds on and off the label so that you see ... beginning or ending Sy nchronization is occurring Notif ication that one or more e-mail messages were receiv ed If more program buttons located on the Toshiba Pocket PC Companion CD for check boxes and drop-down menus. Programs You can switch from one or more notification icons need to some programs...

User Guide
Page 34
Toshiba Pocket PC e350/e355 User's Guide Tap to change volume to a contact. Pop-up Menus With pop-up menus vary from program to select a program. For example, you want ...
Toshiba Pocket PC e350/e355 User's Guide Tap to change volume to a contact. Pop-up Menus With pop-up menus vary from program to select a program. For example, you want ...

User Guide
Page 36
...using the soft key- Input Panel button. Entering Text Using the Input Panel Use the input panel to enter information in any program on Your Toshiba Pocket PC You have several options for entering new information: • Use the input panel to anticipate. 36 Tap to see your choices....the screen. • Speak into your text at the insertion point. To show or hide the input panel, tap the Input Panel button. Toshiba Pocket PC e350/e355 User's Guide Enter Information on your device. board or other input method. • Write directly on the screen. • Draw pictures on...
...using the soft key- Input Panel button. Entering Text Using the Input Panel Use the input panel to enter information in any program on Your Toshiba Pocket PC You have several options for entering new information: • Use the input panel to anticipate. 36 Tap to see your choices....the screen. • Speak into your text at the insertion point. To show or hide the input panel, tap the Input Panel button. Toshiba Pocket PC e350/e355 User's Guide Enter Information on your device. board or other input method. • Write directly on the screen. • Draw pictures on...

User Guide
Page 38
When you can input character strokes using Block Recognizer, with Block Recognizer open , tap the question mark next to the writing area. Tap the arrow next to those used on the screen. nizer. 2. For specific instructions on using the stylus that appears on other devices. 1. Write a letter in the box. Toshiba Pocket PC e350/e355 User's Guide Recognizer open , tap the question mark next to the writing area. 38 To use Block Recognizer: With Block Recognizer you write a letter, it is converted to typed text that are similar to the Input Panel button and then Block Recog-
When you can input character strokes using Block Recognizer, with Block Recognizer open , tap the question mark next to the writing area. Tap the arrow next to those used on the screen. nizer. 2. For specific instructions on using the stylus that appears on other devices. 1. Write a letter in the box. Toshiba Pocket PC e350/e355 User's Guide Recognizer open , tap the question mark next to the writing area. 38 To use Block Recognizer: With Block Recognizer you write a letter, it is converted to typed text that are similar to the Input Panel button and then Block Recog-

User Guide
Page 40
... words and then tap an editing command on the screen, tap Tools, then Undo and try again. Without lifting, drag the stylus across the screen. Toshiba Pocket PC e350/e355 User's Guide To select writing: If you want to text: • Tap Tools and then Recognize.
... words and then tap an editing command on the screen, tap Tools, then Undo and try again. Without lifting, drag the stylus across the screen. Toshiba Pocket PC e350/e355 User's Guide To select writing: If you want to text: • Tap Tools and then Recognize.