
User Guide
Page 27
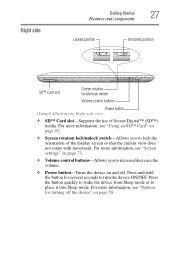
...hold the button for turning off the device" on and off. Right side Getting Started 27 Features and components Locked position Unlocked position SD™ Card slot Screen rotation lock/unlock switch Volume control buttons Power button (Sample Illustration) Right side view ❖ SD™ Card slot-... it into Sleep mode. For more information, see "Using an SD™ Card" on page 92. ❖ Screen rotation lock/unlock switch-Allows you to lock the orientation of Secure Digital™ (SD™) media. Press the button quickly to wake the device from Sleep mode or...
...hold the button for turning off the device" on and off. Right side Getting Started 27 Features and components Locked position Unlocked position SD™ Card slot Screen rotation lock/unlock switch Volume control buttons Power button (Sample Illustration) Right side view ❖ SD™ Card slot-... it into Sleep mode. For more information, see "Using an SD™ Card" on page 92. ❖ Screen rotation lock/unlock switch-Allows you to lock the orientation of Secure Digital™ (SD™) media. Press the button quickly to wake the device from Sleep mode or...

User Guide
Page 28
... station" on page 96. ❖ Speakers-Allow you to listen to sounds on page 33. Top Locked position Unlocked position Back cover lock/unlock switch (Sample Illustration) Top view ❖ Back Cover lock/unlock switch-Allows or prevents removal of the back cover. For more information, see "Removing the battery ...from the device" on your device. The locked position secures the cover in place, and in speakers" on page 91. For more information, see "Using the built-in the unlocked ...
... station" on page 96. ❖ Speakers-Allow you to listen to sounds on page 33. Top Locked position Unlocked position Back cover lock/unlock switch (Sample Illustration) Top view ❖ Back Cover lock/unlock switch-Allows or prevents removal of the back cover. For more information, see "Removing the battery ...from the device" on your device. The locked position secures the cover in place, and in speakers" on page 91. For more information, see "Using the built-in the unlocked ...

User Guide
Page 33
... position (Sample Illustration) Unlocking the back cover lock 3 Slide your battery has run out of power, you have two options: plug in serious injury. The SD™ Card slot must be empty when ... tablet's power off and remove all cables and peripherals that are connected to the device. 2 Turn the tablet upside down and slide the cover lock to the lock. Failure to abnormal shock, vibration or pressure. Never short-circuit the battery pack by either accidentally or intentionally bringing the battery terminals in contact...
... position (Sample Illustration) Unlocking the back cover lock 3 Slide your battery has run out of power, you have two options: plug in serious injury. The SD™ Card slot must be empty when ... tablet's power off and remove all cables and peripherals that are connected to the device. 2 Turn the tablet upside down and slide the cover lock to the lock. Failure to abnormal shock, vibration or pressure. Never short-circuit the battery pack by either accidentally or intentionally bringing the battery terminals in contact...
User Guide
Page 34
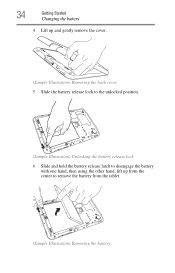
34 Getting Started Changing the battery 4 Lift up and gently remove the cover. (Sample Illustration) Removing the back cover 5 Slide the battery release lock to the unlocked position. (Sample Illustration) Unlocking the battery release lock 6 Slide and hold the battery release latch to disengage the battery with one hand, then using the other hand, lift up from the center to remove the battery from the tablet. (Sample Illustration) Removing the battery
34 Getting Started Changing the battery 4 Lift up and gently remove the cover. (Sample Illustration) Removing the back cover 5 Slide the battery release lock to the unlocked position. (Sample Illustration) Unlocking the battery release lock 6 Slide and hold the battery release latch to disengage the battery with one hand, then using the other hand, lift up from the center to remove the battery from the tablet. (Sample Illustration) Removing the battery
User Guide
Page 35
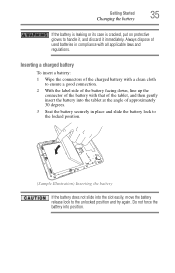
... at the angle of the battery with all applicable laws and regulations. Do not force the battery into the slot easily, move the battery release lock to handle it, and discard it immediately. Getting Started 35 Changing the battery If the battery is leaking or its case is cracked, put on... protective gloves to the unlocked position and try again. Always dispose of used batteries in place and slide the battery lock to the locked position. (Sample Illustration) Inserting the battery If the battery does not slide into position.
... at the angle of the battery with all applicable laws and regulations. Do not force the battery into the slot easily, move the battery release lock to handle it, and discard it immediately. Getting Started 35 Changing the battery If the battery is leaking or its case is cracked, put on... protective gloves to the unlocked position and try again. Always dispose of used batteries in place and slide the battery lock to the locked position. (Sample Illustration) Inserting the battery If the battery does not slide into position.

User Guide
Page 36
36 Getting Started Changing the battery (Sample Illustration) Locking the battery release lock 4 Seat the back cover in step 3 of "Removing the battery from the device" on page 33. 7 Restart the device. Cover lock Locked position (Sample Illustration) Replacing the back cover lock 5 Turn the device right side up. 6 Reconnect any cables that were removed in place, and then slide the cover lock to the locked position.
36 Getting Started Changing the battery (Sample Illustration) Locking the battery release lock 4 Seat the back cover in step 3 of "Removing the battery from the device" on page 33. 7 Restart the device. Cover lock Locked position (Sample Illustration) Replacing the back cover lock 5 Turn the device right side up. 6 Reconnect any cables that were removed in place, and then slide the cover lock to the locked position.
User Guide
Page 42
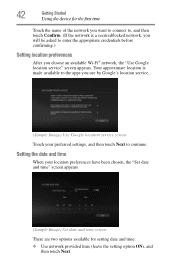
... device for setting date and time: ❖ Use network provided time (leave the setting option ON), and then touch Next. Your approximate location is a secured/locked network, you will be asked to enter the appropriate credentials before confirming.) Setting location preferences After you use by Google's location service. (Sample Image) Use...
... device for setting date and time: ❖ Use network provided time (leave the setting option ON), and then touch Next. Your approximate location is a secured/locked network, you will be asked to enter the appropriate credentials before confirming.) Setting location preferences After you use by Google's location service. (Sample Image) Use...
User Guide
Page 44
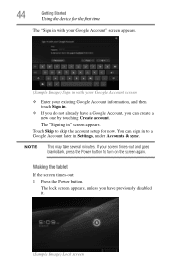
... screen again. If your existing Google Account information, and then touch Sign in " screen appears. The lock screen appears, unless you have a Google Account, you do not already have previously disabled it. (Sample Image) Lock screen 44 Getting Started Using the device for now. NOTE This may take several minutes. Waking the...
... screen again. If your existing Google Account information, and then touch Sign in " screen appears. The lock screen appears, unless you have a Google Account, you do not already have previously disabled it. (Sample Image) Lock screen 44 Getting Started Using the device for now. NOTE This may take several minutes. Waking the...
User Guide
Page 45
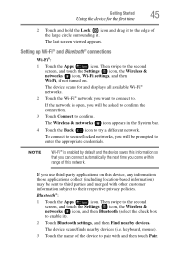
... device for and displays all available Wi-Fi® networks. 2 Touch the Wi-Fi® network you want to connect to. To connect to secure/locked networks, you will be prompted to pair with other customer information subject to try a different network. The last screen viewed appears. keyboard, mouse). 3 Touch the... of the large circle surrounding it ). 2 Touch Bluetooth settings, and then Find nearby devices. The device scans for the first time 2 Touch and hold the Lock ( ) icon and drag it to the edge of the device to enter the appropriate credentials.
... device for and displays all available Wi-Fi® networks. 2 Touch the Wi-Fi® network you want to connect to. To connect to secure/locked networks, you will be prompted to pair with other customer information subject to try a different network. The last screen viewed appears. keyboard, mouse). 3 Touch the... of the large circle surrounding it ). 2 Touch Bluetooth settings, and then Find nearby devices. The device scans for the first time 2 Touch and hold the Lock ( ) icon and drag it to the edge of the device to enter the appropriate credentials.
User Guide
Page 51
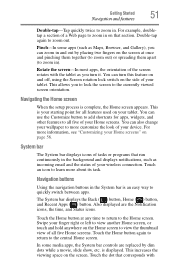
This allows you to lock the screen to quickly switch between apps. System bar The System bar displays icons of tasks or programs that run continuously in the System bar ... and hold anywhere on that corresponds with the tablet as Maps, Browser, and Gallery), you turn this feature on and off, using the Screen rotation lock switch on your wallpaper to zoom in and out by dim dots while a movie, slide show, etc. For example, doubletap a section of your Home screens...
This allows you to lock the screen to quickly switch between apps. System bar The System bar displays icons of tasks or programs that run continuously in the System bar ... and hold anywhere on that corresponds with the tablet as Maps, Browser, and Gallery), you turn this feature on and off, using the Screen rotation lock switch on your wallpaper to zoom in and out by dim dots while a movie, slide show, etc. For example, doubletap a section of your Home screens...
User Guide
Page 54
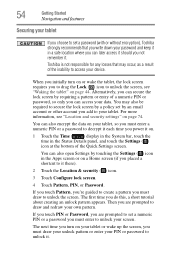
54 Getting Started Navigation and features Securing your tablet If you choose to set a password (with or without encryption), Toshiba strongly recommends that may also be required to secure the lock screen by a policy set a numeric PIN or a password you add to your tablet or wake up the ... PIN, or Password. The first time you to drag the Lock ( ) icon to it . When you initially turn on page 74. Alternatively, you placed a shortcut to unlock the screen, see "Location and security settings" on your tablet. Toshiba is not responsible for any losses that you write down your...
54 Getting Started Navigation and features Securing your tablet If you choose to set a password (with or without encryption), Toshiba strongly recommends that may also be required to secure the lock screen by a policy set a numeric PIN or a password you add to your tablet or wake up the ... PIN, or Password. The first time you to drag the Lock ( ) icon to it . When you initially turn on page 74. Alternatively, you placed a shortcut to unlock the screen, see "Location and security settings" on your tablet. Toshiba is not responsible for any losses that you write down your...
User Guide
Page 55
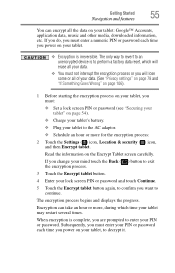
...etc. If you change your mind touch the Back ( ) button to exit the encryption process. 3 Touch the Encrypt tablet button. 4 Enter your lock screen PIN or password and touch Continue. 5 Touch the Encrypt tablet button again, to confirm you power on your tablet, to continue. Subsequently, you... must : ❖ Set a lock screen PIN or password (see "Securing your tablet" on the Encrypt Tablet screen carefully. The only way to revert to an unencrypted device is irreversible...
...etc. If you change your mind touch the Back ( ) button to exit the encryption process. 3 Touch the Encrypt tablet button. 4 Enter your lock screen PIN or password and touch Continue. 5 Touch the Encrypt tablet button again, to confirm you power on your tablet, to continue. Subsequently, you... must : ❖ Set a lock screen PIN or password (see "Securing your tablet" on the Encrypt Tablet screen carefully. The only way to revert to an unencrypted device is irreversible...

User Guide
Page 70
...networks settings Use the Wireless & networks settings to configure and manage connections to the second screen, and touch the Settings ( ) icon. Lock screen orientation Touch to turn ON/OFF screen rotation, see "Screen settings" on page 73. Touch to select the tablet setting you will...Settings menu appears. For more information, see "Sound settings" on page 65. The Wireless & Networks settings can also be locked/unlocked by using the screen rotation lock/unlock switch. NOTE This may also be used to configure connections between your device's settings 2 Touch the Settings ( ) ...
...networks settings Use the Wireless & networks settings to configure and manage connections to the second screen, and touch the Settings ( ) icon. Lock screen orientation Touch to turn ON/OFF screen rotation, see "Screen settings" on page 73. Touch to select the tablet setting you will...Settings menu appears. For more information, see "Sound settings" on page 65. The Wireless & Networks settings can also be locked/unlocked by using the screen rotation lock/unlock switch. NOTE This may also be used to configure connections between your device's settings 2 Touch the Settings ( ) ...

User Guide
Page 72
... detected when the tablet last scanned for Bluetooth® devices. ❖ Find nearby devices-Touch to set audible feedback when touching or locking and unlocking the screen. Touch a notification sound to listen to a sample of it. ❖ Audible selection-Select to hear a sound...; devices. 72 Settings Customizing your device's settings ❖ Discoverable-Select to make your tablet discoverable by other onscreen items. ❖ Screen lock sounds-Select to the second screen, and touch the Settings ( ) icon. You can be configured to search for media playback, notifications,...
... detected when the tablet last scanned for Bluetooth® devices. ❖ Find nearby devices-Touch to set audible feedback when touching or locking and unlocking the screen. Touch a notification sound to listen to a sample of it. ❖ Audible selection-Select to hear a sound...; devices. 72 Settings Customizing your device's settings ❖ Discoverable-Select to make your tablet discoverable by other onscreen items. ❖ Screen lock sounds-Select to the second screen, and touch the Settings ( ) icon. You can be configured to search for media playback, notifications,...

User Guide
Page 75
If you choose to set a password (with or without encryption), Toshiba strongly recommends that connect to it. if you do, the account you added will be administrators for any devices that you write down your lock screen with a list of the applications you have accounts that it is ...display. ❖ Encrypt tablet-Under Screen unlock, touch this way, but that requires the ability to encrypt the contents of your tablet. Toshiba is not responsible for your passwords as a device administrator. Touch an application in this list to disable its applications, such as the ability...
If you choose to set a password (with or without encryption), Toshiba strongly recommends that connect to it. if you do, the account you added will be administrators for any devices that you write down your lock screen with a list of the applications you have accounts that it is ...display. ❖ Encrypt tablet-Under Screen unlock, touch this way, but that requires the ability to encrypt the contents of your tablet. Toshiba is not responsible for your passwords as a device administrator. Touch an application in this list to disable its applications, such as the ability...

User Guide
Page 93
.... 3 Touch the Storage ( ) icon. The card pops out slightly. The Storage menu appears. 4 Touch Unmount SD card. 5 Gently press the card inward to release it locks in place. (Sample Illustration) Inserting memory media Removing memory media Do not remove media while data is required. Exploring the Features on your Device 93...
.... 3 Touch the Storage ( ) icon. The card pops out slightly. The Storage menu appears. 4 Touch Unmount SD card. 5 Gently press the card inward to release it locks in place. (Sample Illustration) Inserting memory media Removing memory media Do not remove media while data is required. Exploring the Features on your Device 93...
User Guide
Page 126
... sync 77 manage accounts 77 B back camera 92 back cover removable 26 back cover lock/unlock switch 28 background data accounts & sync 77 backing up data 23 backup data 46 Google™ Account 46 TOSHIBA File Manager 46 battery Call2Recycle™ 39 care 37, 38 changing 33 charge indicator light... applications settings 77 Bluetooth® setting up 45 wireless & networks 71 button power 40 buttons back cover lock/unlock switch 28 buttons and features 48 power button 27 screen rotation lock/unlock switch 27 volume control 27 C Call2Recycle™ battery 39 camera back camera 26 front camera 25 ...
... sync 77 manage accounts 77 B back camera 92 back cover removable 26 back cover lock/unlock switch 28 background data accounts & sync 77 backing up data 23 backup data 46 Google™ Account 46 TOSHIBA File Manager 46 battery Call2Recycle™ 39 care 37, 38 changing 33 charge indicator light... applications settings 77 Bluetooth® setting up 45 wireless & networks 71 button power 40 buttons back cover lock/unlock switch 28 buttons and features 48 power button 27 screen rotation lock/unlock switch 27 volume control 27 C Call2Recycle™ battery 39 camera back camera 26 front camera 25 ...

User Guide
Page 128
... Licenses 13 lights battery light 25 front/back camera indicator light 25 ON/OFF light 25 power light 25 location & security clear storage 76 configure lock screen 75 encrypt tablet 75 GPS 74 location for Google 74 owner info 75 secure credentials 76 set password 76 settings 74, 75 visible passwords...
... Licenses 13 lights battery light 25 front/back camera indicator light 25 ON/OFF light 25 power light 25 location & security clear storage 76 configure lock screen 75 encrypt tablet 75 GPS 74 location for Google 74 owner info 75 secure credentials 76 set password 76 settings 74, 75 visible passwords...

User Guide
Page 130
130 Index screen screen auto-rotate 73 settings 73 screen auto-rotate screen 73 screen brightness screen settings 73 screen rotation lock/unlock switch 27 screen settings animation 73 screen brightness 73 screen time-out 73 screen time-out screen settings 73 SD™ Card using 92 ...
130 Index screen screen auto-rotate 73 settings 73 screen auto-rotate screen 73 screen brightness screen settings 73 screen rotation lock/unlock switch 27 screen settings animation 73 screen brightness 73 screen time-out 73 screen time-out screen settings 73 SD™ Card using 92 ...
thrive_AT105-T10162.pdf
Page 1
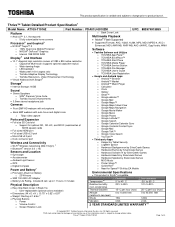
... Thrive™ Tablet Detailed Product Specification1 Model Name: AT105-T10162 Part Number: PDA01U-00102M UPC: 883974915859 Platform Android™ 3.1, Honeycomb o 5 fully cutomizable home screens o Back Cover Lock ...Toshiba Adaptive Display Technology o Toshiba Resolution+ Video Enhancement Technology Virtual Keyboard with Swype® Storage5 Software Toshiba Software and Utilities o TOSHIBA App PlaceSM o TOSHIBA BookPlace™ o TOSHIBA Start Place o TOSHIBA Media Player o TOSHIBA Service Station o TOSHIBA File Manager o TOSHIBA User's Guide o TOSHIBA...
... Thrive™ Tablet Detailed Product Specification1 Model Name: AT105-T10162 Part Number: PDA01U-00102M UPC: 883974915859 Platform Android™ 3.1, Honeycomb o 5 fully cutomizable home screens o Back Cover Lock ...Toshiba Adaptive Display Technology o Toshiba Resolution+ Video Enhancement Technology Virtual Keyboard with Swype® Storage5 Software Toshiba Software and Utilities o TOSHIBA App PlaceSM o TOSHIBA BookPlace™ o TOSHIBA Start Place o TOSHIBA Media Player o TOSHIBA Service Station o TOSHIBA File Manager o TOSHIBA User's Guide o TOSHIBA...