User Guide
Page 20
...mode 45 Adding optional external devices 46 Adding memory 46 Recovering the Internal Storage Drive 47 Creating recovery media 48 Restoring from recovery media 50 Refresh your PC (with user's data 52 Reset your PC 54 Installing drivers and applications 57 Using the TOSHIBA Dual Pointing Device 58 Using the touch pad 59 Adjusting touch pad settings 62 Disabling or enabling the touch pad 62 Connecting an external device 62 Using external display devices 63 Selecting video cables 63 Connecting an HDMI™-compatible television or display device 63 Connecting an external monitor...
...mode 45 Adding optional external devices 46 Adding memory 46 Recovering the Internal Storage Drive 47 Creating recovery media 48 Restoring from recovery media 50 Refresh your PC (with user's data 52 Reset your PC 54 Installing drivers and applications 57 Using the TOSHIBA Dual Pointing Device 58 Using the touch pad 59 Adjusting touch pad settings 62 Disabling or enabling the touch pad 62 Connecting an external device 62 Using external display devices 63 Selecting video cables 63 Connecting an HDMI™-compatible television or display device 63 Connecting an external monitor...
User Guide
Page 22
... 95 Connecting your computer to a network ....... 96 Exploring audio features 96 Recording sounds 96 Using external speakers or headphones ....... 97 Using the Web Camera 98 Using the Smart Card Reader 98 Using the Memory card reader 99 Inserting memory media 99 Removing memory media 100 Using the expansion port 101 Chapter 5: Utilities 102 eco Utility 103 Password Utility 104 Using a supervisor password 104 Using a user password 106 Deleting a user password 108 System Settings 109 Sleep Utilities 111 USB Sleep and Charge 111 Enabling/Disabling USB Sleep and Charge 113 Power...
... 95 Connecting your computer to a network ....... 96 Exploring audio features 96 Recording sounds 96 Using external speakers or headphones ....... 97 Using the Web Camera 98 Using the Smart Card Reader 98 Using the Memory card reader 99 Inserting memory media 99 Removing memory media 100 Using the expansion port 101 Chapter 5: Utilities 102 eco Utility 103 Password Utility 104 Using a supervisor password 104 Using a user password 106 Deleting a user password 108 System Settings 109 Sleep Utilities 111 USB Sleep and Charge 111 Enabling/Disabling USB Sleep and Charge 113 Power...
User Guide
Page 27
... stay current with the various computer software or hardware options, visit Toshiba's Web site at support.toshiba.com. Your particular model may not have all subject to perform tasks in Windows 8.1. Introduction This guide 27 NOTE The product specifications and configuration information are all the features and specifications listed or illustrated. You can: ❖ Read the entire guide from beginning to end. ❖ Skim...
... stay current with the various computer software or hardware options, visit Toshiba's Web site at support.toshiba.com. Your particular model may not have all subject to perform tasks in Windows 8.1. Introduction This guide 27 NOTE The product specifications and configuration information are all the features and specifications listed or illustrated. You can: ❖ Read the entire guide from beginning to end. ❖ Skim...

User Guide
Page 62
... visit support.toshiba.com. You may include USB 3.0 port(s). For more information, see if you first need to install new software. Connecting an external device NOTE Depending on your hand as you type. For help with the heel of the following: ❖ Try adjusting your computer. See "Disabling or enabling the touch pad" on page 62. ❖ Adjust the sensitivity of the Windows Control Panel. You can easily attach an external device your typing...
... visit support.toshiba.com. You may include USB 3.0 port(s). For more information, see if you first need to install new software. Connecting an external device NOTE Depending on your hand as you type. For help with the heel of the following: ❖ Try adjusting your computer. See "Disabling or enabling the touch pad" on page 62. ❖ Adjust the sensitivity of the Windows Control Panel. You can easily attach an external device your typing...

User Guide
Page 64
... modes are only available with the monitor to use the ( ) + P keys: Press the ( ) + P keys repeatedly until the setting you first need a larger screen. The quickest way to change the display output settings is to change the display settings by pressing the ( ) + P keys, or by configuring the display properties settings. Your computer will automatically detect the external display device. NOTE You can choose to see if you want takes effect. 64 Getting Started Using external display devices manual...
... modes are only available with the monitor to use the ( ) + P keys: Press the ( ) + P keys repeatedly until the setting you first need a larger screen. The quickest way to change the display output settings is to change the display settings by pressing the ( ) + P keys, or by configuring the display properties settings. Your computer will automatically detect the external display device. NOTE You can choose to see if you want takes effect. 64 Getting Started Using external display devices manual...
User Guide
Page 70
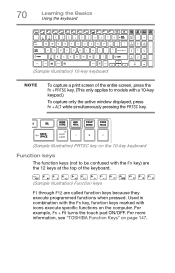
... models with a 10-key keypad.) To capture only the active window displayed, press Fn + ALT while simultaneously pressing the PRTSC key. (Sample Illustration) PRTSC key on the 10-key keyboard Function keys The function keys (not to be confused with icons execute specific functions on page 147. For more information, see "TOSHIBA Function Keys" on the computer. Used in combination with the Fn key, function keys marked with the Fn key) are called function keys...
... models with a 10-key keypad.) To capture only the active window displayed, press Fn + ALT while simultaneously pressing the PRTSC key. (Sample Illustration) PRTSC key on the 10-key keyboard Function keys The function keys (not to be confused with icons execute specific functions on page 147. For more information, see "TOSHIBA Function Keys" on the computer. Used in combination with the Fn key, function keys marked with the Fn key) are called function keys...
User Guide
Page 96
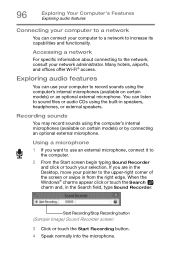
... and functionality. Using a microphone 1 If you are in the Desktop, move your network administrator. Start Recording/Stop Recording button (Sample Image) Sound Recorder screen 3 Click or touch the Start Recording button. 4 Speak normally into the microphone. Accessing a network For specific information about connecting to sound files or audio CDs using the computer's internal microphones (available on certain models) or an optional external microphone. Many hotels, airports, and offices offer Wi-Fi® access. You can use an external microphone, connect...
... and functionality. Using a microphone 1 If you are in the Desktop, move your network administrator. Start Recording/Stop Recording button (Sample Image) Sound Recorder screen 3 Click or touch the Start Recording button. 4 Speak normally into the microphone. Accessing a network For specific information about connecting to sound files or audio CDs using the computer's internal microphones (available on certain models) or an optional external microphone. Many hotels, airports, and offices offer Wi-Fi® access. You can use an external microphone, connect...
User Guide
Page 109
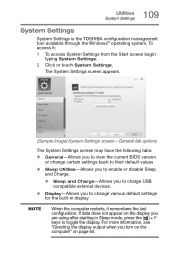
General tab options The System Settings screen may have the following tabs: ❖ General-Allows you to view the current BIOS version or change various default settings for the built-in Sleep mode, press the ( ) + P keys to charge USB compatible external devices. ❖ Display-Allows you are using after starting in display NOTE When the computer restarts, it : 1 To access System Settings from the Start screen begin typing System Settings. 2 Click or touch System Settings. If data...
General tab options The System Settings screen may have the following tabs: ❖ General-Allows you to view the current BIOS version or change various default settings for the built-in Sleep mode, press the ( ) + P keys to charge USB compatible external devices. ❖ Display-Allows you are using after starting in display NOTE When the computer restarts, it : 1 To access System Settings from the Start screen begin typing System Settings. 2 Click or touch System Settings. If data...

User Guide
Page 112
... the external devices thoroughly before use. ❖ If USB Sleep and Charge is enabled, the computer's battery will be disabled. As such, we recommend that does not have the USB Sleep and Charge functioncompatible icon ( ), attach the mouse or keyboard to the compatible ports. USB bus power (DC 5V) is similarly supplied to the external devices which are connected to it. 112 Utilities Sleep Utilities NOTE ❖ When "USB Sleep and Charge function" is set to Enabled, the "USB Wakeup function...
... the external devices thoroughly before use. ❖ If USB Sleep and Charge is enabled, the computer's battery will be disabled. As such, we recommend that does not have the USB Sleep and Charge functioncompatible icon ( ), attach the mouse or keyboard to the compatible ports. USB bus power (DC 5V) is similarly supplied to the external devices which are connected to it. 112 Utilities Sleep Utilities NOTE ❖ When "USB Sleep and Charge function" is set to Enabled, the "USB Wakeup function...

User Guide
Page 115
The Function Key screen appears. (Sample Image) Function Key 3 Slide the ON/OFF switch to activate functions by default. TOSHIBA Function Key enables you to enable/disable the each notification. 4 Click or touch Close. These settings turn notifications ON/OFF. 1 To access Function Key from the Start screen begin typing Function Key. 2 Click or touch Function Key. Some functions show the toast notification at the edge of the screen. 115 Utilities Function Key Function Key NOTE The Function option is disabled by pressing specific keys either singly or in combination with Fn.
The Function Key screen appears. (Sample Image) Function Key 3 Slide the ON/OFF switch to activate functions by default. TOSHIBA Function Key enables you to enable/disable the each notification. 4 Click or touch Close. These settings turn notifications ON/OFF. 1 To access Function Key from the Start screen begin typing Function Key. 2 Click or touch Function Key. Some functions show the toast notification at the edge of the screen. 115 Utilities Function Key Function Key NOTE The Function option is disabled by pressing specific keys either singly or in combination with Fn.
User Guide
Page 125
... Windows® operating system is not working The battery light is blinking when the computer is on, this indicates a power mismatch. The output specifications of the AC adaptor must match the input specifications of these problems, use the AC adaptor that shipped with your work routine, you can easily detect if the operating system is not working Once you may need to fix the problem. Unless a hardware device has failed, problems...
... Windows® operating system is not working The battery light is blinking when the computer is on, this indicates a power mismatch. The output specifications of the AC adaptor must match the input specifications of these problems, use the AC adaptor that shipped with your work routine, you can easily detect if the operating system is not working Once you may need to fix the problem. Unless a hardware device has failed, problems...

User Guide
Page 127
... reset your display settings in the event they have been improperly set of the options found on this menu were available by the user. Startup Repair This feature automates the repair process. 127 If Something Goes Wrong The Windows® operating system is a very powerful tool for problems and repair them if possible. Restore points may be created: ❖ When new hardware or software is installed ❖ Manually by the user System Image Recovery Windows...
... reset your display settings in the event they have been improperly set of the options found on this menu were available by the user. Startup Repair This feature automates the repair process. 127 If Something Goes Wrong The Windows® operating system is a very powerful tool for problems and repair them if possible. Restore points may be created: ❖ When new hardware or software is installed ❖ Manually by the user System Image Recovery Windows...
User Guide
Page 132
... Themes panel (Desktop Background, Color, Sounds, and Screen Saver). 132 If Something Goes Wrong Display problems You have gone into a working power outlet. ❖ Check that came with the computer. Refer to the documentation that the cable connecting the external monitor to the computer is firmly attached. ❖ Try adjusting the contrast and brightness controls on the external monitor. ❖ Press Fn + F5 to make sure the display...
... Themes panel (Desktop Background, Color, Sounds, and Screen Saver). 132 If Something Goes Wrong Display problems You have gone into a working power outlet. ❖ Check that came with the computer. Refer to the documentation that the cable connecting the external monitor to the computer is firmly attached. ❖ Try adjusting the contrast and brightness controls on the external monitor. ❖ Press Fn + F5 to make sure the display...

User Guide
Page 138
... your computer will be displayed. ❖ Connect your computer directly to an optical disc, or external hard disk. Save your internal storage drive. See "Computing tips" on your work frequently. 138 If Something Goes Wrong Develop good computing habits NOTE To enable or disable wireless communication, use the Fn + F8 key. The IP address for each active network adapter will lock, forcing you have enabled any security provisions (closed...
... your computer will be displayed. ❖ Connect your computer directly to an optical disc, or external hard disk. Save your internal storage drive. See "Computing tips" on your work frequently. 138 If Something Goes Wrong Develop good computing habits NOTE To enable or disable wireless communication, use the Fn + F8 key. The IP address for each active network adapter will lock, forcing you have enabled any security provisions (closed...

User Guide
Page 142
...; Create a restore point (refer to "Saving system configuration with File History under the System and Security heading. Connect the AC adaptor before continuing. 1 From the Start screen, type Control. Follow the on battery power. For additional Help, while in prior to the installation, undoing any changes that appears. 2 Click or touch Save backup copies of new hardware (printers, pointing devices, external hard drives, optional external writable optical disc drive writers, scanners, etc.) and software (applications...
...; Create a restore point (refer to "Saving system configuration with File History under the System and Security heading. Connect the AC adaptor before continuing. 1 From the Start screen, type Control. Follow the on battery power. For additional Help, while in prior to the installation, undoing any changes that appears. 2 Click or touch Save backup copies of new hardware (printers, pointing devices, external hard drives, optional external writable optical disc drive writers, scanners, etc.) and software (applications...

User Guide
Page 152
...TOSHIBA Function key increases the speaker volume. Fn+ This TOSHIBA Function key decreases the speaker volume. Fn+ This TOSHIBA Function key allows you to zoom in. Zoom (Display resolution) Fn+ [Space bar] This TOSHIBA Function key switches screen resolution. Fn+ This TOSHIBA Function key takes a snapshot of your display screen. 152 TOSHIBA Function Keys Functions Keyboard Function keys Fn+ This TOSHIBA Function key enables/disables the keyboard backlight. Cycle through the screen resolutions, and then select the desired resolution. Fn+ This TOSHIBA Function key...
...TOSHIBA Function key increases the speaker volume. Fn+ This TOSHIBA Function key decreases the speaker volume. Fn+ This TOSHIBA Function key allows you to zoom in. Zoom (Display resolution) Fn+ [Space bar] This TOSHIBA Function key switches screen resolution. Fn+ This TOSHIBA Function key takes a snapshot of your display screen. 152 TOSHIBA Function Keys Functions Keyboard Function keys Fn+ This TOSHIBA Function key enables/disables the keyboard backlight. Cycle through the screen resolutions, and then select the desired resolution. Fn+ This TOSHIBA Function key...
User Guide
Page 162
... you turn on the keyboard. hot swapping-The ability to add or remove devices from a computer while the computer is returned to the internal storage drive the current state of an electric circuit are removable. function keys-The keys labeled F1 through F12, typically located on the computer again, your work , including all components of your work is running and have secondary hard disks that are connected...
... you turn on the keyboard. hot swapping-The ability to add or remove devices from a computer while the computer is returned to the internal storage drive the current state of an electric circuit are removable. function keys-The keys labeled F1 through F12, typically located on the computer again, your work , including all components of your work is running and have secondary hard disks that are connected...
User Guide
Page 170
... 93 standard features 91, 92 Device Manager fixing a problem 129 directing display output 64 disabling touch pad 62 display troubleshooting 133 display devices external 63 display output settings 64 display, external adjusting 65 disposal information 18 disposing of your computer 88 documentation 29 E eco power plan 86 eco Utility® 103 enabling touch pad 62 ENERGY STAR® 25 expansion capability 101 expansion port using 101 exploring desktop 92 Start screen 90 external display device HDMI® Out port 63 RGB (monitor) port 63
... 93 standard features 91, 92 Device Manager fixing a problem 129 directing display output 64 disabling touch pad 62 display troubleshooting 133 display devices external 63 display output settings 64 display, external adjusting 65 disposal information 18 disposing of your computer 88 documentation 29 E eco power plan 86 eco Utility® 103 enabling touch pad 62 ENERGY STAR® 25 expansion capability 101 expansion port using 101 exploring desktop 92 Start screen 90 external display device HDMI® Out port 63 RGB (monitor) port 63

User Guide
Page 171
... 42 internal storage drive recovery 47 K keyboard function keys 70 overlay keys 71 special Windows® keys 71 troubleshooting 131 using 69 keys function keys 70 overlay for cursor control 72 overlay keys 71 overlay to type numeric data 72 L LEDs system indicator lights 82 AC adaptor light 81 AC power light 39, 41 battery light 41 Web Camera light 98 Licenses 17 M maintaining your battery 88 memory adding 46 Memory card reader inserting memory media 99 removing memory media 100 using 99 microphone using 96 monitor connecting 64 monitor problems troubleshooting 132 monitoring battery power 81...
... 42 internal storage drive recovery 47 K keyboard function keys 70 overlay keys 71 special Windows® keys 71 troubleshooting 131 using 69 keys function keys 70 overlay for cursor control 72 overlay keys 71 overlay to type numeric data 72 L LEDs system indicator lights 82 AC adaptor light 81 AC power light 39, 41 battery light 41 Web Camera light 98 Licenses 17 M maintaining your battery 88 memory adding 46 Memory card reader inserting memory media 99 removing memory media 100 using 99 microphone using 96 monitor connecting 64 monitor problems troubleshooting 132 monitoring battery power 81...
User Guide
Page 173
... Start screen 74 Startup menu problem solving 125 supervisor password, deleting 106 supervisor password, set up 104 system indicator lights AC power 39 LEDs 41, 81, 82, 98 System Settings 109 T taking care of battery 87 taskbar 93 television adjusting display 65 Tiles Start screen 92 tips for computing 68 Toshiba online resources 76 registering computer Toshiba Web site 43 worldwide offices 146 TOSHIBA Application Installer 117 Toshiba Dual Pointing Device 58 TOSHIBA Function Keys functions 147 touch pad using 59 touch screen...
... Start screen 74 Startup menu problem solving 125 supervisor password, deleting 106 supervisor password, set up 104 system indicator lights AC power 39 LEDs 41, 81, 82, 98 System Settings 109 T taking care of battery 87 taskbar 93 television adjusting display 65 Tiles Start screen 92 tips for computing 68 Toshiba online resources 76 registering computer Toshiba Web site 43 worldwide offices 146 TOSHIBA Application Installer 117 Toshiba Dual Pointing Device 58 TOSHIBA Function Keys functions 147 touch pad using 59 touch screen...


