
User Guide
Page 29
... Disk Drive Recovery using the Recovery media 68 Deleting the Hard Disk Recovery Utility 71 Installing drivers and applications 72 Using the Toshiba Dual Pointing Device 74 Using the TouchPad 75 Disabling or enabling the Dual Pointing Device.76 Turning off the computer 77 Closing...display output when you turn on the computer 80 Adjusting the quality of the external display......81 Video limitations 81 Using an external keyboard 82 Using a mouse 82 Connecting a USB mouse 82 Connecting an optional external diskette drive........83 Connecting external speakers or headphones.........84 ...
... Disk Drive Recovery using the Recovery media 68 Deleting the Hard Disk Recovery Utility 71 Installing drivers and applications 72 Using the Toshiba Dual Pointing Device 74 Using the TouchPad 75 Disabling or enabling the Dual Pointing Device.76 Turning off the computer 77 Closing...display output when you turn on the computer 80 Adjusting the quality of the external display......81 Video limitations 81 Using an external keyboard 82 Using a mouse 82 Connecting a USB mouse 82 Connecting an optional external diskette drive........83 Connecting external speakers or headphones.........84 ...

User Guide
Page 30
... computer 104 Cleaning the computer 104 Moving the computer 105 Backing up your work 105 Restoring your keyboard emulate a full-size key- 30 Contents Chapter 2: Learning the Basics 85 Computing tips 85 Using the keyboard 87 Character keys 87 Making your work 106 Preparing for communications 106 Powering down the computer 107...
... computer 104 Cleaning the computer 104 Moving the computer 105 Backing up your work 105 Restoring your keyboard emulate a full-size key- 30 Contents Chapter 2: Learning the Basics 85 Computing tips 85 Using the keyboard 87 Character keys 87 Making your work 106 Preparing for communications 106 Powering down the computer 107...

User Guide
Page 32
... Media Adapter Slot 158 Inserting memory media 158 Removing memory media 159 Connecting your modem to a telephone line.........159 Connecting to a phone line 160 Chapter 6: Toshiba Utilities 162 Hotkey Utility 163 TOSHIBA Assist 164 TOSHIBA Accessibility 165 Fn-esse 166 Starting Fn-esse 166 Using the keyboard or pointing device to assign keys 168
... Media Adapter Slot 158 Inserting memory media 158 Removing memory media 159 Connecting your modem to a telephone line.........159 Connecting to a phone line 160 Chapter 6: Toshiba Utilities 162 Hotkey Utility 163 TOSHIBA Assist 164 TOSHIBA Accessibility 165 Fn-esse 166 Starting Fn-esse 166 Using the keyboard or pointing device to assign keys 168

User Guide
Page 34
... 202 Keyboard problems 204 Display problems 204 Disk drive problems 207 DVD-ROM or multi-function drive problems...209 Sound system problems 210 PC Card problems 210 Printer problems 213 Modem problems 214 Develop good computing habits 215 If you need further assistance 216 Before you contact Toshiba 216 Contacting Toshiba 217 Other Toshiba...
... 202 Keyboard problems 204 Display problems 204 Disk drive problems 207 DVD-ROM or multi-function drive problems...209 Sound system problems 210 PC Card problems 210 Printer problems 213 Modem problems 214 Develop good computing habits 215 If you need further assistance 216 Before you contact Toshiba 216 Contacting Toshiba 217 Other Toshiba...

User Guide
Page 42
Keeping yourself comfortable Strain and stress injuries are connected to work comfortably throughout the day. Using the computer keyboard incorrectly can result in temperature or humidity and sources of the equipment, you can work If you turn it off, unplug it from ... time using the computer and rest. If the computer does not operate properly after you spill liquid into the computer, turn it on , contact a Toshiba service representative or your hands, wrists, and/or arms hurt while typing, stop using their computers. However, with a little care and the proper use...
Keeping yourself comfortable Strain and stress injuries are connected to work comfortably throughout the day. Using the computer keyboard incorrectly can result in temperature or humidity and sources of the equipment, you can work If you turn it off, unplug it from ... time using the computer and rest. If the computer does not operate properly after you spill liquid into the computer, turn it on , contact a Toshiba service representative or your hands, wrists, and/or arms hurt while typing, stop using their computers. However, with a little care and the proper use...

User Guide
Page 43
... height and distance. Below eye level Footrest Approximately 90° angles Correct posture and positioning of the computer ❖ Position your chair so that the keyboard is important to Some people find a backless chair more comfortable than a conventional chair. Proper seating is a primary factor in reducing work 43 Placement of the...
... height and distance. Below eye level Footrest Approximately 90° angles Correct posture and positioning of the computer ❖ Position your chair so that the keyboard is important to Some people find a backless chair more comfortable than a conventional chair. Proper seating is a primary factor in reducing work 43 Placement of the...

User Guide
Page 46
...use it again. ❖ Never turn off the computer if a drive light indicates a drive is reading from objects that gets into the computer's keyboard. Turning off overnight to let it dry out before you remove a PC Card that has been used extensively. Be careful when you use . ...Information on disks is used for lengthy periods of time. ❖ Avoid spilling liquids into the keyboard, turn off the computer immediately. If two cards are installed, both . ❖ Keep the computer and disks away from or writing to the...
...use it again. ❖ Never turn off the computer if a drive light indicates a drive is reading from objects that gets into the computer's keyboard. Turning off overnight to let it dry out before you remove a PC Card that has been used extensively. Be careful when you use . ...Information on disks is used for lengthy periods of time. ❖ Avoid spilling liquids into the keyboard, turn off the computer immediately. If two cards are installed, both . ❖ Keep the computer and disks away from or writing to the...

User Guide
Page 48
...; Add more memory (see "Adding memory" on page 56) ❖ Connect a mouse (see "Connecting a USB mouse" on page 82) ❖ Connect a full-size keyboard (see "Using an external keyboard" on page 82) ❖ Connect an external monitor (see "Using external display devices" on page 78) ❖ Connect a local printer (see "Connecting a local... charge the battery, you may want to your computer. To use it. Before adding any of these devices to the computer, be sure to , a mouse, keyboard, printer, memory, and PC cards. After setting up your computer, you must attach the AC adapter.
...; Add more memory (see "Adding memory" on page 56) ❖ Connect a mouse (see "Connecting a USB mouse" on page 82) ❖ Connect a full-size keyboard (see "Using an external keyboard" on page 82) ❖ Connect an external monitor (see "Using external display devices" on page 78) ❖ Connect a local printer (see "Connecting a local... charge the battery, you may want to your computer. To use it. Before adding any of these devices to the computer, be sure to , a mouse, keyboard, printer, memory, and PC cards. After setting up your computer, you must attach the AC adapter.

User Guide
Page 65
... on your computer's HDD: 1 Make sure the computer is turned off. 2 Press and hold the 0 (zero) key on your keyboard while powering on , the TOSHIBA HDD Recovery Utility screen displays. Be sure to save your work first. 1 Press 1 on the hard disk drive and your information will...drive to its original factory setting. To recover your C: drive and then recovering it. A confirmation message displays reminding you that all partitions on the keyboard to recover your hard disk drive to the factory-set default, or recovering just your C: drive and leaving other partitions (for example, a D: ...
... on your computer's HDD: 1 Make sure the computer is turned off. 2 Press and hold the 0 (zero) key on your keyboard while powering on , the TOSHIBA HDD Recovery Utility screen displays. Be sure to save your work first. 1 Press 1 on the hard disk drive and your information will...drive to its original factory setting. To recover your C: drive and then recovering it. A confirmation message displays reminding you that all partitions on the keyboard to recover your hard disk drive to the factory-set default, or recovering just your C: drive and leaving other partitions (for example, a D: ...
User Guide
Page 66
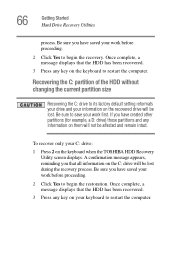
... save your C: drive: 1 Press 2 on the C: drive will not be lost during the recovery process. Once complete, a message displays that all information on the keyboard when the TOSHIBA HDD Recovery Utility screen displays. 66 Getting Started Hard Drive Recovery Utilities process. Be sure to begin the restoration. To recover only your work...
... save your C: drive: 1 Press 2 on the C: drive will not be lost during the recovery process. Once complete, a message displays that all information on the keyboard when the TOSHIBA HDD Recovery Utility screen displays. 66 Getting Started Hard Drive Recovery Utilities process. Be sure to begin the restoration. To recover only your work...

User Guide
Page 67
... keys to increase/decrease the C: drive size by 5 GB. A confirmation message appears, reminding you created a D: drive, it will be lost. Be sure to save your keyboard to restart the computer. Getting Started Hard Drive Recovery Utilities 67 Recovering the C: partition with a user specified size Resizing and recovering your C: drive to its... be lost during the recovery process) and your information will be deleted during the recovery process. To resize and recover your C: drive: 1 Press 3 on the keyboard when the TOSHIBA HDD Recovery Utility screen displays.
... keys to increase/decrease the C: drive size by 5 GB. A confirmation message appears, reminding you created a D: drive, it will be lost. Be sure to save your keyboard to restart the computer. Getting Started Hard Drive Recovery Utilities 67 Recovering the C: partition with a user specified size Resizing and recovering your C: drive to its... be lost during the recovery process) and your information will be deleted during the recovery process. To resize and recover your C: drive: 1 Press 3 on the keyboard when the TOSHIBA HDD Recovery Utility screen displays.

User Guide
Page 68
...during the recovery process. Be sure you have saved your work first. 1 Press 1 on the keyboard to recover your hard disk drive to its original factory setting. Sample TOSHIBA HDD Recovery Utility screen Recovering the original factory image (recommended) Recovering a hard disk drive to its... your hard disk drive using your Hard Drive Recovery Utilities. A confirmation message displays, reminding you that all partitions on , the TOSHIBA HDD Recovery Utility screen displays. 68 Getting Started Hard Drive Recovery Utilities Hard Disk Drive Recovery using the Recovery media If you need...
...during the recovery process. Be sure you have saved your work first. 1 Press 1 on the keyboard to recover your hard disk drive to its original factory setting. Sample TOSHIBA HDD Recovery Utility screen Recovering the original factory image (recommended) Recovering a hard disk drive to its... your hard disk drive using your Hard Drive Recovery Utilities. A confirmation message displays, reminding you that all partitions on , the TOSHIBA HDD Recovery Utility screen displays. 68 Getting Started Hard Drive Recovery Utilities Hard Disk Drive Recovery using the Recovery media If you need...

User Guide
Page 69
... have saved your work first. A confirmation message appears, reminding you have created other partitions (for example, a D: drive) those partitions and any key on the keyboard when the TOSHIBA HDD Recovery Utility screen displays. This will not be affected and remain intact. Recovering the C: partition of your C: drive without the HDD Recovery Area...
... have saved your work first. A confirmation message appears, reminding you have created other partitions (for example, a D: drive) those partitions and any key on the keyboard when the TOSHIBA HDD Recovery Utility screen displays. This will not be affected and remain intact. Recovering the C: partition of your C: drive without the HDD Recovery Area...

User Guide
Page 70
... example, if you have saved your work first. A confirmation message appears, reminding you that the HDD has been recovered. 3 Press any key on the keyboard when the TOSHIBA HDD Recovery Utility screen displays. Be sure you created a D: drive, it will be deleted during the recovery process) and your information will be lost... Recovery Utilities Recovering your C: drive to its status in the Volume list to display its factory default state without the recovery partition: 1 Press 3 on your keyboard to restart the computer.
... example, if you have saved your work first. A confirmation message appears, reminding you that the HDD has been recovered. 3 Press any key on the keyboard when the TOSHIBA HDD Recovery Utility screen displays. Be sure you created a D: drive, it will be deleted during the recovery process) and your information will be lost... Recovery Utilities Recovering your C: drive to its status in the Volume list to display its factory default state without the recovery partition: 1 Press 3 on your keyboard to restart the computer.

User Guide
Page 75
Pushing harder on the TouchPad in the desired direction. To double-click, press the primary button twice in front of the keyboard, is much smaller than the display screen, moving your cursor across the screen often means having to move your finger several times across the TouchPad ...-Performs the same function as the right button on a mouse. When a step instructs you to click or choose an item, move . Getting Started Using the Toshiba Dual Pointing Device 75 To move the cursor, gently push the pointing device in the direction you want the cursor to move the cursor to...
Pushing harder on the TouchPad in the desired direction. To double-click, press the primary button twice in front of the keyboard, is much smaller than the display screen, moving your cursor across the screen often means having to move your finger several times across the TouchPad ...-Performs the same function as the right button on a mouse. When a step instructs you to click or choose an item, move . Getting Started Using the Toshiba Dual Pointing Device 75 To move the cursor, gently push the pointing device in the direction you want the cursor to move the cursor to...

User Guide
Page 82
... on to your computer. Using a mouse You may move to the upper-right side of the computer's builtin TouchPad. 82 Getting Started Using an external keyboard Using an external keyboard If you prefer to use a USB-compatible mouse. NOTE After logging on the computer. You can use a full-size...
... on to your computer. Using a mouse You may move to the upper-right side of the computer's builtin TouchPad. 82 Getting Started Using an external keyboard Using an external keyboard If you prefer to use a USB-compatible mouse. NOTE After logging on the computer. You can use a full-size...

User Guide
Page 87
... a typewriter, except that: ❖ The space bar creates a space character instead of just passing over an area of a full-size keyboard. Using the keyboard Your computer's keyboard contains character keys, control keys, function keys, and special Windows® keys, providing all the functionality of the page. ❖ The ... 0 are not interchangeable. NOTE The Windows® XP operating system records information, such as new icon positions may be lost. Sample keyboard Character keys Typing with the character keys is very much like typing on page 107 to learn more about Standby.
... a typewriter, except that: ❖ The space bar creates a space character instead of just passing over an area of a full-size keyboard. Using the keyboard Your computer's keyboard contains character keys, control keys, function keys, and special Windows® keys, providing all the functionality of the page. ❖ The ... 0 are not interchangeable. NOTE The Windows® XP operating system records information, such as new icon positions may be lost. Sample keyboard Character keys Typing with the character keys is very much like typing on page 107 to learn more about Standby.

User Guide
Page 88
...assign separate functions to the right and left Ctrl and Alt keys, or to simulate the Enter key on the full-sized keyboard. Your computer's keyboard has only one Enter and one of the specially marked keys allows you are the 12 keys at the top of the ... the time, this does not matter. editing keys; Sample function keys 88 Learning the Basics Using the keyboard Making your keyboard emulate a full-size keyboard Although your program documentation. A standard full-size keyboard has two Enter, Ctrl, and Alt keys; Pressing the Fn key simultaneously in combination with a standard...
...assign separate functions to the right and left Ctrl and Alt keys, or to simulate the Enter key on the full-sized keyboard. Your computer's keyboard has only one Enter and one of the specially marked keys allows you are the 12 keys at the top of the ... the time, this does not matter. editing keys; Sample function keys 88 Learning the Basics Using the keyboard Making your keyboard emulate a full-size keyboard Although your program documentation. A standard full-size keyboard has two Enter, Ctrl, and Alt keys; Pressing the Fn key simultaneously in combination with a standard...

User Guide
Page 89
... Start menu ❖ Application key-Has the same function as you enter numeric data or control the cursor as the secondary mouse (or the Toshiba Dual Pointing Device) button Overlay keys The keys with icons execute specific functions on page 220. For more information, see "Fn-esse®" ...on page 166, or "Hot Keys" on the computer. Windows special keys Start key Application key Sample Windows special keys Your computer's keyboard has two keys that have special functions in combination with the Fn key, function keys marked with gray numbers and symbols on a desktop computer...
... Start menu ❖ Application key-Has the same function as you enter numeric data or control the cursor as the secondary mouse (or the Toshiba Dual Pointing Device) button Overlay keys The keys with icons execute specific functions on page 220. For more information, see "Fn-esse®" ...on page 166, or "Hot Keys" on the computer. Windows special keys Start key Application key Sample Windows special keys Your computer's keyboard has two keys that have special functions in combination with the Fn key, function keys marked with gray numbers and symbols on a desktop computer...

User Guide
Page 90
To turn the cursor control overlay on, press Fn and F10 simultaneously. The cursor control mode light on the keyboard indicator panel goes out. The numeric mode light on the keyboard indicator panel goes out. To turn the numeric overlay on, press Fn and F11 simultaneously. To turn the overlay off , ...hold down the Fn key and press F10 again. The cursor control mode light on the keyboard indicator panel glows when the cursor control overlay is on. To turn the overlay off , hold down the Fn key and press F11 again. ...
To turn the cursor control overlay on, press Fn and F10 simultaneously. The cursor control mode light on the keyboard indicator panel goes out. The numeric mode light on the keyboard indicator panel goes out. To turn the numeric overlay on, press Fn and F11 simultaneously. To turn the overlay off , ...hold down the Fn key and press F10 again. The cursor control mode light on the keyboard indicator panel glows when the cursor control overlay is on. To turn the overlay off , hold down the Fn key and press F11 again. ...

