User Guide 2
Page 18
... total memory 52 Recovering the Internal Storage Drive 53 Creating recovery media 54 Restoring from recovery media 56 Refresh your PC (with user's data 57 Reset your PC 60 Installing drivers and applications 62 Using the Toshiba Dual Pointing Device 63 Adjusting touch pad settings 66 Disabling or enabling the touch pad 67 Scrolling with the touch pad 67 Control buttons 67 Connecting an external device 68 Using external display devices 68 Selecting video cables 69 Connecting an HDMI™-compatible television or display device 69 Connecting an external monitor or projector...
... total memory 52 Recovering the Internal Storage Drive 53 Creating recovery media 54 Restoring from recovery media 56 Refresh your PC (with user's data 57 Reset your PC 60 Installing drivers and applications 62 Using the Toshiba Dual Pointing Device 63 Adjusting touch pad settings 66 Disabling or enabling the touch pad 67 Scrolling with the touch pad 67 Control buttons 67 Connecting an external device 68 Using external display devices 68 Selecting video cables 69 Connecting an HDMI™-compatible television or display device 69 Connecting an external monitor or projector...

User Guide 2
Page 20
... Start screen 102 Charms 103 Tiles 104 Exploring the desktop 104 Finding your way around the desktop 104 Windows® Store 106 Setting up for communications 106 Connecting your computer to a network .........107 Exploring audio features 107 Recording sounds 108 Using external speakers or headphones..........108 Using the Web Camera 109 Using an ExpressCard 109 Inserting an ExpressCard 110 Removing an ExpressCard 110 Using the Memory card reader...
... Start screen 102 Charms 103 Tiles 104 Exploring the desktop 104 Finding your way around the desktop 104 Windows® Store 106 Setting up for communications 106 Connecting your computer to a network .........107 Exploring audio features 107 Recording sounds 108 Using external speakers or headphones..........108 Using the Web Camera 109 Using an ExpressCard 109 Inserting an ExpressCard 110 Removing an ExpressCard 110 Using the Memory card reader...

User Guide 2
Page 21
... Support & Recovery 119 eco Utility 120 Setting passwords 121 Using a supervisor password 121 Using a user password 123 System Settings 124 Sleep and Charge 126 USB Sleep and Charge 126 Enabling/Disabling USB Sleep and Charge......128 Power supply mode settings 128 HDD Protection Utility 129 Function Key 130 Cooling Performance Diagnostic Tool 131 PC Diagnostic Tool 131 PC Health Monitor 132 Recovery Media Creator 133 Service Station 133 TOSHIBA Application Installer 133 TOSHIBA Button Setting 135 Trusted Platform Module (TPM 135 Fingerprint Utility 136 Fingerprint utility...
... Support & Recovery 119 eco Utility 120 Setting passwords 121 Using a supervisor password 121 Using a user password 123 System Settings 124 Sleep and Charge 126 USB Sleep and Charge 126 Enabling/Disabling USB Sleep and Charge......128 Power supply mode settings 128 HDD Protection Utility 129 Function Key 130 Cooling Performance Diagnostic Tool 131 PC Diagnostic Tool 131 PC Health Monitor 132 Recovery Media Creator 133 Service Station 133 TOSHIBA Application Installer 133 TOSHIBA Button Setting 135 Trusted Platform Module (TPM 135 Fingerprint Utility 136 Fingerprint utility...

User Guide 2
Page 44
... in Sleep or Hibernation mode, data will need a small Phillips screwdriver for this model, Slot A is the bottom slot. Before you install or remove a memory module, turn off the computer, unplug the AC adaptor, and remove the battery. You can be hot. 44 Getting Started Adding memory (optional) memory if you use a small Phillips screwdriver of data. The surrounding area may be installed in the memory module slots on the underside of the screen...
... in Sleep or Hibernation mode, data will need a small Phillips screwdriver for this model, Slot A is the bottom slot. Before you install or remove a memory module, turn off the computer, unplug the AC adaptor, and remove the battery. You can be hot. 44 Getting Started Adding memory (optional) memory if you use a small Phillips screwdriver of data. The surrounding area may be installed in the memory module slots on the underside of the screen...
User Guide 2
Page 45
... on the work . NOTE To locate your memory module slot cover please refer to your work surface to the computer, including the AC adaptor. Make sure the system indicator panel's storage drive light and the drive in-use light are off the power while a disk/disc is in memory will not be lost. If you to remove a memory module with the computer turned on page 95. Do not try to lose your Quick Start document...
... on the work . NOTE To locate your memory module slot cover please refer to your work surface to the computer, including the AC adaptor. Make sure the system indicator panel's storage drive light and the drive in-use light are off the power while a disk/disc is in memory will not be lost. If you to remove a memory module with the computer turned on page 95. Do not try to lose your Quick Start document...
User Guide 2
Page 51
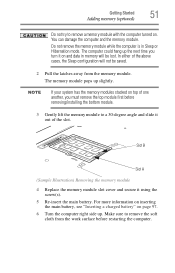
... a charged battery" on . Slot B Slot A (Sample Illustration) Removing the memory module 4 Replace the memory module slot cover and secure it out of the above cases, the Sleep configuration will be saved. 2 Pull the latches away from the work surface before removing/installing the bottom module. 3 Gently lift the memory module to remove a memory module with the computer turned on page 97. 6 Turn the computer right side up slightly. Make sure to remove the soft cloth from the memory module...
... a charged battery" on . Slot B Slot A (Sample Illustration) Removing the memory module 4 Replace the memory module slot cover and secure it out of the above cases, the Sleep configuration will be saved. 2 Pull the latches away from the work surface before removing/installing the bottom module. 3 Gently lift the memory module to remove a memory module with the computer turned on page 97. 6 Turn the computer right side up slightly. Make sure to remove the soft cloth from the memory module...

User Guide 2
Page 52
... could cause system failure, computer or AC adaptor damage or a fire, possibly resulting in "Installing a memory module" on a hard flat surface. In this : Press the ( ) + X keys, and then click System. Installed memory (RAM) is displayed below the System heading. If the computer does not recognize the memory configuration, turn off the computer and remove the memory module slot cover (complete steps 1-10 in serious injury. 7 Reconnect the...
... could cause system failure, computer or AC adaptor damage or a fire, possibly resulting in "Installing a memory module" on a hard flat surface. In this : Press the ( ) + X keys, and then click System. Installed memory (RAM) is displayed below the System heading. If the computer does not recognize the memory configuration, turn off the computer and remove the memory module slot cover (complete steps 1-10 in serious injury. 7 Reconnect the...

User Guide 2
Page 68
... using. Using external display devices NOTE To locate your HDMI port, RGB port, or DisplayPort, please refer to the right mouse button ("right-clicking"). Turn on your computer. Your computer comes with the device to see if you first need to install new software. 2 Connect the device's video or USB cable to the port on the program you can easily attach an external device your system, some models may automatically detect the external device. 68 Getting Started Connecting an external device The function...
... using. Using external display devices NOTE To locate your HDMI port, RGB port, or DisplayPort, please refer to the right mouse button ("right-clicking"). Turn on your computer. Your computer comes with the device to see if you first need to install new software. 2 Connect the device's video or USB cable to the port on the program you can easily attach an external device your system, some models may automatically detect the external device. 68 Getting Started Connecting an external device The function...
User Guide 2
Page 69
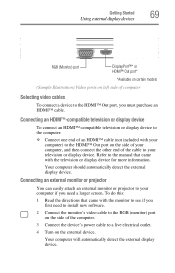
... an external monitor or projector to your television or display device. Getting Started Using external display devices 69 RGB (Monitor) port DisplayPort™* or HDMI™ Out port* *Available on certain models (Sample Illustration) Video ports on left side of computer Selecting video cables To connect a device to the HDMI™ Out port, you need to install new software. 2 Connect the monitor's video cable to the RGB (monitor) port on the side of the computer. 3 Connect the device's power cable to a live electrical outlet. 4 Turn on the external device.
... an external monitor or projector to your television or display device. Getting Started Using external display devices 69 RGB (Monitor) port DisplayPort™* or HDMI™ Out port* *Available on certain models (Sample Illustration) Video ports on left side of computer Selecting video cables To connect a device to the HDMI™ Out port, you need to install new software. 2 Connect the monitor's video cable to the RGB (monitor) port on the side of the computer. 3 Connect the device's power cable to a live electrical outlet. 4 Turn on the external device.

User Guide 2
Page 107
... you to record sounds using the computer's internal microphone (available on page 170. For information on your computer to purchase additional software, external hardware or services. Your system comes with common Wi-Fi® networking problems, see "TOSHIBA Function Keys" on certain models) or an optional external microphone. This is OFF, the wireless indicator light will be limited. NOTE To enable or disable wireless communication, use your computer. Exploring audio features You can connect many different...
... you to record sounds using the computer's internal microphone (available on page 170. For information on your computer to purchase additional software, external hardware or services. Your system comes with common Wi-Fi® networking problems, see "TOSHIBA Function Keys" on certain models) or an optional external microphone. This is OFF, the wireless indicator light will be limited. NOTE To enable or disable wireless communication, use your computer. Exploring audio features You can connect many different...
User Guide 2
Page 132
... information includes device operation time and number of actuations or status changes (e.g.: number of power button and Fn key combination uses, and AC adaptor, battery, LCD, fan, HDD, sound volume, wireless communication switch, docking and USB information), date of the device. PC Health Monitor (Available on certain models.) The PC Health Monitor software program monitors computer system functions such as power consumption, the cooling system and the 3D Accelerometer (available on the computer's internal storage drive. It also...
... information includes device operation time and number of actuations or status changes (e.g.: number of power button and Fn key combination uses, and AC adaptor, battery, LCD, fan, HDD, sound volume, wireless communication switch, docking and USB information), date of the device. PC Health Monitor (Available on certain models.) The PC Health Monitor software program monitors computer system functions such as power consumption, the cooling system and the 3D Accelerometer (available on the computer's internal storage drive. It also...
User Guide 2
Page 144
... troubleshoot the Operating System and/or its settings. Unless a hardware device has failed, problems usually occur when you may need to their defaults For more information, see "Reset your level of your PC (with computers. If Windows® fails to fix the problem. To enter the Boot menu manually: 1 Press Ctrl, Alt, and Del simultaneously (once). 2 Press the Power button in the Startup menu to start properly, you change ❖ Your computer settings...
... troubleshoot the Operating System and/or its settings. Unless a hardware device has failed, problems usually occur when you may need to their defaults For more information, see "Reset your level of your PC (with computers. If Windows® fails to fix the problem. To enter the Boot menu manually: 1 Press Ctrl, Alt, and Del simultaneously (once). 2 Press the Power button in the Startup menu to start properly, you change ❖ Your computer settings...

User Guide 2
Page 145
... Wrong The Windows® operating system is not working properly and that are created: ❖ When new hardware or software is installed ❖ Manually by the user System Image Recovery Windows® will "Recover" the Operating system using your problem. Restore points are installed during the Windows® boot process: ❖ Enable low resolution video mode Restarts Windows® using a specific image provided by pressing the F8 key during startup ❖ Enable Safe Mode Starts Windows® with another set of your current video driver at...
... Wrong The Windows® operating system is not working properly and that are created: ❖ When new hardware or software is installed ❖ Manually by the user System Image Recovery Windows® will "Recover" the Operating system using your problem. Restore points are installed during the Windows® boot process: ❖ Enable low resolution video mode Restarts Windows® using a specific image provided by pressing the F8 key during startup ❖ Enable Safe Mode Starts Windows® with another set of your current video driver at...

User Guide 2
Page 148
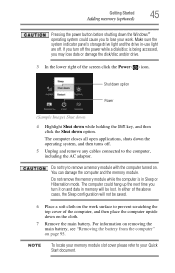
... the Settings ( ) Charm. 3 In the lower right of the screen click the Power ( ) icon. Shut down option Power (Sample Image) Shut down 4 While holding the Shift key, click the Shut down the operating system, and then turns off. 5 Check for the error again. 6 If the error recurs, remove the memory module entirely and check for the error again. 148 If Something Goes Wrong Memory problems driver or...
... the Settings ( ) Charm. 3 In the lower right of the screen click the Power ( ) icon. Shut down option Power (Sample Image) Shut down 4 While holding the Shift key, click the Shut down the operating system, and then turns off. 5 Check for the error again. 6 If the error recurs, remove the memory module entirely and check for the error again. 148 If Something Goes Wrong Memory problems driver or...

User Guide 2
Page 151
... using an external monitor: ❖ Check that the monitor is turned on. ❖ Check that the cable connecting the external monitor to the computer is firmly attached. ❖ Try adjusting the contrast and brightness controls on the external monitor. ❖ Press Fn and F5 simultaneously to activate the screen. If this , press Fn and F5 simultaneously (once). You can change the settings for your desktop background, under Colors, Sounds...
... using an external monitor: ❖ Check that the monitor is turned on. ❖ Check that the cable connecting the external monitor to the computer is firmly attached. ❖ Try adjusting the contrast and brightness controls on the external monitor. ❖ Press Fn and F5 simultaneously to activate the screen. If this , press Fn and F5 simultaneously (once). You can change the settings for your desktop background, under Colors, Sounds...
User Guide 2
Page 156
... disabled. on the optical disc drive itself. Adjust the volume control. The disc will not come out of new cards. Press the button on page 155. Sound system problems No sound is compatible with an optical data disc, refer to the software's documentation and check that they are using is coming from a microphone is fed to your optical disc drive. For more of devices, such as a removable hard disk, additional memory, or a pager. Adjust the volume control...
... disabled. on the optical disc drive itself. Adjust the volume control. The disc will not come out of new cards. Press the button on page 155. Sound system problems No sound is compatible with an optical data disc, refer to the software's documentation and check that they are using is coming from a microphone is fed to your optical disc drive. For more of devices, such as a removable hard disk, additional memory, or a pager. Adjust the volume control...
User Guide 2
Page 165
... installation, undoing any files from optical discs. Before installing anything goes wrong, you need any changes that appears. 2 Click Save backup copies of new hardware (printers, pointing devices, external hard drives, optical disc drive writers, scanners, etc.) and software (applications like Microsoft® Office and Adobe® Photoshop®, or utility software such as special toolbars for installing hardware and software Here are also widely available. before continuing. 1 From the Start screen, type Control...
... installation, undoing any files from optical discs. Before installing anything goes wrong, you need any changes that appears. 2 Click Save backup copies of new hardware (printers, pointing devices, external hard drives, optical disc drive writers, scanners, etc.) and software (applications like Microsoft® Office and Adobe® Photoshop®, or utility software such as special toolbars for installing hardware and software Here are also widely available. before continuing. 1 From the Start screen, type Control...
User Guide 2
Page 193
... control overlay TOSHIBA Function key 174 customize computer settings 72 D data/entire system backup troubleshooting 164 desktop creating new icon 104 exploring the 104 icons 104 recycle bin 105 standard features 103, 104 Desktop Assist 116 Media & Entertainment tab 117 Support & Recovery tab 119 Tools & Utilities tab 118 Device Manager fixing a problem 147 directing display output 70 disabling touch pad 67 display troubleshooting 152 display devices external 68 display output settings 70 display, external adjusting 71 disposal information 16 disposing of used batteries...
... control overlay TOSHIBA Function key 174 customize computer settings 72 D data/entire system backup troubleshooting 164 desktop creating new icon 104 exploring the 104 icons 104 recycle bin 105 standard features 103, 104 Desktop Assist 116 Media & Entertainment tab 117 Support & Recovery tab 119 Tools & Utilities tab 118 Device Manager fixing a problem 147 directing display output 70 disabling touch pad 67 display troubleshooting 152 display devices external 68 display output settings 70 display, external adjusting 71 disposal information 16 disposing of used batteries...
User Guide 2
Page 197
... indicator lights AC power 37 drive in-use indicator 80 LEDs 39, 88, 89, 109 System Settings 124 T taking care of battery 98 taskbar 105 television adjusting display 71 Tiles Start screen 104 tips for computing 74 Toshiba online resources 83 registering computer Toshiba Web site 41 worldwide offices 169 Toshiba accessories memory 43 TOSHIBA Application Installer 133 TOSHIBA Button Setting 135 Toshiba Dual Pointing Device 63 Toshiba EasyGuard® 84 TOSHIBA Function keys cursor control overlay 174 disabling or enabling wireless devices...
... indicator lights AC power 37 drive in-use indicator 80 LEDs 39, 88, 89, 109 System Settings 124 T taking care of battery 98 taskbar 105 television adjusting display 71 Tiles Start screen 104 tips for computing 74 Toshiba online resources 83 registering computer Toshiba Web site 41 worldwide offices 169 Toshiba accessories memory 43 TOSHIBA Application Installer 133 TOSHIBA Button Setting 135 Toshiba Dual Pointing Device 63 Toshiba EasyGuard® 84 TOSHIBA Function keys cursor control overlay 174 disabling or enabling wireless devices...

User Guide 2
Page 198
... enabling/disabling touch pad 173 Hibernation mode 171 keyboard Function keys 175 Lock (Instant security) 171 numeric overlay 174 optical disk drive 174 Output (Display switch) 172 power plan 171 scroll lock 174 Sleep mode 171 speaker volume 175 using to set a power plan 93 volume mute 174 Zoom (Display resolution) 175 zoom in 175 zoom out 175 TOSHIBA HDD Protection Utility 129 TouchPad™ control buttons 67 primary button 67 secondary button 68 traveling tips 101 troubleshooting 151 AC power light is blinking 142 battery light is blinking...
... enabling/disabling touch pad 173 Hibernation mode 171 keyboard Function keys 175 Lock (Instant security) 171 numeric overlay 174 optical disk drive 174 Output (Display switch) 172 power plan 171 scroll lock 174 Sleep mode 171 speaker volume 175 using to set a power plan 93 volume mute 174 Zoom (Display resolution) 175 zoom in 175 zoom out 175 TOSHIBA HDD Protection Utility 129 TouchPad™ control buttons 67 primary button 67 secondary button 68 traveling tips 101 troubleshooting 151 AC power light is blinking 142 battery light is blinking...


