
Users Manual Canada; English
Page 4
..., Vari-Bright and combinations thereof are subject to digital format, alteration, transfer of copied material and distribution on a network) without the prior written permission of Advanced Micro Devices, Inc. ConfigFree is a trademark of TOSHIBA Corporation. Please comply with respect to the use beyond that stipulated above (including conversion to change without notice. However, succeeding computers and manuals are...
..., Vari-Bright and combinations thereof are subject to digital format, alteration, transfer of copied material and distribution on a network) without the prior written permission of Advanced Micro Devices, Inc. ConfigFree is a trademark of TOSHIBA Corporation. Please comply with respect to the use beyond that stipulated above (including conversion to change without notice. However, succeeding computers and manuals are...

Users Manual Canada; English
Page 12
... in the text to the left. Icons Icons identify ports, dials, and other parts of this computer. The indicator panel also uses icons to set up and begin using optional devices and troubleshooting. We identify such operations by the key top symbols separated by a plus sign (+). Keys The keyboard keys are to describe, identify, and highlight terms and operating procedures. For example, CTRL + C means you are...
... in the text to the left. Icons Icons identify ports, dials, and other parts of this computer. The indicator panel also uses icons to set up and begin using optional devices and troubleshooting. We identify such operations by the key top symbols separated by a plus sign (+). Keys The keyboard keys are to describe, identify, and highlight terms and operating procedures. For example, CTRL + C means you are...
Users Manual Canada; English
Page 24
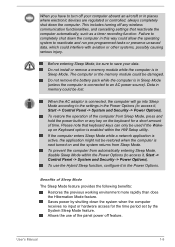
... Power Options (to access it , Start -> Control Panel -> System and Security -> Power Options). Allows the use the Hybrid Sleep function, configure it in the Power Options (to access it , Start -> Control Panel -> System and Security -> Power Options). Before entering Sleep Mode, be used if the Wakeup on Keyboard option is next turned on the keyboard for the time period set by the System Sleep Mode feature. To restore the operation of the panel power off feature. To use of the computer from Sleep Mode. This includes turning off any key...
... Power Options (to access it , Start -> Control Panel -> System and Security -> Power Options). Allows the use the Hybrid Sleep function, configure it in the Power Options (to access it , Start -> Control Panel -> System and Security -> Power Options). Before entering Sleep Mode, be used if the Wakeup on Keyboard option is next turned on the keyboard for the time period set by the System Sleep Mode feature. To restore the operation of the panel power off feature. To use of the computer from Sleep Mode. This includes turning off any key...
Users Manual Canada; English
Page 67
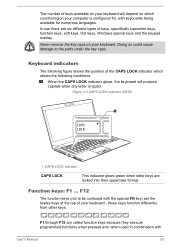
... CAPS LOCK indicator glows, the keyboard will depend on which country/region your computer is typed. CAPS LOCK indicator CAPS LOCK This indicator glows green when letter keys are six different types of keys, specifically typewriter keys, function keys, soft keys, Hot keys, Windows special keys and the keypad overlay. these keys function differently from other keys. In use there are locked into their uppercase format. Doing so could cause damage to be confused with User's Manual 3-3 F1...
... CAPS LOCK indicator glows, the keyboard will depend on which country/region your computer is typed. CAPS LOCK indicator CAPS LOCK This indicator glows green when letter keys are six different types of keys, specifically typewriter keys, function keys, soft keys, Hot keys, Windows special keys and the keypad overlay. these keys function differently from other keys. In use there are locked into their uppercase format. Doing so could cause damage to be confused with User's Manual 3-3 F1...
Users Manual Canada; English
Page 69
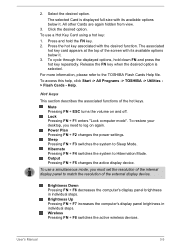
... top of the hot keys. To cycle through the displayed options, hold the FN key. 2. Lock Pressing FN + F1 enters ''Lock computer mode''. To restore your desktop, you must set the resolution of the internal display panel to match the resolution of the external display device. Power Plan Pressing FN + F2 changes the power settings. Sleep Pressing FN + F3 switches the system to log on and off. Output Pressing FN + F5 changes the active display device. To use a Hot Key Card using a hot key: 1.
... top of the hot keys. To cycle through the displayed options, hold the FN key. 2. Lock Pressing FN + F1 enters ''Lock computer mode''. To restore your desktop, you must set the resolution of the internal display panel to match the resolution of the external display device. Power Plan Pressing FN + F2 changes the power settings. Sleep Pressing FN + F3 switches the system to log on and off. Output Pressing FN + F5 changes the active display device. To use a Hot Key Card using a hot key: 1.

Users Manual Canada; English
Page 90
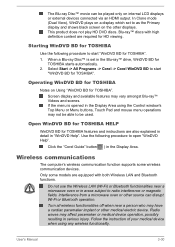
... or Touch Pad, or closing/opening the display panel. Playback may not be used rewritable disc, the full formatting might be able to reproduce music or voice. Unfinalized DVDs created on Windows 7. Use DVD-Video discs with a region code which is supported for any other function, including using the TOSHIBA VIDEO PLAYER. Install, remove or connect external devices, including the following: memory media card, USB device, external display, optical digital devices. Not support to the computer. About recorded DVDs and Blu-ray™ discs Some DVD-ROM drives for TOSHIBA software...
... or Touch Pad, or closing/opening the display panel. Playback may not be used rewritable disc, the full formatting might be able to reproduce music or voice. Unfinalized DVDs created on Windows 7. Use DVD-Video discs with a region code which is supported for any other function, including using the TOSHIBA VIDEO PLAYER. Install, remove or connect external devices, including the following: memory media card, USB device, external display, optical digital devices. Not support to the computer. About recorded DVDs and Blu-ray™ discs Some DVD-ROM drives for TOSHIBA software...
Users Manual Canada; English
Page 94
... Bluetooth functionalities near a person who may affect pacemaker or medical device operation, possibly resulting in the Display Area. If the menu is set to radio interference or magnetic fields. This product does not play HD DVD discs. Follow the instruction of your medical device when using the Control window's Top Menu or Menu buttons, Touch Pad and mouse menu operations may vary amongst Blu-ray™ Videos and scenes. Use the following procedure to start...
... Bluetooth functionalities near a person who may affect pacemaker or medical device operation, possibly resulting in the Display Area. If the menu is set to radio interference or magnetic fields. This product does not play HD DVD discs. Follow the instruction of your medical device when using the Control window's Top Menu or Menu buttons, Touch Pad and mouse menu operations may vary amongst Blu-ray™ Videos and scenes. Use the following procedure to start...
Users Manual Canada; English
Page 106
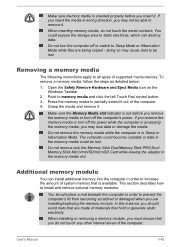
... are installing/replacing the memory module. Grasp the media and remove it out of the computer. If you insert the media in order to increase the amount of materials that hold or generate static electricity. When inserting memory media, do not touch any other internal areas of the computer. 4. Open the Safely Remove Hardware and Eject Media icon on the Windows Taskbar. 2. Press the memory media to install and remove optional memory modules. Make sure the Memory Media slot indicator...
... are installing/replacing the memory module. Grasp the media and remove it out of the computer. If you insert the media in order to increase the amount of materials that hold or generate static electricity. When inserting memory media, do not touch any other internal areas of the computer. 4. Open the Safely Remove Hardware and Eject Media icon on the Windows Taskbar. 2. Press the memory media to install and remove optional memory modules. Make sure the Memory Media slot indicator...
Users Manual Canada; English
Page 107
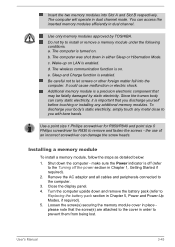
... cables and peripherals connected to let screws or other foreign matter fall into Slot A and Slot B respectively. b. The computer will operate in either Sleep or Hibernation Mode. Close the display panel. 4. The wireless communication function is turned on . Installing a memory module To install a memory module, follow the steps as detailed below: 1. d. Use only memory modules approved by static electricity. make sure the Power indicator is important that the screw(s) are attached to the cover in order...
... cables and peripherals connected to let screws or other foreign matter fall into Slot A and Slot B respectively. b. The computer will operate in either Sleep or Hibernation Mode. Close the display panel. 4. The wireless communication function is turned on . Installing a memory module To install a memory module, follow the steps as detailed below: 1. d. Use only memory modules approved by static electricity. make sure the Power indicator is important that the screw(s) are attached to the cover in order...
Users Manual Canada; English
Page 114
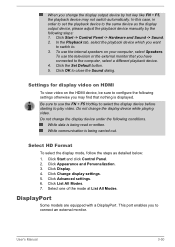
... Display. 4. Select one of the mode at List All Modes. User's Manual 3-50 In this case, in order to set the playback device to play video. Be sure to use the internal speakers on the HDMI device, be sure to configure the following settings otherwise you have connected to close the Sound dialog. Do not change the display device while playing video. Click Start and click Control Panel. 2. Click the Set Default button. 5. Select HD Format To select the display mode...
... Display. 4. Select one of the mode at List All Modes. User's Manual 3-50 In this case, in order to set the playback device to play video. Be sure to use the internal speakers on the HDMI device, be sure to configure the following settings otherwise you have connected to close the Sound dialog. Do not change the display device while playing video. Click Start and click Control Panel. 2. Click the Set Default button. 5. Select HD Format To select the display mode...
Users Manual Canada; English
Page 131
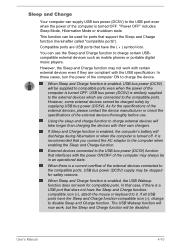
... Charge function-compatible icon ( ), change to it. External devices connected to the compatible ports, USB bus power (DC5V) supply may be used for compatible ports. If all USB ports have the Sleep and Charge functioncompatible icon ( ), attach the mouse or keyboard to disable Sleep and Charge function. In those cases, turn the power of the computer ON to the USB port even when the power of the computer is enabled, the computer's battery will take longer than charging the devices...
... Charge function-compatible icon ( ), change to it. External devices connected to the compatible ports, USB bus power (DC5V) supply may be used for compatible ports. If all USB ports have the Sleep and Charge functioncompatible icon ( ), attach the mouse or keyboard to disable Sleep and Charge function. In those cases, turn the power of the computer ON to the USB port even when the power of the computer is enabled, the computer's battery will take longer than charging the devices...

Users Manual Canada; English
Page 155
... by TOSHIBA as replacements. User's Manual 5-4 use of the battery pack This section provides the important safety precautions in order to handle your battery pack properly. The RTC battery does not charge while the computer is turned off even if the AC adaptor is turned off. Refer to Chapter 6 Troubleshooting for the internal real time clock and calendar function and also maintains the system configuration while...
... by TOSHIBA as replacements. User's Manual 5-4 use of the battery pack This section provides the important safety precautions in order to handle your battery pack properly. The RTC battery does not charge while the computer is turned off even if the AC adaptor is turned off. Refer to Chapter 6 Troubleshooting for the internal real time clock and calendar function and also maintains the system configuration while...

Users Manual Canada; English
Page 163
... give you hear any error messages against the operating system documentation. Check that your software or disk. loose cables can cause erroneous or intermittent signals. Check all cables to ensure they are correctly and firmly attached to TOSHIBA Support. in the documentation included with it display any unusual noises? Check that all connectors for loose pins. keyboard, hard disk drive, display panel, touch pad, touch pad control buttons - Write down what...
... give you hear any error messages against the operating system documentation. Check that your software or disk. loose cables can cause erroneous or intermittent signals. Check all cables to ensure they are correctly and firmly attached to TOSHIBA Support. in the documentation included with it display any unusual noises? Check that all connectors for loose pins. keyboard, hard disk drive, display panel, touch pad, touch pad control buttons - Write down what...
Users Manual Canada; English
Page 165
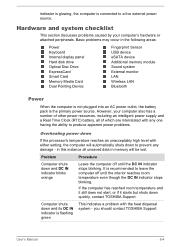
... shuts down quickly, contact TOSHIBA Support. in this instance all of other power resources, including an intelligent power supply and a Real Time Clock (RTC) battery, all unsaved data in the following areas: Power Keyboard Internal display panel Hard disk drive Optical Disc Drive ExpressCard Smart Card Memory Media Card Dual Pointing Device Fingerprint Sensor USB device eSATA device Additional memory module Sound system External monitor LAN Wireless LAN Bluetooth Power When the computer is not plugged into an AC power outlet, the battery pack is connected to...
... shuts down quickly, contact TOSHIBA Support. in this instance all of other power resources, including an intelligent power supply and a Real Time Clock (RTC) battery, all unsaved data in the following areas: Power Keyboard Internal display panel Hard disk drive Optical Disc Drive ExpressCard Smart Card Memory Media Card Dual Pointing Device Fingerprint Sensor USB device eSATA device Additional memory module Sound system External monitor LAN Wireless LAN Bluetooth Power When the computer is not plugged into an AC power outlet, the battery pack is connected to...

Users Manual Canada; English
Page 169
... the Boot Priority setting within the TOSHIBA HW Setup utility please refer to the operating system's documentation or online Help File for further information. Hard disk drive Problem Computer does not boot from contact with the keyboard and Touch Pad while the display panel has been closed. if so remove it . User's Manual 6-8 Optical Disc Drive For more information, refer to an external monitor. You should always follow the instructions with a good quality LCD screen cleaner...
... the Boot Priority setting within the TOSHIBA HW Setup utility please refer to the operating system's documentation or online Help File for further information. Hard disk drive Problem Computer does not boot from contact with the keyboard and Touch Pad while the display panel has been closed. if so remove it . User's Manual 6-8 Optical Disc Drive For more information, refer to an external monitor. You should always follow the instructions with a good quality LCD screen cleaner...

Users Manual Canada; English
Page 172
... should initially try changing not work the double-click speed setting within the Mouse Control utility. 1. Remove the mouse from the computer and then reconnect it to a free USB port it in order to ensure it , click Start -> Control Panel -> Hardware and Sound -> Mouse. Within the Mouse Properties window, click the Buttons tab. 3. Set the pointer speed as required and click OK. The on-screen pointer moves erratically The elements of Touch pad is firmly...
... should initially try changing not work the double-click speed setting within the Mouse Control utility. 1. Remove the mouse from the computer and then reconnect it to a free USB port it in order to ensure it , click Start -> Control Panel -> Hardware and Sound -> Mouse. Within the Mouse Properties window, click the Buttons tab. 3. Set the pointer speed as required and click OK. The on-screen pointer moves erratically The elements of Touch pad is firmly...

Users Manual Canada; English
Page 176
... problem, contact TOSHIBA Support. Problem Procedure No sound is properly working. Check within the Windows Device Manager application to decrease it click the volume down button. If there is turned to Off Check to the documentation supplied with your audio device. Disconnect the AC adaptor and all peripheral devices. 3. Remove the battery pack. 4. If you determine that the device is heard Adjust the volume. Check the software volume settings. If there is secure. Turn...
... problem, contact TOSHIBA Support. Problem Procedure No sound is properly working. Check within the Windows Device Manager application to decrease it click the volume down button. If there is turned to Off Check to the documentation supplied with your audio device. Disconnect the AC adaptor and all peripheral devices. 3. Remove the battery pack. 4. If you determine that the device is heard Adjust the volume. Check the software volume settings. If there is secure. Turn...

Users Manual Canada; English
Page 178
... while in Sleep Mode. Wake-up on again. Problem Procedure No display Try adjusting the contrast and brightness controls on LAN function consumes power even when the system is connected. When the external monitor is set as the primary display device in extended desktop mode, it is not set the display panel and external monitor to the computer is in order to change the display priority and ensure that the cable connecting the external monitor to clone mode. Display error occurs Check...
... while in Sleep Mode. Wake-up on again. Problem Procedure No display Try adjusting the contrast and brightness controls on LAN function consumes power even when the system is connected. When the external monitor is set as the primary display device in extended desktop mode, it is not set the display panel and external monitor to the computer is in order to change the display priority and ensure that the cable connecting the external monitor to clone mode. Display error occurs Check...
Users Manual Canada; English
Page 210
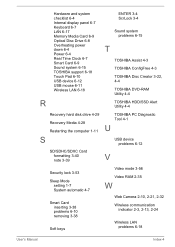
... 6-4 Internal display panel 6-7 Keyboard 6-7 LAN 6-17 Memory Media Card 6-9 Optical Disc Drive 6-8 Overheating power down 6-4 Power 6-4 Real Time Clock 6-7 Smart Card 6-9 Sound system 6-15 TOSHIBA support 6-18 Touch Pad 6-10 USB device 6-12 USB mouse 6-11 Wireless LAN 6-18 R ENTER 3-4 ScrLock 3-4 Sound system problems 6-15 T TOSHIBA Assist 4-3 TOSHIBA ConfigFree 4-3 TOSHIBA Disc Creator 3-22, 4-4 TOSHIBA DVD-RAM Utility 4-4 TOSHIBA HDD/SSD Alert Utility 4-4 Recovery hard disk drive 4-29 Recovery Media 4-28 Restarting the computer 1-11 S SD/SDHC/SDXC Card formatting 3-40 note 3-39 TOSHIBA PC...
... 6-4 Internal display panel 6-7 Keyboard 6-7 LAN 6-17 Memory Media Card 6-9 Optical Disc Drive 6-8 Overheating power down 6-4 Power 6-4 Real Time Clock 6-7 Smart Card 6-9 Sound system 6-15 TOSHIBA support 6-18 Touch Pad 6-10 USB device 6-12 USB mouse 6-11 Wireless LAN 6-18 R ENTER 3-4 ScrLock 3-4 Sound system problems 6-15 T TOSHIBA Assist 4-3 TOSHIBA ConfigFree 4-3 TOSHIBA Disc Creator 3-22, 4-4 TOSHIBA DVD-RAM Utility 4-4 TOSHIBA HDD/SSD Alert Utility 4-4 Recovery hard disk drive 4-29 Recovery Media 4-28 Restarting the computer 1-11 S SD/SDHC/SDXC Card formatting 3-40 note 3-39 TOSHIBA PC...
Detailed Specs for Tecra R850 PT520C-00U023 English
Page 1
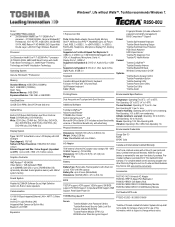
... Battery Battery Type: Removable, Rechargeable 6-cell Lithium Ion (Li-ion) 10.8V x 66 Wh capacity Battery life: up to 149F) Thermal Gradient: Operating 15 C per hr. Toshiba recommends Windows 7. Serial-ATA hard disk drive Optical Drive Built-in Mic) Bluetooth v3.0+EDR Expansion 1 Express Card Slot Ports: Bridge Media adaptor (Secure Digital, Memory Stick™, Memory Stick PRO™, MultiMedia Card, xD Picture Card), RGB, 2 x USB2.0, 1 x eSATA/USB2.0, 1 x USB3.0, RJ45 (LAN), Headphone, Microphone, Display Port...
... Battery Battery Type: Removable, Rechargeable 6-cell Lithium Ion (Li-ion) 10.8V x 66 Wh capacity Battery life: up to 149F) Thermal Gradient: Operating 15 C per hr. Toshiba recommends Windows 7. Serial-ATA hard disk drive Optical Drive Built-in Mic) Bluetooth v3.0+EDR Expansion 1 Express Card Slot Ports: Bridge Media adaptor (Secure Digital, Memory Stick™, Memory Stick PRO™, MultiMedia Card, xD Picture Card), RGB, 2 x USB2.0, 1 x eSATA/USB2.0, 1 x USB3.0, RJ45 (LAN), Headphone, Microphone, Display Port...


