
Users Manual AU/NZ
Page 3
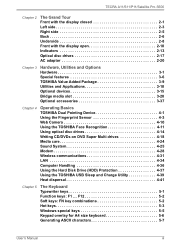
... Optional devices 3-15 Bridge media slot 3-20 Optional accessories 3-37 Chapter 4 Operating Basics TOSHIBA Dual Pointing Device 4-1 Using the Fingerprint Sensor 4-3 Web Camera 4-10 Using the TOSHIBA Face Recognition 4-11 Using optical disc drives 4-14 Writing CD/DVDs on DVD Super Multi drives 4-18 Media care 4-24 Sound System 4-25 Modem 4-28 Wireless communications 4-31 LAN 4-34 Computer Handling 4-36 Using the Hard Disk Drive (HDD) Protection 4-37 Using the TOSHIBA USB Sleep and Charge Utility 4-39 Heat dispersal 4-41 Chapter 5 The Keyboard Typewriter keys 5-1 Function...
... Optional devices 3-15 Bridge media slot 3-20 Optional accessories 3-37 Chapter 4 Operating Basics TOSHIBA Dual Pointing Device 4-1 Using the Fingerprint Sensor 4-3 Web Camera 4-10 Using the TOSHIBA Face Recognition 4-11 Using optical disc drives 4-14 Writing CD/DVDs on DVD Super Multi drives 4-18 Media care 4-24 Sound System 4-25 Modem 4-28 Wireless communications 4-31 LAN 4-34 Computer Handling 4-36 Using the Hard Disk Drive (HDD) Protection 4-37 Using the TOSHIBA USB Sleep and Charge Utility 4-39 Heat dispersal 4-41 Chapter 5 The Keyboard Typewriter keys 5-1 Function...
Users Manual AU/NZ
Page 4
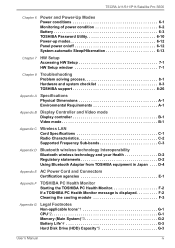
...*1 G-1 CPU*2 G-1 Memory (Main System)*3 G-2 Battery Life*4 G-3 Hard Disk Drive (HDD) Capacity*5 G-3 User's Manual iv TECRA A11/S11/P11/Satellite Pro S500 Chapter 6 Power and Power-Up Modes Power conditions 6-1 Monitoring of power condition 6-2 Battery 6-3 TOSHIBA Password Utility 6-10 Power-up modes 6-12 Panel power on/off 6-12 System automatic Sleep/Hibernation 6-13 Chapter 7 HW Setup Accessing HW Setup 7-1 HW Setup window 7-1 Chapter 8 Troubleshooting Problem solving process 8-1 Hardware and system checklist 8-3 TOSHIBA support 8-26 Appendix A Specifications Physical...
...*1 G-1 CPU*2 G-1 Memory (Main System)*3 G-2 Battery Life*4 G-3 Hard Disk Drive (HDD) Capacity*5 G-3 User's Manual iv TECRA A11/S11/P11/Satellite Pro S500 Chapter 6 Power and Power-Up Modes Power conditions 6-1 Monitoring of power condition 6-2 Battery 6-3 TOSHIBA Password Utility 6-10 Power-up modes 6-12 Panel power on/off 6-12 System automatic Sleep/Hibernation 6-13 Chapter 7 HW Setup Accessing HW Setup 7-1 HW Setup window 7-1 Chapter 8 Troubleshooting Problem solving process 8-1 Hardware and system checklist 8-3 TOSHIBA support 8-26 Appendix A Specifications Physical...
Users Manual AU/NZ
Page 6
... instructions and descriptions it contains are accurate for the TOSHIBA TECRA A11/S11/P11/Satellite Pro S500 Portable Personal Computer at the time of International Business Machines Corporation. Memory Stick, Memory Stick PRO, Memory Stick PRO Duo and i.LINK are trademarks of TOSHIBA. TOSHIBA TECRA A11/S11/P11/Satellite Pro S500 Portable Personal Computer User's Manual First edition January 2010 Copyright authority for accuracy. Please comply with respect to digital format...
... instructions and descriptions it contains are accurate for the TOSHIBA TECRA A11/S11/P11/Satellite Pro S500 Portable Personal Computer at the time of International Business Machines Corporation. Memory Stick, Memory Stick PRO, Memory Stick PRO Duo and i.LINK are trademarks of TOSHIBA. TOSHIBA TECRA A11/S11/P11/Satellite Pro S500 Portable Personal Computer User's Manual First edition January 2010 Copyright authority for accuracy. Please comply with respect to digital format...
Users Manual AU/NZ
Page 11
... prohibited. TECRA A11/S11/P11/Satellite Pro S500 Pursuant to FCC CFR 47, Part 68: When you are ready to install or use the modem, call the telephone company and let them to make any of your telephone equipment is not operating properly, you will connect the modem ■ The registration number that is located on the device The FCC registration number of the...
... prohibited. TECRA A11/S11/P11/Satellite Pro S500 Pursuant to FCC CFR 47, Part 68: When you are ready to install or use the modem, call the telephone company and let them to make any of your telephone equipment is not operating properly, you will connect the modem ■ The registration number that is located on the device The FCC registration number of the...
Users Manual AU/NZ
Page 24
... highlight terms and operating procedures. Read Chapter 3, Hardware, Utilities and Options if connecting optional products or external devices. User's Manual xxii Preface Congratulations on your computer, basic operations and care, using your computer. It also provides detailed information on configuring your purchase of the TECRA A11/S11/P11Satellite Pro S500 Series computer. Then read over the Chapter 1, Getting Started and Chapter 3, Hardware, Utilities and Options chapters to setup and configure these features...
... highlight terms and operating procedures. Read Chapter 3, Hardware, Utilities and Options if connecting optional products or external devices. User's Manual xxii Preface Congratulations on your computer, basic operations and care, using your computer. It also provides detailed information on configuring your purchase of the TECRA A11/S11/P11Satellite Pro S500 Series computer. Then read over the Chapter 1, Getting Started and Chapter 3, Hardware, Utilities and Options chapters to setup and configure these features...
Users Manual AU/NZ
Page 38
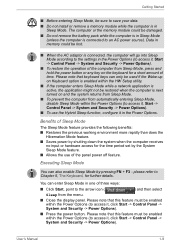
... the display panel. Benefits of the panel power off feature. Please note that this feature must be enabled within the Power Options (to access it , click Start -> Control Panel -> System and Security -> Power Options). User's Manual 1-9 please refer to Chapter 5, The Keyboard, for the time period set by the System Sleep Mode feature. ■ Allows the use the Hybrid Sleep function, configure it in the Power Options (to access it, Start -> Control Panel -> System and Security -> Power Options). ■ To restore the operation...
... the display panel. Benefits of the panel power off feature. Please note that this feature must be enabled within the Power Options (to access it , click Start -> Control Panel -> System and Security -> Power Options). User's Manual 1-9 please refer to Chapter 5, The Keyboard, for the time period set by the System Sleep Mode feature. ■ Allows the use the Hybrid Sleep function, configure it in the Power Options (to access it, Start -> Control Panel -> System and Security -> Power Options). ■ To restore the operation...

Users Manual AU/NZ
Page 46
... 3, Hardware, Utilities and Options. Wireless communication switch Slide this switch to the left to turn on the functions. The Grand Tour System indicators Bridge media slot These LED indicators allow you to monitor the status of Bluetooth, Wireless LAN and Wireless WAN functions and are described in more detail within the Wireless indicators section. This slot lets you insert an SD™/SDHC™ memory card, miniSD™/microSD™ Card, Memory Stick® (PRO™/PRO Duo...
... 3, Hardware, Utilities and Options. Wireless communication switch Slide this switch to the left to turn on the functions. The Grand Tour System indicators Bridge media slot These LED indicators allow you to monitor the status of Bluetooth, Wireless LAN and Wireless WAN functions and are described in more detail within the Wireless indicators section. This slot lets you insert an SD™/SDHC™ memory card, miniSD™/microSD™ Card, Memory Stick® (PRO™/PRO Duo...
Users Manual AU/NZ
Page 50
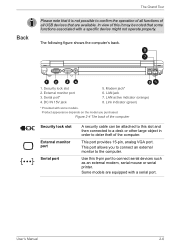
... computer Security lock slot External monitor port Serial port A security cable can be noted that are equipped with some functions associated with a specific device might not operate properly. Some models are available. This port provides 15-pin, analog VGA port. Security lock slot 2. Modem jack* 6. Use this slot and then connected to a desk or other large object in order to deter theft of all USB devices that some models. User's Manual 2-6 Link indicator (green) * Provided with a serial port. The Grand...
... computer Security lock slot External monitor port Serial port A security cable can be noted that are equipped with some functions associated with a specific device might not operate properly. Some models are available. This port provides 15-pin, analog VGA port. Security lock slot 2. Modem jack* 6. Use this slot and then connected to a desk or other large object in order to deter theft of all USB devices that some models. User's Manual 2-6 Link indicator (green) * Provided with a serial port. The Grand...
Users Manual AU/NZ
Page 66
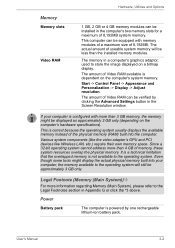
... of Video RAM can be installed in Appendix G or click the *3 above. Legal Footnote (Memory (Main System))*3 For more than 3 GB memory, the memory might display the actual physical memory built into the computer. Hardware, Utilities and Options Memory Memory slots Video RAM 1 GB, 2 GB or 4 GB memory modules can be verified by one rechargeable lithium-ion battery pack. Start -> Control Panel -> Appearance and Personalization -> Display -> Adjust resolution. Power Battery pack The computer is configured with memory modules of...
... of Video RAM can be installed in Appendix G or click the *3 above. Legal Footnote (Memory (Main System))*3 For more than 3 GB memory, the memory might display the actual physical memory built into the computer. Hardware, Utilities and Options Memory Memory slots Video RAM 1 GB, 2 GB or 4 GB memory modules can be verified by one rechargeable lithium-ion battery pack. Start -> Control Panel -> Appearance and Personalization -> Display -> Adjust resolution. Power Battery pack The computer is configured with memory modules of...
Users Manual AU/NZ
Page 78
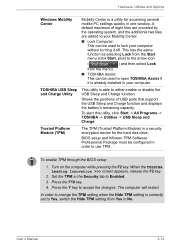
... TPM (Trusted Platform Module) is a security encryption device for accessing several mobile PC settings quickly in order to your Mobility Center. ■ Lock Computer: This can be used to Enabled. 3. To enable TPM through the BIOS setup: 1. Press the F10 key. 4. User's Manual 3-14 A default maximum of USB ports that support the USB Sleep and Charge function and displays the battery's remaining capacity. This has the same function as selecting Lock from the Start menu (click Start, point to the...
... TPM (Trusted Platform Module) is a security encryption device for accessing several mobile PC settings quickly in order to your Mobility Center. ■ Lock Computer: This can be used to Enabled. 3. To enable TPM through the BIOS setup: 1. Press the F10 key. 4. User's Manual 3-14 A default maximum of USB ports that support the USB Sleep and Charge function and displays the battery's remaining capacity. This has the same function as selecting Lock from the Start menu (click Start, point to the...
Users Manual AU/NZ
Page 88
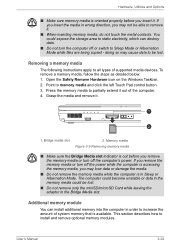
... to install and remove optional memory modules. Bridge media slot 2. User's Manual 3-24 Additional memory module You can destroy data. ■ Do not turn off the power while the computer is in the Bridge Media slot. Hardware, Utilities and Options ■ Make sure memory media is available. You could be lost . ■ Do not remove only the miniSD/microSD Card while leaving the adaptor in Sleep or Hibernation Mode. Grasp the media and remove it out of supported media devices.
... to install and remove optional memory modules. Bridge media slot 2. User's Manual 3-24 Additional memory module You can destroy data. ■ Do not turn off the power while the computer is in the Bridge Media slot. Hardware, Utilities and Options ■ Make sure memory media is available. You could be lost . ■ Do not remove only the miniSD/microSD Card while leaving the adaptor in Sleep or Hibernation Mode. Grasp the media and remove it out of supported media devices.
Users Manual AU/NZ
Page 92
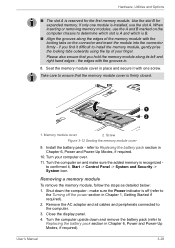
... all cables and peripherals connected to Replacing the battery pack section in Chapter 6, Power and Power-Up Modes, if required). Screw Figure 3-12 Seating the memory module cover 9. Removing a memory module To remove the memory module, follow the steps as detailed below: 1. make sure the added memory is firmly closed. 1 2 1. When inserting or removing memory modules, use the slot A. Seat the memory module cover in Chapter 1, Getting Started if required). 2. Turn the computer on and make sure the Power indicator is...
... all cables and peripherals connected to Replacing the battery pack section in Chapter 6, Power and Power-Up Modes, if required). Screw Figure 3-12 Seating the memory module cover 9. Removing a memory module To remove the memory module, follow the steps as detailed below: 1. make sure the added memory is firmly closed. 1 2 1. When inserting or removing memory modules, use the slot A. Seat the memory module cover in Chapter 1, Getting Started if required). 2. Turn the computer on and make sure the Power indicator is...
Users Manual AU/NZ
Page 99
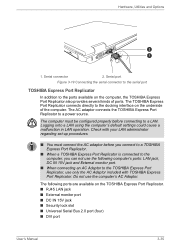
...'s default settings could cause a malfunction in LAN operation. The AC adaptor connects the TOSHIBA Express Port Replicator to the TOSHIBA Express Port Replicator, use the computer's AC Adaptor. Check with TOSHIBA Express Port Replicator. The TOSHIBA Express Port Replicator connects directly to the computer, you can not use the following ports are available on the TOSHIBA Express Port Replicator. ■ RJ45 LAN jack ■ External monitor port ■ DC IN 15V jack ■ Security lock slot ■...
...'s default settings could cause a malfunction in LAN operation. The AC adaptor connects the TOSHIBA Express Port Replicator to the TOSHIBA Express Port Replicator, use the computer's AC Adaptor. Check with TOSHIBA Express Port Replicator. The TOSHIBA Express Port Replicator connects directly to the computer, you can not use the following ports are available on the TOSHIBA Express Port Replicator. ■ RJ45 LAN jack ■ External monitor port ■ DC IN 15V jack ■ Security lock slot ■...
Users Manual AU/NZ
Page 171
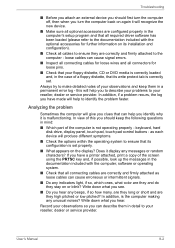
... attached, print a copy of the screen using the PRTSC key and, if possible, look up the messages in the documentation included with the optional accessories for loose pins. ■ Check that your floppy diskette, CD or DVD media is correctly loaded and, in the case of the computer is not operating properly - keyboard, hard disk drive, display panel, touch pad, touch pad control buttons - Write down what you see...
... attached, print a copy of the screen using the PRTSC key and, if possible, look up the messages in the documentation included with the optional accessories for loose pins. ■ Check that your floppy diskette, CD or DVD media is correctly loaded and, in the case of the computer is not operating properly - keyboard, hard disk drive, display panel, touch pad, touch pad control buttons - Write down what you see...
Users Manual AU/NZ
Page 176
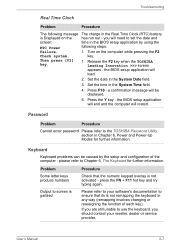
... Y key - Keyboard Keyboard problems can be displayed. 5. Please refer to your reseller, dealer or service provider. Set the date in the System Time field. 4. the BIOS setup application will end and the computer will need to the TOSHIBA Password Utility section in any way (remapping involves changing or reassigning the function of the computer - If you are still unable to use the keyboard, you will restart. User's Manual 8-7 you...
... Y key - Keyboard Keyboard problems can be displayed. 5. Please refer to your reseller, dealer or service provider. Set the date in the System Time field. 4. the BIOS setup application will end and the computer will need to the TOSHIBA Password Utility section in any way (remapping involves changing or reassigning the function of the computer - If you are still unable to use the keyboard, you will restart. User's Manual 8-7 you...

Users Manual AU/NZ
Page 188
... the Using the TOSHIBA USB Sleep and Charge Utility section in order to ensure it in Chapter 4, Operating Basics. After that any required USB device drivers are still able to use the "USB Sleep and Charge function". Troubleshooting USB device In addition to the information in the TOSHIBA Sleep and Charge utility to enable this function. Select the "Enable USB Sleep and Charge" check box in this you are properly installed - Ensure that , turn the power of this computer. USB Sleep and Charge function may be disabled. User's Manual...
... the Using the TOSHIBA USB Sleep and Charge Utility section in order to ensure it in Chapter 4, Operating Basics. After that any required USB device drivers are still able to use the "USB Sleep and Charge function". Troubleshooting USB device In addition to the information in the TOSHIBA Sleep and Charge utility to enable this function. Select the "Enable USB Sleep and Charge" check box in this you are properly installed - Ensure that , turn the power of this computer. USB Sleep and Charge function may be disabled. User's Manual...
Users Manual AU/NZ
Page 192
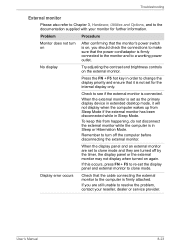
... display panel and an external monitor are set as the primary display device in Sleep Mode. If this from Sleep Mode if the external monitor has been disconnected while in extended desktop mode, it is not set the display panel and external monitor to clone mode. User's Manual 8-23 To keep this occurs, press FN + F5 to resolve the problem, contact your monitor for the internal display only. Display error occurs Check that the monitor's power switch is in order to change the display...
... display panel and an external monitor are set as the primary display device in Sleep Mode. If this from Sleep Mode if the external monitor has been disconnected while in extended desktop mode, it is not set the display panel and external monitor to clone mode. User's Manual 8-23 To keep this occurs, press FN + F5 to resolve the problem, contact your monitor for the internal display only. Display error occurs Check that the monitor's power switch is in order to change the display...
Users Manual AU/NZ
Page 226
disable: To turn a computer option off. To accomplish these tasks, the unit physically rotates the disk at high speed past a read many times. documentation: The set of manuals and/or other image producing device used to view computer output. driver: A software program, generally part of the operating system, that controls a specific piece of hardware (frequently a peripheral device such as system functions. The DVD-R drive uses a laser to communicate with erase. device driver: A program...
disable: To turn a computer option off. To accomplish these tasks, the unit physically rotates the disk at high speed past a read many times. documentation: The set of manuals and/or other image producing device used to view computer output. driver: A software program, generally part of the operating system, that controls a specific piece of hardware (frequently a peripheral device such as system functions. The DVD-R drive uses a laser to communicate with erase. device driver: A program...
Users Manual AU/NZ
Page 229
I /O devices: Equipment used to communicate with any other devices dispersed over a relatively limited area and connected by manually pressing marked keys. keyboard: An input device containing switches that are activated by a communications link that enables any device to interact with the computer and transfer data to and from a computer. For each key, the transmitted code is etched into the processor to help improve processing speed...
I /O devices: Equipment used to communicate with any other devices dispersed over a relatively limited area and connected by manually pressing marked keys. keyboard: An input device containing switches that are activated by a communications link that enables any device to interact with the computer and transfer data to and from a computer. For each key, the transmitted code is etched into the processor to help improve processing speed...
Detailed Specs for Tecra P11 PTSE3A-0CC00K AU/NZ; English
Page 2
... BIOS Support, Boot Device, TSETUP 3 Year limited international parts and labour warranty,Australia and New Zealand warrantyincludes complimentarycourier pick-up and return service Yes 75W Worldwide AC Adaptor Biometric securitywith advanced Fingerprint sensor with Toshiba Fingerprint Utility, Hard Disk password prevents unauthorised access to the Hard Drive and can be synchronised with the user password, Kensington® cable lock slot for optional theft protection devices, Trusted Platform Module (TPM) for hardware encryption, User and supervisor password prevents...
... BIOS Support, Boot Device, TSETUP 3 Year limited international parts and labour warranty,Australia and New Zealand warrantyincludes complimentarycourier pick-up and return service Yes 75W Worldwide AC Adaptor Biometric securitywith advanced Fingerprint sensor with Toshiba Fingerprint Utility, Hard Disk password prevents unauthorised access to the Hard Drive and can be synchronised with the user password, Kensington® cable lock slot for optional theft protection devices, Trusted Platform Module (TPM) for hardware encryption, User and supervisor password prevents...


