
User Guide
Page 26
...Ltd. xD-Picture Card is a trademark of Synaptics, Inc. and/or Toshiba Corporation. Adobe and Photoshop are trademarks of SD Card Association. Memory Stick, Memory Stick PRO, and i.LINK are owned by Toshiba is under license. For disposal, reuse or recycling information, please contact your...trademarks of their respective owners. 26 Trademarks Tecra is a trademark of PCMCIA. ExpressCard is a registered trademark of Microsoft Corporation in the United States and/or other brand and product names are registered trademarks of Toshiba America Information Systems, Inc. and any ...
...Ltd. xD-Picture Card is a trademark of Synaptics, Inc. and/or Toshiba Corporation. Adobe and Photoshop are trademarks of SD Card Association. Memory Stick, Memory Stick PRO, and i.LINK are owned by Toshiba is under license. For disposal, reuse or recycling information, please contact your...trademarks of their respective owners. 26 Trademarks Tecra is a trademark of PCMCIA. ExpressCard is a registered trademark of Microsoft Corporation in the United States and/or other brand and product names are registered trademarks of Toshiba America Information Systems, Inc. and any ...
User Guide
Page 28
... first time 47 Opening the display panel 47 Your computer's features and specifications ....48 Turning on the power 48 Adding memory (optional 49 Installing a memory module 50 Removing a memory module 55 Checking total memory 56 Hard Drive Recovery Utilities 57 Creating Recovery CDs/DVDs 57 Hard Disk Drive Recovery using the recovery partition 59...
... first time 47 Opening the display panel 47 Your computer's features and specifications ....48 Turning on the power 48 Adding memory (optional 49 Installing a memory module 50 Removing a memory module 55 Checking total memory 56 Hard Drive Recovery Utilities 57 Creating Recovery CDs/DVDs 57 Hard Disk Drive Recovery using the recovery partition 59...

User Guide
Page 31
... 131 Removing an ExpressCard 132 Using the Bridge Media Adapter Slot 133 Inserting memory media 133 Removing memory media 134 Using the i.LINK® port 134 Chapter 5: Utilities 135 TOSHIBA Assist 136 Connect 137 Secure 138 Protect & Fix 139 Optimize 140 TOSHIBA Application Installer 141 Setting passwords 142 Using an instant password 142 Using...
... 131 Removing an ExpressCard 132 Using the Bridge Media Adapter Slot 133 Inserting memory media 133 Removing memory media 134 Using the i.LINK® port 134 Chapter 5: Utilities 135 TOSHIBA Assist 136 Connect 137 Secure 138 Protect & Fix 139 Optimize 140 TOSHIBA Application Installer 141 Setting passwords 142 Using an instant password 142 Using...

User Guide
Page 32
... Quickly creating a new power profile 150 Customizing a power profile 150 Mouse Utility 151 Toshiba Hardware Setup 152 TOSHIBA Zooming Utility 153 Toshiba Button Controls 155 CD/DVD Drive Acoustic Silencer 156 TOSHIBA Accessibility 157 Fingerprint Authentication Utility 158 Fingerprint utility limitations 158 Fingerprint Enrollment 158 Fingerprint Logon... conflict 175 A plan of action 175 Resolving hardware conflicts on your own .....176 Fixing a problem with Device Manager ...........177 Memory problems 179 Power and the batteries 179 Keyboard problems 181 Display problems 181
... Quickly creating a new power profile 150 Customizing a power profile 150 Mouse Utility 151 Toshiba Hardware Setup 152 TOSHIBA Zooming Utility 153 Toshiba Button Controls 155 CD/DVD Drive Acoustic Silencer 156 TOSHIBA Accessibility 157 Fingerprint Authentication Utility 158 Fingerprint utility limitations 158 Fingerprint Enrollment 158 Fingerprint Logon... conflict 175 A plan of action 175 Resolving hardware conflicts on your own .....176 Fixing a problem with Device Manager ...........177 Memory problems 179 Power and the batteries 179 Keyboard problems 181 Display problems 181

User Guide
Page 42
Click Next to , a mouse, keyboard, printer, memory, and PC Cards. See "Connecting to a power source" on your computer, the Setup Wizard guides you through steps to set up your software. 1 From the ...
Click Next to , a mouse, keyboard, printer, memory, and PC Cards. See "Connecting to a power source" on your computer, the Setup Wizard guides you through steps to set up your software. 1 From the ...

User Guide
Page 43
Failure to your product. Adding optional external devices NOTE Before adding external devices or memory, Toshiba recommends setting up your computer. Registering your computer with Toshiba 43 NOTE If you are connecting your computer to a network, consult your system administrator before you choose your computer name and network settings. 6 Follow the ...
Failure to your product. Adding optional external devices NOTE Before adding external devices or memory, Toshiba recommends setting up your computer. Registering your computer with Toshiba 43 NOTE If you are connecting your computer to a network, consult your system administrator before you choose your computer name and network settings. 6 Follow the ...

User Guide
Page 49
...adding external devices or memory, Toshiba recommends setting up your software" on the power The preinstalled operating system will load automatically. Adding memory (optional) HINT: To purchase additional memory modules, see the accessories information packaged with enough memory to increase the computer's memory if you turn on ... your software. You may want to run most of data. See "Setting up your system or visit accessories.toshiba.com. Getting Started Adding memory (optional) 49 3 Press and hold the power button in until the operating system has loaded completely. When ...
...adding external devices or memory, Toshiba recommends setting up your software" on the power The preinstalled operating system will load automatically. Adding memory (optional) HINT: To purchase additional memory modules, see the accessories information packaged with enough memory to increase the computer's memory if you turn on ... your software. You may want to run most of data. See "Setting up your system or visit accessories.toshiba.com. Getting Started Adding memory (optional) 49 3 Press and hold the power button in until the operating system has loaded completely. When ...
User Guide
Page 50
...or Shut Down. Slot B is on the system). The Turn off the computer using the Start menu. If the computer has been running recently, the memory module may be hot. Avoid touching the cover, the module, and the surrounding area before replacing it must be installed in the... on may also be hot. To avoid damaging the computer's screws, use a small Phillips screwdriver that is in good condition. Before you install or remove a memory module while the computer is in Standby or Hibernation mode, data will need a small Phillips screwdriver for this model, Slot A is to step 3. 1 Click ...
...or Shut Down. Slot B is on the system). The Turn off the computer using the Start menu. If the computer has been running recently, the memory module may be hot. Avoid touching the cover, the module, and the surrounding area before replacing it must be installed in the... on may also be hot. To avoid damaging the computer's screws, use a small Phillips screwdriver that is in good condition. Before you install or remove a memory module while the computer is in Standby or Hibernation mode, data will need a small Phillips screwdriver for this model, Slot A is to step 3. 1 Click ...

User Guide
Page 51
Memory module slot cover Front of computer (Sample Illustration) Removing the memory module slot cover Front of computer (Sample Illustration) Locating the memory module slot cover 6 Using a small Phillips screwdriver, loosen the captive screws that secure the memory module slot cover. Getting Started Adding memory (optional) 51 4 Remove the main battery. For information on removing the main battery, see "Removing the battery from the computer" on page 110. 5 Close the display panel and turn the computer upside down to locate the memory module slot cover.
Memory module slot cover Front of computer (Sample Illustration) Removing the memory module slot cover Front of computer (Sample Illustration) Locating the memory module slot cover 6 Using a small Phillips screwdriver, loosen the captive screws that secure the memory module slot cover. Getting Started Adding memory (optional) 51 4 Remove the main battery. For information on removing the main battery, see "Removing the battery from the computer" on page 110. 5 Close the display panel and turn the computer upside down to locate the memory module slot cover.

User Guide
Page 52
... be installed, it must remove the top module first before removing/installing the bottom module. NOTE If your system has the memory modules stacked on page 55. Static electricity can retrieve them later. Grease or dust on the connector may have built up the... memory module by performing steps 2-3 of "Removing a memory module" on top of the computer. 52 Getting Started Adding memory (optional) 7 Remove the memory module slot cover. 8 Place the screws and the cover in slot A. 11 Pick ...
... be installed, it must remove the top module first before removing/installing the bottom module. NOTE If your system has the memory modules stacked on page 55. Static electricity can retrieve them later. Grease or dust on the connector may have built up the... memory module by performing steps 2-3 of "Removing a memory module" on top of the computer. 52 Getting Started Adding memory (optional) 7 Remove the memory module slot cover. 8 Place the screws and the cover in slot A. 11 Pick ...

User Guide
Page 53
...down on the top edge of the module to seat the module into place securely with the corresponding cutouts in the socket. Getting Started Adding memory (optional) 53 aligning the connector's notch with the matching key in the side of the module. notch latch connector latch key (Sample Illustration)... Aligning the memory module with the socket 12 Firmly press the memory module into the memory slot's socket at the sides of the socket. If the latches and cutouts do not line up correctly, ...
...down on the top edge of the module to seat the module into place securely with the corresponding cutouts in the socket. Getting Started Adding memory (optional) 53 aligning the connector's notch with the matching key in the side of the module. notch latch connector latch key (Sample Illustration)... Aligning the memory module with the socket 12 Firmly press the memory module into the memory slot's socket at the sides of the socket. If the latches and cutouts do not line up correctly, ...
User Guide
Page 54
... 111. 16 Turn the computer right side up the computer, verify that the computer has recognized the additional memory module. TECHNICAL NOTE: You must have at least one memory module is to work. For more information on inserting the main battery, see "Inserting a charged battery" on.... If you can now continue setting up the computer. Slot B Slot A (Sample Illustration) Inserting the memory module into position. When the operating system has loaded, you are adding extra memory after setting up . 17 Reconnect the cables. 18 Restart the computer. 54 Getting Started Adding...
... 111. 16 Turn the computer right side up the computer, verify that the computer has recognized the additional memory module. TECHNICAL NOTE: You must have at least one memory module is to work. For more information on inserting the main battery, see "Inserting a charged battery" on.... If you can now continue setting up the computer. Slot B Slot A (Sample Illustration) Inserting the memory module into position. When the operating system has loaded, you are adding extra memory after setting up . 17 Reconnect the cables. 18 Restart the computer. 54 Getting Started Adding...
User Guide
Page 55
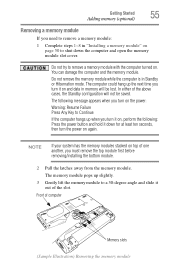
... it on . Front of the slot. You can damage the computer and the memory module. Getting Started Adding memory (optional) 55 Removing a memory module If you need to remove a memory module: 1 Complete steps 1-8 in "Installing a memory module" on top of one another, you must remove the top module first before... removing/installing the bottom module. 2 Pull the latches away from the memory module. Do not try to remove a memory module with the computer turned on and data in Standby or Hibernation mode. In either of the above cases, the...
... it on . Front of the slot. You can damage the computer and the memory module. Getting Started Adding memory (optional) 55 Removing a memory module If you need to remove a memory module: 1 Complete steps 1-8 in "Installing a memory module" on top of one another, you must remove the top module first before... removing/installing the bottom module. 2 Pull the latches away from the memory module. Do not try to remove a memory module with the computer turned on and data in Standby or Hibernation mode. In either of the above cases, the...
User Guide
Page 56
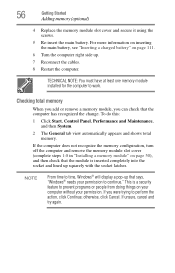
..." on page 50), and then check that the computer has recognized the change. TECHNICAL NOTE: You must have at least one memory module installed for the computer to continue." otherwise, click Cancel. For more information on inserting the main battery, see "Inserting a ...permission. To do this: 1 Click Start, Control Panel, Performance and Maintenance, and then System. 2 The General tab view automatically appears and shows total memory. If unsure, cancel and try again. This is inserted completely into the socket and lined up . 7 Reconnect the cables. 8 Restart the computer. If...
..." on page 50), and then check that the computer has recognized the change. TECHNICAL NOTE: You must have at least one memory module installed for the computer to continue." otherwise, click Cancel. For more information on inserting the main battery, see "Inserting a ...permission. To do this: 1 Click Start, Control Panel, Performance and Maintenance, and then System. 2 The General tab view automatically appears and shows total memory. If unsure, cancel and try again. This is inserted completely into the socket and lined up . 7 Reconnect the cables. 8 Restart the computer. If...

User Guide
Page 73
...mode" on page 77. You should save your unsaved information will be lost. Factors to consider when choosing Standby: ❖ While in system memory (RAM) so that, when you restart the computer, you can continue working from where you left off. Be sure to save your work first.... Getting Started Turning off the computer 73 ❖ Since information is being retrieved from the hard disk rather than from memory, restarting from Hibernation takes a little more time and consumes more main battery power to start up than restarting from turning off the computer...
...mode" on page 77. You should save your unsaved information will be lost. Factors to consider when choosing Standby: ❖ While in system memory (RAM) so that, when you restart the computer, you can continue working from where you left off. Be sure to save your work first.... Getting Started Turning off the computer 73 ❖ Since information is being retrieved from the hard disk rather than from memory, restarting from Hibernation takes a little more time and consumes more main battery power to start up than restarting from turning off the computer...

User Guide
Page 81
... your software documentation for further information. Computing tips ❖ Save your file to the disk. This feature saves your work stays in the computer's temporary memory until you last saved. Chapter 2 Learning the Basics This chapter gives some computing tips and provides important information about basic features.
... your software documentation for further information. Computing tips ❖ Save your file to the disk. This feature saves your work stays in the computer's temporary memory until you last saved. Chapter 2 Learning the Basics This chapter gives some computing tips and provides important information about basic features.

User Guide
Page 101
...the computer on battery power 101 To ensure that you play DVDs while running the computer on AC power. The LithiumIon battery has no memory effect so it is continuously operated on . This may fail to retain a charge. TECHNICAL NOTE: The RTC battery does not charge ...off . Users who are not completely familiar with setup changes, contact Toshiba's Global Support Centre. If the computer is helpful to let the battery fully discharge each time. The RTC battery powers the RTC memory that will provide the most stable operating environment and optimum system performance for...
...the computer on battery power 101 To ensure that you play DVDs while running the computer on AC power. The LithiumIon battery has no memory effect so it is continuously operated on . This may fail to retain a charge. TECHNICAL NOTE: The RTC battery does not charge ...off . Users who are not completely familiar with setup changes, contact Toshiba's Global Support Centre. If the computer is helpful to let the battery fully discharge each time. The RTC battery powers the RTC memory that will provide the most stable operating environment and optimum system performance for...

User Guide
Page 103
... until it maintains this extends battery life and helps ensure accurate monitoring of battery capacity. The RTC battery powers the System Time Clock and BIOS memory used to 26 degrees Celsius). ❖ The battery is extremely hot or cold. To ensure that you operate your computer's configuration settings. Charging the RTC...
... until it maintains this extends battery life and helps ensure accurate monitoring of battery capacity. The RTC battery powers the System Time Clock and BIOS memory used to 26 degrees Celsius). ❖ The battery is extremely hot or cold. To ensure that you operate your computer's configuration settings. Charging the RTC...

User Guide
Page 133
...types of supported media, visit Toshiba's Web site at accessories.toshiba.com. NOTE Do not use of Memory Stick™, Memory Stick™ PRO, Secure Digital™ (SD™), MMC™ (MultiMediaCard™), or xD-Picture Card™ media. Inserting memory media The following instructions apply to... areas) are face down. 2 Push the media into the adapter until it locks in place. (Sample Illustration) Inserting memory media When inserting memory media, do not touch the metal contacts. Exploring Your Computer's Features Using the Bridge Media Adapter Slot 133 Using the ...
...types of supported media, visit Toshiba's Web site at accessories.toshiba.com. NOTE Do not use of Memory Stick™, Memory Stick™ PRO, Secure Digital™ (SD™), MMC™ (MultiMediaCard™), or xD-Picture Card™ media. Inserting memory media The following instructions apply to... areas) are face down. 2 Push the media into the adapter until it locks in place. (Sample Illustration) Inserting memory media When inserting memory media, do not touch the metal contacts. Exploring Your Computer's Features Using the Bridge Media Adapter Slot 133 Using the ...

User Guide
Page 134
The card pops out slightly. 3 Grasp the card and pull it straight out. (Sample Illustration) Removing memory media Do not remove memory media while data is on the front of data in real-time, such as video devices. Wait for the indicator light to try again later....174; port also supports isochronous data transfer (the delivery of data at a guaranteed rate). 134 Exploring Your Computer's Features Using the i.LINK® port Removing memory media 1 Prepare the media for removal by clicking the Safely Remove Hardware icon in the System tray and then selecting the card or device you...
The card pops out slightly. 3 Grasp the card and pull it straight out. (Sample Illustration) Removing memory media Do not remove memory media while data is on the front of data in real-time, such as video devices. Wait for the indicator light to try again later....174; port also supports isochronous data transfer (the delivery of data at a guaranteed rate). 134 Exploring Your Computer's Features Using the i.LINK® port Removing memory media 1 Prepare the media for removal by clicking the Safely Remove Hardware icon in the System tray and then selecting the card or device you...


