
User Guide
Page 29
... panel 52 Your computer's features and specifications ....53 Turning on the power 54 Using the Toshiba Dual Pointing Device 55 Using the TouchPad 55 Disabling or enabling the Dual Pointing Device.56 Installing a memory module 57 Removing a memory module 61 Hard Drive Recovery Utilities 63 Creating Recovery CDs/DVDs 64 Hard Disk Drive...
... panel 52 Your computer's features and specifications ....53 Turning on the power 54 Using the Toshiba Dual Pointing Device 55 Using the TouchPad 55 Disabling or enabling the Dual Pointing Device.56 Installing a memory module 57 Removing a memory module 61 Hard Drive Recovery Utilities 63 Creating Recovery CDs/DVDs 64 Hard Disk Drive...
User Guide
Page 34
... 190 Tablet and Pen Settings 192 Cross Menu Utility 193 Creating a New Menu 194 TOSHIBA Tablet Access Code Utility 195 TOSHIBA Zooming Utility 196 TOSHIBA Button Controls 198 CD/DVD Drive Acoustic Silencer 199 TOSHIBA Accessibility 200 Toshiba Mobile Extension 201 TOSHIBA SD Memory Boot Utility 202 Booting from a bootable SD card 203 Chapter 6: Keeping Your Files...
... 190 Tablet and Pen Settings 192 Cross Menu Utility 193 Creating a New Menu 194 TOSHIBA Tablet Access Code Utility 195 TOSHIBA Zooming Utility 196 TOSHIBA Button Controls 198 CD/DVD Drive Acoustic Silencer 199 TOSHIBA Accessibility 200 Toshiba Mobile Extension 201 TOSHIBA SD Memory Boot Utility 202 Booting from a bootable SD card 203 Chapter 6: Keeping Your Files...

User Guide
Page 35
... can help you 223 Resolving a hardware conflict 224 A plan of action 224 Resolving hardware conflicts on your own .....225 Fixing a problem with Device Manager ...........226 Memory problems 228 Power and the batteries 229 Keyboard problems 231 Display problems 232 Disk drive problems 234 DVD-ROM or multi-function drive problems...237... problems 247 Develop good computing habits 250 Data and system configuration backup in Windows XP 251 If you need further assistance 257 Before you contact Toshiba 257
... can help you 223 Resolving a hardware conflict 224 A plan of action 224 Resolving hardware conflicts on your own .....225 Fixing a problem with Device Manager ...........226 Memory problems 228 Power and the batteries 229 Keyboard problems 231 Display problems 232 Disk drive problems 234 DVD-ROM or multi-function drive problems...237... problems 247 Develop good computing habits 250 Data and system configuration backup in Windows XP 251 If you need further assistance 257 Before you contact Toshiba 257

User Guide
Page 46
... setup steps up your software NOTE The names of windows displayed, and the order in which windows appear, may vary according to , a mouse, keyboard, printer, memory, and PC cards. Setting up to your computer.
... setup steps up your software NOTE The names of windows displayed, and the order in which windows appear, may vary according to , a mouse, keyboard, printer, memory, and PC cards. Setting up to your computer.

User Guide
Page 48
... periodic updates, announcements, and special offers applicable to register at register.toshiba.com. If you opt not to the product. Adding external devices NOTE Before adding external devices or memory, Toshiba recommends setting up process of your desktop or go to the Toshiba Web site at that time, you may want to complete Product...
... periodic updates, announcements, and special offers applicable to register at register.toshiba.com. If you opt not to the product. Adding external devices NOTE Before adding external devices or memory, Toshiba recommends setting up process of your desktop or go to the Toshiba Web site at that time, you may want to complete Product...

User Guide
Page 57
... or remove a memory module, turn off the computer using the Start menu. Installing a memory module HINT: To purchase additional memory modules see the accessories information packaged with enough memory to increase the The... Other Hardware window. 9 Close the Control Panel window. Before you install or remove a memory module while the computer is in standby or hibernation mode, data will be lost. You... may want to run most of today's popular applications. Do not install or remove a memory module while any internal or external drive power is appropriate. 6 Click Apply. 7 Click OK...
... or remove a memory module, turn off the computer using the Start menu. Installing a memory module HINT: To purchase additional memory modules see the accessories information packaged with enough memory to increase the The... Other Hardware window. 9 Close the Control Panel window. Before you install or remove a memory module while the computer is in standby or hibernation mode, data will be lost. You... may want to run most of today's popular applications. Do not install or remove a memory module while any internal or external drive power is appropriate. 6 Click Apply. 7 Click OK...

User Guide
Page 58
... software and hardware options for your computer, and for this happens, let the memory modules cool to room temperature before you replace them. Additional memory comes in various capacities (to regularly check the Toshiba Web site at step 1; If the computer is on the base of data.... 58 Getting Started Installing a memory module computer's memory if you use a standard Phillips No. 1 screwdriver that is in good condition. Additional memory modules can be sure to stay current on , begin at accessories.toshiba.com). If you use the computer for a long time, ...
... software and hardware options for your computer, and for this happens, let the memory modules cool to room temperature before you replace them. Additional memory comes in various capacities (to regularly check the Toshiba Web site at step 1; If the computer is on the base of data.... 58 Getting Started Installing a memory module computer's memory if you use a standard Phillips No. 1 screwdriver that is in good condition. Additional memory modules can be sure to stay current on , begin at accessories.toshiba.com). If you use the computer for a long time, ...

User Guide
Page 59
...properly closed and is not in tablet mode. Getting Started Installing a memory module 59 4 Close the display panel and remove any cables you turn the computer over, make sure that secures the memory slot cover, then remove the memory slot cover. Before you may cause damage to the screen. 5 ...Turn the computer upside down, remove the battery, and locate the expansion memory cover to the computer, including the AC adapter cord/cable...
...properly closed and is not in tablet mode. Getting Started Installing a memory module 59 4 Close the display panel and remove any cables you turn the computer over, make sure that secures the memory slot cover, then remove the memory slot cover. Before you may cause damage to the screen. 5 ...Turn the computer upside down, remove the battery, and locate the expansion memory cover to the computer, including the AC adapter cord/cable...
User Guide
Page 60
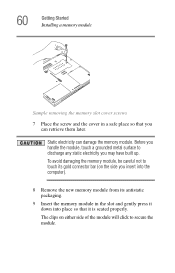
...will click to discharge any static electricity you can damage the memory module. Static electricity can retrieve them later. To avoid damaging the memory module, be careful not to touch its antistatic packaging. 9 Insert the memory module in a safe place so that it is seated properly.... 60 Getting Started Installing a memory module Sample removing the memory slot cover screws 7 Place the screw and...
...will click to discharge any static electricity you can damage the memory module. Static electricity can retrieve them later. To avoid damaging the memory module, be careful not to touch its antistatic packaging. 9 Insert the memory module in a safe place so that it is seated properly.... 60 Getting Started Installing a memory module Sample removing the memory slot cover screws 7 Place the screw and...
User Guide
Page 61
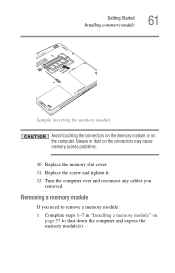
Removing a memory module If you removed. Getting Started Installing a memory module 61 Sample inserting the memory module Avoid touching the connectors on the memory module or on page 57 to remove a memory module: 1 Complete steps 1-7 in "Installing a memory module" on the computer. Grease or dust on the connectors may cause memory access problems. 10 Replace the memory slot cover. 11 Replace the screw and tighten it. 12 Turn the computer over and reconnect any cables you need to shut down the computer and expose the memory module(s).
Removing a memory module If you removed. Getting Started Installing a memory module 61 Sample inserting the memory module Avoid touching the connectors on the memory module or on page 57 to remove a memory module: 1 Complete steps 1-7 in "Installing a memory module" on the computer. Grease or dust on the connectors may cause memory access problems. 10 Replace the memory slot cover. 11 Replace the screw and tighten it. 12 Turn the computer over and reconnect any cables you need to shut down the computer and expose the memory module(s).

User Guide
Page 62
...hang up when you turn the power on . Do not remove the memory module while the computer is in memory will not be lost. In either of the slot. 62 Getting Started Installing a memory module Do not try to remove a memory module with the computer turned on again. 2 Pull the clips away from... the slot. Sample removing the memory module 3 Carefully remove the module from the memory module. The following message appears when you turn on the power: Warning: Resume Failure Press Any Key To Continue If the computer hangs up...
...hang up when you turn the power on . Do not remove the memory module while the computer is in memory will not be lost. In either of the slot. 62 Getting Started Installing a memory module Do not try to remove a memory module with the computer turned on again. 2 Pull the clips away from... the slot. Sample removing the memory module 3 Carefully remove the module from the memory module. The following message appears when you turn on the power: Warning: Resume Failure Press Any Key To Continue If the computer hangs up...
User Guide
Page 63
...; Recover your hard disk drive to the factory-set default. ❖ Recover just your C: drive, leaving any other partitions you may have at least one memory module installed for example, a D: drive. ❖ Recover your hard disk drive to the factory-set default without the HDD Recovery partition. ❖ Delete your hard... created intact, for the computer to recover your system. Using the HDD Recovery, you to work. Getting Started Hard Drive Recovery Utilities 63 4 Replace the memory slot cover and the screw. 5 Restart the computer.
...; Recover your hard disk drive to the factory-set default. ❖ Recover just your C: drive, leaving any other partitions you may have at least one memory module installed for example, a D: drive. ❖ Recover your hard disk drive to the factory-set default without the HDD Recovery partition. ❖ Delete your hard... created intact, for the computer to recover your system. Using the HDD Recovery, you to work. Getting Started Hard Drive Recovery Utilities 63 4 Replace the memory slot cover and the screw. 5 Restart the computer.

User Guide
Page 87
... running low. See your software documentation for example, a system error occurs and you must restart your computer, or your work temporarily stays in the computer's memory until you are working. See "Setting battery alarms" on . HINT: Some programs have an automatic save it to the hard disk. Computing tips ❖ Save...
... running low. See your software documentation for example, a system error occurs and you must restart your computer, or your work temporarily stays in the computer's memory until you are working. See "Setting battery alarms" on . HINT: Some programs have an automatic save it to the hard disk. Computing tips ❖ Save...

User Guide
Page 107
Let the disc dry completely before shutting down the Windows® operating system could cause you to memory and enters a low power mode ❖ Restart, which restarts the computer Each option has its advantages. Make sure the system indicator panel's disk light and ...
Let the disc dry completely before shutting down the Windows® operating system could cause you to memory and enters a low power mode ❖ Restart, which restarts the computer Each option has its advantages. Make sure the system indicator panel's disk light and ...

User Guide
Page 109
...a little more time and battery power to start up than the Standby option, because information is being retrieved from the hard disk instead of from memory. ❖ On restarting, the computer returns to consider when choosing Hibernation: ❖ While in hibernation mode, the computer uses no battery power.... the computer uses some battery power. Standby stores the current state of the computer to consider when choosing Standby: ❖ While in memory so that, when you restart the computer, you can continue working from the hard disk takes longer than the Turn Off or Shut down...
...a little more time and battery power to start up than the Standby option, because information is being retrieved from the hard disk instead of from memory. ❖ On restarting, the computer returns to consider when choosing Hibernation: ❖ While in hibernation mode, the computer uses no battery power.... the computer uses some battery power. Standby stores the current state of the computer to consider when choosing Standby: ❖ While in memory so that, when you restart the computer, you can continue working from the hard disk takes longer than the Turn Off or Shut down...

User Guide
Page 117
... Shut down. The Shut Down window appears. 2 Select Stand By from the drop-down list of all open programs and files to memory, turns off light blinks amber to memory, turns off the display, and goes into a low-power mode. 117 Learning the Basics Powering down the computer Sample Turn off light...
... Shut down. The Shut Down window appears. 2 Select Stand By from the drop-down list of all open programs and files to memory, turns off light blinks amber to memory, turns off the display, and goes into a low-power mode. 117 Learning the Basics Powering down the computer Sample Turn off light...
User Guide
Page 125
... (RTC) battery. The RTC battery may display the incorrect time and date or stop working . The RTC battery powers the System Time Clock and BIOS memory used to reset the real-time clock. To recharge the RTC battery, plug the computer into a live electrical outlet and leave the computer powered on...
... (RTC) battery. The RTC battery may display the incorrect time and date or stop working . The RTC battery powers the System Time Clock and BIOS memory used to reset the real-time clock. To recharge the RTC battery, plug the computer into a live electrical outlet and leave the computer powered on...

User Guide
Page 168
...is not digitally signed. Formatting an optional SD card To format an SD card, use the Toshiba SD Memory Card Format utility. Click on Start, All Programs, Toshiba, Utilities, and then click on the left side of the SD card drivers, one or more... drivers During installation of the SD card slot glows when the card is being accessed. The SD indicator light on SD Memory Card Format. Inserting an SD card To insert an SD card, turn the card so that the connector (metal area)... card again. The message may appear as "Digital Signature not found (About Secure Digital Emulation from Toshiba)."
...is not digitally signed. Formatting an optional SD card To format an SD card, use the Toshiba SD Memory Card Format utility. Click on Start, All Programs, Toshiba, Utilities, and then click on the left side of the SD card drivers, one or more... drivers During installation of the SD card slot glows when the card is being accessed. The SD indicator light on SD Memory Card Format. Inserting an SD card To insert an SD card, turn the card so that the connector (metal area)... card again. The message may appear as "Digital Signature not found (About Secure Digital Emulation from Toshiba)."

User Guide
Page 172
Chapter 5 Toshiba Utilities Your computer includes several utilities designed to help you to best meet your individual needs. Together, these allow you to reconfigure your ...default options. The following utilities are described in this chapter: ❖ Fn-esse ❖ Hotkey Utility ❖ TOSHIBA Assist ❖ Computer Diagnostic Tool ❖ The Toshiba Rotation Utility ❖ Cross Menu Utility ❖ TOSHIBA Tablet Access Code Utility ❖ Power Management ❖ TOSHIBA Hardware Setup ❖ TOSHIBA Zooming Utility ❖ TOSHIBA SD Memory Boot Utility 172
Chapter 5 Toshiba Utilities Your computer includes several utilities designed to help you to best meet your individual needs. Together, these allow you to reconfigure your ...default options. The following utilities are described in this chapter: ❖ Fn-esse ❖ Hotkey Utility ❖ TOSHIBA Assist ❖ Computer Diagnostic Tool ❖ The Toshiba Rotation Utility ❖ Cross Menu Utility ❖ TOSHIBA Tablet Access Code Utility ❖ Power Management ❖ TOSHIBA Hardware Setup ❖ TOSHIBA Zooming Utility ❖ TOSHIBA SD Memory Boot Utility 172

User Guide
Page 181
181 Toshiba Utilities TOSHIBA Assist PROTECT & FIX The PROTECT & FIX tab displays icons for the following utilities: ❖ Computer Diagnostic Tool ❖ HDD Protection Sample TOSHIBA Assist window, PROTECT & FIX tab OPTIMIZE The OPTIMIZE tab displays icons for the following utilities: ❖ Power Management ❖ TOSHIBA SD Memory Boot Utility ❖ Mouse Utility ❖ TOSHIBA Accessibility ❖ Toshiba Mobile Extension
181 Toshiba Utilities TOSHIBA Assist PROTECT & FIX The PROTECT & FIX tab displays icons for the following utilities: ❖ Computer Diagnostic Tool ❖ HDD Protection Sample TOSHIBA Assist window, PROTECT & FIX tab OPTIMIZE The OPTIMIZE tab displays icons for the following utilities: ❖ Power Management ❖ TOSHIBA SD Memory Boot Utility ❖ Mouse Utility ❖ TOSHIBA Accessibility ❖ Toshiba Mobile Extension


