
User Guide
Page 5
... you with this change. Contact the state public utility commission, public service commission or corporation commission for repair or limited warranty information, please contact Toshiba Corporation, Toshiba America Information Systems, Inc. Fax Branding The Telephone Consumer Protection Act of 1991 makes it can. For earlier products, the REN is subject to maintain uninterrupted service. In order to make changes in advance...
... you with this change. Contact the state public utility commission, public service commission or corporation commission for repair or limited warranty information, please contact Toshiba Corporation, Toshiba America Information Systems, Inc. Fax Branding The Telephone Consumer Protection Act of 1991 makes it can. For earlier products, the REN is subject to maintain uninterrupted service. In order to make changes in advance...
User Guide
Page 28
... Opening the display panel 48 Your computer's features and specifications ....49 Turning on the power 49 Adding memory (optional 50 Installing a memory module 51 Removing a memory module 55 Hard Drive Recovery Utilities 58 Creating Recovery CDs/DVDs 58 Hard Disk Drive Recovery Options 60 Installing drivers and applications 65 Using the Toshiba Dual Pointing Device 66 Using the TouchPad 66 Disabling or enabling the TouchPad 67 Disabling or enabling the Dual Pointing Device 67 Using external display devices 68 Directing the display output when you turn on the computer 68 Adjusting...
... Opening the display panel 48 Your computer's features and specifications ....49 Turning on the power 49 Adding memory (optional 50 Installing a memory module 51 Removing a memory module 55 Hard Drive Recovery Utilities 58 Creating Recovery CDs/DVDs 58 Hard Disk Drive Recovery Options 60 Installing drivers and applications 65 Using the Toshiba Dual Pointing Device 66 Using the TouchPad 66 Disabling or enabling the TouchPad 67 Disabling or enabling the Dual Pointing Device 67 Using external display devices 68 Directing the display output when you turn on the computer 68 Adjusting...

User Guide
Page 51
... condition. Avoid touching the cover, the module, and the surrounding area before replacing it. otherwise, skip to step 3. 1 Click Start, and then click the arrow next to follow these directions could result in Standby or Hibernation mode, data will need a standard small Phillips screwdriver for this procedure. You will be hot. Failure to the lock button in the memory module slots on the...
... condition. Avoid touching the cover, the module, and the surrounding area before replacing it. otherwise, skip to step 3. 1 Click Start, and then click the arrow next to follow these directions could result in Standby or Hibernation mode, data will need a standard small Phillips screwdriver for this procedure. You will be hot. Failure to the lock button in the memory module slots on the...

User Guide
Page 55
... memory module installed for the computer to shut down the computer and open the memory module slot cover. You can verify that the computer has recognized it using the screw. 15 Re-insert the battery. Getting Started 55 Adding memory (optional) Do not force the memory module into the socket and level when secured in place. The memory module should be completely inserted into position. When the operating...
... memory module installed for the computer to shut down the computer and open the memory module slot cover. You can verify that the computer has recognized it using the screw. 15 Re-insert the battery. Getting Started 55 Adding memory (optional) Do not force the memory module into the socket and level when secured in place. The memory module should be completely inserted into position. When the operating...

User Guide
Page 57
Getting Started 57 Adding memory (optional) 3 Gently lift the memory module to work. Checking total memory When you add or remove a memory module, you can check that the module is displayed below the System heading under Memory (RAM). To do this: 1 Click Start, Control Panel, and then double-click System. For more information on inserting the battery, see "Changing the main battery" on page 111. 6 Turn the computer right side up squarely...
Getting Started 57 Adding memory (optional) 3 Gently lift the memory module to work. Checking total memory When you add or remove a memory module, you can check that the module is displayed below the System heading under Memory (RAM). To do this: 1 Click Start, Control Panel, and then double-click System. For more information on inserting the battery, see "Changing the main battery" on page 111. 6 Turn the computer right side up squarely...

User Guide
Page 60
... Hard Disk Drive Recovery using the recovery partition You have the options of your keyboard while powering on the computer. To recover your hard disk drive using the Hard Drive Recovery partition to the factory-set default, or recovering just your C: drive and leaving other partitions (for example, a D: drive) intact, or changing the size of recovering your system using the utilities stored on your computer's HDD: 1 Make sure the computer is turned off. 2 Press and hold the 0 (zero) key on , the Toshiba Recovery Wizard screen displays. (Sample Image) Toshiba Recovery...
... Hard Disk Drive Recovery using the recovery partition You have the options of your keyboard while powering on the computer. To recover your hard disk drive using the Hard Drive Recovery partition to the factory-set default, or recovering just your C: drive and leaving other partitions (for example, a D: drive) intact, or changing the size of recovering your system using the utilities stored on your computer's HDD: 1 Make sure the computer is turned off. 2 Press and hold the 0 (zero) key on , the Toshiba Recovery Wizard screen displays. (Sample Image) Toshiba Recovery...

User Guide
Page 68
.... To do this : 1 Connect the monitor's video cable to the available video port. The quickest way to the documentation for the type of the computer. 2 Connect the device's power cable to your operating system and devices. Using external display devices Your computer comes with display options. 4 Select the settings you can be connected via the RGB (monitor) port. 68 Getting Started Using external display devices 6 Close the Printers and Other Hardware window. 7 Close the Control Panel window. 8 Click the TouchPAD ON/OFF tab. The...
.... To do this : 1 Connect the monitor's video cable to the available video port. The quickest way to the documentation for the type of the computer. 2 Connect the device's power cable to your operating system and devices. Using external display devices Your computer comes with display options. 4 Select the settings you can be connected via the RGB (monitor) port. 68 Getting Started Using external display devices 6 Close the Printers and Other Hardware window. 7 Close the Control Panel window. 8 Click the TouchPAD ON/OFF tab. The...
User Guide
Page 85
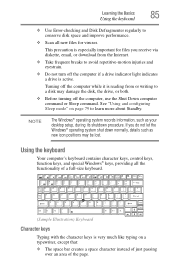
... keyboard. (Sample Illustration) Keyboard Character keys Typing with the character keys is active. NOTE The Windows® operating system records information, such as new icon positions may damage the disk, the drive, or both. ❖ Before turning off the computer if a drive indicator light indicates a drive is very much like typing on page 79 to a disk may be lost. See "Using and configuring Sleep mode" on a typewriter, except that: ❖ The space bar creates...
... keyboard. (Sample Illustration) Keyboard Character keys Typing with the character keys is active. NOTE The Windows® operating system records information, such as new icon positions may damage the disk, the drive, or both. ❖ Before turning off the computer if a drive indicator light indicates a drive is very much like typing on page 79 to a disk may be lost. See "Using and configuring Sleep mode" on a typewriter, except that: ❖ The space bar creates...
User Guide
Page 106
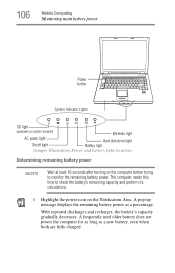
.... A frequently used older battery does not power the computer for as long as a percentage. A pop-up message displays the remaining battery power as a new battery, even when both are fully charged. The computer needs this time to monitor the remaining battery power. 106 Mobile Computing Monitoring main battery power Power button System Indicator Lights SD light (available on certain models) Wireless light AC power light On/off light Hard disk drive light Battery light (Sample Illustration) Power and battery light locations Determining remaining battery power NOTE Wait at...
.... A frequently used older battery does not power the computer for as long as a percentage. A pop-up message displays the remaining battery power as a new battery, even when both are fully charged. The computer needs this time to monitor the remaining battery power. 106 Mobile Computing Monitoring main battery power Power button System Indicator Lights SD light (available on certain models) Wireless light AC power light On/off light Hard disk drive light Battery light (Sample Illustration) Power and battery light locations Determining remaining battery power NOTE Wait at...

User Guide
Page 142
.... 8 Click OK to exit. The TOSHIBA Assist window appears. 2 On the left side, select Secure. 3 Select the User Password icon. 4 Click Delete. 5 Follow the on password protection. Using a user password A user password provides power-on -screen instructions to remove the user password. Toshiba is not responsible for the power-on password functions: 1 Click Start, All Programs, Toshiba, Utilities, and then TOSHIBA Assist. Setting a user password If you choose to set a supervisor or user password, Toshiba strongly recommends that may occur to...
.... 8 Click OK to exit. The TOSHIBA Assist window appears. 2 On the left side, select Secure. 3 Select the User Password icon. 4 Click Delete. 5 Follow the on password protection. Using a user password A user password provides power-on -screen instructions to remove the user password. Toshiba is not responsible for the power-on password functions: 1 Click Start, All Programs, Toshiba, Utilities, and then TOSHIBA Assist. Setting a user password If you choose to set a supervisor or user password, Toshiba strongly recommends that may occur to...

User Guide
Page 144
... help diagnose problems with devices in your computer. NOTE Click the + (plus) and - (minus) symbols to expand and collapse the categories. 4 Click Start Diagnostics when you would like to test by clicking the check box that appears to the left of the device. 144 Toshiba Utilities PC Diagnostic Tool Utility Deleting a user password To cancel the power-on -screen instructions to remove the user password.
... help diagnose problems with devices in your computer. NOTE Click the + (plus) and - (minus) symbols to expand and collapse the categories. 4 Click Start Diagnostics when you would like to test by clicking the check box that appears to the left of the device. 144 Toshiba Utilities PC Diagnostic Tool Utility Deleting a user password To cancel the power-on -screen instructions to remove the user password.
User Guide
Page 168
... information on setting up ConfigFree. NOTE If your system) to open the TOSHIBA Assist, and then click the ConfigFree icon. ❖ Click the ConfigFree icon in the application. ConfigFree Utilities Connectivity Doctor The Connectivity Doctor lets you analyze your network connections and fix network connection problems. Using Connectivity Doctor, you can view detailed network information by simply moving the mouse pointer. 168 Toshiba Utilities ConfigFree™ Getting Started This...
... information on setting up ConfigFree. NOTE If your system) to open the TOSHIBA Assist, and then click the ConfigFree icon. ❖ Click the ConfigFree icon in the application. ConfigFree Utilities Connectivity Doctor The Connectivity Doctor lets you analyze your network connections and fix network connection problems. Using Connectivity Doctor, you can view detailed network information by simply moving the mouse pointer. 168 Toshiba Utilities ConfigFree™ Getting Started This...
User Guide
Page 169
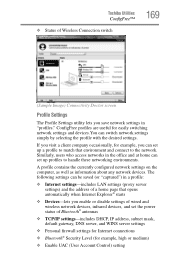
... and wireless network devices, infrared devices, and set up a profile to match that opens automatically when Internet Explorer® starts ❖ Devices-lets you enable or disable settings of Bluetooth® antennas ❖ TCP/IP settings-includes DHCP, IP address, subnet mask, default gateway, DNS server, and WINS server settings ❖ Personal firewall settings for Internet connections ❖ Bluetooth® Security Level (for example, high or medium) ❖ Enable UAC (User Account Control) setting...
... and wireless network devices, infrared devices, and set up a profile to match that opens automatically when Internet Explorer® starts ❖ Devices-lets you enable or disable settings of Bluetooth® antennas ❖ TCP/IP settings-includes DHCP, IP address, subnet mask, default gateway, DNS server, and WINS server settings ❖ Personal firewall settings for Internet connections ❖ Bluetooth® Security Level (for example, high or medium) ❖ Enable UAC (User Account Control) setting...

User Guide
Page 180
... monitor, optional external optical drive, optional external diskette drive, and other power-using resources. ❖ The Driver tab, which displays the drivers being used by the device. Properties include the name of the manufacturer, the type of tabs. The operating system displays the Device Properties dialog box, which lists resources assigned to the Lock button in "Removing a memory module" on page 55. To check a device's properties: 1 Click Start, Control Panel, System and Maintenance, System, and then Device Manager. 2 To view the device(s) installed...
... monitor, optional external optical drive, optional external diskette drive, and other power-using resources. ❖ The Driver tab, which displays the drivers being used by the device. Properties include the name of the manufacturer, the type of tabs. The operating system displays the Device Properties dialog box, which lists resources assigned to the Lock button in "Removing a memory module" on page 55. To check a device's properties: 1 Click Start, Control Panel, System and Maintenance, System, and then Device Manager. 2 To view the device(s) installed...

User Guide
Page 183
... the external keyboard. Using the computer's TouchPad: 1 Click Start, and then click the arrow next to its previous setting. If you through the display options. If no password is registered, press any key to activate the screen. If this , press Fn and F5 simultaneously (once). If Something Goes Wrong Resolving a hardware conflict 183 You have gone into a working power outlet. ❖ Check that the monitor's power cord/cable...
... the external keyboard. Using the computer's TouchPad: 1 Click Start, and then click the arrow next to its previous setting. If you through the display options. If no password is registered, press any key to activate the screen. If this , press Fn and F5 simultaneously (once). If Something Goes Wrong Resolving a hardware conflict 183 You have gone into a working power outlet. ❖ Check that the monitor's power cord/cable...

User Guide
Page 228
.... Memory cache installed on the screen that saves to perform a task instead of using a pointing device such as the battery save mode. (2) A key or combination of your work , including all open files and programs, when you turn on the network. A feature of many Toshiba notebook computers that represents a function, file, or program. Compare non-interlaced. internal device - See also cache, CPU cache, L2 cache. See also Standby, Suspend. hot key...
.... Memory cache installed on the screen that saves to perform a task instead of using a pointing device such as the battery save mode. (2) A key or combination of your work , including all open files and programs, when you turn on the network. A feature of many Toshiba notebook computers that represents a function, file, or program. Compare non-interlaced. internal device - See also cache, CPU cache, L2 cache. See also Standby, Suspend. hot key...
User Guide
Page 234
... memory 50 adding memory 50 Alt keys 86 audio .wav files 128 audio features 128 B backing up files 84 battery changing 111 charge indicator light 47, 105 charge not lasting 182 charging 45, 47 conserving power 108 disposal 115 low charge 107 monitoring power 47, 105 not charging 181 power plan 210 power usage hot key 110 real-time clock (RTC) 102 removing 111 BIOS Setup see Toshiba Hardware Setup button power 50, 59 start 120 C CD creating 98 playing an audio...
... memory 50 adding memory 50 Alt keys 86 audio .wav files 128 audio features 128 B backing up files 84 battery changing 111 charge indicator light 47, 105 charge not lasting 182 charging 45, 47 conserving power 108 disposal 115 low charge 107 monitoring power 47, 105 not charging 181 power plan 210 power usage hot key 110 real-time clock (RTC) 102 removing 111 BIOS Setup see Toshiba Hardware Setup button power 50, 59 start 120 C CD creating 98 playing an audio...
User Guide
Page 235
... 45 connection set up 124 control buttons 67 critical applications 3 Ctrl keys 86 D desktop creating new icon 119 major features 119 desktop exploration 118 desktop icons 119 Device Manager 179 checking properties 180 devices keyboard 69 mouse 69 Disk Defragmenter 186 disk drive corrupted/damaged data files 186 missing files/trouble accessing a disk 185 running slow 186 diskette drive cannot insert a diskette 186 cannot read a diskette 186 connecting 71 external, connecting 71 display...
... 45 connection set up 124 control buttons 67 critical applications 3 Ctrl keys 86 D desktop creating new icon 119 major features 119 desktop exploration 118 desktop icons 119 Device Manager 179 checking properties 180 devices keyboard 69 mouse 69 Disk Defragmenter 186 disk drive corrupted/damaged data files 186 missing files/trouble accessing a disk 185 running slow 186 diskette drive cannot insert a diskette 186 cannot read a diskette 186 connecting 71 external, connecting 71 display...
User Guide
Page 237
... slot cover 53 memory module installation 51 installing inserting into socket 53 removing 57 microphone 128 modem determining COM port 121 problem solving 191 resetting port to default settings 121 upgrading 121 monitor 68 connecting 68 not working 183 mouse installing 69 serial 69 N network accessing 123 Dial-Up Networking Wizard 123 networking wireless 123 O opening the display panel 48 optical drive problems 187 troubleshooting 187 other documentation 38 overlay keys 87 P password disabling a user 142, 144 setting a user 142 types 140 passwords instant, using 141 setting 140 PC Card...
... slot cover 53 memory module installation 51 installing inserting into socket 53 removing 57 microphone 128 modem determining COM port 121 problem solving 191 resetting port to default settings 121 upgrading 121 monitor 68 connecting 68 not working 183 mouse installing 69 serial 69 N network accessing 123 Dial-Up Networking Wizard 123 networking wireless 123 O opening the display panel 48 optical drive problems 187 troubleshooting 187 other documentation 38 overlay keys 87 P password disabling a user 142, 144 setting a user 142 types 140 passwords instant, using 141 setting 140 PC Card...
User Guide
Page 239
... Sleep 82 Startup menu problem solving 176 stored data protection 2 T taskbar 120 television adjusting display 69 Toshiba registering computer 44 worldwide offices 202 Toshiba Assist 135 TOSHIBA Button Controls 153 Toshiba Dual Pointing Device 66 Toshiba Hardware Setup 150 Toshiba online resources 99 Toshiba utilities 134 traveling tips 117 troubleshooting DVD player general problems 194 external keyboard 183 keyboard 182 keypad overlay 182 optical drive 187 turning on the computer 50 turning on the power 49 U user password, disabling 142, 144 user password, setting 142 using...
... Sleep 82 Startup menu problem solving 176 stored data protection 2 T taskbar 120 television adjusting display 69 Toshiba registering computer 44 worldwide offices 202 Toshiba Assist 135 TOSHIBA Button Controls 153 Toshiba Dual Pointing Device 66 Toshiba Hardware Setup 150 Toshiba online resources 99 Toshiba utilities 134 traveling tips 117 troubleshooting DVD player general problems 194 external keyboard 183 keyboard 182 keypad overlay 182 optical drive 187 turning on the computer 50 turning on the power 49 U user password, disabling 142, 144 user password, setting 142 using...


