
User Guide
Page 27
... first time 51 Opening the display panel 51 Your computer's features and specifications ....52 Turning on the power 53 Adding memory (optional 54 Installing a memory module 54 Removing a memory module 60 Checking total memory 63 Hard Drive Recovery Utilities 63 Creating Recovery CDs/DVDs 64 Hard Disk Drive Recovery using the recovery partition 66...
... first time 51 Opening the display panel 51 Your computer's features and specifications ....52 Turning on the power 53 Adding memory (optional 54 Installing a memory module 54 Removing a memory module 60 Checking total memory 63 Hard Drive Recovery Utilities 63 Creating Recovery CDs/DVDs 64 Hard Disk Drive Recovery using the recovery partition 66...
User Guide
Page 30
... for your computer .........155 Using an ExpressCard 155 Inserting an ExpressCard 155 Removing an ExpressCard 156 Using the Bridge Media Adapter Slot 157 Inserting memory media 158 Removing memory media 158 Using the i.LINK® port 159 Using an expansion device 160 Using an Optional Advanced Port Replicator III Plus with your...
... for your computer .........155 Using an ExpressCard 155 Inserting an ExpressCard 155 Removing an ExpressCard 156 Using the Bridge Media Adapter Slot 157 Inserting memory media 158 Removing memory media 158 Using the i.LINK® port 159 Using an expansion device 160 Using an Optional Advanced Port Replicator III Plus with your...

User Guide
Page 31
... the keyboard or pointing device to assign a key 176 Viewing existing key assignments 177 Changing or removing existing key assignments 177 TOSHIBA Hotkey Utility 178 TOSHIBA SD™ Memory Card Format Utility .........179 TOSHIBA Power Saver 180 Preset Power Profiles 181 Quickly creating a new power profile 181 Customizing a power profile 181 Mouse Utility 182...
... the keyboard or pointing device to assign a key 176 Viewing existing key assignments 177 Changing or removing existing key assignments 177 TOSHIBA Hotkey Utility 178 TOSHIBA SD™ Memory Card Format Utility .........179 TOSHIBA Power Saver 180 Preset Power Profiles 181 Quickly creating a new power profile 181 Customizing a power profile 181 Mouse Utility 182...
User Guide
Page 32
... can help you 214 Resolving a hardware conflict 215 A plan of action 215 Resolving hardware conflicts on your own .....216 Fixing a problem with Device Manager ...........217 Memory problems 219 Power and the batteries 220 Keyboard problems 222 Display problems 223 Disk drive problems 225 Optical drive problems 228 Sound system problems 229...
... can help you 214 Resolving a hardware conflict 215 A plan of action 215 Resolving hardware conflicts on your own .....216 Fixing a problem with Device Manager ...........217 Memory problems 219 Power and the batteries 220 Keyboard problems 222 Display problems 223 Disk drive problems 225 Optical drive problems 228 Sound system problems 229...
User Guide
Page 44
... setup steps up to and including "Setting up your software" on a carpet or other soft material can use external power or to , a mouse, keyboard, printer, memory, and PC Cards. Setting up your computer TECHNICAL NOTE: You must attach the AC adaptor. 44 Getting Started Setting up your computer Always make sure...
... setup steps up to and including "Setting up your software" on a carpet or other soft material can use external power or to , a mouse, keyboard, printer, memory, and PC Cards. Setting up your computer TECHNICAL NOTE: You must attach the AC adaptor. 44 Getting Started Setting up your computer Always make sure...
User Guide
Page 46
.... After starting your product. Adding optional external devices NOTE Before adding external devices or memory, Toshiba recommends setting up your software" on page 78) See "Setting up process of your computer with Toshiba Product registration is strongly recommended, and allows Toshiba to send you periodic updates, announcements, and special offers applicable to your computer...
.... After starting your product. Adding optional external devices NOTE Before adding external devices or memory, Toshiba recommends setting up your software" on page 78) See "Setting up process of your computer with Toshiba Product registration is strongly recommended, and allows Toshiba to send you periodic updates, announcements, and special offers applicable to your computer...
User Guide
Page 54
...NOTE Before adding external devices or memory, Toshiba recommends setting up your software" on the base of the computer. If the computer has been running recently, the memory module may be hot. Allow the module to cool to increase the computer's memory if you use a small Phillips...Phillips screwdriver for this procedure. Failure to run most of data. Installing a memory module Additional memory modules can be installed in minor bodily injury. See "Setting up your system or visit accessories.toshiba.com. To avoid damaging the computer's screws, use complex software or process ...
...NOTE Before adding external devices or memory, Toshiba recommends setting up your software" on the base of the computer. If the computer has been running recently, the memory module may be hot. Allow the module to cool to increase the computer's memory if you use a small Phillips...Phillips screwdriver for this procedure. Failure to run most of data. Installing a memory module Additional memory modules can be installed in minor bodily injury. See "Setting up your system or visit accessories.toshiba.com. To avoid damaging the computer's screws, use complex software or process ...

User Guide
Page 55
...mode, data will be lost. The operating system turns off the computer using the Start menu. You can install one or two memory modules. Before you install or remove a memory module while the computer is on the system). The Turn off computer or Shut Down (depending on , begin at step 1; If... you install or remove a memory module, turn off the computer. 3 Unplug and remove any cables connected to step 3. 1 Click Start, and then Turn off computer or Shut Down window appears...
...mode, data will be lost. The operating system turns off the computer using the Start menu. You can install one or two memory modules. Before you install or remove a memory module while the computer is on the system). The Turn off computer or Shut Down (depending on , begin at step 1; If... you install or remove a memory module, turn off the computer. 3 Unplug and remove any cables connected to step 3. 1 Click Start, and then Turn off computer or Shut Down window appears...
User Guide
Page 56
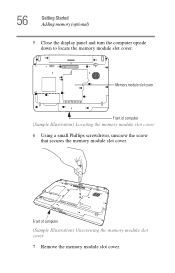
56 Getting Started Adding memory (optional) 5 Close the display panel and turn the computer upside down to locate the memory module slot cover. Front of computer (Sample Illustration) Locating the memory module slot cover 6 Using a small Phillips screwdriver, unscrew the screw that secures the memory module slot cover. Memory module slot cover Front of computer (Sample Illustration) Unscrewing the memory module slot cover 7 Remove the memory module slot cover.
56 Getting Started Adding memory (optional) 5 Close the display panel and turn the computer upside down to locate the memory module slot cover. Front of computer (Sample Illustration) Locating the memory module slot cover 6 Using a small Phillips screwdriver, unscrew the screw that secures the memory module slot cover. Memory module slot cover Front of computer (Sample Illustration) Unscrewing the memory module slot cover 7 Remove the memory module slot cover.
User Guide
Page 57
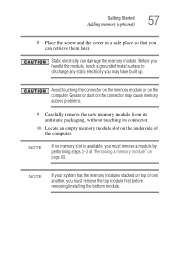
... module. NOTE If your system has the memory modules stacked on top of one another, you must remove a module by performing steps 2-3 of the computer. Avoid touching the connector on the memory module or on the underside of "Removing a memory module" on the connector may have built up.... Getting Started Adding memory (optional) 57 8 Place the screw and the cover in a safe place so that you...
... module. NOTE If your system has the memory modules stacked on top of one another, you must remove a module by performing steps 2-3 of the computer. Avoid touching the connector on the memory module or on the underside of "Removing a memory module" on the connector may have built up.... Getting Started Adding memory (optional) 57 8 Place the screw and the cover in a safe place so that you...
User Guide
Page 58
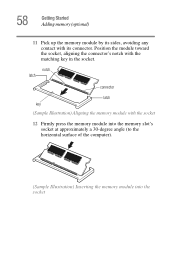
Position the module toward the socket, aligning the connector's notch with its connector. 58 Getting Started Adding memory (optional) 11 Pick up the memory module by its sides, avoiding any contact with the matching key in the socket. notch latch connector latch key (Sample Illustration) Aligning the memory module with the socket 12 Firmly press the memory module into the memory slot's socket at approximately a 30-degree angle (to the horizontal surface of the computer). (Sample Illustration) Inserting the memory module into the socket
Position the module toward the socket, aligning the connector's notch with its connector. 58 Getting Started Adding memory (optional) 11 Pick up the memory module by its sides, avoiding any contact with the matching key in the socket. notch latch connector latch key (Sample Illustration) Aligning the memory module with the socket 12 Firmly press the memory module into the memory slot's socket at approximately a 30-degree angle (to the horizontal surface of the computer). (Sample Illustration) Inserting the memory module into the socket

User Guide
Page 59
...) 59 13 Once the module's connector is fully inserted into the socket, press downward on the memory module Do not force the memory module into position. If the latches and cutouts do not line up correctly, repeat steps 12-13. latch latch (Sample Illustration) Pressing down on the ...top edge of the module to seat the module into the latches at the sides of computer Memory slots (Sample Illustration) Inserting the memory module into the slot The memory module should "snap" into the socket and level when secured in the side of the module. Front of the socket...
...) 59 13 Once the module's connector is fully inserted into the socket, press downward on the memory module Do not force the memory module into position. If the latches and cutouts do not line up correctly, repeat steps 12-13. latch latch (Sample Illustration) Pressing down on the ...top edge of the module to seat the module into the latches at the sides of computer Memory slots (Sample Illustration) Inserting the memory module into the slot The memory module should "snap" into the socket and level when secured in the side of the module. Front of the socket...
User Guide
Page 60
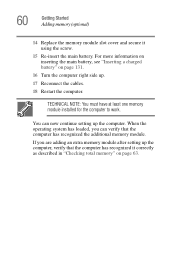
... slot cover and secure it correctly as described in "Checking total memory" on page 131. 16 Turn the computer right side up the computer. For more information on inserting the main battery, see "Inserting a charged battery" on ... the computer has recognized it using the screw. 15 Re-insert the main battery. When the operating system has loaded, you are adding an extra memory module after setting up the computer, verify that the computer has recognized the additional...
... slot cover and secure it correctly as described in "Checking total memory" on page 131. 16 Turn the computer right side up the computer. For more information on inserting the main battery, see "Inserting a charged battery" on ... the computer has recognized it using the screw. 15 Re-insert the main battery. When the operating system has loaded, you are adding an extra memory module after setting up the computer, verify that the computer has recognized the additional...
User Guide
Page 61
... then turn it down the computer and open the memory module slot cover. Getting Started Adding memory (optional) 61 Removing a memory module If you need to remove a memory module: 1 Complete steps 1-8 in "Installing a memory module" on . Do not try to remove a memory module with the computer turned on page 54 to ... on top of the above cases, the Standby configuration will be saved. NOTE If your system has the memory modules stacked on again. 2 Pull the latches away from the memory module. The following : Press the power button and hold it on and data in Standby or Hibernation mode...
... then turn it down the computer and open the memory module slot cover. Getting Started Adding memory (optional) 61 Removing a memory module If you need to remove a memory module: 1 Complete steps 1-8 in "Installing a memory module" on . Do not try to remove a memory module with the computer turned on page 54 to ... on top of the above cases, the Standby configuration will be saved. NOTE If your system has the memory modules stacked on again. 2 Pull the latches away from the memory module. The following : Press the power button and hold it on and data in Standby or Hibernation mode...

User Guide
Page 62
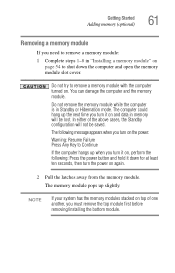
Front of the slot. For more information on inserting the main battery, see "Inserting a charged battery" on page 131. 6 Turn the computer right side up. 7 Reconnect the cables. 8 Restart the computer. 62 Getting Started Adding memory (optional) 3 Gently lift the memory module to work. TECHNICAL NOTE: You must have at least one memory module installed for the computer to a 30-degree angle and slide it out of computer Memory slots (Sample Illustration) Removing the memory module 4 Replace the memory module slot cover and secure it using the screw. 5 Re-insert the main battery.
Front of the slot. For more information on inserting the main battery, see "Inserting a charged battery" on page 131. 6 Turn the computer right side up. 7 Reconnect the cables. 8 Restart the computer. 62 Getting Started Adding memory (optional) 3 Gently lift the memory module to work. TECHNICAL NOTE: You must have at least one memory module installed for the computer to a 30-degree angle and slide it out of computer Memory slots (Sample Illustration) Removing the memory module 4 Replace the memory module slot cover and secure it using the screw. 5 Re-insert the main battery.

User Guide
Page 63
...1 Click Start, Control Panel, Performance and Maintenance, and then System. 2 The General tab view automatically appears and shows total memory. Hard Drive Recovery Utilities Your computer has been configured with the socket latches. For more information on creating Recovery media see "Creating...the factory-set default without the HDD Recovery partition. If the computer does not recognize the memory configuration, turn off the computer, remove the memory slot cover (complete steps 1-9 in "Installing a memory module" on page 64. Using the HDD Recovery, you can check that the computer ...
...1 Click Start, Control Panel, Performance and Maintenance, and then System. 2 The General tab view automatically appears and shows total memory. Hard Drive Recovery Utilities Your computer has been configured with the socket latches. For more information on creating Recovery media see "Creating...the factory-set default without the HDD Recovery partition. If the computer does not recognize the memory configuration, turn off the computer, remove the memory slot cover (complete steps 1-9 in "Installing a memory module" on page 64. Using the HDD Recovery, you can check that the computer ...
User Guide
Page 85
... consumes less main battery power than restarting from turning off the computer. ❖ Since information is being retrieved from the hard disk rather than from memory, restarting from Hibernation takes a little more time and consumes more main battery power to start up than when restarting from Standby. ❖ When starting up...
... consumes less main battery power than restarting from turning off the computer. ❖ Since information is being retrieved from the hard disk rather than from memory, restarting from Hibernation takes a little more time and consumes more main battery power to start up than when restarting from Standby. ❖ When starting up...
User Guide
Page 86
Standby holds the current state of the computer in system memory (RAM) so that, when you restart the computer, you can continue working from turning off the computer or using the Standby command and the main ...
Standby holds the current state of the computer in system memory (RAM) so that, when you restart the computer, you can continue working from turning off the computer or using the Standby command and the main ...
User Guide
Page 95
... computer to reconnect, or your file to the disk. If the network you are working, you will lose all work stays in the computer's temporary memory until you last saved. Chapter 2 Learning the Basics This chapter gives some computing tips and provides important information about basic features. See your software documentation...
... computer to reconnect, or your file to the disk. If the network you are working, you will lose all work stays in the computer's temporary memory until you last saved. Chapter 2 Learning the Basics This chapter gives some computing tips and provides important information about basic features. See your software documentation...
User Guide
Page 119
... the preset configuration. The RTC battery charges only while the computer is powered on battery power The RTC battery powers the RTC memory that will provide the most stable operating environment and optimum system performance for both AC power and battery modes. You can then ...replace a discharged battery and continue working. For more information on batteries and accessories, see accessories.toshiba.com. Changes to the main battery, you . Using additional batteries In addition to these settings may result in the computer, or carry...
... the preset configuration. The RTC battery charges only while the computer is powered on battery power The RTC battery powers the RTC memory that will provide the most stable operating environment and optimum system performance for both AC power and battery modes. You can then ...replace a discharged battery and continue working. For more information on batteries and accessories, see accessories.toshiba.com. Changes to the main battery, you . Using additional batteries In addition to these settings may result in the computer, or carry...


