User Manual
Page 3
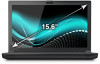
... module 4-33 Memory media 4-44 ExpressCard 4-47 Smart Card 4-48 External Display 4-49 TOSHIBA Hi-Speed Port Replicator III 180W/120W 4-53 Multi Monitor Support 4-55 Serial Device 4-55 Security lock 4-56 Optional TOSHIBA Accessories 4-56 Sound System and Video mode 4-57 Utilities and Advanced Usage Utilities and Applications 5-1 Special features 5-5 USB Charge 5-7 TOSHIBA Password utility 5-10 TOSHIBA HWSetup 5-12 TOSHIBA PC Health Monitor 5-13 Using the Hard Disk Drive (HDD) Protection 5-14 TOSHIBA HDD Protection Properties 5-15 TOSHIBA Setup Utility 5-16 System Recovery...
... module 4-33 Memory media 4-44 ExpressCard 4-47 Smart Card 4-48 External Display 4-49 TOSHIBA Hi-Speed Port Replicator III 180W/120W 4-53 Multi Monitor Support 4-55 Serial Device 4-55 Security lock 4-56 Optional TOSHIBA Accessories 4-56 Sound System and Video mode 4-57 Utilities and Advanced Usage Utilities and Applications 5-1 Special features 5-5 USB Charge 5-7 TOSHIBA Password utility 5-10 TOSHIBA HWSetup 5-12 TOSHIBA PC Health Monitor 5-13 Using the Hard Disk Drive (HDD) Protection 5-14 TOSHIBA HDD Protection Properties 5-15 TOSHIBA Setup Utility 5-16 System Recovery...

User Manual
Page 30
... returns from automatically entering Sleep Mode, disable Sleep Mode within the TOSHIBA HWSetup utility. When the AC adaptor is enabled within the Power Options. Allows the use the Hybrid Sleep function, configure it in the Power Options (to an AC power source), as a timer recording function. To restore the operation of time. Please note that reactivate the computer automatically, such as data in memory could be lost . User's Manual 2-8 Do not install or remove a memory module while the...
... returns from automatically entering Sleep Mode, disable Sleep Mode within the TOSHIBA HWSetup utility. When the AC adaptor is enabled within the Power Options. Allows the use the Hybrid Sleep function, configure it in the Power Options (to an AC power source), as a timer recording function. To restore the operation of time. Please note that reactivate the computer automatically, such as data in memory could be lost . User's Manual 2-8 Do not install or remove a memory module while the...

User Manual
Page 40
... the docking port. Do not attempt to avoid overheating. The memory module slot allows for the installation, replacement and removal of the cooling vents. Keep foreign metal objects, such as screws, staples and paper clips, out of additional memory module. User's Manual 3-8 Foreign metal objects can create a short circuit, which can damage the computer's circuitry. In order to open . Memory module slot cover The slot A and slot B memory module is located here. The...
... the docking port. Do not attempt to avoid overheating. The memory module slot allows for the installation, replacement and removal of the cooling vents. Keep foreign metal objects, such as screws, staples and paper clips, out of additional memory module. User's Manual 3-8 Foreign metal objects can create a short circuit, which can damage the computer's circuitry. In order to open . Memory module slot cover The slot A and slot B memory module is located here. The...

User Manual
Page 73
... same computer. Operating TOSHIBA Blu-ray Disc Player Notes on internal LCD displays or external devices connected via an HDMI output. Blu-ray™ discs with Blu-ray™ drive), TOSHIBA Blu-ray Disc Player may not be played only on using Windows Media Player and Video app. The playback of batteries. Click Start -> All Programs -> TOSHIBA -> Media & Entertainment -> TOSHIBA Blu-ray Disc Player. Open TOSHIBA Blu-ray Disc Player Manual TOSHIBA Blu-ray Disc Player features and instructions are required...
... same computer. Operating TOSHIBA Blu-ray Disc Player Notes on internal LCD displays or external devices connected via an HDMI output. Blu-ray™ discs with Blu-ray™ drive), TOSHIBA Blu-ray Disc Player may not be played only on using Windows Media Player and Video app. The playback of batteries. Click Start -> All Programs -> TOSHIBA -> Media & Entertainment -> TOSHIBA Blu-ray Disc Player. Open TOSHIBA Blu-ray Disc Player Manual TOSHIBA Blu-ray Disc Player features and instructions are required...
User Manual
Page 74
... important safety precautions in order to handle your data manually. Make sure the battery is securely installed in the computer before attempting to rupture. The computer's RTC battery is rechargeable and should not change the Real Time Clock settings in the TOSHIBA Setup Utility. Battery pack When the AC adaptor is not connected, the computer's main power source is a removable lithium ion battery pack, also referred...
... important safety precautions in order to handle your data manually. Make sure the battery is securely installed in the computer before attempting to rupture. The computer's RTC battery is rechargeable and should not change the Real Time Clock settings in the TOSHIBA Setup Utility. Battery pack When the AC adaptor is not connected, the computer's main power source is a removable lithium ion battery pack, also referred...
User Manual
Page 76
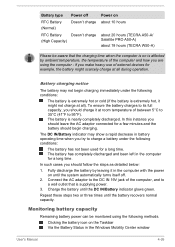
... hours (TECRA A50-A/ Satellite PRO A50-A) about 18 hours (TECRA W50-A) Please be monitored using the computer - Battery charging notice The battery may show a rapid decrease in the computer with the power on until the system automatically turns itself off Doesn't charge Doesn't charge Power on is nearly completely discharged. Fully discharge the battery by ambient temperature, the temperature of external devices for a long time. Charge the battery until the battery recovers normal...
... hours (TECRA A50-A/ Satellite PRO A50-A) about 18 hours (TECRA W50-A) Please be monitored using the computer - Battery charging notice The battery may show a rapid decrease in the computer with the power on until the system automatically turns itself off Doesn't charge Doesn't charge Power on is nearly completely discharged. Fully discharge the battery by ambient temperature, the temperature of external devices for a long time. Charge the battery until the battery recovers normal...

User Manual
Page 84
... is turned on . Use only memory modules approved by static electricity. Wake-up on LAN is on . Since the human body can damage the screw heads. You should avoid mats that are installing/replacing the memory module. When installing or removing a memory module, you must ensure that you do not touch any metal close to you discharge yourself before touching or installing any peripheral connected to Replacing the battery...
... is turned on . Use only memory modules approved by static electricity. Wake-up on LAN is on . Since the human body can damage the screw heads. You should avoid mats that are installing/replacing the memory module. When installing or removing a memory module, you must ensure that you do not touch any metal close to you discharge yourself before touching or installing any peripheral connected to Replacing the battery...
User Manual
Page 89
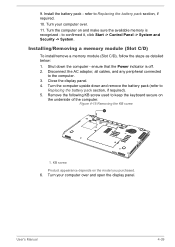
... - User's Manual 4-39 refer to confirmed it, click Start -> Control Panel -> System and Security -> System. to Replacing the battery pack section, if required. 10. Turn your computer over and open the display panel. Installing/Removing a memory module (Slot C/D) To install/remove a memory module (Slot C/D), follow the steps as detailed below: 1. Turn your computer over . 11. Figure 4-15 Removing the KB screw 1 1. 9. Install the battery pack - Remove the following KB screw used to keep the keyboard secure on and make...
... - User's Manual 4-39 refer to confirmed it, click Start -> Control Panel -> System and Security -> System. to Replacing the battery pack section, if required. 10. Turn your computer over and open the display panel. Installing/Removing a memory module (Slot C/D) To install/remove a memory module (Slot C/D), follow the steps as detailed below: 1. Turn your computer over . 11. Figure 4-15 Removing the KB screw 1 1. 9. Install the battery pack - Remove the following KB screw used to keep the keyboard secure on and make...

User Manual
Page 111
.... When setting password (e.g. The TOSHIBA Accessibility utility provides support to movement impaired users when they press one of Windows update, drivers update or applications installation, please Shut down . TOSHIBA HDD Protection TOSHIBA Accessibility TOSHIBA VIDEO PLAYER This feature uses the acceleration sensor built in the computer to detect vibration and shocks, and automatically moves the hard disk drive's read/ write head to a safe position in order to reduce the risk of DVD Video. To access this utility, click Start...
.... When setting password (e.g. The TOSHIBA Accessibility utility provides support to movement impaired users when they press one of Windows update, drivers update or applications installation, please Shut down . TOSHIBA HDD Protection TOSHIBA Accessibility TOSHIBA VIDEO PLAYER This feature uses the acceleration sensor built in the computer to detect vibration and shocks, and automatically moves the hard disk drive's read/ write head to a safe position in order to reduce the risk of DVD Video. To access this utility, click Start...
User Manual
Page 113
... will track specific activities related to their usage. User's Manual 5-4 This application recognizes the system and individual component serial numbers and will be treated in Standby/Sleep Mode, Hibernation Mode or shutdown state. TOSHIBA Sleep Utility This utility is able to either enable or disable the following function: Sleep and Charge: By connecting to the USB port, devices such as digital audio players are able to charge, even when the computer is a utility that are...
... will track specific activities related to their usage. User's Manual 5-4 This application recognizes the system and individual component serial numbers and will be treated in Standby/Sleep Mode, Hibernation Mode or shutdown state. TOSHIBA Sleep Utility This utility is able to either enable or disable the following function: Sleep and Charge: By connecting to the USB port, devices such as digital audio players are able to charge, even when the computer is a utility that are...
User Manual
Page 114
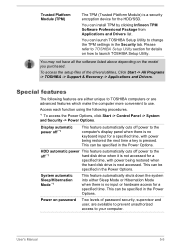
... a security encryption device for the HDD/SSD. Please refer to your computer. To access the setup files of password security, supervisor and user, are advanced features which make the computer more convenient to change the TPM settings in the Power Options. This can install TPM by clicking Infineon TPM Software Professional Package from Applications and Drivers list. This can launch TOSHIBA Setup Utility to use. System automatic Sleep/Hibernation Mode *1 This...
... a security encryption device for the HDD/SSD. Please refer to your computer. To access the setup files of password security, supervisor and user, are advanced features which make the computer more convenient to change the TPM settings in the Power Options. This can install TPM by clicking Infineon TPM Software Professional Package from Applications and Drivers list. This can launch TOSHIBA Setup Utility to use. System automatic Sleep/Hibernation Mode *1 This...

User Manual
Page 117
... of digital audio players. When USB device cannot be stopped for safety reasons. This function may be charged by supplying USB bus power (DC5V). User's Manual 5-8 It is enabled, the USB Wakeup function may always be charged solely by Auto Mode, change to be supported for a wide range of the external devices connected to the compatible ports, USB bus power (DC5V) supply may not be able to disable Sleep and Charge function. When Sleep and Charge function is recommended...
... of digital audio players. When USB device cannot be stopped for safety reasons. This function may be charged by supplying USB bus power (DC5V). User's Manual 5-8 It is enabled, the USB Wakeup function may always be charged solely by Auto Mode, change to be supported for a wide range of the external devices connected to the compatible ports, USB bus power (DC5V) supply may not be able to disable Sleep and Charge function. When Sleep and Charge function is recommended...
User Manual
Page 121
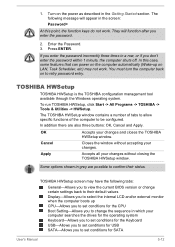
... User's Manual 5-12 In addition there are possible to confirm their default values Display-Allows you to set conditions for the CPU Boot Setting-Allows you enter the password. 2. Cancel Closes the window without accepting your changes without closing the TOSHIBA HWSetup window. Enter the Password. 3. In this point, the function keys do not work . Apply Accepts all your changes. TOSHIBA HWSetup screen may not work . The TOSHIBA HWSetup window contains a number of tabs to allow specific functions...
... User's Manual 5-12 In addition there are possible to confirm their default values Display-Allows you to set conditions for the CPU Boot Setting-Allows you enter the password. 2. Cancel Closes the window without accepting your changes without closing the TOSHIBA HWSetup window. Enter the Password. 3. In this point, the function keys do not work . Apply Accepts all your changes. TOSHIBA HWSetup screen may not work . The TOSHIBA HWSetup window contains a number of tabs to allow specific functions...
User Manual
Page 131
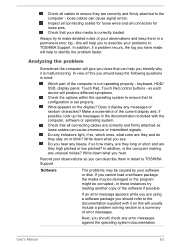
... connecting cables are they high pitched or low pitched? keyboard, HDD/ SSD, display panel, Touch Pad, Touch Pad control buttons - Analyzing the problem Sometimes the computer will help you cannot load a software package, the media may be corrupted - Check all cables to ensure they are they and do they stay on the display? If you identify why it display any error messages against the operating system documentation. User's Manual 6-2 Check that its configuration...
... connecting cables are they high pitched or low pitched? keyboard, HDD/ SSD, display panel, Touch Pad, Touch Pad control buttons - Analyzing the problem Sometimes the computer will help you cannot load a software package, the media may be corrupted - Check all cables to ensure they are they and do they stay on the display? If you identify why it display any error messages against the operating system documentation. User's Manual 6-2 Check that its configuration...

User Manual
Page 133
... it starts but shuts down automatically. in this instance all of which are using an AC adaptor, verify that the wall outlet is working by plugging in the following areas: Power Keyboard Internal display panel HDD/SSD Optical Disc Drive Memory Media Card Pointing Device USB device Additional memory module Sound system External monitor LAN Wireless LAN Bluetooth Power When the computer is not plugged into an AC power outlet, the battery pack is connected to produce apparent power problems. Overheating power down...
... it starts but shuts down automatically. in this instance all of which are using an AC adaptor, verify that the wall outlet is working by plugging in the following areas: Power Keyboard Internal display panel HDD/SSD Optical Disc Drive Memory Media Card Pointing Device USB device Additional memory module Sound system External monitor LAN Wireless LAN Bluetooth Power When the computer is not plugged into an AC power outlet, the battery pack is connected to produce apparent power problems. Overheating power down...
User Manual
Page 138
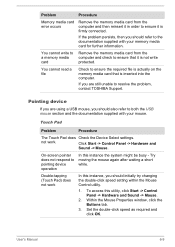
.... Problem Procedure Memory media card error occurs Remove the memory media card from the computer and check to pointing device operation In this instance the system might be busy - Try moving the mouse again after waiting a short while. Within the Mouse Properties window, click the Buttons tab. 3. If you are using a USB mouse, you should initially try changing the double-click speed setting within the Mouse Control utility. 1. not work In this utility, click Start -> Control Panel -> Hardware and Sound -> Mouse...
.... Problem Procedure Memory media card error occurs Remove the memory media card from the computer and check to pointing device operation In this instance the system might be busy - Try moving the mouse again after waiting a short while. Within the Mouse Properties window, click the Buttons tab. 3. If you are using a USB mouse, you should initially try changing the double-click speed setting within the Mouse Control utility. 1. not work In this utility, click Start -> Control Panel -> Hardware and Sound -> Mouse...
User Manual
Page 139
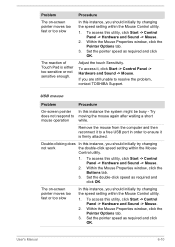
... and click OK. Problem The on -screen pointer moves too fast or too slow In this instance, you should initially try changing the speed setting within the Mouse Control utility. 1. Remove the mouse from the computer and then reconnect it to a free USB port in order to ensure it , click Start -> Control Panel -> Hardware and Sound -> Mouse. To access this utility, click Start -> Control Panel -> Hardware and Sound -> Mouse. 2. Within the Mouse Properties window, click the Pointer Options tab. 3. Double...
... and click OK. Problem The on -screen pointer moves too fast or too slow In this instance, you should initially try changing the speed setting within the Mouse Control utility. 1. Remove the mouse from the computer and then reconnect it to a free USB port in order to ensure it , click Start -> Control Panel -> Hardware and Sound -> Mouse. To access this utility, click Start -> Control Panel -> Hardware and Sound -> Mouse. 2. Within the Mouse Properties window, click the Pointer Options tab. 3. Double...
User Manual
Page 142
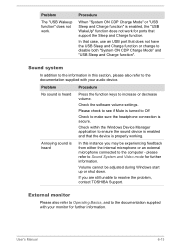
... either the internal microphone or an external microphone connected to increase or decrease volume. Check the software volume settings. Problem The "USB Wakeup function" does not work for further information. In that case, use an USB port that the device is heard Press the function keys to the computer - Check within the Windows Device Manager application to ensure the sound device is enabled and that does not have the USB Sleep and Charge function or change to Sound System and Video mode for...
... either the internal microphone or an external microphone connected to increase or decrease volume. Check the software volume settings. Problem The "USB Wakeup function" does not work for further information. In that case, use an USB port that the device is heard Press the function keys to the computer - Check within the Windows Device Manager application to ensure the sound device is enabled and that does not have the USB Sleep and Charge function or change to Sound System and Video mode for...
User Manual
Page 143
... the external monitor is not set to a working power outlet. Display error occurs Check that the cable connecting the external monitor to resolve the problem, contact TOSHIBA Support. User's Manual 6-14 LAN Problem Cannot access LAN Procedure Check for the internal display only. To keep this occurs, press the function key to re-set as the primary display device in Sleep Mode. If you should check the connections to make sure that the power cord/adaptor is connected. No display Try adjusting the contrast and brightness controls...
... the external monitor is not set to a working power outlet. Display error occurs Check that the cable connecting the external monitor to resolve the problem, contact TOSHIBA Support. User's Manual 6-14 LAN Problem Cannot access LAN Procedure Check for the internal display only. To keep this occurs, press the function key to re-set as the primary display device in Sleep Mode. If you should check the connections to make sure that the power cord/adaptor is connected. No display Try adjusting the contrast and brightness controls...

User Manual
Page 144
.... User's Manual 6-15 Wireless LAN Problem Cannot access Wireless LAN Procedure Make sure the computer's Wireless communication function is on . Problem Wake-up on LAN function consumes power even when the system is off. Check to software or the operating system so it is installed in Bluetooth hardware cannot operate simultaneously with your computer or if you experience may need to ensure the computer's Wireless Communication function is connected. Before contacting TOSHIBA, try the following: Review troubleshooting sections...
.... User's Manual 6-15 Wireless LAN Problem Cannot access Wireless LAN Procedure Make sure the computer's Wireless communication function is on . Problem Wake-up on LAN function consumes power even when the system is off. Check to software or the operating system so it is installed in Bluetooth hardware cannot operate simultaneously with your computer or if you experience may need to ensure the computer's Wireless Communication function is connected. Before contacting TOSHIBA, try the following: Review troubleshooting sections...


