
User Manual
Page 29
...65 Recovering without changing the internal storage drive partitions 67 Creating recovery DVDs/media 70 Restoring from recovery DVDs/media 72 Erasing the Internal Storage Drive 74 Checking the internal storage drive operating status 76 Installing drivers and applications 76 Using the Toshiba Dual Pointing Device 77 Using the TouchPad 77 Scrolling with the TouchPad 78 Control buttons 78 Disabling or enabling the TouchPad 78 Using external display devices 79 Connecting an external monitor or projector ....79 Directing the display output when you turn on the computer 80 Adjusting the...
...65 Recovering without changing the internal storage drive partitions 67 Creating recovery DVDs/media 70 Restoring from recovery DVDs/media 72 Erasing the Internal Storage Drive 74 Checking the internal storage drive operating status 76 Installing drivers and applications 76 Using the Toshiba Dual Pointing Device 77 Using the TouchPad 77 Scrolling with the TouchPad 78 Control buttons 78 Disabling or enabling the TouchPad 78 Using external display devices 79 Connecting an external monitor or projector ....79 Directing the display output when you turn on the computer 80 Adjusting the...
User Manual
Page 33
... 33 Mouse Utility 158 TOSHIBA Hardware Setup 159 USB Sleep and Charge Utility 161 Starting the USB Sleep and Charge Utility.......161 USB Sleep and Charge 161 Enabling USB Sleep and Charge 163 Power supply mode settings 163 TOSHIBA Zooming Utility 165 TOSHIBA Button Support 166 TOSHIBA Accessibility 167 Trusted Platform Module (TPM 168 Fingerprint Authentication Utility 169 Fingerprint utility limitations 169 Using the Fingerprint Authentication Utility 169 Fingerprint Logon 170 Care and maintenance of your fingerprint reader 170 Fingerprint reader limitations 172 TOSHIBA eco...
... 33 Mouse Utility 158 TOSHIBA Hardware Setup 159 USB Sleep and Charge Utility 161 Starting the USB Sleep and Charge Utility.......161 USB Sleep and Charge 161 Enabling USB Sleep and Charge 163 Power supply mode settings 163 TOSHIBA Zooming Utility 165 TOSHIBA Button Support 166 TOSHIBA Accessibility 167 Trusted Platform Module (TPM 168 Fingerprint Authentication Utility 169 Fingerprint utility limitations 169 Using the Fingerprint Authentication Utility 169 Fingerprint Logon 170 Care and maintenance of your fingerprint reader 170 Fingerprint reader limitations 172 TOSHIBA eco...
User Manual
Page 52
... all open programs, shuts down the operating system, and then turns off the computer using the Start menu. NOTE For this model, Slot A is on the work surface to prevent scratching the top cover of the computer, and then place the computer upside down button in Slot A. Slot B is to step 3. 1 Click Start. Before you install or remove a memory module while the computer is in Sleep or Hibernation mode, data...
... all open programs, shuts down the operating system, and then turns off the computer using the Start menu. NOTE For this model, Slot A is on the work surface to prevent scratching the top cover of the computer, and then place the computer upside down button in Slot A. Slot B is to step 3. 1 Click Start. Before you install or remove a memory module while the computer is in Sleep or Hibernation mode, data...

User Manual
Page 57
... computer has recognized it using the screw. 15 Re-insert the main battery. TECHNICAL NOTE: You must have adequate ventilation and are adding extra memory after setting up the computer. Overheating your computer is connected to remove the soft cloth from overheating when the power is turned on a hard flat surface. Getting Started 57 Adding memory (optional) 14 Replace the memory module slot cover and secure it...
... computer has recognized it using the screw. 15 Re-insert the main battery. TECHNICAL NOTE: You must have adequate ventilation and are adding extra memory after setting up the computer. Overheating your computer is connected to remove the soft cloth from overheating when the power is turned on a hard flat surface. Getting Started 57 Adding memory (optional) 14 Replace the memory module slot cover and secure it...
User Manual
Page 58
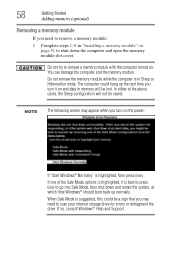
... and Support. You can damage the computer and the memory module. Do not try to go into Safe Mode, then shut down the computer and open the memory module slot cover. In either of the Safe Mode options is highlighted, it on and data in memory will not be a sign that you may appear when you turn on the power: If "Start Windows® Normally" is in "Installing a memory module" on...
... and Support. You can damage the computer and the memory module. Do not try to go into Safe Mode, then shut down the computer and open the memory module slot cover. In either of the Safe Mode options is highlighted, it on and data in memory will not be a sign that you may appear when you turn on the power: If "Start Windows® Normally" is in "Installing a memory module" on...
User Manual
Page 59
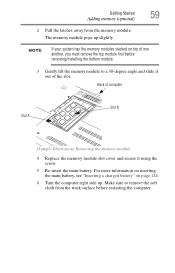
... must remove the top module first before restarting the computer. Make sure to a 30-degree angle and slide it out of computer Slot A Slot B (Sample Illustration) Removing the memory module 4 Replace the memory module slot cover and secure it using the screw. 5 Re-insert the main battery. Getting Started 59 Adding memory (optional) 2 Pull the latches away from the work surface before removing/installing the bottom module. 3 Gently lift the memory module to remove the...
... must remove the top module first before restarting the computer. Make sure to a 30-degree angle and slide it out of computer Slot A Slot B (Sample Illustration) Removing the memory module 4 Replace the memory module slot cover and secure it using the screw. 5 Re-insert the main battery. Getting Started 59 Adding memory (optional) 2 Pull the latches away from the work surface before removing/installing the bottom module. 3 Gently lift the memory module to remove the...
User Manual
Page 60
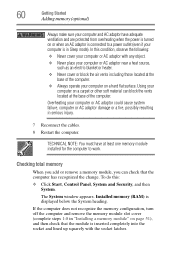
... and remove the memory module slot cover (complete steps 1-8 in "Installing a memory module" on page 51), and then check that the computer has recognized the change. Overheating your computer is in Sleep mode). The System window appears. TECHNICAL NOTE: You must have adequate ventilation and are protected from overheating when the power is turned on or when an AC adaptor is connected to work. Checking total memory...
... and remove the memory module slot cover (complete steps 1-8 in "Installing a memory module" on page 51), and then check that the computer has recognized the change. Overheating your computer is in Sleep mode). The System window appears. TECHNICAL NOTE: You must have adequate ventilation and are protected from overheating when the power is turned on or when an AC adaptor is connected to work. Checking total memory...

User Manual
Page 96
... like typing on a typewriter, except that: ❖ The space bar creates a space character instead of just passing over an area of the page. ❖ The lowercase letter l (el) and the number 1 are not interchangeable. Using the keyboard Your computer's keyboard contains character keys, control keys, function keys, and special Windows® keys, providing all new files for files you do not let the Windows® operating...
... like typing on a typewriter, except that: ❖ The space bar creates a space character instead of just passing over an area of the page. ❖ The lowercase letter l (el) and the number 1 are not interchangeable. Using the keyboard Your computer's keyboard contains character keys, control keys, function keys, and special Windows® keys, providing all new files for files you do not let the Windows® operating...
User Manual
Page 108
... the media on the disc. Do not set the volume too high when using an application that allows you insert an optical disc into the optical disc drive and the AutoRun feature does not automatically start your computer's detailed specifications at pcsupport.toshiba.com. If your hearing. For more information regarding supported optical media formats please refer to your disc, try using headphones. For other types of media, use...
... the media on the disc. Do not set the volume too high when using an application that allows you insert an optical disc into the optical disc drive and the AutoRun feature does not automatically start your computer's detailed specifications at pcsupport.toshiba.com. If your hearing. For more information regarding supported optical media formats please refer to your disc, try using headphones. For other types of media, use...
User Manual
Page 152
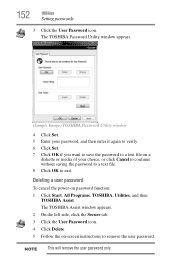
... password to remove the user password. The TOSHIBA Password Utility window appears. (Sample Image) TOSHIBA Password Utility window 4 Click Set. 5 Enter your choice, or click Cancel to continue without saving the password to a text file. 8 Click OK to exit. The TOSHIBA Assist window appears. 2 On the left side, click the Secure tab. 3 Click the User Password icon. 4 Click Delete. 5 Follow the on-screen instructions to a text file on password function: 1 Click Start, All Programs, TOSHIBA, Utilities...
... password to remove the user password. The TOSHIBA Password Utility window appears. (Sample Image) TOSHIBA Password Utility window 4 Click Set. 5 Enter your choice, or click Cancel to continue without saving the password to a text file. 8 Click OK to exit. The TOSHIBA Assist window appears. 2 On the left side, click the Secure tab. 3 Click the User Password icon. 4 Click Delete. 5 Follow the on-screen instructions to a text file on password function: 1 Click Start, All Programs, TOSHIBA, Utilities...
User Manual
Page 174
... status changes (e.g.: number of power button and Fn key combination uses, and AC adaptor, battery, LCD, fan, HDD, sound volume, wireless communication switch, docking and USB information), date of your TOSHIBA computer. It alerts users to entities located outside of your country or region of the total hard disk capacity (approximately 3 MB or less per year). Additionally, TOSHIBA may also be transferred to specific system conditions via pop-up messages. 174 Utilities TOSHIBA Service Station TOSHIBA Service...
... status changes (e.g.: number of power button and Fn key combination uses, and AC adaptor, battery, LCD, fan, HDD, sound volume, wireless communication switch, docking and USB information), date of your TOSHIBA computer. It alerts users to entities located outside of your country or region of the total hard disk capacity (approximately 3 MB or less per year). Additionally, TOSHIBA may also be transferred to specific system conditions via pop-up messages. 174 Utilities TOSHIBA Service Station TOSHIBA Service...
User Manual
Page 183
... be equal to your computer model. The battery light is blinking when the computer is on the AC adaptor (for each device. Unless a hardware device has failed, problems usually occur when you can easily detect if the operating system is correct, and the plug fits correctly in the Startup menu to start from the normal routine. ❖ The screen does not look right...
... be equal to your computer model. The battery light is blinking when the computer is on the AC adaptor (for each device. Unless a hardware device has failed, problems usually occur when you can easily detect if the operating system is correct, and the plug fits correctly in the Startup menu to start from the normal routine. ❖ The screen does not look right...
User Manual
Page 189
... registered, press any key to activate the screen. The keyboard you through the display options. Display Auto Off may need to its previous setting. To do this does not correct the problem, press Fn and F5 simultaneously again to return the display priority to update your keyboard driver. If you are using is not set for an external monitor. If the numlock light or cursor control overlay light is on . You...
... registered, press any key to activate the screen. The keyboard you through the display options. Display Auto Off may need to its previous setting. To do this does not correct the problem, press Fn and F5 simultaneously again to return the display priority to update your keyboard driver. If you are using is not set for an external monitor. If the numlock light or cursor control overlay light is on . You...
User Manual
Page 205
...the "USB Sleep and Charge function" is set to a compatible port. For more of "USB Sleep and Charge function" may be used, change the setting to Disabled. ❖ Make sure that you have a non-Sleep and Charge USB port available or disable the "USB Sleep and Charge function." Change the setting to Enabled. ❖ Some external devices may not be able to use the "USB Sleep and Charge function." ❖ The setting of the following methods. ❖ Change the Enabled mode setting. ❖ Turn OFF the computer while external devices are connected. ❖ Connect external devices...
...the "USB Sleep and Charge function" is set to a compatible port. For more of "USB Sleep and Charge function" may be used, change the setting to Disabled. ❖ Make sure that you have a non-Sleep and Charge USB port available or disable the "USB Sleep and Charge function." Change the setting to Enabled. ❖ Some external devices may not be able to use the "USB Sleep and Charge function." ❖ The setting of the following methods. ❖ Change the Enabled mode setting. ❖ Turn OFF the computer while external devices are connected. ❖ Connect external devices...
User Manual
Page 233
... the operating system automatically recognize the change. The physical components of pixels is returned to help improve processing speed. A method of refreshing a computer screen, in combination with the Fn key can set system options or control system parameters, such as a mouse. The decentralized, world-wide network of using a pointing device such as the battery save mode. (2) A key or combination of data. See also cache, CPU...
... the operating system automatically recognize the change. The physical components of pixels is returned to help improve processing speed. A method of refreshing a computer screen, in combination with the Fn key can set system options or control system parameters, such as a mouse. The decentralized, world-wide network of using a pointing device such as the battery save mode. (2) A key or combination of data. See also cache, CPU...

User Manual
Page 240
... changing 122 charge indicator light 46, 116 charge not lasting 188 charging 47, 114 conserving power 119 disposal 127 installing 122, 124 low charge 118 maintaining 126 monitoring power 46, 116 240 not charging 188 notifications 118 power plan 216 power plan hot key 121 real-time clock (RTC) 113, 115 remaining power 117 removing 123 safety precautions 125 BIOS Setup see TOSHIBA Hardware Setup button power 49 start 131 buttons eject, optical disc drive 105 Media control buttons 105 C Call2Recycle™ battery...
... changing 122 charge indicator light 46, 116 charge not lasting 188 charging 47, 114 conserving power 119 disposal 127 installing 122, 124 low charge 118 maintaining 126 monitoring power 46, 116 240 not charging 188 notifications 118 power plan 216 power plan hot key 121 real-time clock (RTC) 113, 115 remaining power 117 removing 123 safety precautions 125 BIOS Setup see TOSHIBA Hardware Setup button power 49 start 131 buttons eject, optical disc drive 105 Media control buttons 105 C Call2Recycle™ battery...

User Manual
Page 242
... Device 222 disabling or enabling wireless devices 221 display brightness 220 Hibernation mode 218 keyboard overlays 223 Lock (Instant security) 215 Output (Display switch) 219 power plan 216 Sleep mode 217 volume mute 214 Zoom (Display resolution) 223 zooming in 223 zooming out 223 Hot Key Cards 209 Hot key functions 213 hot key power plan 121 I icon 130 desktop 130 moving to desktop 130 recycle bin 130 safety 39 inserting ExpressCards® 137 installation memory module 51 installing main battery...
... Device 222 disabling or enabling wireless devices 221 display brightness 220 Hibernation mode 218 keyboard overlays 223 Lock (Instant security) 215 Output (Display switch) 219 power plan 216 Sleep mode 217 volume mute 214 Zoom (Display resolution) 223 zooming in 223 zooming out 223 Hot Key Cards 209 Hot key functions 213 hot key power plan 121 I icon 130 desktop 130 moving to desktop 130 recycle bin 130 safety 39 inserting ExpressCards® 137 installation memory module 51 installing main battery...

User Manual
Page 243
J jack RJ-11 134 K keyboard character keys 96 function keys 97 hot keys 223 not working 180 special Windows® keys 97 troubleshooting 189 unexpected characters 189 using 96 keyboard, external 81 L light AC power 45 drive in-use indicator 105 lock computer, using 94 M main battery changing 122 installing 122, 124 removing 123 safety precautions 125 manual eject hole optical disc drive 105 memory adding 51 problem solving 187 removing memory module slot cover 53 Memory card reader inserting memory media 139 removing memory media 140 memory module installation 51 installing inserting into ...
J jack RJ-11 134 K keyboard character keys 96 function keys 97 hot keys 223 not working 180 special Windows® keys 97 troubleshooting 189 unexpected characters 189 using 96 keyboard, external 81 L light AC power 45 drive in-use indicator 105 lock computer, using 94 M main battery changing 122 installing 122, 124 removing 123 safety precautions 125 manual eject hole optical disc drive 105 memory adding 51 problem solving 187 removing memory module slot cover 53 Memory card reader inserting memory media 139 removing memory media 140 memory module installation 51 installing inserting into ...
User Manual
Page 244
... disabling a user 152 setting a user 151 supervisor set up 150 types 149 passwords instant, using 149 setting 149 port Mini DisplayPort™ 79 RGB 79 power computer will not start 180 connecting cable to AC adaptor 46 cord/cable 46 cord/cable connectors 224 energy-saving features 111 problem solving 187 turning on 49 power button 49 power plan hot key 121 power plans 120 power source connecting 46 powering down using Hibernate 88 using Sleep 90 precautions 42 primary button...
... disabling a user 152 setting a user 151 supervisor set up 150 types 149 passwords instant, using 149 setting 149 port Mini DisplayPort™ 79 RGB 79 power computer will not start 180 connecting cable to AC adaptor 46 cord/cable 46 cord/cable connectors 224 energy-saving features 111 problem solving 187 turning on 49 power button 49 power plan hot key 121 power plans 120 power source connecting 46 powering down using Hibernate 88 using Sleep 90 precautions 42 primary button...
User Manual
Page 246
... TouchPad™ control buttons 78 disabling 78 enabling 78 primary button 78 secondary button 78 using 77 traveling tips 128 troubleshooting DVD player general problems 199 external keyboard 189 keyboard 189 optical disc drive 193 Trusted Platform Module (TPM) 168 turning on the computer 49 turning on the power 49 U USB Sleep and Charge cannot use 205 USB Sleep and Charge Utility 161 USB Wakeup function does not work 205 USB-compatible printer 81 user password, disabling 152 user password, setting 151 using display devices 79 ExpressCard® 137 Memory card reader 139 Smart Card Reader...
... TouchPad™ control buttons 78 disabling 78 enabling 78 primary button 78 secondary button 78 using 77 traveling tips 128 troubleshooting DVD player general problems 199 external keyboard 189 keyboard 189 optical disc drive 193 Trusted Platform Module (TPM) 168 turning on the computer 49 turning on the power 49 U USB Sleep and Charge cannot use 205 USB Sleep and Charge Utility 161 USB Wakeup function does not work 205 USB-compatible printer 81 user password, disabling 152 user password, setting 151 using display devices 79 ExpressCard® 137 Memory card reader 139 Smart Card Reader...


