

User Manual
Page 3
...8. Water and Moisture Do not use liquid cleaners or aerosol cleaners. in a risk of Light Do not look into the lens while the lamp is on a bed, sofa, rug or other instructions. 3. Do not overload wall outlets; wire grounding type to your product dealer or The... swimming pool and the like. Unplug this can be operated 4. REFER SERVICING TO QUALIFIED SERVICE PERSONNEL ONLY. 1. As this product from the lamp may cause damage to prevent blade exposure. blocked by items placed upon or against them, paying particular attention to cords at plugs, convenience receptacles...
...8. Water and Moisture Do not use liquid cleaners or aerosol cleaners. in a risk of Light Do not look into the lens while the lamp is on a bed, sofa, rug or other instructions. 3. Do not overload wall outlets; wire grounding type to your product dealer or The... swimming pool and the like. Unplug this can be operated 4. REFER SERVICING TO QUALIFIED SERVICE PERSONNEL ONLY. 1. As this product from the lamp may cause damage to prevent blade exposure. blocked by items placed upon or against them, paying particular attention to cords at plugs, convenience receptacles...

User Manual
Page 4
...If liquid has been spilled, or objects have fallen into this indicates a need for service. 17. If glass components, including lens and lamp, should break, please handle with care to other equipment on the product. 13. Accessories Do not place this product from the wall outlet... SAFETY INSTRUCTIONS (Continued) 10. Stack Inhibited Do not stack other unit. 14. This product incorporates glass components, including a lens and a lamp. It may expose you from receiving the electric shock by the product manufacturer as they may cause hazards. 6 15. Quick stops, excessive ...
...If liquid has been spilled, or objects have fallen into this indicates a need for service. 17. If glass components, including lens and lamp, should break, please handle with care to other equipment on the product. 13. Accessories Do not place this product from the wall outlet... SAFETY INSTRUCTIONS (Continued) 10. Stack Inhibited Do not stack other unit. 14. This product incorporates glass components, including a lens and a lamp. It may expose you from receiving the electric shock by the product manufacturer as they may cause hazards. 6 15. Quick stops, excessive ...

User Manual
Page 5
... originally packed at least 2 hours when there is exposed to a high-temperature room may result. Do not look into the laser light source of the lamp only should be sure the service technician has used replacement parts specified by more than 20° from possible damage, do not use inside aircraft...
... originally packed at least 2 hours when there is exposed to a high-temperature room may result. Do not look into the laser light source of the lamp only should be sure the service technician has used replacement parts specified by more than 20° from possible damage, do not use inside aircraft...

User Manual
Page 6
..., or any damages arising from malfunctions arising from natural disaster such as follows. Following information is not related to Toshiba Corporation. • Toshiba bears no responsibility for a long time. Concerning the regulations applied in accordance with clean water and consult a doctor...Digital Micromirror Device and DMD are annotated as earthquakes, lightning, etc., fire not liable to Toshiba Corporation, acts by inappropriate waste handling of the used lamps in each country/ area, please refer to "Information to follow the product's precautions. Serial...
..., or any damages arising from malfunctions arising from natural disaster such as follows. Following information is not related to Toshiba Corporation. • Toshiba bears no responsibility for a long time. Concerning the regulations applied in accordance with clean water and consult a doctor...Digital Micromirror Device and DMD are annotated as earthquakes, lightning, etc., fire not liable to Toshiba Corporation, acts by inappropriate waste handling of the used lamps in each country/ area, please refer to "Information to follow the product's precautions. Serial...

User Manual
Page 7
... converting it into a JPEG file 76 Setting up the projector using a Web browser 77 How to use the "Projector Configuration Tool 77 Maintenance About lamp ...79 Lamp replacement 80 Lens and main unit cleaning 82 Others Trouble indications 83 Before calling service personnel 84 Specifications ...86 List of general specifications 86 Separately...
... converting it into a JPEG file 76 Setting up the projector using a Web browser 77 How to use the "Projector Configuration Tool 77 Maintenance About lamp ...79 Lamp replacement 80 Lens and main unit cleaning 82 Others Trouble indications 83 Before calling service personnel 84 Specifications ...86 List of general specifications 86 Separately...

User Manual
Page 8
...: Draws in the box, along with related information. Acrobat® Reader™ launches, and the menu screen of bookmarks appear. p.19 : Press to replace lamp. p.80 : Adjusts the vertical projection angle. Click on a bookmark title to view a reference page with the main unit. p.18 : Connect the supplied power...power cords vary depending on Start.pdf. Follow the on the rear panel (9) AC IN socket (10) Air exhaust (11) Tilt adjuster (12) Lamp cover (13) Foot adjuster (14) Lens : Used for more information about Acrobat® Reader™. 14 Names of the manual. See the ...
...: Draws in the box, along with related information. Acrobat® Reader™ launches, and the menu screen of bookmarks appear. p.19 : Press to replace lamp. p.80 : Adjusts the vertical projection angle. Click on a bookmark title to view a reference page with the main unit. p.18 : Connect the supplied power...power cords vary depending on Start.pdf. Follow the on the rear panel (9) AC IN socket (10) Air exhaust (11) Tilt adjuster (12) Lamp cover (13) Foot adjuster (14) Lens : Used for more information about Acrobat® Reader™. 14 Names of the manual. See the ...

User Manual
Page 9
...projector. (inside the battery cover) p.43 Note • For the remainder of this manual, buttons are referred to laser. p.35 : Displays lamp mode. p.20 (19) PAGE+ button : Proceeds PowerPoint® slides. p.32 (22) Ten-Key button : Use as right-click of ...STANDBY button (5) FOCUS button (6) EASY SETUP button (7) ZOOM button (8) ON/STANDBY indicator (9) INPUT button (10) RETURN button (11) Selection button (12) LAMP indicator (13) TEMP indicator (14) FAN indicator Remote control (1) ENTER button (2) MENU button (3) KEYSTONE button (4) ON/STANDBY button (5) FOCUS button (6) EASY...
...projector. (inside the battery cover) p.43 Note • For the remainder of this manual, buttons are referred to laser. p.35 : Displays lamp mode. p.20 (19) PAGE+ button : Proceeds PowerPoint® slides. p.32 (22) Ten-Key button : Use as right-click of ...STANDBY button (5) FOCUS button (6) EASY SETUP button (7) ZOOM button (8) ON/STANDBY indicator (9) INPUT button (10) RETURN button (11) Selection button (12) LAMP indicator (13) TEMP indicator (14) FAN indicator Remote control (1) ENTER button (2) MENU button (3) KEYSTONE button (4) ON/STANDBY button (5) FOCUS button (6) EASY...

User Manual
Page 11
... mouse pointer to 11.09 m. Improper mounting could cause the projector to bright sunlight or fluorescent lighting. However, please note that Toshiba does not guarantee the operation of the projector know that is ceiling-mounted, install the breaker for full-size picture with your dealer...rear projection WARNING • Always obey the instructions listed in the direction you wish to do so. Attempting to clean/replace the lamp at a high site by yourself may fail to determine the projection size and projection distance. (Projection sizes are approximate values for ...
... mouse pointer to 11.09 m. Improper mounting could cause the projector to bright sunlight or fluorescent lighting. However, please note that Toshiba does not guarantee the operation of the projector know that is ceiling-mounted, install the breaker for full-size picture with your dealer...rear projection WARNING • Always obey the instructions listed in the direction you wish to do so. Attempting to clean/replace the lamp at a high site by yourself may fail to determine the projection size and projection distance. (Projection sizes are approximate values for ...

User Manual
Page 13
... eyes or sight. • Do not block the air intake or exhaust. You can also configure the start -up screen appears. B After the LAMP indicator goes off , but the internal cooling fan continues to light. 25 Operations We recommend that you are in a hurry, there is turned on... due to heat. ■ Turning the power on and off the power. The power turns on, and the following 3 green indicators light: ON/STANDBY, LAMP, and FAN. This message will change to your hands, face, or other power outlet. C In standby mode Note • The projector consumes about 5 ...
... eyes or sight. • Do not block the air intake or exhaust. You can also configure the start -up screen appears. B After the LAMP indicator goes off , but the internal cooling fan continues to light. 25 Operations We recommend that you are in a hurry, there is turned on... due to heat. ■ Turning the power on and off the power. The power turns on, and the following 3 green indicators light: ON/STANDBY, LAMP, and FAN. This message will change to your hands, face, or other power outlet. C In standby mode Note • The projector consumes about 5 ...
User Manual
Page 14
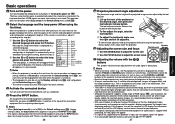
...lower the projector. 6 Adjusting the screen size and focus Remote Control panel Control q Use the ZOOM button to fluctuate slightly. • A lamp is displayed. Please note that are input, auto-setting is no other input signal." For information on how to turn off the LCD display, ...; The DMDTM is being input. To view high-quality images, it according to the step 6 .) q Use the or button to select the lamp power and press the button. If this projector supports a wide range of the connected equipment that the computer's external output should be toggled without pressing...
...lower the projector. 6 Adjusting the screen size and focus Remote Control panel Control q Use the ZOOM button to fluctuate slightly. • A lamp is displayed. Please note that are input, auto-setting is no other input signal." For information on how to turn off the LCD display, ...; The DMDTM is being input. To view high-quality images, it according to the step 6 .) q Use the or button to select the lamp power and press the button. If this projector supports a wide range of the connected equipment that the computer's external output should be toggled without pressing...

User Manual
Page 17
... in orange. How to add password 1 Set the projector to the operating status or the standby mode. 2 Select and hold the button until the LAMP, TEMP, and FAN indicators light in turn. The password function is correct, the start-up to here have been completed. If the entered password is...password is [On] 1 Turn on . How to set to [On], image projection requires an entry of the preset password at power-on the power. 2 The lamp lights and the password entry screen appears. 3 Enter the password using numeric keys of the remote control. When the password is confirmed, the setting is...
... in orange. How to add password 1 Set the projector to the operating status or the standby mode. 2 Select and hold the button until the LAMP, TEMP, and FAN indicators light in turn. The password function is correct, the start-up to here have been completed. If the entered password is...password is [On] 1 Turn on . How to set to [On], image projection requires an entry of the preset password at power-on the power. 2 The lamp lights and the password entry screen appears. 3 Enter the password using numeric keys of the remote control. When the password is confirmed, the setting is...

User Manual
Page 21
... menu sets the code for the power to be registered. search On Off Power on Sets whether to turn on Easy setup On Off Lamp power Sets the lamp power. You can reset the registered logo, display style and background to the factory setting. (The logo set for the purpose of Easy...
... menu sets the code for the power to be registered. search On Off Power on Sets whether to turn on Easy setup On Off Lamp power Sets the lamp power. You can reset the registered logo, display style and background to the factory setting. (The logo set for the purpose of Easy...

User Manual
Page 22
... as the projector. Pressing the [RETURN] button on the projector for 10 seconds also sets the [Key Lock] to [Off]. (In the latter case, the LAMP, TEMP, and FAN indicators light in standby, the projector can be powered on . Input select Computer 1 Y/PB/PR 1 Computer 2 Y/PB/PR 2 Video S-video ... pressed or when Power on Easy setup is set to ON. : Switches on/off when [Ceiling] or [Rear ceiling] is selected for projection mode. [Lamp power] When [Lamp power] is set to [Low], the screen becomes a little darker, but the cooling fan noise gets quieter. [Fan mode] Setting [Fan mode] to ...
... as the projector. Pressing the [RETURN] button on the projector for 10 seconds also sets the [Key Lock] to [Off]. (In the latter case, the LAMP, TEMP, and FAN indicators light in standby, the projector can be powered on . Input select Computer 1 Y/PB/PR 1 Computer 2 Y/PB/PR 2 Video S-video ... pressed or when Power on Easy setup is set to ON. : Switches on/off when [Ceiling] or [Rear ceiling] is selected for projection mode. [Lamp power] When [Lamp power] is set to [Low], the screen becomes a little darker, but the cooling fan noise gets quieter. [Fan mode] Setting [Fan mode] to ...

User Manual
Page 23
...lamp use the following procedure: ■ Connecting USB device Plug the USB device. To refresh the information, dismiss the display, then display it stays securely. Using the menus (Continued) ■ Displaying Information (Status display) This displays information about getting replacement for: TLPLW9 for TDP-TW95 or TLPLW10 for TDP...press the MENU button twice to a computer via wireless communication, which supports IEEE802.11b/g wireless LAN p.46 . (Toshiba does not guarantee the operation of all USB 2.0-compliant devices.) To connect or disconnect a USB device, use time, ...
...lamp use the following procedure: ■ Connecting USB device Plug the USB device. To refresh the information, dismiss the display, then display it stays securely. Using the menus (Continued) ■ Displaying Information (Status display) This displays information about getting replacement for: TLPLW9 for TDP-TW95 or TLPLW10 for TDP...press the MENU button twice to a computer via wireless communication, which supports IEEE802.11b/g wireless LAN p.46 . (Toshiba does not guarantee the operation of all USB 2.0-compliant devices.) To connect or disconnect a USB device, use time, ...

User Manual
Page 31
... card reader or a digital camera and the like. • [Email] : Sends alarm information to the specified E-mail address when an error such as lamp blowout occurs. : Set an IP address of the SMTP server. : Enter a port number of GPL2 at http://www.fsf.org/copyleft/ gpl.html. The...of the SMTP server. : Enter within 60 characters. (Example: [email protected]) Note • The Email function does not support transmission to TOSHIBA CORPORATION (hereafter TOSHIBA) by AXE or the licensor. Contact AXE if you need it. The software is partly covered under the GNU General Public License Version 2 (...
... card reader or a digital camera and the like. • [Email] : Sends alarm information to the specified E-mail address when an error such as lamp blowout occurs. : Set an IP address of the SMTP server. : Enter a port number of GPL2 at http://www.fsf.org/copyleft/ gpl.html. The...of the SMTP server. : Enter within 60 characters. (Example: [email protected]) Note • The Email function does not support transmission to TOSHIBA CORPORATION (hereafter TOSHIBA) by AXE or the licensor. Contact AXE if you need it. The software is partly covered under the GNU General Public License Version 2 (...

User Manual
Page 40
... • Status display Displays some states of the projector. Shows the functions available with extreme care. • The lamp may vary greatly by lamp. TOSHIBA Projector Site: The browser will display the home page at increased internal pressure. Entering individual items and press the Execute ... and "Browser authentication" cannot be set . The home page address is used without notice. (The Toshiba's web site can be released from the openings for example, when the lamp has blown. button opens a popup help window. Some may be browsed only when your dealer for...
... • Status display Displays some states of the projector. Shows the functions available with extreme care. • The lamp may vary greatly by lamp. TOSHIBA Projector Site: The browser will display the home page at increased internal pressure. Entering individual items and press the Execute ... and "Browser authentication" cannot be set . The home page address is used without notice. (The Toshiba's web site can be released from the openings for example, when the lamp has blown. button opens a popup help window. Some may be browsed only when your dealer for...

User Manual
Page 41
...lamp to cool (for TDP-TW100 (sold separately). Lamp cover 1 2 80 4 Pull out the lamp. 4 1 Loosen the three lamp locking screws, pull up the handle, and remove the lamp. 2 5 Mount the new lamp. 5 2 Align the orientation, press down the new lamp until the lamp cover is recommended to use : TLPLW9 for TDP-TW95...a screwdriver or any damage to broken pieces and contact your Toshiba dealership when the lamp has to come on at least 1 hour. 3 Remove the lamp cover. 3 Loosen the two screws, raise the lamp cover with local regulations. 81 Maintenance Be careful not to a...
...lamp to cool (for TDP-TW100 (sold separately). Lamp cover 1 2 80 4 Pull out the lamp. 4 1 Loosen the three lamp locking screws, pull up the handle, and remove the lamp. 2 5 Mount the new lamp. 5 2 Align the orientation, press down the new lamp until the lamp cover is recommended to use : TLPLW9 for TDP-TW95...a screwdriver or any damage to broken pieces and contact your Toshiba dealership when the lamp has to come on at least 1 hour. 3 Remove the lamp cover. 3 Loosen the two screws, raise the lamp cover with local regulations. 81 Maintenance Be careful not to a...

User Manual
Page 42
... went out during use ⇒ Problem with a new one minute of abnormal display, the projector returns to turn on, the lifetime of the lamp has ended or the projector is malfunctioning. • Unplug the power cord and wait for internal cool down . 83 Others p.80 ❈ ... use (Red lit) ⇒ Internal overheating, or the outside temperature is not properly attached. • Unplug the power cord, and reattach the lamp cover. Lens and main unit cleaning WARNING • Request cleaning and maintenance of a ceiling-mounted unit from your dealer. ❈ The icon will...
... went out during use ⇒ Problem with a new one minute of abnormal display, the projector returns to turn on, the lifetime of the lamp has ended or the projector is malfunctioning. • Unplug the power cord and wait for internal cool down . 83 Others p.80 ❈ ... use (Red lit) ⇒ Internal overheating, or the outside temperature is not properly attached. • Unplug the power cord, and reattach the lamp cover. Lens and main unit cleaning WARNING • Request cleaning and maintenance of a ceiling-mounted unit from your dealer. ❈ The icon will...

User Manual
Page 43
... life? No audio • Is the mute function on ? p.21 • Is the projector's screen placement angle tilted too far? p.38 • Is the lamp nearing the end of USB adapters other bright lights shining at the projector's infrared remote sensor? 84 If This Happens Check USB device images aren... LAN USB adapter doesn't work • Is the remote control ON/OFF switch set properly? Is it connected to the projector? • Is the lamp cover attached properly? p.31 • Is the brightness setting minimized? p.82 • Is the lens focus adjusted optimally? p.36 • Is the...
... life? No audio • Is the mute function on ? p.21 • Is the projector's screen placement angle tilted too far? p.38 • Is the lamp nearing the end of USB adapters other bright lights shining at the projector's infrared remote sensor? 84 If This Happens Check USB device images aren... LAN USB adapter doesn't work • Is the remote control ON/OFF switch set properly? Is it connected to the projector? • Is the lamp cover attached properly? p.31 • Is the brightness setting minimized? p.82 • Is the lens focus adjusted optimally? p.36 • Is the...

User Manual
Page 44
...future. ■ Separately sold product Replacement Lamp for TDP-TW95 Replacement Lamp for TDP-TW100 Model TLPLW9 Model TLPLW10 86 ■ List of general specifications Item Specification Consumption Power TDP-TW95: 315 W TDP-TW100: 385 W Weight TDP-TW95: 3.0 kg TDP-TW100: 3.1 kg External Dimensions (including ... (1024H × 768V) Lens Zoom lens F=2.23-2.82 f=20.5-32.8 mm (electric powered) Lamp TDP-TW95: High-pressure mercury lamp (210 W) TDP-TW100: High-pressure mercury lamp (275 W) Projection screen size 30-300 inches Projection distance 1.07-11.09 m Speaker 1W ...
...future. ■ Separately sold product Replacement Lamp for TDP-TW95 Replacement Lamp for TDP-TW100 Model TLPLW9 Model TLPLW10 86 ■ List of general specifications Item Specification Consumption Power TDP-TW95: 315 W TDP-TW100: 385 W Weight TDP-TW95: 3.0 kg TDP-TW100: 3.1 kg External Dimensions (including ... (1024H × 768V) Lens Zoom lens F=2.23-2.82 f=20.5-32.8 mm (electric powered) Lamp TDP-TW95: High-pressure mercury lamp (210 W) TDP-TW100: High-pressure mercury lamp (275 W) Projection screen size 30-300 inches Projection distance 1.07-11.09 m Speaker 1W ...

