
User Manual
Page 1
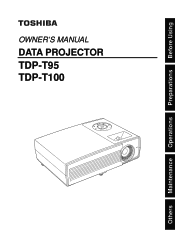
OWNER'S MANUAL DATA PROJECTOR TDP-T95 TDP-T100 Others Maintenance Operations Preparations Before Using
OWNER'S MANUAL DATA PROJECTOR TDP-T95 TDP-T100 Others Maintenance Operations Preparations Before Using
User Manual
Page 3
...outlet before cleaning. Before Using IMPORTANT SAFETY INSTRUCTIONS CAUTION: PLEASE READ AND OBSERVE ALL WARNINGS AND INSTRUCTIONS GIVEN IN THIS OWNER'S MANUAL AND THOSE MARKED ON THE UNIT. RETAIN THIS BOOKLET FOR FUTURE REFERENCE. The strong light from the type of power source ...on or pinched by the user. Heat 8. for cleaning. 4 5 As this product near water. - Unplug this product, read the owner's manual carefully, and follow all the operating and other products (including amplifiers) that produce heat. Do not use the polarized plug with three- Use ...
...outlet before cleaning. Before Using IMPORTANT SAFETY INSTRUCTIONS CAUTION: PLEASE READ AND OBSERVE ALL WARNINGS AND INSTRUCTIONS GIVEN IN THIS OWNER'S MANUAL AND THOSE MARKED ON THE UNIT. RETAIN THIS BOOKLET FOR FUTURE REFERENCE. The strong light from the type of power source ...on or pinched by the user. Heat 8. for cleaning. 4 5 As this product near water. - Unplug this product, read the owner's manual carefully, and follow all the operating and other products (including amplifiers) that produce heat. Do not use the polarized plug with three- Use ...
User Manual
Page 6
... saturated cloth, be drawn to the environmental aspects of battery disposal. • Do not mix different battery types or combine used lamps in this Instruction Manual. • Toshiba Corporation accepts no responsibility in a designated disposal area. • Attention should be sure to follow the product's precautions. Model No. Using the batteries improperly...
... saturated cloth, be drawn to the environmental aspects of battery disposal. • Do not mix different battery types or combine used lamps in this Instruction Manual. • Toshiba Corporation accepts no responsibility in a designated disposal area. • Attention should be sure to follow the product's precautions. Model No. Using the batteries improperly...
User Manual
Page 8
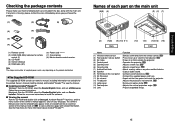
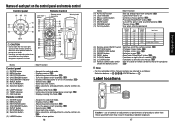
...depending on the product destination. ◆The Supplied CD-ROM The supplied CD-ROM contains an owner's manual, including information not available for remote control (2) ■ (3) CD-ROM ■ (4) Owner's Manual ■ (5) RGB cable (3m) ■ (6) Power cord (See note) ■ (7) Carrying... : Press to view a reference page with the main unit. p.27 : Projects expanded image. 15 Preparations The Owner's Manual cover and list of the Owner's manual appears. p.44 : Adjusts the vertical projection angle. p.27 : Draws in the box, along with related information. p.27...
...depending on the product destination. ◆The Supplied CD-ROM The supplied CD-ROM contains an owner's manual, including information not available for remote control (2) ■ (3) CD-ROM ■ (4) Owner's Manual ■ (5) RGB cable (3m) ■ (6) Power cord (See note) ■ (7) Carrying... : Press to view a reference page with the main unit. p.27 : Projects expanded image. 15 Preparations The Owner's Manual cover and list of the Owner's manual appears. p.44 : Adjusts the vertical projection angle. p.27 : Draws in the box, along with related information. p.27...
User Manual
Page 9
... than described here may result in hazardous radiation exposure. 17 Preparations p.34 : Adjusts keystone distortion. p.20 (25) R-CLICK button : Functions as right-click of this manual, buttons are referred to as left-click of a mouse. p.25 : Lights when internal temperature is on /off (standby). p.47 : Displays cooling fan mode. p.20 (26...
... than described here may result in hazardous radiation exposure. 17 Preparations p.34 : Adjusts keystone distortion. p.20 (25) R-CLICK button : Functions as right-click of this manual, buttons are referred to as left-click of a mouse. p.25 : Lights when internal temperature is on /off (standby). p.47 : Displays cooling fan mode. p.20 (26...
User Manual
Page 12
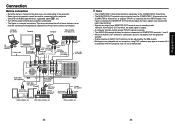
... can be exchanged.) Computer (for devices connected to this projector, but it is projected with the INPUT button. Connection Before connection • Read the owner's manual of the device you are output from MONITOR OUT terminal even in standby mode.
... can be exchanged.) Computer (for devices connected to this projector, but it is projected with the INPUT button. Connection Before connection • Read the owner's manual of the device you are output from MONITOR OUT terminal even in standby mode.
User Manual
Page 14
...When the projector is automatically set via the Display setting menu p.37 and Lamp power via the Default setting menu p.40 . • This owner's manual assumes that these are constantly lit) on " p.24 . 2 Select the language and the lamp power (When using extremely advanced technology, but there ...while projecting, the "No signal" will appear. 27 Operations It is used for language (to turn off the LCD display, see the owner's manual of RGB signals p.50 , any resolutions not supported by following the instructions in the Default setting menu p.40 (factory setting is [On]), the...
...When the projector is automatically set via the Display setting menu p.37 and Lamp power via the Default setting menu p.40 . • This owner's manual assumes that these are constantly lit) on " p.24 . 2 Select the language and the lamp power (When using extremely advanced technology, but there ...while projecting, the "No signal" will appear. 27 Operations It is used for language (to turn off the LCD display, see the owner's manual of RGB signals p.50 , any resolutions not supported by following the instructions in the Default setting menu p.40 (factory setting is [On]), the...
User Manual
Page 15
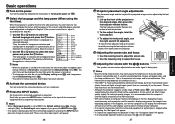
... Correcting the keystone distortion When the projector placement angle against the screen is reset to the original size. 29 Operations Press . Adjusting Keystone distortion [Manual] 1 Press the KEYSTONE button. 2 Select [V-keystone] by the buttons. You can keep pressing. 4 To reset the zoom, press the RETURN.... button, zoom ratio is finished, the Keystone menu appears again. For fine adjustment, select [V-keystone] by the button and adjust image manually by the button. 3 Use the buttons for each type of the input signal by the projector p.50 , p.51 . • If...
... Correcting the keystone distortion When the projector placement angle against the screen is reset to the original size. 29 Operations Press . Adjusting Keystone distortion [Manual] 1 Press the KEYSTONE button. 2 Select [V-keystone] by the buttons. You can keep pressing. 4 To reset the zoom, press the RETURN.... button, zoom ratio is finished, the Keystone menu appears again. For fine adjustment, select [V-keystone] by the button and adjust image manually by the button. 3 Use the buttons for each type of the input signal by the projector p.50 , p.51 . • If...

User Manual
Page 21
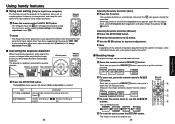
.... [Remote control] Sets a remote control code from the connected device that if [Power on the power when the ON/STANDBY button is pressed (Manual), or when the power cord is set to [Low], the screen becomes a little darker, but the cooling fan noise gets quieter. [Fan mode...21 (Standard) (Rear) (Ceiling) (Rear ceiling) No signal power off ) 30 min. Item Projection mode Description Sets projection mode in (Auto). Manual Auto Lamp power Sets the lamp power. Fan mode Sets the cooling fan speed. Low Standard Standard High Remote control When two or more projectors...
.... [Remote control] Sets a remote control code from the connected device that if [Power on the power when the ON/STANDBY button is pressed (Manual), or when the power cord is set to [Low], the screen becomes a little darker, but the cooling fan noise gets quieter. [Fan mode...21 (Standard) (Rear) (Ceiling) (Rear ceiling) No signal power off ) 30 min. Item Projection mode Description Sets projection mode in (Auto). Manual Auto Lamp power Sets the lamp power. Fan mode Sets the cooling fan speed. Low Standard Standard High Remote control When two or more projectors...
User Manual
Page 23
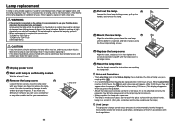
...cover. 3 Loosen the two screws, raise the lamp cover with a new one . See the lamp's manual for instructions on condition of glass. If you have been using 1 the three lamp locking screws. 6 ... very hot, and may cause burn injuries. If used lamps, and dispose of your Toshiba dealership when the lamp has to a danger of damage from falling pieces of environmentally harmful...lamp is reached, and lock in the Status display menu indicates the time of use : TLPLW9 for TDP-T95 or TLPLW10 for the lamp to remove the lamp cover. p.42 • It is consumable supplies...
...cover. 3 Loosen the two screws, raise the lamp cover with a new one . See the lamp's manual for instructions on condition of glass. If you have been using 1 the three lamp locking screws. 6 ... very hot, and may cause burn injuries. If used lamps, and dispose of your Toshiba dealership when the lamp has to a danger of damage from falling pieces of environmentally harmful...lamp is reached, and lock in the Status display menu indicates the time of use : TLPLW9 for TDP-T95 or TLPLW10 for the lamp to remove the lamp cover. p.42 • It is consumable supplies...


