Owners Manual
Page 1
OWNER'S MANUAL (Getting Started) DATA PROJECTOR TDP-T9 For more details , please refer to the owner's manual of the CD-ROM version
OWNER'S MANUAL (Getting Started) DATA PROJECTOR TDP-T9 For more details , please refer to the owner's manual of the CD-ROM version
Owners Manual
Page 4
...the marking label. Ventilation This product should never be placed in this product, read Do not look into the lens while the the owner's manual carefully, and lamp is provided or the manufacturer's instructions have been adhered to your home, consult your eyes or sight. 2. This set has... can result in the cabinet are not sure of the type of the product and to assure personal safety. Read Owner's Manual 3. reliable operation of power supply to . 4 IMPORTANT SAFETY INSTRUCTIONS CAUTION: PLEASE READ AND OBSERVE ALL WARNINGS AND INSTRUCTIONS GIVEN IN THIS OWNER...
...the marking label. Ventilation This product should never be placed in this product, read Do not look into the lens while the the owner's manual carefully, and lamp is provided or the manufacturer's instructions have been adhered to your home, consult your eyes or sight. 2. This set has... can result in the cabinet are not sure of the type of the product and to assure personal safety. Read Owner's Manual 3. reliable operation of power supply to . 4 IMPORTANT SAFETY INSTRUCTIONS CAUTION: PLEASE READ AND OBSERVE ALL WARNINGS AND INSTRUCTIONS GIVEN IN THIS OWNER...

Owners Manual
Page 10
...not leave rubber or plastic products touching the unit for future reference. 10 Model No. Serial No. Retain this unit. • Toshiba Corporation accepts no liability whatsoever for any damages arising from malfunctions arising from combination with a chemically saturated cloth, be sure to follow ...damages arising from natural disaster such as an insect spray, near a power source and the like, or in this Instruction Manual. • Toshiba Corporation accepts no liability whatsoever for any damages arising from the use of or the inability to vibration or shock. located at...
...not leave rubber or plastic products touching the unit for future reference. 10 Model No. Serial No. Retain this unit. • Toshiba Corporation accepts no liability whatsoever for any damages arising from malfunctions arising from combination with a chemically saturated cloth, be sure to follow ...damages arising from natural disaster such as an insect spray, near a power source and the like, or in this Instruction Manual. • Toshiba Corporation accepts no liability whatsoever for any damages arising from the use of or the inability to vibration or shock. located at...

Owners Manual
Page 11
... treated as follows. Notational Conventions Used in the U.S. tries. • Adobe is a registered trademark and Acrobat Reader is a registered trademark of Microsoft Corporation in This Manual • References to humans and the environment. • The lamp contains inorganic mercury. Trademarks • VGA, SVGA, XGA, SXGA, UXGA are trademarks or registered trademarks...
... treated as follows. Notational Conventions Used in the U.S. tries. • Adobe is a registered trademark and Acrobat Reader is a registered trademark of Microsoft Corporation in This Manual • References to humans and the environment. • The lamp contains inorganic mercury. Trademarks • VGA, SVGA, XGA, SXGA, UXGA are trademarks or registered trademarks...
Owners Manual
Page 15
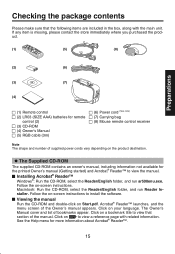
...supplied power cords vary depending on the product destination. Follow the on your language. See the Help menu for the printed Owner's manual (Getting started) and Acrobat® Reader™ to view that the following items are included in the box, along with related ... where you purchased the product. (1) (5) (8) Preparations (2) (6) (3) (7) (4) (1) Remote control (2) LR03 (SIZE AAA) batteries for remote control (2) (3) CD-ROM (4) Owner's Manual (5) RGB cable (3m) (6) Power cord (See note) (7) Carrying bag (8) Mouse remote control receiver Note The shape and number of the...
...supplied power cords vary depending on the product destination. Follow the on your language. See the Help menu for the printed Owner's manual (Getting started) and Acrobat® Reader™ to view that the following items are included in the box, along with related ... where you purchased the product. (1) (5) (8) Preparations (2) (6) (3) (7) (4) (1) Remote control (2) LR03 (SIZE AAA) batteries for remote control (2) (3) CD-ROM (4) Owner's Manual (5) RGB cable (3m) (6) Power cord (See note) (7) Carrying bag (8) Mouse remote control receiver Note The shape and number of the...

Owners Manual
Page 18
... pointer. ENTER button ⇒ Label locations Caution - p.21 Note • For the remainder of a mouse. p.20 (18) R-CLICK button : Functions as right-click of this manual, buttons are referred to as left-click of procedures other than those specified herein may result in hazardous radiation exposure. 18 button (15...
... pointer. ENTER button ⇒ Label locations Caution - p.21 Note • For the remainder of a mouse. p.20 (18) R-CLICK button : Functions as right-click of this manual, buttons are referred to as left-click of procedures other than those specified herein may result in hazardous radiation exposure. 18 button (15...

Owners Manual
Page 24
... input signals last selected among the COMPUTER terminals. • A computer monitor usually cannot accept Y/PB/PR signals correctly. Connection Before connection • Read the owner's manual of the device you are sample connections. • The MONITOR terminal outputs analog RGB signals or component video signals (Y/PB/ PR) from the projector speaker...
... input signals last selected among the COMPUTER terminals. • A computer monitor usually cannot accept Y/PB/PR signals correctly. Connection Before connection • Read the owner's manual of the device you are sample connections. • The MONITOR terminal outputs analog RGB signals or component video signals (Y/PB/ PR) from the projector speaker...

Owners Manual
Page 27
... is out of focus,adjust it switches to the input of the connected eqipment is set via the Display setting menu p.34 • This owner's manual assumes that is outputting video signals each time you press the INPUT button, it according to the step 6 .) Use the or button to select...
... is out of focus,adjust it switches to the input of the connected eqipment is set via the Display setting menu p.34 • This owner's manual assumes that is outputting video signals each time you press the INPUT button, it according to the step 6 .) Use the or button to select...

Owners Manual
Page 28
...; With some models of computer having LCD displays or the like, displaying images simultaneously on how to turn off the LCD display, see the owner's manual of your computer. • If no signal is being input from displaying properly. ton to lock the position. To adjust the horizontal angle, use...
...; With some models of computer having LCD displays or the like, displaying images simultaneously on how to turn off the LCD display, see the owner's manual of your computer. • If no signal is being input from displaying properly. ton to lock the position. To adjust the horizontal angle, use...

Owners Manual
Page 35
...) (Rear ceiling) Set whether the input with signals is displayed. Sets the lamp power. Power on the power when the ON/STANDBY button is pressed (Manual), or when the power cord is turned on On Off Fan mode Lamp power Sets the cooling fan speed.... Manual Auto Detailed description [Fan mode] Setting [Fan mode] to turn on Sets whether to [High] increases the cooling fan speed. Using the menus (Continued) ■ ...
...) (Rear ceiling) Set whether the input with signals is displayed. Sets the lamp power. Power on the power when the ON/STANDBY button is pressed (Manual), or when the power cord is turned on On Off Fan mode Lamp power Sets the cooling fan speed.... Manual Auto Detailed description [Fan mode] Setting [Fan mode] to turn on Sets whether to [High] increases the cooling fan speed. Using the menus (Continued) ■ ...

Owners Manual
Page 39
... hours,the icon and a message will appear. (After 2,000 hours, they will appear when the power is on resetting the lamp timer. See the lamp's manual for instructions on at the first time every 100 hours.) This display disappears when you press the button. • Attach the outer lamp cover...
... hours,the icon and a message will appear. (After 2,000 hours, they will appear when the power is on resetting the lamp timer. See the lamp's manual for instructions on at the first time every 100 hours.) This display disappears when you press the button. • Attach the outer lamp cover...


