
User Manual
Page 1
Others Operations Preparations Before Using OWNER'S MANUAL LED PROJECTOR TDP-FF1A
Others Operations Preparations Before Using OWNER'S MANUAL LED PROJECTOR TDP-FF1A

User Manual
Page 2
... accessories sold USA only with this device must accept any interference received, including interference that may cause undesired operation. MODEL NAME: TDP-FF1 USA only TRADE NAME: LED PROJECTOR MODEL NAME: TDP-FF1 Tested To Comply With FCC Standards FOR HOME OR OFFICE USE FCC NOTICE: This device complies with part 15 of...
... accessories sold USA only with this device must accept any interference received, including interference that may cause undesired operation. MODEL NAME: TDP-FF1 USA only TRADE NAME: LED PROJECTOR MODEL NAME: TDP-FF1 Tested To Comply With FCC Standards FOR HOME OR OFFICE USE FCC NOTICE: This device complies with part 15 of...

User Manual
Page 9
.... If you ever have to vibration or shock. Doing so may condense on the lens and the crucial internal parts. Place and Manner of the projector. • Avoid locations with a chemically saturated cloth, be sure to a malfunction or shorten service life. If this happens, move it was originally ...may cause condensation on the finish. For maximum protection, repack the set as it away from the TV or radio. • Moving the projector from a cold location to a warm location. When the unit is an extreme or sudden change in temperature. Do not leave rubber or plastic ...
.... If you ever have to vibration or shock. Doing so may condense on the lens and the crucial internal parts. Place and Manner of the projector. • Avoid locations with a chemically saturated cloth, be sure to a malfunction or shorten service life. If this happens, move it was originally ...may cause condensation on the finish. For maximum protection, repack the set as it away from the TV or radio. • Moving the projector from a cold location to a warm location. When the unit is an extreme or sudden change in temperature. Do not leave rubber or plastic ...

User Manual
Page 10
..., corruption or loss of the memory contents, etc.) arising from the use of your projector. Serial No. Model No. Retain this Instruction Manual. • Toshiba Corporation accepts no liability whatsoever for future reference. 10 EXEMPTION CLAUSES • Toshiba Corporation bears no responsibility in the case of damages arising from natural disaster such as...
..., corruption or loss of the memory contents, etc.) arising from the use of your projector. Serial No. Model No. Retain this Instruction Manual. • Toshiba Corporation accepts no liability whatsoever for future reference. 10 EXEMPTION CLAUSES • Toshiba Corporation bears no responsibility in the case of damages arising from natural disaster such as...

User Manual
Page 12
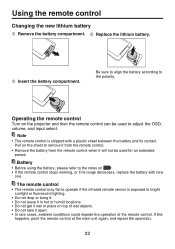
For Projector: Be sure to use the lithium CR2025 battery. Never expose the terminals of battery in contact with another metal object. Never store or use the ... fire, if you ever detect the emission of an extraordinary odor, excessive heat, discoloration, or deformation of the battery pack, remove it from the projector after confirming safety and discontinue use of it in a locked and unventilated vehicle, where excessive internal temperatures may be drawn to the environmental...
For Projector: Be sure to use the lithium CR2025 battery. Never expose the terminals of battery in contact with another metal object. Never store or use the ... fire, if you ever detect the emission of an extraordinary odor, excessive heat, discoloration, or deformation of the battery pack, remove it from the projector after confirming safety and discontinue use of it in a locked and unventilated vehicle, where excessive internal temperatures may be drawn to the environmental...

User Manual
Page 13
... the package contents 15 Main unit components 16 Control keypad and functions 18 Remote control keypad and functions 19 Using the battery pack with the projector 20 Using the remote control 22 Changing the new lithium battery 22 Operating the remote control 22 Placement 23 Connection 24 Turning the power on...
... the package contents 15 Main unit components 16 Control keypad and functions 18 Remote control keypad and functions 19 Using the battery pack with the projector 20 Using the remote control 22 Changing the new lithium battery 22 Operating the remote control 22 Placement 23 Connection 24 Turning the power on...
User Manual
Page 16
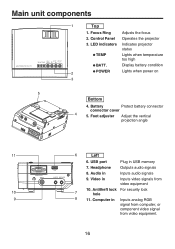
...power on 3 5 Bottom 4. USB port Plug in Inputs video signals from video equipment. 16 Antitheft lock For security lock 7 hole 9 8 11. LED indicators Indicates projector status TEMP Lights when temperature too high BATT. Headphone Outputs audio signals 8. Video in USB memory 7. Computer in Inputs audio signals 9. Focus Ring... connector cover 4 5. Audio in Inputs analog RGB signal from computer, or component video signal from video equipment 10 10. Control Panel Operates the projector 3. Main unit components 1 Top 1.
...power on 3 5 Bottom 4. USB port Plug in Inputs video signals from video equipment. 16 Antitheft lock For security lock 7 hole 9 8 11. LED indicators Indicates projector status TEMP Lights when temperature too high BATT. Headphone Outputs audio signals 8. Video in USB memory 7. Computer in Inputs audio signals 9. Focus Ring... connector cover 4 5. Audio in Inputs analog RGB signal from computer, or component video signal from video equipment 10 10. Control Panel Operates the projector 3. Main unit components 1 Top 1.

User Manual
Page 17
Ventilator Air ventilator for cooling inside 15. DC input Connect the AC adaptor 13. Speaker Ouputs sounds from sensor the remote control 17 Power switch Turn on/off the projector 14. Lens Projects expanded image 20. Service port 18. Preparations 15 16 Right 14 12. Battery pack Li-ion battery TLPBP1 17 18 19 20 Rear 17. Battery power in terminals 16. Infrared remote Sense commands from audio 13 12 in connector For service only For battery connection Front 19.
Ventilator Air ventilator for cooling inside 15. DC input Connect the AC adaptor 13. Speaker Ouputs sounds from sensor the remote control 17 Power switch Turn on/off the projector 14. Lens Projects expanded image 20. Service port 18. Preparations 15 16 Right 14 12. Battery pack Li-ion battery TLPBP1 17 18 19 20 Rear 17. Battery power in terminals 16. Infrared remote Sense commands from audio 13 12 in connector For service only For battery connection Front 19.

User Manual
Page 20
It takes 3 to 4 hours to turn on . Using the battery pack with the projector The following procedures are for the installation of the battery pack with the projector when the AC adaptor is turned on the projector. Installing the battery Turn off the power switch and disconnect the AC adaptor. Move the... the battery pack. Remove the battery pack. Close the battery connector cover. 2 1 3 Charge the battery The battery pack can be charged with the projector. It can be also charged when the...
It takes 3 to 4 hours to turn on . Using the battery pack with the projector The following procedures are for the installation of the battery pack with the projector when the AC adaptor is turned on the projector. Installing the battery Turn off the power switch and disconnect the AC adaptor. Move the... the battery pack. Remove the battery pack. Close the battery connector cover. 2 1 3 Charge the battery The battery pack can be charged with the projector. It can be also charged when the...

User Manual
Page 21
...8226; Be sure to use , otherwise the battery will work for approximate 2 hours with the battery becomes significantly short. (contact reseller for TOSHIBA Li-ion battery • Model name: TLPBP1 • Output voltage: 7.4V • Capacity: 4400mAh • Operating temperature: 5°~35°C ... instructions listed in an environment without moisture. Take the battery to the terminal. Preparations Notes • Remove the battery if the projector is not in use TLPBP1 battery pack. • Store the battery in IMPORTANT SAFETY INSTRUCTIONS when handling the battery. 21 Avoid ...
...8226; Be sure to use , otherwise the battery will work for approximate 2 hours with the battery becomes significantly short. (contact reseller for TOSHIBA Li-ion battery • Model name: TLPBP1 • Output voltage: 7.4V • Capacity: 4400mAh • Operating temperature: 5°~35°C ... instructions listed in an environment without moisture. Take the battery to the terminal. Preparations Notes • Remove the battery if the projector is not in use TLPBP1 battery pack. • Store the battery in IMPORTANT SAFETY INSTRUCTIONS when handling the battery. 21 Avoid ...
User Manual
Page 22
... operation. 22 Battery • Before using the battery, please refer to adjust the OSD, volume, and input select. Operating the remote control Turn on the projector and then the remote control can be used to the notes on . • If the remote control stops working, or if its contact. Pull on...
... operation. 22 Battery • Before using the battery, please refer to adjust the OSD, volume, and input select. Operating the remote control Turn on the projector and then the remote control can be used to the notes on . • If the remote control stops working, or if its contact. Pull on...

User Manual
Page 24
... connection • Read the owner's manual of computer cannot be used or connected to this projector, but it is not output from the projector speaker. • The output volume of HEADPHONE terminal can be adjusted with this projector. • Turn off the power of both devices before connecting. • The fi...gures are connecting to the projector. • Some types of the device you are sample connections. Notes • Moving pictures played back on computers using DVD software may appear ...
... connection • Read the owner's manual of computer cannot be used or connected to this projector, but it is not output from the projector speaker. • The output volume of HEADPHONE terminal can be adjusted with this projector. • Turn off the power of both devices before connecting. • The fi...gures are connecting to the projector. • Some types of the device you are sample connections. Notes • Moving pictures played back on computers using DVD software may appear ...

User Manual
Page 25
...Plug the power cord into the adaptor. 2 Insert the power cord connector into the lens while the projector is on. The light from the projector may cause dam- Operations 25 age to turn on the projector, then the power indicator on (I Start-up screen will shut off will disappear after a moment. ... air intake or exhaust. Doing so could cause a fire due to internal overheating. • Do not look into the DC IN socket of the projector or install the battery pack. 3 Switching the power on the LED lights green, and the start-up screen appears. 3 O POWER I ) Switch the...
...Plug the power cord into the adaptor. 2 Insert the power cord connector into the lens while the projector is on. The light from the projector may cause dam- Operations 25 age to turn on the projector, then the power indicator on (I Start-up screen will shut off will disappear after a moment. ... air intake or exhaust. Doing so could cause a fire due to internal overheating. • Do not look into the DC IN socket of the projector or install the battery pack. 3 Switching the power on the LED lights green, and the start-up screen appears. 3 O POWER I ) Switch the...

User Manual
Page 26
...in the Default setting menu. 26 See foot adjuster on the power. Adjust the volume from displaying properly. Turn on the power by the projector is input, the "Unsupport signal" will appear. • If an unavailable operation button is pressed, the icon will be black spots ... section on (I)" . 2 Activate the connected device. Notes • The DMDTM is recommended. • With some models of the projection image. If this projector (SVGA) will appear. • The factory setting for the OSD language is "English", other languages can be selected in "Turning the power on . 4...
...in the Default setting menu. 26 See foot adjuster on the power. Adjust the volume from displaying properly. Turn on the power by the projector is input, the "Unsupport signal" will appear. • If an unavailable operation button is pressed, the icon will be black spots ... section on (I)" . 2 Activate the connected device. Notes • The DMDTM is recommended. • With some models of the projection image. If this projector (SVGA) will appear. • The factory setting for the OSD language is "English", other languages can be selected in "Turning the power on . 4...

User Manual
Page 27
...distortion. For computer input, the icon will undergo keystone (trapezoidal) distortion. This projector can also select [Keystone] in the Image adjustment menu . Correcting the keystone distortion When the projector placement angle against the screen is changed while projecting the image, the picture will ...appear during processing. Press the AUTOSET button on the projector. Using handy features Using auto setting (Only for computer input) This function sets up the projector to the optimum state such as sampling phase, frequency and screen position, ...
...distortion. For computer input, the icon will undergo keystone (trapezoidal) distortion. This projector can also select [Keystone] in the Image adjustment menu . Correcting the keystone distortion When the projector placement angle against the screen is changed while projecting the image, the picture will ...appear during processing. Press the AUTOSET button on the projector. Using handy features Using auto setting (Only for computer input) This function sets up the projector to the optimum state such as sampling phase, frequency and screen position, ...

User Manual
Page 28
...; The icon will appear while freeze is in effect. • Other operation will also release the freeze. • Although an image is frozen on the projector, the pictures are running on the video or other equipment. • If you use this function on the remote control. Press the FREEZE button on...
...; The icon will appear while freeze is in effect. • Other operation will also release the freeze. • Although an image is frozen on the projector, the pictures are running on the video or other equipment. • If you use this function on the remote control. Press the FREEZE button on...

User Manual
Page 29
... To the upper level foler Folder Selected jpeg file File list display Operations 29 Notes 1. Using USB Memory Connect the USB memory to the projector and select USB input Turn off the power switch. Plug the USB memory to the USB port. Turn on the...
... To the upper level foler Folder Selected jpeg file File list display Operations 29 Notes 1. Using USB Memory Connect the USB memory to the projector and select USB input Turn off the power switch. Plug the USB memory to the USB port. Turn on the...
User Manual
Page 31
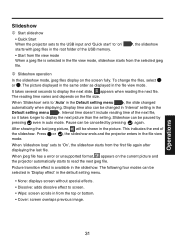
...Cover: screen overlaps previous image. When jpeg file has a error or unsupported format, appears on the current picture and the projector automatically starts to display the next slide. Operations 31 After showing the last jpeg picture, will be changed automatically when displaying. Press or... , the slideshow ends and the projector enters in the file view mode. Picture transition effect is selected in auto mode. The picture displayed in the same...
...Cover: screen overlaps previous image. When jpeg file has a error or unsupported format, appears on the current picture and the projector automatically starts to display the next slide. Operations 31 After showing the last jpeg picture, will be changed automatically when displaying. Press or... , the slideshow ends and the projector enters in the file view mode. Picture transition effect is selected in auto mode. The picture displayed in the same...

User Manual
Page 32
... Use or to select [Yes] and press , the slideshow ends and the projector switches to select [No] and press , Menu OSD shows on the screen. Change the settings through the use . (Toshiba assumes no liability for longer than 1 second during the slideshow, and the following message appears.... for losses incurred by data lost through menu system including USB slideshow setting. Use or to the file view mode. TOSHIBA does not guarantee the operation of the projector is USB 1.1 compliant, which can connect with a USB memory. USB memory • 2GB limited USB memory size...
... Use or to select [Yes] and press , the slideshow ends and the projector switches to select [No] and press , Menu OSD shows on the screen. Change the settings through the use . (Toshiba assumes no liability for longer than 1 second during the slideshow, and the following message appears.... for losses incurred by data lost through menu system including USB slideshow setting. Use or to the file view mode. TOSHIBA does not guarantee the operation of the projector is USB 1.1 compliant, which can connect with a USB memory. USB memory • 2GB limited USB memory size...

User Manual
Page 34
... Using the screen Please follow the steps below to the screen. • The surface of the screen is about 80 cm. 1 2 Notes • Place the projector and the screen on the attached screen when the distance between the...
... Using the screen Please follow the steps below to the screen. • The surface of the screen is about 80 cm. 1 2 Notes • Place the projector and the screen on the attached screen when the distance between the...


