

User Manual
Page 2
Serial No. Retain this information for future reference. Others Maintenance Operations Preparations Before Using OWNER'S MANUAL PROJECTOR TDP-ET10 TDP-ET20 (with built-in DVD player) In the spaces provided below, record the Model and Serial Number located at the bottom of your projector. Model No.
Serial No. Retain this information for future reference. Others Maintenance Operations Preparations Before Using OWNER'S MANUAL PROJECTOR TDP-ET10 TDP-ET20 (with built-in DVD player) In the spaces provided below, record the Model and Serial Number located at the bottom of your projector. Model No.

User Manual
Page 3
..., please contact your local authorities or the Electronic Industries Alliance: www.eiae.org. MODEL NAME: TDP-ET10, TDP-ET20 USA only TRADE NAME: PROJECTOR Tested to Comply With FCC Standards FOR HOME OR OFFICE USE MODEL NAME: TDP-ET10, TDP-ET20 FCC NOTICE: This device complies with part 15 of the FCC Rules. SAFETY PRECAUTIONS...
..., please contact your local authorities or the Electronic Industries Alliance: www.eiae.org. MODEL NAME: TDP-ET10, TDP-ET20 USA only TRADE NAME: PROJECTOR Tested to Comply With FCC Standards FOR HOME OR OFFICE USE MODEL NAME: TDP-ET10, TDP-ET20 FCC NOTICE: This device complies with part 15 of the FCC Rules. SAFETY PRECAUTIONS...

User Manual
Page 8
... the operating instructions. This product incorporates glass components, including a lens and a lamp. The broken pieces of the lamp rupturing, thoroughly clean the area around the projector and discard any way. Quick stops, excessive force, and uneven surfaces may fall, causing serious injury to a child or adult, and serious damage to avoid...
... the operating instructions. This product incorporates glass components, including a lens and a lamp. The broken pieces of the lamp rupturing, thoroughly clean the area around the projector and discard any way. Quick stops, excessive force, and uneven surfaces may fall, causing serious injury to a child or adult, and serious damage to avoid...

User Manual
Page 10
...15A IMPORTANT PRECAUTIONS Save Original Packing Materials The original shipping carton and packing materials will come in temperature. For maximum protection, repack the set of projector is an extreme or sudden change in temperature, moisture may lead to such a change in handy if you ever have to BSI362. Moisture ... ship or vehicle that are subject to a warm location. When the unit is reduced so use it with care. • Do not use the projector while holding it from possible damage, do not use the product vertically in any upright position or slantwise in your...
...15A IMPORTANT PRECAUTIONS Save Original Packing Materials The original shipping carton and packing materials will come in temperature. For maximum protection, repack the set of projector is an extreme or sudden change in temperature, moisture may lead to such a change in handy if you ever have to BSI362. Moisture ... ship or vehicle that are subject to a warm location. When the unit is reduced so use it with care. • Do not use the projector while holding it from possible damage, do not use the product vertically in any upright position or slantwise in your...

User Manual
Page 12
... • The illustrations in This Manual • References to burns or injury. Surround • 5.1ch audio output is driven by surrounding external speakers. • This projector with new ones. • If the remote control does not operate correctly, or if the operating range becomes re- Notational Conventions Used in this document...
... • The illustrations in This Manual • References to burns or injury. Surround • 5.1ch audio output is driven by surrounding external speakers. • This projector with new ones. • If the remote control does not operate correctly, or if the operating range becomes re- Notational Conventions Used in this document...
User Manual
Page 18
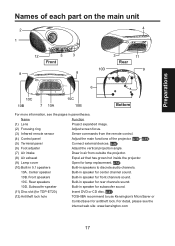
Subwoofer speaker Built-in speaker for TDP-ET20) Insert DVD or CD disc. p.31 (12) Antitheft lock hole TOSHIBA recommend to discrete audio channels. 10A. For detail, please see the pages in speakers to use Kensington's MicroSaver or ComboSaver... (1) Lens Project expanded image. (2) Focusing ring Adjust screen focus. (3) Infrared remote sensor Sense commands from outside the projector. (8) Air exhaust Expel air that has grown hot inside the projector. (9) Lamp cover Open for front channels sound. 10C. p.50 (10) Built-in 5.1 speakers Built-in parentheses....
Subwoofer speaker Built-in speaker for TDP-ET20) Insert DVD or CD disc. p.31 (12) Antitheft lock hole TOSHIBA recommend to discrete audio channels. 10A. For detail, please see the pages in speakers to use Kensington's MicroSaver or ComboSaver... (1) Lens Project expanded image. (2) Focusing ring Adjust screen focus. (3) Infrared remote sensor Sense commands from outside the projector. (8) Air exhaust Expel air that has grown hot inside the projector. (9) Lamp cover Open for front channels sound. 10C. p.50 (10) Built-in 5.1 speakers Built-in parentheses....

User Manual
Page 19
Control panel and remote control parts for TDP-ET10 SCRESEIZNE PMICOTOUERE 8 7 6 5 4 3 [TDP-ET10 control panel] 2 1 [TDP-ET10 Remote] For more information, see the pages in parentheses. (1) ON/STANDBY: Switch projector between ON and STANDBY. (2) MENU (INPUT) p.24 p.41 : 1 Access the main programming menu or select input source. 9 (3) ENTER : Activate highlighted item in the on screen...
Control panel and remote control parts for TDP-ET10 SCRESEIZNE PMICOTOUERE 8 7 6 5 4 3 [TDP-ET10 control panel] 2 1 [TDP-ET10 Remote] For more information, see the pages in parentheses. (1) ON/STANDBY: Switch projector between ON and STANDBY. (2) MENU (INPUT) p.24 p.41 : 1 Access the main programming menu or select input source. 9 (3) ENTER : Activate highlighted item in the on screen...

User Manual
Page 20
... to display Title/Chapter access menu. Control panel and remote control parts for TDP-ET20 Preparations 8 7 6 4 5 21 3 [TDP-ET20 control panel] [TDP-ET20 Remote] 9 1 16 10 17 3 18 11 12 13 14 15 19 20 21 (1) ON/STANDBY: Switch the projector between ON and STANDBY. (2) MENU (INPUT) p.24 p.41 : Access the main programming menu...
... to display Title/Chapter access menu. Control panel and remote control parts for TDP-ET20 Preparations 8 7 6 4 5 21 3 [TDP-ET20 control panel] [TDP-ET20 Remote] 9 1 16 10 17 3 18 11 12 13 14 15 19 20 21 (1) ON/STANDBY: Switch the projector between ON and STANDBY. (2) MENU (INPUT) p.24 p.41 : Access the main programming menu...

User Manual
Page 21
... 11 1 3 4 5 6 12 2 7 8 For more information, see the pages in AC Power ■ Note Although this to external audio system with audio output. : When operating the projector via a computer, connect this owner's manual abbreviates component video signals as YPBPR, the product also supports signals from video equipment marked "YCBCR." 20 p.25 : Input...
... 11 1 3 4 5 6 12 2 7 8 For more information, see the pages in AC Power ■ Note Although this to external audio system with audio output. : When operating the projector via a computer, connect this owner's manual abbreviates component video signals as YPBPR, the product also supports signals from video equipment marked "YCBCR." 20 p.25 : Input...

User Manual
Page 22
... operation of the batteries properly. Two batteries (R03, size AAA) are used. (3) Put back the battery cover. • Operating the projector from the front (2) Insert the dry-cell batteries. Be sure to align the plus and minus ends of the remote control. If this ...-cell batteries into the remote control (1) Remove the battery cover. ■ Point the remote control toward the projector's infrared remote sensor and press a button. • Operating the projector from the rear Preparations Dry-cell batteries • Before using for extended periods. • If the remote control...
... operation of the batteries properly. Two batteries (R03, size AAA) are used. (3) Put back the battery cover. • Operating the projector from the front (2) Insert the dry-cell batteries. Be sure to align the plus and minus ends of the remote control. If this ...-cell batteries into the remote control (1) Remove the battery cover. ■ Point the remote control toward the projector's infrared remote sensor and press a button. • Operating the projector from the rear Preparations Dry-cell batteries • Before using for extended periods. • If the remote control...

User Manual
Page 23
... projection (Rear) Ceiling-mounted rear projection (Rear Ceiling) TDP-ET10 only WARNING • Always obey the instructions listed in a serious injury. • If the projector is "floormounted front projection" although you wish to mount the projector on a ceiling requires special ceiling brackets (sold separately) ...use of anomaly. Set the Projection mode in case of the projector know that fact. ■ Note In order to avoid image distortion, place the projector at flat and neat. 22 Mounting the projector on the ceiling, be sure to ask your needs. Improper mounting...
... projection (Rear) Ceiling-mounted rear projection (Rear Ceiling) TDP-ET10 only WARNING • Always obey the instructions listed in a serious injury. • If the projector is "floormounted front projection" although you wish to mount the projector on a ceiling requires special ceiling brackets (sold separately) ...use of anomaly. Set the Projection mode in case of the projector know that fact. ■ Note In order to avoid image distortion, place the projector at flat and neat. 22 Mounting the projector on the ceiling, be sure to ask your needs. Improper mounting...

User Manual
Page 24
...) 40 (=101.6 cm) 50 (=127.0 cm) 60 (=152.4 cm) 80 (=203.2 cm) 100 (=254.0 cm) 120 (=304.8 cm) projection distance a (cm) [inches] Edge of the projector to the center of 40 cm to 177 cm. Projection Distance and Size Use the figures, tables, and formulas below to determine the projection...
...) 40 (=101.6 cm) 50 (=127.0 cm) 60 (=152.4 cm) 80 (=203.2 cm) 100 (=254.0 cm) 120 (=304.8 cm) projection distance a (cm) [inches] Edge of the projector to the center of 40 cm to 177 cm. Projection Distance and Size Use the figures, tables, and formulas below to determine the projection...

User Manual
Page 25
... Input (Coaxial) Terminal Amplifier 24 This does not mean that all of these devices can or must be used or connected to this projector. • Turn off the power of both devices before connecting. • The figure below is a sample connection. Connection Before connection • Some types of...
... Input (Coaxial) Terminal Amplifier 24 This does not mean that all of these devices can or must be used or connected to this projector. • Turn off the power of both devices before connecting. • The figure below is a sample connection. Connection Before connection • Some types of...

User Manual
Page 27
...; Do not look into a wall or other objects near the air exhaust. The projector can be activated by pressing the Power key on the control panel for seconds then ...will light up and Start-up screen will start to flash, indicating standby mode. 2 Activate the projector. When the projector is on. Doing so could deform or break the object. • Turn off AC switch before plugging... Connecting the power cord 1 Insert the power cord connector into the AC IN socket of the projector. 2 Insert the power cord plug into the lens while the lamp is activated, the red LED at the ...
...; Do not look into a wall or other objects near the air exhaust. The projector can be activated by pressing the Power key on the control panel for seconds then ...will light up and Start-up screen will start to flash, indicating standby mode. 2 Activate the projector. When the projector is on. Doing so could deform or break the object. • Turn off AC switch before plugging... Connecting the power cord 1 Insert the power cord connector into the AC IN socket of the projector. 2 Insert the power cord plug into the lens while the lamp is activated, the red LED at the ...

User Manual
Page 28
.... ■ PRECAUTION • If the power cord is unplugged before plugging it may fail to save power and turning the power off 1 Put the Projector into standby mode. If the lamp overheats, it back in standby mode. When cooling lamp After cooling complete A Red: blink Blue: on . We ... indicator (Blue LED) is complete, give the lamp time (about 60 seconds. Operations 27 The power off indication message will not be using the projector for about 5 minutes) to be displayed for the second press of power in . In this state the power cannot be valid. Pressing the ON...
.... ■ PRECAUTION • If the power cord is unplugged before plugging it may fail to save power and turning the power off 1 Put the Projector into standby mode. If the lamp overheats, it back in standby mode. When cooling lamp After cooling complete A Red: blink Blue: on . We ... indicator (Blue LED) is complete, give the lamp time (about 60 seconds. Operations 27 The power off indication message will not be using the projector for about 5 minutes) to be displayed for the second press of power in . In this state the power cannot be valid. Pressing the ON...

User Manual
Page 29
This projector can be changed automatically when video input source is memorized for each video input. Input source can display the on screen language in English, French, ... select video input and press . (4) Press [UP] [DOWN] or key to select desired audio input source. Turn on the remote control as well. or TDP-ET10 or TDP-ET20 28 Select input source by following the instruction in "Turning the power on the power. Audio input source also can be changed using...
This projector can be changed automatically when video input source is memorized for each video input. Input source can display the on screen language in English, French, ... select video input and press . (4) Press [UP] [DOWN] or key to select desired audio input source. Turn on the remote control as well. or TDP-ET10 or TDP-ET20 28 Select input source by following the instruction in "Turning the power on the power. Audio input source also can be changed using...

User Manual
Page 30
...changed . (2) To adjust the projection size, it in full screen format in horizontal direction to accommodate 16:9 full-screen display. Use this projector. the central part is best for 4:3-signal video images. (3) Zoom Enlarges an image with letterbox format to display it is needed to ...adjust the focus. 7 Select a screen size (aspect ratio) The aspect ratio is fixed to Full without regard to image height. Operations 5 Projector placement angle adjustments (1) There are 4:3. This mode is best for squeeze-signal video images. (2) 4:3: Scales an image so that it is the default...
...changed . (2) To adjust the projection size, it in full screen format in horizontal direction to accommodate 16:9 full-screen display. Use this projector. the central part is best for 4:3-signal video images. (3) Zoom Enlarges an image with letterbox format to display it is needed to ...adjust the focus. 7 Select a screen size (aspect ratio) The aspect ratio is fixed to Full without regard to image height. Operations 5 Projector placement angle adjustments (1) There are 4:3. This mode is best for squeeze-signal video images. (2) 4:3: Scales an image so that it is the default...

User Manual
Page 31
...-quality images, it is recommended that the computer's external output should be expanded or shrunk, which will affect image quality slightly. If this projector (WVGA) will be set to turn off the LCD display, see the owner's manual of your computer. • If a signal not supported...to WVGA (854 × 480) resolution. • With some models of computer having LCD displays or the like, displaying images simultaneously on the projector and the monitor's display may prevent the images from the connected device, the "No signal" will appear. 30 Basic operations (Continued) 8 Adjusting ...
...-quality images, it is recommended that the computer's external output should be expanded or shrunk, which will affect image quality slightly. If this projector (WVGA) will be set to turn off the LCD display, see the owner's manual of your computer. • If a signal not supported...to WVGA (854 × 480) resolution. • With some models of computer having LCD displays or the like, displaying images simultaneously on the projector and the monitor's display may prevent the images from the connected device, the "No signal" will appear. 30 Basic operations (Continued) 8 Adjusting ...

User Manual
Page 32
... is entered, will appear. (2) In DVD setup menu, there are 2 pages. Operations 31 TDP-ET20 DVD playback About The icons on the remote control when DVD input is incorrect. If you forget the password, you purchase this projector, it is LANGUAGE SETUP page. Press key to select page and press key to...
... is entered, will appear. (2) In DVD setup menu, there are 2 pages. Operations 31 TDP-ET20 DVD playback About The icons on the remote control when DVD input is incorrect. If you forget the password, you purchase this projector, it is LANGUAGE SETUP page. Press key to select page and press key to...

User Manual
Page 33
... registration code will not set to default if restored. Please get the code of your DVD video discs. TDP-ET20 DVD Playback (Continued) PARENTAL DVD discs equipped with your DVD video player as projector setting will be shown. ■ Notes This registration code is for DIVX® Video-On-Demand only, do...
... registration code will not set to default if restored. Please get the code of your DVD video discs. TDP-ET20 DVD Playback (Continued) PARENTAL DVD discs equipped with your DVD video player as projector setting will be shown. ■ Notes This registration code is for DIVX® Video-On-Demand only, do...


