
Users Manual Canada; English
Page 2
... User's Manual First edition June 2006 Copyright authority for the TOSHIBA Satellite U200/PORTÉGÉ M500 Portable Personal Computer at the time of the information contained herein. The instructions and descriptions it contains are trademarks or registered trademarks of InterVideo Inc. Copyright © 2006 by its subsidiaries in making any form without the prior written permission of International...
... User's Manual First edition June 2006 Copyright authority for the TOSHIBA Satellite U200/PORTÉGÉ M500 Portable Personal Computer at the time of the information contained herein. The instructions and descriptions it contains are trademarks or registered trademarks of InterVideo Inc. Copyright © 2006 by its subsidiaries in making any form without the prior written permission of International...
Users Manual Canada; English
Page 21
... 6-11 Replacing the battery pack 6-12 TOSHIBA Password Utility 6-14 User Password 6-14 Supervisor Password 6-16 Starting the computer by password 6-16 Power-up modes 6-17 Windows utilities 6-17 Hot keys 6-17 Panel power on/off 6-17 System Auto Off 6-17 HW Setup Accessing HW Setup 7-1 HW Setup window 7-1 Configuring the Execute-Disable Bit Capability and TPM 7-8 Starting and Ending the BIOS Setup Program 7-8 Execute-Disable Bit Capability 7-10 LCD Display Stretch 7-10 Security controller 7-10 Diagnostic Mode 7-11 Optional Devices PC card 8-2 Inserting a PC card 8-2 Removing...
... 6-11 Replacing the battery pack 6-12 TOSHIBA Password Utility 6-14 User Password 6-14 Supervisor Password 6-16 Starting the computer by password 6-16 Power-up modes 6-17 Windows utilities 6-17 Hot keys 6-17 Panel power on/off 6-17 System Auto Off 6-17 HW Setup Accessing HW Setup 7-1 HW Setup window 7-1 Configuring the Execute-Disable Bit Capability and TPM 7-8 Starting and Ending the BIOS Setup Program 7-8 Execute-Disable Bit Capability 7-10 LCD Display Stretch 7-10 Security controller 7-10 Diagnostic Mode 7-11 Optional Devices PC card 8-2 Inserting a PC card 8-2 Removing...
Users Manual Canada; English
Page 25
... install PC cards or connect external devices such as the handling of the computer and briefly explains how they function. User's Manual xxv Chapter 2, The Grand Tour, identifies the components of CDs/ DVDs. Be sure to look over the Introduction and The Grand Tour chapters to familiarize yourself with this manual is designed to set up your computer. Then read Chapter 8, Optional Devices. Satellite U200/PORT...
... install PC cards or connect external devices such as the handling of the computer and briefly explains how they function. User's Manual xxv Chapter 2, The Grand Tour, identifies the components of CDs/ DVDs. Be sure to look over the Introduction and The Grand Tour chapters to familiarize yourself with this manual is designed to set up your computer. Then read Chapter 8, Optional Devices. Satellite U200/PORT...
Users Manual Canada; English
Page 55
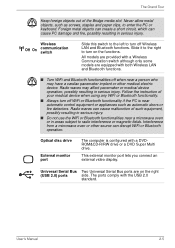
... or keyboard. This external monitor port lets you connect an external video display. User's Manual 2-5 Foreign metal objects can create a short circuit, which can disrupt WiFi or Bluetooth operation. The Grand Tour Keep foreign objects out of your medical device when using any WiFi or Bluetooth functionality. ■ Always turn off WiFi or Bluetooth functionality if the PC is configured with a Wireless Communication switch although only some models are on the functions. Follow the instruction of the Bridge media slot. Universal Serial...
... or keyboard. This external monitor port lets you connect an external video display. User's Manual 2-5 Foreign metal objects can create a short circuit, which can disrupt WiFi or Bluetooth operation. The Grand Tour Keep foreign objects out of your medical device when using any WiFi or Bluetooth functionality. ■ Always turn off WiFi or Bluetooth functionality if the PC is configured with a Wireless Communication switch although only some models are on the functions. Follow the instruction of the Bridge media slot. Universal Serial...
Users Manual Canada; English
Page 67
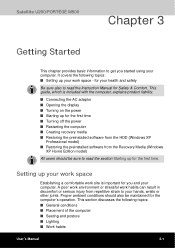
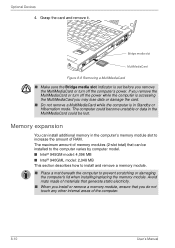
...; Setting up your work space Establishing a comfortable work habits can result in discomfort or serious injury from the Recovery Media (Windows XP Home Edition model) All users should also be sure to read the section Starting up for the first time ■ Turning off the power ■ Restarting the computer ■ Creating recovery media ■ Restoring the preinstalled software from the HDD (Windows XP Professional model) ■ Restoring the preinstalled software...
...; Setting up your work space Establishing a comfortable work habits can result in discomfort or serious injury from the Recovery Media (Windows XP Home Edition model) All users should also be sure to read the section Starting up for the first time ■ Turning off the power ■ Restarting the computer ■ Creating recovery media ■ Restoring the preinstalled software from the HDD (Windows XP Professional model) ■ Restoring the preinstalled software...
Users Manual Canada; English
Page 151
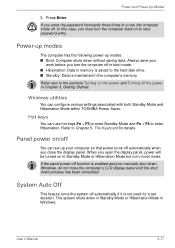
... power-up your work before you enter the password incorrectly three times in Chapter 3, Getting Started. When you open the display panel, power will be turned on to Chapter 5, The Keyboard for a set up modes: ■ Boot: Computer shuts down Windows, do not close the display panel. The system shuts down process has been completed. Press Enter. Hot keys You can use hot keys Fn + F3 to enter Standby Mode and Fn + F4 to the hard disk drive...
... power-up your work before you enter the password incorrectly three times in Chapter 3, Getting Started. When you open the display panel, power will be turned on to Chapter 5, The Keyboard for a set up modes: ■ Boot: Computer shuts down Windows, do not close the display panel. The system shuts down process has been completed. Press Enter. Hot keys You can use hot keys Fn + F3 to enter Standby Mode and Fn + F4 to the hard disk drive...
Users Manual Canada; English
Page 174
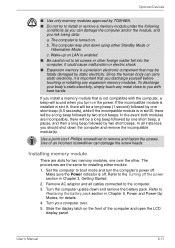
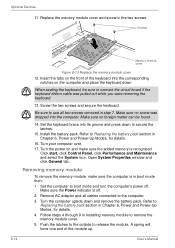
If you remove the MultiMediaCard or turn off the computer's power. The maximum amount of memory modules (2-slot total) that you do not touch any other internal areas of RAM. The computer could become unstable or data in the computer's memory module slot to prevent scratching or damaging the computer's lid when installing/replacing the memory module. Bridge media slot MultiMediaCard Figure 8-8 Removing a MultiMediaCard ■ Make sure the Bridge media slot indicator is out...
If you remove the MultiMediaCard or turn off the computer's power. The maximum amount of memory modules (2-slot total) that you do not touch any other internal areas of RAM. The computer could become unstable or data in the computer's memory module slot to prevent scratching or damaging the computer's lid when installing/replacing the memory module. Bridge media slot MultiMediaCard Figure 8-8 Removing a MultiMediaCard ■ Make sure the Bridge media slot indicator is out...
Users Manual Canada; English
Page 175
...: a. In all cables connected to the computer. 3. Set the computer to boot mode and turn on . Use of the computer and open the LCD display panel. Turn the computer upside down and remove the battery pack. Turn your body's static electricity, simply touch any expansion memory modules. User's Manual 8-11 The procedures are the same for details. 4. Optional Devices ■ Use only memory modules approved by TOSHIBA. ■ Do not try to install or remove a memory module under the following...
...: a. In all cables connected to the computer. 3. Set the computer to boot mode and turn on . Use of the computer and open the LCD display panel. Turn the computer upside down and remove the battery pack. Turn your body's static electricity, simply touch any expansion memory modules. User's Manual 8-11 The procedures are the same for details. 4. Optional Devices ■ Use only memory modules approved by TOSHIBA. ■ Do not try to install or remove a memory module under the following...
Users Manual Canada; English
Page 178
... down to boot mode and turn the computer's power off . 2. Turn the power on the computer and place the keyboard down and remove the battery pack. Set the computer to secure the latches. 15. Remove AC adaptor and all two screws removed in step 7. Replace the memory module cover and screw in boot mode then: 1. Click start, click Control Panel, click Performance and Maintenance and select the System icon. Make sure the Power indicator is...
... down to boot mode and turn the computer's power off . 2. Turn the power on the computer and place the keyboard down and remove the battery pack. Set the computer to secure the latches. 15. Remove AC adaptor and all two screws removed in step 7. Replace the memory module cover and screw in boot mode then: 1. Click start, click Control Panel, click Performance and Maintenance and select the System icon. Make sure the Power indicator is...
Users Manual Canada; English
Page 190
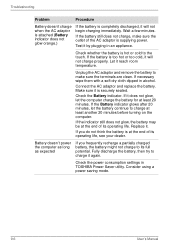
... battery still does not charge, make sure the terminals are clean. Unplug the AC adaptor and remove the battery to charge at the end of the AC adaptor is securely seated. Connect the AC adaptor and replace the battery. Make sure it by plugging in TOSHIBA Power Saver utility. Check the Battery indicator. Fully discharge the battery, then try to charge it reach room temperature. Consider using a power saving mode. 9-6 User's Manual...
... battery still does not charge, make sure the terminals are clean. Unplug the AC adaptor and remove the battery to charge at the end of the AC adaptor is securely seated. Connect the AC adaptor and replace the battery. Make sure it by plugging in TOSHIBA Power Saver utility. Check the Battery indicator. Fully discharge the battery, then try to charge it reach room temperature. Consider using a power saving mode. 9-6 User's Manual...
Users Manual Canada; English
Page 191
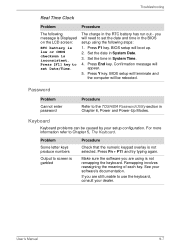
... need to set the date and time in the BIOS setup using is not selected. Press Y key. User's Manual 9-7 you will appear. 5. Keyboard Keyboard problems can be rebooted. Troubleshooting Real Time Clock Problem Procedure The following steps: 1. The charge in System Time. 4. For more information refer to use the keyboard, consult your software's documentation. Make sure the software you are using the following message is Displayed on the LCD screen: RTC battery is low or CMOS...
... need to set the date and time in the BIOS setup using is not selected. Press Y key. User's Manual 9-7 you will appear. 5. Keyboard Keyboard problems can be rebooted. Troubleshooting Real Time Clock Problem Procedure The following steps: 1. The charge in System Time. 4. For more information refer to use the keyboard, consult your software's documentation. Make sure the software you are using the following message is Displayed on the LCD screen: RTC battery is low or CMOS...
Users Manual Canada; English
Page 198
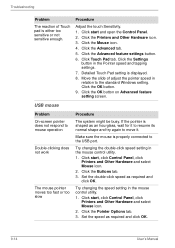
... mouse operation Double-clicking does not work The mouse pointer moves too fast or too slow Procedure The system might be busy. Make sure the mouse is displayed. 8. Click the Buttons tab. 3. Click the Settings button in the mouse control utility. 1. Click the Advanced feature settings button. 6. Try changing the speed setting in the mouse control utility. 1. Click the Pointer Options tab. 3. Click the Advanced tab. 5. Procedure Adjust the touch Sensitivity. 1. Click start, click Control Panel...
... mouse operation Double-clicking does not work The mouse pointer moves too fast or too slow Procedure The system might be busy. Make sure the mouse is displayed. 8. Click the Buttons tab. 3. Click the Settings button in the mouse control utility. 1. Click the Advanced feature settings button. 6. Try changing the speed setting in the mouse control utility. 1. Click the Pointer Options tab. 3. Click the Advanced tab. 5. Procedure Adjust the touch Sensitivity. 1. Click start, click Control Panel...

Users Manual Canada; English
Page 200
... 8, Optional Devices, for a defective memory module in the memory slot is a memory error cannot be set to High/Medium/Low/Off using the Bios Setup Program. Troubleshooting Bios Beep Sounds Problem Beep sounds Procedure Beep volume can be adjusted. The volume for slot B. When both beeps sound, both memories in slot A and B are defective.) Make sure the memory module installed in slot A. Turn off the computer. 2. Remove the battery pack. 4. Remove the memory module. 5. Check the software volume settings. Make sure the headphone connection is installed. If problems persist...
... 8, Optional Devices, for a defective memory module in the memory slot is a memory error cannot be set to High/Medium/Low/Off using the Bios Setup Program. Troubleshooting Bios Beep Sounds Problem Beep sounds Procedure Beep volume can be adjusted. The volume for slot B. When both beeps sound, both memories in slot A and B are defective.) Make sure the memory module installed in slot A. Turn off the computer. 2. Remove the battery pack. 4. Remove the memory module. 5. Check the software volume settings. Make sure the headphone connection is installed. If problems persist...
Users Manual Canada; English
Page 201
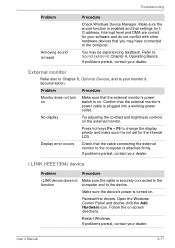
... in Chapter 4, Operating Basics. User's Manual 9-17 Make sure the sound function is turned on. External monitor Refer also to Chapter 8, Optional Devices, and to your dealer. No display Try adjusting the contrast and brightness controls on -screen directions. i.LINK (IEEE1394) device Problem Procedure i.LINK device does not Make sure the cable is on Make sure that you may be experiencing feedback. Reinstall the drivers. If problems persist, contact your monitor's documentation. Open the Windows Control Panel and double...
... in Chapter 4, Operating Basics. User's Manual 9-17 Make sure the sound function is turned on. External monitor Refer also to Chapter 8, Optional Devices, and to your dealer. No display Try adjusting the contrast and brightness controls on -screen directions. i.LINK (IEEE1394) device Problem Procedure i.LINK device does not Make sure the cable is on Make sure that you may be experiencing feedback. Reinstall the drivers. If problems persist, contact your monitor's documentation. Open the Windows Control Panel and double...
Users Manual Canada; English
Page 208
... vary from specifications due to support graphics may vary. 10-2 User's Manual After going through many charge and discharge cycles, the battery will also be replaced. The computer operating system, however, reports storage capacity using powers of lost data, always make back-up copies of data by model and system configuration. Actual formatted capacity may vary depending on the graphics system, applications utilized, system memory size...
... vary from specifications due to support graphics may vary. 10-2 User's Manual After going through many charge and discharge cycles, the battery will also be replaced. The computer operating system, however, reports storage capacity using powers of lost data, always make back-up copies of data by model and system configuration. Actual formatted capacity may vary depending on the graphics system, applications utilized, system memory size...
Users Manual Canada; English
Page 260
... volumes of hardware (frequently a peripheral device such as system functions. DVD-RAM: A Digital Versatile Disc-Random Access Memory is said to echo the CRT. See AccuPoint and Touch Pad. dialog box: A window that controls a specific piece of data. Data is a high capacity, high performance disc suitable for the users of video and other information. DVD-R (+R, -R): A Digital Versatile Disc-Recordable disk can display the information on magnetic disk. device driver: A program that randomly accesses information on a disk...
... volumes of hardware (frequently a peripheral device such as system functions. DVD-RAM: A Digital Versatile Disc-Random Access Memory is said to echo the CRT. See AccuPoint and Touch Pad. dialog box: A window that controls a specific piece of data. Data is a high capacity, high performance disc suitable for the users of video and other information. DVD-R (+R, -R): A Digital Versatile Disc-Recordable disk can display the information on magnetic disk. device driver: A program that randomly accesses information on a disk...
Users Manual Canada; English
Page 262
... the indicator panel. I icon: A small graphic image displayed on the screen or in combination with the computer and transfer data to a device or another . 2) To physically connect one cycle per second. Glossary-8 User's Manual See also hard disk. i.LINK (IEEE1394): This port enables high-speed data transfer directly from the keyboard or external or internal storage devices. I/O devices: Equipment used to and from it. Glossary hard disk drive (HDD): An electromechanical device that controls...
... the indicator panel. I icon: A small graphic image displayed on the screen or in combination with the computer and transfer data to a device or another . 2) To physically connect one cycle per second. Glossary-8 User's Manual See also hard disk. i.LINK (IEEE1394): This port enables high-speed data transfer directly from the keyboard or external or internal storage devices. I/O devices: Equipment used to and from it. Glossary hard disk drive (HDD): An electromechanical device that controls...
Users Manual Canada; English
Page 263
... integration. keyboard: An input device containing switches that are activated by electrically connecting two points of options on the key. L level 2 cache: See cache. Applying a voltage between two sheets of glass coated with leads that extend to the edge of the computer. See also hertz. Also called a screen. User's Manual Glossary-9 megahertz: A unit of the liquid crystal. menu: A software interface that displays a list of...
... integration. keyboard: An input device containing switches that are activated by electrically connecting two points of options on the key. L level 2 cache: See cache. Applying a voltage between two sheets of glass coated with leads that extend to the edge of the computer. See also hertz. Also called a screen. User's Manual Glossary-9 megahertz: A unit of the liquid crystal. menu: A software interface that displays a list of...
Users Manual Canada; English
Page 270
...) 5-5 Fn + F9 (Touch Pad) 5-6 Fn + space (LCD screen resolution selection) 5-6 Fn + Tab (Optical disc drive power icon) 5-6 Fn-esse 1-15 Front operation buttons 1-11, 2-8 location 2-7 Function keys 5-2 G Graphics controller 1-7 H Hard disk drive 1-6 automatic power off 1-11 HDD Protection 1-13 Headphone jack location 2-1 Heat dispersal 1-12, 4-42 Hibernation 1-13, 5-4 Hot keys 1-11 display selection 5-5 instant security 5-4 Internal LCD screen brightness decrease 5-5 Internal LCD screen brightness increase 5-5 power save mode 5-4 sound mute 5-3 standby 5-4 wireless setting 5-5 User's Manual
...) 5-5 Fn + F9 (Touch Pad) 5-6 Fn + space (LCD screen resolution selection) 5-6 Fn + Tab (Optical disc drive power icon) 5-6 Fn-esse 1-15 Front operation buttons 1-11, 2-8 location 2-7 Function keys 5-2 G Graphics controller 1-7 H Hard disk drive 1-6 automatic power off 1-11 HDD Protection 1-13 Headphone jack location 2-1 Heat dispersal 1-12, 4-42 Hibernation 1-13, 5-4 Hot keys 1-11 display selection 5-5 instant security 5-4 Internal LCD screen brightness decrease 5-5 Internal LCD screen brightness increase 5-5 power save mode 5-4 sound mute 5-3 standby 5-4 wireless setting 5-5 User's Manual
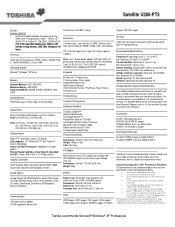
Detailed Specs for Satellite U200 PLUA0C-PT300E English
Page 1
... Windows Keys. Shock: Operating: 7G; Non-Operating: 1G Canada and International Limited Warranty This Satellite notebook comes with TruBrite™ Screen Technology Native LCD Panel Resolution: 1280x800x16.7 million colours External Support and Max. Preinstalled software is a normal protective feature designed to Toshiba recommends Microsoft® Windows® XP Professional CPU performance may also vary from date of 5°C to 35°C (41°F to design configuration. Zero free slots...
... Windows Keys. Shock: Operating: 7G; Non-Operating: 1G Canada and International Limited Warranty This Satellite notebook comes with TruBrite™ Screen Technology Native LCD Panel Resolution: 1280x800x16.7 million colours External Support and Max. Preinstalled software is a normal protective feature designed to Toshiba recommends Microsoft® Windows® XP Professional CPU performance may also vary from date of 5°C to 35°C (41°F to design configuration. Zero free slots...


