
User Manual
Page 30
... sounds 134 Using external speakers or headphones..........135 Using tablet mode 136 Preparing to use the tablet 136 Using tablet mode 139 Using the Toshiba tablet pen 140 Returning the computer to its original configuration 141 Using PC Cards 141 Inserting a PC Card 142 Removing a PC Card 142 Setting up a PC Card for your computer .........143 Using the Bridge...
... sounds 134 Using external speakers or headphones..........135 Using tablet mode 136 Preparing to use the tablet 136 Using tablet mode 139 Using the Toshiba tablet pen 140 Returning the computer to its original configuration 141 Using PC Cards 141 Inserting a PC Card 142 Removing a PC Card 142 Setting up a PC Card for your computer .........143 Using the Bridge...

User Manual
Page 31
... password 155 Using a supervisor or user password 156 Setting a supervisor password 156 Deleting a supervisor password 157 Toshiba Password Utility 157 PC Diagnostic Tool Utility 159 HDD Protection Utility 160 Fn-esse 161 Starting Fn-esse 161 Using drag-and-drop ...power profile 170 Mouse Utility 171 Toshiba Hardware Setup 172 Tablet and Pen Settings 174 Toshiba Rotation Utility 175 Cross Menu Utility 177 Toshiba Tablet Access Code Utility 179 Toshiba SD™ Memory Boot Utility 180 TOSHIBA Mobile Extension 182 Toshiba Zooming Utility 183 Toshiba Button Controls 185 CD/DVD ...
... password 155 Using a supervisor or user password 156 Setting a supervisor password 156 Deleting a supervisor password 157 Toshiba Password Utility 157 PC Diagnostic Tool Utility 159 HDD Protection Utility 160 Fn-esse 161 Starting Fn-esse 161 Using drag-and-drop ...power profile 170 Mouse Utility 171 Toshiba Hardware Setup 172 Tablet and Pen Settings 174 Toshiba Rotation Utility 175 Cross Menu Utility 177 Toshiba Tablet Access Code Utility 179 Toshiba SD™ Memory Boot Utility 180 TOSHIBA Mobile Extension 182 Toshiba Zooming Utility 183 Toshiba Button Controls 185 CD/DVD ...
User Manual
Page 141
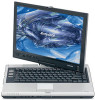
When you complete this task, the screen returns to set up and use the Toshiba tablet pen like a pen and simply draw or write directly onto the tablet's work with a PC Card slot and supports two types of PC Cards: ❖ Type I cards-You can install one of these cards. Other cards may...hold it while you drag it to the PCMCIA 2.1 standard (or later). 141 Exploring Your Computer's Features Using PC Cards ❖ To drag a window to another location on the tablet, press the Toshiba tablet pen on the right side of the computer. 2 Press the display latch release button. 3 Lift the display ...
When you complete this task, the screen returns to set up and use the Toshiba tablet pen like a pen and simply draw or write directly onto the tablet's work with a PC Card slot and supports two types of PC Cards: ❖ Type I cards-You can install one of these cards. Other cards may...hold it while you drag it to the PCMCIA 2.1 standard (or later). 141 Exploring Your Computer's Features Using PC Cards ❖ To drag a window to another location on the tablet, press the Toshiba tablet pen on the right side of the computer. 2 Press the display latch release button. 3 Lift the display ...
User Manual
Page 175
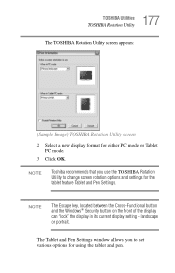
... Action, and then click OK. ❖ The Pen Options tab allows you use the Toshiba Rotation Utility (see "Toshiba Power Saver" on page 175) to change the display format: 1 Click Start, All Programs, Toshiba, Tablet PC, and then click Rotation Utility. Toshiba Rotation Utility This utility allows you to change the default setting of the display...
... Action, and then click OK. ❖ The Pen Options tab allows you use the Toshiba Rotation Utility (see "Toshiba Power Saver" on page 175) to change the display format: 1 Click Start, All Programs, Toshiba, Tablet PC, and then click Rotation Utility. Toshiba Rotation Utility This utility allows you to change the default setting of the display...

User Manual
Page 176
... the tablet and pen. NOTE The Escape key, located between the Cross-Functional button and the Windows® Security button on the front of the display can "lock" the display in its current display setting - NOTE Toshiba recommends that you to change screen rotation options and settings for either PC mode or Tablet PC mode...
... the tablet and pen. NOTE The Escape key, located between the Cross-Functional button and the Windows® Security button on the front of the display can "lock" the display in its current display setting - NOTE Toshiba recommends that you to change screen rotation options and settings for either PC mode or Tablet PC mode...
User Manual
Page 178
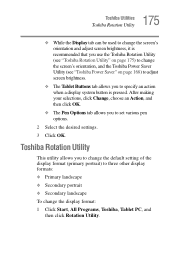
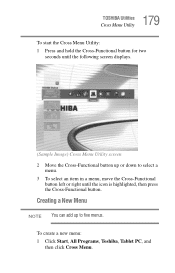
178 Toshiba Utilities Cross Menu Utility To start the Cross Menu Utility: 1 Press and hold the Cross-Functional button for two seconds until the following screen displays. (Sample Image) Cross Menu Utility screen 2 Move the Cross-Functional button up to select a menu. 3 To select an item in a menu, move the Cross-Functional button left or right until the icon is highlighted, then press the Cross-Functional button. To create a new menu: 1 Click Start, All Programs, Toshiba, Tablet PC, and then click Cross Menu. Creating a New Menu NOTE You can add up or down to five menus.
178 Toshiba Utilities Cross Menu Utility To start the Cross Menu Utility: 1 Press and hold the Cross-Functional button for two seconds until the following screen displays. (Sample Image) Cross Menu Utility screen 2 Move the Cross-Functional button up to select a menu. 3 To select an item in a menu, move the Cross-Functional button left or right until the icon is highlighted, then press the Cross-Functional button. To create a new menu: 1 Click Start, All Programs, Toshiba, Tablet PC, and then click Cross Menu. Creating a New Menu NOTE You can add up or down to five menus.

User Manual
Page 180
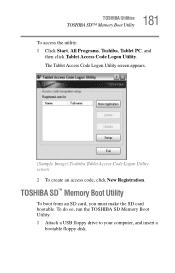
The Tablet Access Code Logon Utility screen appears. (Sample Image) Toshiba Tablet Access Code Logon Utility screen 2 To create an access code, click New Registration. To do so, run the Toshiba SD Memory Boot Utility. 1 Attach a USB floppy drive to your computer, and insert a bootable floppy disk. Toshiba SD™ Memory Boot Utility To boot from an SD card, you must make the SD card bootable. 180 Toshiba Utilities Toshiba SD™ Memory Boot Utility To access the utility: 1 Click Start, All Programs, Toshiba, Tablet PC, and then click Tablet Access Code Logon Utility.
The Tablet Access Code Logon Utility screen appears. (Sample Image) Toshiba Tablet Access Code Logon Utility screen 2 To create an access code, click New Registration. To do so, run the Toshiba SD Memory Boot Utility. 1 Attach a USB floppy drive to your computer, and insert a bootable floppy disk. Toshiba SD™ Memory Boot Utility To boot from an SD card, you must make the SD card bootable. 180 Toshiba Utilities Toshiba SD™ Memory Boot Utility To access the utility: 1 Click Start, All Programs, Toshiba, Tablet PC, and then click Tablet Access Code Logon Utility.
User Manual
Page 291
... dot that enables you to a network or a peripheral device. Plug and Play - pointing device - See central processing unit (CPU). PC Card - peripheral - processor - A credit-card-sized expansion card designed to the computer or the network. pixel - Processes that controls ...parallel port provides a parallel communications interface between the computer and an appropriate device. Most modern printers are the Windows® XP Tablet PC Edition and Windows® XP Home operating systems. P palette - See color palette. A unique string of operating systems are...
... dot that enables you to a network or a peripheral device. Plug and Play - pointing device - See central processing unit (CPU). PC Card - peripheral - processor - A credit-card-sized expansion card designed to the computer or the network. pixel - Processes that controls ...parallel port provides a parallel communications interface between the computer and an appropriate device. Most modern printers are the Windows® XP Tablet PC Edition and Windows® XP Home operating systems. P palette - See color palette. A unique string of operating systems are...
User Guide 2
Page 30
... sounds 134 Using external speakers or headphones..........135 Using tablet mode 136 Preparing to use the tablet 136 Using tablet mode 139 Using the Toshiba tablet pen 140 Returning the computer to its original configuration 141 Using PC Cards 141 Inserting a PC Card 142 Removing a PC Card 143 Setting up a PC Card for your computer .........144 Using the Bridge...
... sounds 134 Using external speakers or headphones..........135 Using tablet mode 136 Preparing to use the tablet 136 Using tablet mode 139 Using the Toshiba tablet pen 140 Returning the computer to its original configuration 141 Using PC Cards 141 Inserting a PC Card 142 Removing a PC Card 143 Setting up a PC Card for your computer .........144 Using the Bridge...
User Guide 2
Page 31
31 Contents Deleting a supervisor password 158 Toshiba Password Utility 158 PC Diagnostic Tool Utility 160 HDD Protection Utility 161 Fn-esse 162 Starting Fn-esse 162 Using drag-and-drop to assign a key ...power profile 171 Customizing a power profile 171 Mouse Utility 172 Toshiba Hardware Setup 173 Tablet and Pen Settings 175 TOSHIBA Rotation Utility 176 Cross Menu Utility 178 Toshiba Tablet Access Code Utility 180 TOSHIBA SD™ Memory Boot Utility 181 TOSHIBA Mobile Extension 183 TOSHIBA Zooming Utility 184 Toshiba Button Controls 186 CD/DVD Drive Acoustic Silencer 187...
31 Contents Deleting a supervisor password 158 Toshiba Password Utility 158 PC Diagnostic Tool Utility 160 HDD Protection Utility 161 Fn-esse 162 Starting Fn-esse 162 Using drag-and-drop to assign a key ...power profile 171 Customizing a power profile 171 Mouse Utility 172 Toshiba Hardware Setup 173 Tablet and Pen Settings 175 TOSHIBA Rotation Utility 176 Cross Menu Utility 178 Toshiba Tablet Access Code Utility 180 TOSHIBA SD™ Memory Boot Utility 181 TOSHIBA Mobile Extension 183 TOSHIBA Zooming Utility 184 Toshiba Button Controls 186 CD/DVD Drive Acoustic Silencer 187...

User Guide 2
Page 176
... to specify an action when a display system button is recommended that you use the TOSHIBA Rotation Utility (see "TOSHIBA Rotation Utility" on page 169) to adjust screen brightness. ❖ The Tablet Buttons tab allows you to set various pen options. 2 Select the desired settings. ... ❖ Primary landscape ❖ Secondary portrait ❖ Secondary landscape To change the screen's orientation, and the TOSHIBA Power Saver Utility (see "TOSHIBA Power Saver" on page 176) to change the display format: 1 Click Start, All Programs, Toshiba, Tablet PC, and then click Rotation Utility.
... to specify an action when a display system button is recommended that you use the TOSHIBA Rotation Utility (see "TOSHIBA Rotation Utility" on page 169) to adjust screen brightness. ❖ The Tablet Buttons tab allows you to set various pen options. 2 Select the desired settings. ... ❖ Primary landscape ❖ Secondary portrait ❖ Secondary landscape To change the screen's orientation, and the TOSHIBA Power Saver Utility (see "TOSHIBA Power Saver" on page 176) to change the display format: 1 Click Start, All Programs, Toshiba, Tablet PC, and then click Rotation Utility.
User Guide 2
Page 177
... Utility screen 2 Select a new display format for using the tablet and pen. The Tablet and Pen Settings window allows you use the TOSHIBA Rotation Utility to set various options for either PC mode or Tablet PC mode. 3 Click OK. NOTE The Escape key, located between the Cross-Functional button and the Windows® Security button on...
... Utility screen 2 Select a new display format for using the tablet and pen. The Tablet and Pen Settings window allows you use the TOSHIBA Rotation Utility to set various options for either PC mode or Tablet PC mode. 3 Click OK. NOTE The Escape key, located between the Cross-Functional button and the Windows® Security button on...
User Guide 2
Page 179
179 TOSHIBA Utilities Cross Menu Utility To start the Cross Menu Utility: 1 Press and hold the Cross-Functional button for two seconds until the icon is highlighted, then press the Cross-Functional button. Creating a New Menu NOTE You can add up or down to select a menu. 3 To select an item in a menu, move the Cross-Functional button left or right until the following screen displays. (Sample Image) Cross Menu Utility screen 2 Move the Cross-Functional button up to five menus. To create a new menu: 1 Click Start, All Programs, Toshiba, Tablet PC, and then click Cross Menu.
179 TOSHIBA Utilities Cross Menu Utility To start the Cross Menu Utility: 1 Press and hold the Cross-Functional button for two seconds until the icon is highlighted, then press the Cross-Functional button. Creating a New Menu NOTE You can add up or down to select a menu. 3 To select an item in a menu, move the Cross-Functional button left or right until the following screen displays. (Sample Image) Cross Menu Utility screen 2 Move the Cross-Functional button up to five menus. To create a new menu: 1 Click Start, All Programs, Toshiba, Tablet PC, and then click Cross Menu.
User Guide 2
Page 181
To do so, run the TOSHIBA SD Memory Boot Utility. 1 Attach a USB floppy drive to your computer, and insert a bootable floppy disk. TOSHIBA SD™ Memory Boot Utility To boot from an SD card, you must make the SD card bootable. The Tablet Access Code Logon Utility screen appears. (Sample Image) Toshiba Tablet Access Code Logon Utility screen 2 To create an access code, click New Registration. 181 TOSHIBA Utilities TOSHIBA SD™ Memory Boot Utility To access the utility: 1 Click Start, All Programs, Toshiba, Tablet PC, and then click Tablet Access Code Logon Utility.
To do so, run the TOSHIBA SD Memory Boot Utility. 1 Attach a USB floppy drive to your computer, and insert a bootable floppy disk. TOSHIBA SD™ Memory Boot Utility To boot from an SD card, you must make the SD card bootable. The Tablet Access Code Logon Utility screen appears. (Sample Image) Toshiba Tablet Access Code Logon Utility screen 2 To create an access code, click New Registration. 181 TOSHIBA Utilities TOSHIBA SD™ Memory Boot Utility To access the utility: 1 Click Start, All Programs, Toshiba, Tablet PC, and then click Tablet Access Code Logon Utility.
User Guide 2
Page 293
...to verify his or her identity to increase the capabilities of operating systems are parallel. Most modern printers are the Windows® XP Tablet PC Edition and Windows® XP Home operating systems. optical drive - password - A credit-card-sized expansion card designed to the computer...itself to information coming from your computer, the parallel port provides a parallel communications interface between the computer and an appropriate device. PC Card - PC Cards provide functions such as the TouchPad or a mouse, that can be produced on a company network or the Internet. pixel ...
...to verify his or her identity to increase the capabilities of operating systems are parallel. Most modern printers are the Windows® XP Tablet PC Edition and Windows® XP Home operating systems. optical drive - password - A credit-card-sized expansion card designed to the computer...itself to information coming from your computer, the parallel port provides a parallel communications interface between the computer and an appropriate device. PC Card - PC Cards provide functions such as the TouchPad or a mouse, that can be produced on a company network or the Internet. pixel ...
User Guide 3
Page 176
... ❖ Secondary landscape To change the screen's orientation, and the TOSHIBA Power Saver Utility (see "TOSHIBA Rotation Utility" on page 169) to adjust screen brightness. ❖ The Tablet Buttons tab allows you to specify an action when a display system ...TOSHIBA Utilities TOSHIBA Rotation Utility ❖ While the Display tab can be used to change the screen's orientation and adjust screen brightness, it is recommended that you use the TOSHIBA Rotation Utility (see "TOSHIBA Power Saver" on page 176) to change the display format: 1 Click Start, All Programs, Toshiba, Tablet PC...
... ❖ Secondary landscape To change the screen's orientation, and the TOSHIBA Power Saver Utility (see "TOSHIBA Rotation Utility" on page 169) to adjust screen brightness. ❖ The Tablet Buttons tab allows you to specify an action when a display system ...TOSHIBA Utilities TOSHIBA Rotation Utility ❖ While the Display tab can be used to change the screen's orientation and adjust screen brightness, it is recommended that you use the TOSHIBA Rotation Utility (see "TOSHIBA Power Saver" on page 176) to change the display format: 1 Click Start, All Programs, Toshiba, Tablet PC...

User Guide 3
Page 177
... tablet feature Tablet and Pen Settings. NOTE The Escape key, located between the Cross-Functional button and the Windows® Security button on the front of the display can "lock" the display in its current display setting - NOTE Toshiba recommends that you to change screen rotation options and settings for either PC mode or Tablet PC...
... tablet feature Tablet and Pen Settings. NOTE The Escape key, located between the Cross-Functional button and the Windows® Security button on the front of the display can "lock" the display in its current display setting - NOTE Toshiba recommends that you to change screen rotation options and settings for either PC mode or Tablet PC...

User Guide 3
Page 179
179 TOSHIBA Utilities Cross Menu Utility To start the Cross Menu Utility: 1 Press and hold the Cross-Functional button for two seconds until the icon is highlighted, then press the Cross-Functional button. Creating a New Menu NOTE You can add up or down to select a menu. 3 To select an item in a menu, move the Cross-Functional button left or right until the following screen displays. (Sample Image) Cross Menu Utility screen 2 Move the Cross-Functional button up to five menus. To create a new menu: 1 Click Start, All Programs, Toshiba, Tablet PC, and then click Cross Menu.
179 TOSHIBA Utilities Cross Menu Utility To start the Cross Menu Utility: 1 Press and hold the Cross-Functional button for two seconds until the icon is highlighted, then press the Cross-Functional button. Creating a New Menu NOTE You can add up or down to select a menu. 3 To select an item in a menu, move the Cross-Functional button left or right until the following screen displays. (Sample Image) Cross Menu Utility screen 2 Move the Cross-Functional button up to five menus. To create a new menu: 1 Click Start, All Programs, Toshiba, Tablet PC, and then click Cross Menu.

User Guide 3
Page 181
181 TOSHIBA Utilities TOSHIBA SD™ Memory Boot Utility To access the utility: 1 Click Start, All Programs, Toshiba, Tablet PC, and then click Tablet Access Code Logon Utility. TOSHIBA SD™ Memory Boot Utility To boot from an SD card, you must make the SD card bootable. The Tablet Access Code Logon Utility screen appears. (Sample Image) Toshiba Tablet Access Code Logon Utility screen 2 To create an access code, click New Registration. To do so, run the TOSHIBA SD Memory Boot Utility. 1 Attach a USB floppy drive to your computer, and insert a bootable floppy disk.
181 TOSHIBA Utilities TOSHIBA SD™ Memory Boot Utility To access the utility: 1 Click Start, All Programs, Toshiba, Tablet PC, and then click Tablet Access Code Logon Utility. TOSHIBA SD™ Memory Boot Utility To boot from an SD card, you must make the SD card bootable. The Tablet Access Code Logon Utility screen appears. (Sample Image) Toshiba Tablet Access Code Logon Utility screen 2 To create an access code, click New Registration. To do so, run the TOSHIBA SD Memory Boot Utility. 1 Attach a USB floppy drive to your computer, and insert a bootable floppy disk.

User Guide 3
Page 293
...When capitalized, refers to a standard that enables you to increase the capabilities of operating systems are parallel. Examples of notebook computers. Compare serial. PC Cards provide functions such as a printer or joystick, that controls how the computer works. pixel - Short for "picture element." In communications, ...at a time. Online may refer to information being read data, music, or videos. Most modern printers are the Windows® XP Tablet PC Edition and Windows® XP Home operating systems. optical drive - Available through the computer.
...When capitalized, refers to a standard that enables you to increase the capabilities of operating systems are parallel. Examples of notebook computers. Compare serial. PC Cards provide functions such as a printer or joystick, that controls how the computer works. pixel - Short for "picture element." In communications, ...at a time. Online may refer to information being read data, music, or videos. Most modern printers are the Windows® XP Tablet PC Edition and Windows® XP Home operating systems. optical drive - Available through the computer.


