User Guide
Page 29
... module 64 Connecting an external USB keyboard 65 Connecting an external USB mouse 65 Connecting a printer 66 Setting up a printer 67 Using your computer in tablet mode 68 Using external display devices 70 Directing the display output when you turn on the computer 70 Adjusting the quality of the external display...
... module 64 Connecting an external USB keyboard 65 Connecting an external USB mouse 65 Connecting a printer 66 Setting up a printer 67 Using your computer in tablet mode 68 Using external display devices 70 Directing the display output when you turn on the computer 70 Adjusting the quality of the external display...
User Guide
Page 32
... the Internet 145 Exploring audio features 145 Using external speakers or headphones..........146 Recording sounds 147 Using a microphone 147 Using tablet mode 148 Preparing to use the tablet 148 Using the Toshiba tablet pen 150 Returning the computer to its original configuration 152 Using the i.LINK port 152 Using PC Cards 153 Inserting a PC...
... the Internet 145 Exploring audio features 145 Using external speakers or headphones..........146 Recording sounds 147 Using a microphone 147 Using tablet mode 148 Preparing to use the tablet 148 Using the Toshiba tablet pen 150 Returning the computer to its original configuration 152 Using the i.LINK port 152 Using PC Cards 153 Inserting a PC...
User Guide
Page 33
...the Slim SelectBay 157 Removing a module from the Slim SelectBay .158 Inserting a module into the Slim SelectBay.....159 Chapter 5: Toshiba Utilities 160 Fn-esse 161 Starting Fn-esse 161 Assigning a key to a program or document ....162 Viewing existing key ... Hotkey utility 171 TOSHIBA Hardware Setup 171 TOSHIBA Mobile Extension 173 TOSHIBA Accessibility 175 TOSHIBA CD/DVD Drive Acoustic Silencer .....176 TOSHIBA Button Controls Utility 177 TOSHIBA Rotation Utility 177 Cross Menu Utility 180 TOSHIBA Tablet Access Code Utility 182 TOSHIBA Zooming Utility 183 TOSHIBA SD Memory Boot ...
...the Slim SelectBay 157 Removing a module from the Slim SelectBay .158 Inserting a module into the Slim SelectBay.....159 Chapter 5: Toshiba Utilities 160 Fn-esse 161 Starting Fn-esse 161 Assigning a key to a program or document ....162 Viewing existing key ... Hotkey utility 171 TOSHIBA Hardware Setup 171 TOSHIBA Mobile Extension 173 TOSHIBA Accessibility 175 TOSHIBA CD/DVD Drive Acoustic Silencer .....176 TOSHIBA Button Controls Utility 177 TOSHIBA Rotation Utility 177 Cross Menu Utility 180 TOSHIBA Tablet Access Code Utility 182 TOSHIBA Zooming Utility 183 TOSHIBA SD Memory Boot ...
User Guide
Page 37
...WITH THE PRODUCT ACTIVATION PROCEDURES. Product activation procedures and Microsoft's privacy policy will find your operating system, Microsoft® Windows® XP Tablet PC Edition, already installed on your work and entertainment can accompany you wherever you go. You will be completed by Internet or telephone ... software may differ from its retail version (if available), and may use technological measures for copy protection. With your new Toshiba notebook computer, your computer. Your operating system offers exciting features, multimedia enjoyment, and easy Internet access.
...WITH THE PRODUCT ACTIVATION PROCEDURES. Product activation procedures and Microsoft's privacy policy will find your operating system, Microsoft® Windows® XP Tablet PC Edition, already installed on your work and entertainment can accompany you wherever you go. You will be completed by Internet or telephone ... software may differ from its retail version (if available), and may use technological measures for copy protection. With your new Toshiba notebook computer, your computer. Your operating system offers exciting features, multimedia enjoyment, and easy Internet access.
User Guide
Page 53
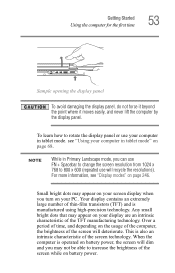
... 800 x 600 (repeated use your display are an intrinsic characteristic of the screen will dim and you may appear on your computer in tablet mode" on your computer in tablet mode. Over a period of time, and depending on battery power. To learn how to increase the brightness of the screen technology. Your...
... 800 x 600 (repeated use your display are an intrinsic characteristic of the screen will dim and you may appear on your computer in tablet mode" on your computer in tablet mode. Over a period of time, and depending on battery power. To learn how to increase the brightness of the screen technology. Your...
User Guide
Page 59
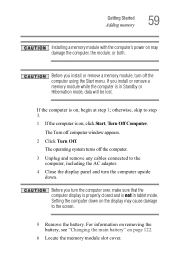
..., including the AC adapter. 4 Close the display panel and turn the computer over, make sure that the computer display is properly closed and is in tablet mode. For information on removing the battery, see "Changing the main battery" on page 122. 6 Locate the memory module slot cover. If you turn the...
..., including the AC adapter. 4 Close the display panel and turn the computer over, make sure that the computer display is properly closed and is in tablet mode. For information on removing the battery, see "Changing the main battery" on page 122. 6 Locate the memory module slot cover. If you turn the...
User Guide
Page 68
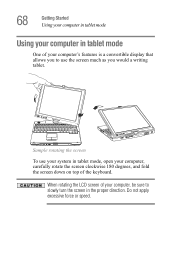
Do not apply excessive force or speed. Sample rotating the screen To use the screen much as you to slowly turn the screen in tablet mode, open your computer, carefully rotate the screen clockwise 180 degrees, and fold the screen down on top of the keyboard. When rotating the LCD screen of your computer, be sure to use your system in the proper direction. 68 Getting Started Using your computer in tablet mode Using your computer in tablet mode One of your computer's features is a convertible display that allows you would a writing tablet.
Do not apply excessive force or speed. Sample rotating the screen To use the screen much as you to slowly turn the screen in tablet mode, open your computer, carefully rotate the screen clockwise 180 degrees, and fold the screen down on top of the keyboard. When rotating the LCD screen of your computer, be sure to use your system in the proper direction. 68 Getting Started Using your computer in tablet mode Using your computer in tablet mode One of your computer's features is a convertible display that allows you would a writing tablet.
User Guide
Page 69
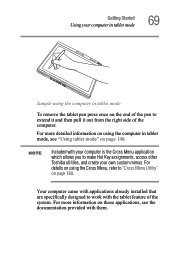
For details on using the computer in tablet mode To remove the tablet pen press once on those applications, see "Using tablet mode" on page 180. For more information on the end of the pen to extend it and then pull it out from the right side ... page 148. For more detailed information on using the Cross Menu, refer to make Hot Key assignments, access other Toshiba utilities, and create your own custom menus. Getting Started Using your computer in tablet mode 69 Sample using the computer in tablet mode, see the documentation provided with them. NOTE Included with the...
For details on using the computer in tablet mode To remove the tablet pen press once on those applications, see "Using tablet mode" on page 180. For more information on the end of the pen to extend it and then pull it out from the right side ... page 148. For more detailed information on using the Cross Menu, refer to make Hot Key assignments, access other Toshiba utilities, and create your own custom menus. Getting Started Using your computer in tablet mode 69 Sample using the computer in tablet mode, see the documentation provided with them. NOTE Included with the...
User Guide
Page 73
...: ❖ If you have work in progress and you are not connected. Press the Cross-Functional button to the display icon. The Windows® XP Tablet PC Edition operating system uses the Shut down command to secondary landscape mode or visa versa using it for a longer period, power down the computer...
...: ❖ If you have work in progress and you are not connected. Press the Cross-Functional button to the display icon. The Windows® XP Tablet PC Edition operating system uses the Shut down command to secondary landscape mode or visa versa using it for a longer period, power down the computer...
User Guide
Page 87
... from the File menu, type a name for your programs' documentation to print. Printing your work 87 Many programs offer a feature that the Windows® XP Tablet PC Edition operating system is not on, turn it . HINT: To make another copy of your printer is set up the printer the first time...
... from the File menu, type a name for your programs' documentation to print. Printing your work 87 Many programs offer a feature that the Windows® XP Tablet PC Edition operating system is not on, turn it . HINT: To make another copy of your printer is set up the printer the first time...
User Guide
Page 98
... or Shut down command The Turn Off or Shut down if you are connected to a Windows® network server (domain server). The Windows® XP Tablet PC Edition operating system uses Turn Off if you are retained indefinitely. Since Hibernation does not require power to maintain the saved information, the system...
... or Shut down command The Turn Off or Shut down if you are connected to a Windows® network server (domain server). The Windows® XP Tablet PC Edition operating system uses Turn Off if you are retained indefinitely. Since Hibernation does not require power to maintain the saved information, the system...
User Guide
Page 129
... to simplify setting up your home network ❖ Ability to detect new and intelligent devices 129 Windows® XP special features The Windows® XP Tablet PC Edition operating system offers you several new features and enhancements, including: ❖ New system file protection ❖ A system restore function, allowing you will explore...
... to simplify setting up your home network ❖ Ability to detect new and intelligent devices 129 Windows® XP special features The Windows® XP Tablet PC Edition operating system offers you several new features and enhancements, including: ❖ New system file protection ❖ A system restore function, allowing you will explore...

User Guide
Page 130
... to work , the taskbar changes to display ❖ Desktop style-how windows are doing. Bringing the world to your desktop With the Windows® Professional Tablet Edition operating system you are displayed and how to browse folders and files ❖ Toolbars-what information from the Internet to reflect what you can...
... to work , the taskbar changes to display ❖ Desktop style-how windows are doing. Bringing the world to your desktop With the Windows® Professional Tablet Edition operating system you are displayed and how to browse folders and files ❖ Toolbars-what information from the Internet to reflect what you can...
User Guide
Page 139
...; operating system attempts to the RJ-45 jack on your computer to a network, it may need a dialup connection. If the computer is Windows® XP Tablet PC Edition, you can connect your computer. To disable the LAN port: 1 Click Start and then click Control Panel. 2 Click Performance and Maintenance. 3 Click the...
...; operating system attempts to the RJ-45 jack on your computer to a network, it may need a dialup connection. If the computer is Windows® XP Tablet PC Edition, you can connect your computer. To disable the LAN port: 1 Click Start and then click Control Panel. 2 Click Performance and Maintenance. 3 Click the...
User Guide
Page 148
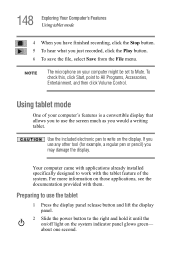
...then click Volume Control. Your computer came with applications already installed specifically designed to work with them. about one second. Preparing to use the tablet 1 Press the display panel release button and lift the display panel. 2 Slide the power button to write on the system indicator panel glows... and hold it until the on/off light on the display. NOTE The microphone on those applications, see the documentation provided with the tablet feature of your computer might be set to Mute. For more information on your computer's features is a convertible display that allows you...
...then click Volume Control. Your computer came with applications already installed specifically designed to work with them. about one second. Preparing to use the tablet 1 Press the display panel release button and lift the display panel. 2 Slide the power button to write on the system indicator panel glows... and hold it until the on/off light on the display. NOTE The microphone on those applications, see the documentation provided with the tablet feature of your computer might be set to Mute. For more information on your computer's features is a convertible display that allows you...

User Guide
Page 149
... latch will click and lock the screen in the proper direction. When rotating your computer's LCD screen, be sure to slowly turn the screen in tablet position. Sample rotating the display panel clockwise 180o 4 Flip the display latch so it points toward the back of the display panel. 5 Fold the display... force or speed. When you complete this task, the screen clicks into place and faces away from the keyboard. 149 Exploring Your Computer's Features Using tablet mode 3 Rotate the display panel clockwise 180o (degrees).
... latch will click and lock the screen in the proper direction. When rotating your computer's LCD screen, be sure to slowly turn the screen in tablet position. Sample rotating the display panel clockwise 180o 4 Flip the display latch so it points toward the back of the display panel. 5 Fold the display... force or speed. When you complete this task, the screen clicks into place and faces away from the keyboard. 149 Exploring Your Computer's Features Using tablet mode 3 Rotate the display panel clockwise 180o (degrees).

User Guide
Page 150
...to an external monitor, use the Cross Menu button (the Cross-Functional button) and select the display option. Using the Toshiba tablet pen 1 Remove the Toshiba tablet pen which is located on an external monitor in primary landscape mode. Pull the pen from the holder. 150 Exploring Your ...Computer's Features Using tablet mode Display Latch Sample folding the display panel down flat By default, the computer desktop will display the...
...to an external monitor, use the Cross Menu button (the Cross-Functional button) and select the display option. Using the Toshiba tablet pen 1 Remove the Toshiba tablet pen which is located on an external monitor in primary landscape mode. Pull the pen from the holder. 150 Exploring Your ...Computer's Features Using tablet mode Display Latch Sample folding the display panel down flat By default, the computer desktop will display the...
User Guide
Page 151
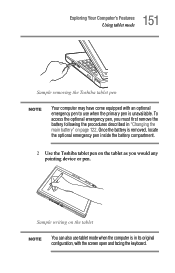
...emergency pen, you would any pointing device or pen. Sample writing on the tablet NOTE You can also use tablet mode when the computer is in "Changing the main battery" on the tablet as you must first remove the battery following the procedures described in its original..., locate the optional emergency pen inside the battery compartment. 2 Use the Toshiba tablet pen on page 122. Once the battery is unavailable. 151 Exploring Your Computer's Features Using tablet mode Sample removing the Toshiba tablet pen NOTE Your computer may have come equipped with the screen open and ...
...emergency pen, you would any pointing device or pen. Sample writing on the tablet NOTE You can also use tablet mode when the computer is in "Changing the main battery" on the tablet as you must first remove the battery following the procedures described in its original..., locate the optional emergency pen inside the battery compartment. 2 Use the Toshiba tablet pen on page 122. Once the battery is unavailable. 151 Exploring Your Computer's Features Using tablet mode Sample removing the Toshiba tablet pen NOTE Your computer may have come equipped with the screen open and ...

User Guide
Page 152
... the display latch release button. 3 Lift the display panel to press it twice - For example, you can use the Toshiba tablet pen like a pen and simply draw or write directly onto the tablet's work space. When working in the same manner you normally would a mouse, or other pointing device. Hold the pen... down and drag the window to another location on the tablet, press the Toshiba tablet pen on the icon (some applications may require you would : ❖ To move the pointing icon (or cursor) on the...
... the display latch release button. 3 Lift the display panel to press it twice - For example, you can use the Toshiba tablet pen like a pen and simply draw or write directly onto the tablet's work space. When working in the same manner you normally would a mouse, or other pointing device. Hold the pen... down and drag the window to another location on the tablet, press the Toshiba tablet pen on the icon (some applications may require you would : ❖ To move the pointing icon (or cursor) on the...
User Guide
Page 161
...more information, see "Hot Keys" on page 240. 161 Toshiba Utilities Fn-esse ❖ TOSHIBA Rotation Utility ❖ Cross Menu Utility ❖ TOSHIBA Tablet Access Code Utility ❖ TOSHIBA Zooming Utility ❖ TOSHIBA SD Memory Boot Utility Fn-esse The operating system shortcuts and Toshiba's Fn-esse program provide quick ways to quickly access your programs..., you can access Fn-esse in its associated Windows® program ❖ Display a customized folder of two ways: ❖ Click Start, All Programs, Toshiba, Utilities and Fn-esse. ❖ Click the Fn-esse icon.
...more information, see "Hot Keys" on page 240. 161 Toshiba Utilities Fn-esse ❖ TOSHIBA Rotation Utility ❖ Cross Menu Utility ❖ TOSHIBA Tablet Access Code Utility ❖ TOSHIBA Zooming Utility ❖ TOSHIBA SD Memory Boot Utility Fn-esse The operating system shortcuts and Toshiba's Fn-esse program provide quick ways to quickly access your programs..., you can access Fn-esse in its associated Windows® program ❖ Display a customized folder of two ways: ❖ Click Start, All Programs, Toshiba, Utilities and Fn-esse. ❖ Click the Fn-esse icon.
