User Guide
Page 28
... without changing the internal storage drive partitions 64 Creating recovery DVDs/media 66 Restoring from recovery DVDs/media 67 Erasing the Internal Storage Drive 69 Checking the internal storage drive operating status 71 Installing drivers and applications 71 Using the TouchPad 71 Adjusting TouchPad™ settings 75 Disabling or enabling the TouchPad 75 Using external display devices 76 Connecting the display device 76 Directing the display output when you turn on the computer 77 Adjusting the quality of the external display......78 Using an external keyboard 78 Using a mouse...
... without changing the internal storage drive partitions 64 Creating recovery DVDs/media 66 Restoring from recovery DVDs/media 67 Erasing the Internal Storage Drive 69 Checking the internal storage drive operating status 71 Installing drivers and applications 71 Using the TouchPad 71 Adjusting TouchPad™ settings 75 Disabling or enabling the TouchPad 75 Using external display devices 76 Connecting the display device 76 Directing the display output when you turn on the computer 77 Adjusting the quality of the external display......78 Using an external keyboard 78 Using a mouse...
User Guide
Page 30
... battery power 106 Battery Notice 106 Power management 107 Using additional batteries 108 Charging batteries 108 Charging the main battery 108 Charging the RTC battery 109 Monitoring main battery power 110 Determining remaining battery power 112 What to do when the main battery runs low 112 Setting battery notifications 113 Conserving battery power 113 Power Plans 114 Using a hot key to set the Power Plan 115 Using the TOSHIBA eco power plan 116 Changing the main battery 116 Removing the battery from the computer .......117 Inserting a charged battery...
... battery power 106 Battery Notice 106 Power management 107 Using additional batteries 108 Charging batteries 108 Charging the main battery 108 Charging the RTC battery 109 Monitoring main battery power 110 Determining remaining battery power 112 What to do when the main battery runs low 112 Setting battery notifications 113 Conserving battery power 113 Power Plans 114 Using a hot key to set the Power Plan 115 Using the TOSHIBA eco power plan 116 Changing the main battery 116 Removing the battery from the computer .......117 Inserting a charged battery...

User Guide
Page 31
...Using the Memory card reader 129 Inserting memory media 129 Removing memory media 130 Chapter 5: Utilities 131 TOSHIBA Assist 132 Connect 133 Secure 134 Protect & Fix 135 Optimize 136 TOSHIBA Application Installer 137 Setting passwords 138 Using an instant password 138 Using a supervisor password 139 Using a user password 140 Deleting a user password 141 TOSHIBA Face Recognition Utility 142 TOSHIBA PC Diagnostic Tool Utility 143 TOSHIBA HDD Protection Utility 144 Mouse Utility 145 TOSHIBA Hardware Setup 146 USB Sleep and Charge Utility 148 Starting the USB Sleep and Charge...
...Using the Memory card reader 129 Inserting memory media 129 Removing memory media 130 Chapter 5: Utilities 131 TOSHIBA Assist 132 Connect 133 Secure 134 Protect & Fix 135 Optimize 136 TOSHIBA Application Installer 137 Setting passwords 138 Using an instant password 138 Using a supervisor password 139 Using a user password 140 Deleting a user password 141 TOSHIBA Face Recognition Utility 142 TOSHIBA PC Diagnostic Tool Utility 143 TOSHIBA HDD Protection Utility 144 Mouse Utility 145 TOSHIBA Hardware Setup 146 USB Sleep and Charge Utility 148 Starting the USB Sleep and Charge...
User Guide
Page 54
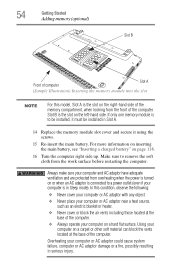
... connected to be installed, it must be installed in Slot A. 14 Replace the memory module slot cover and secure it using the screws. 15 Re-insert the main battery. Make sure to remove the soft cloth from overheating when the power is turned on the right-hand side of the memory compartment, when looking from the front of the computer. 54 Getting Started Adding memory (optional) Slot B Front of computer Slot...
... connected to be installed, it must be installed in Slot A. 14 Replace the memory module slot cover and secure it using the screws. 15 Re-insert the main battery. Make sure to remove the soft cloth from overheating when the power is turned on the right-hand side of the memory compartment, when looking from the front of the computer. 54 Getting Started Adding memory (optional) Slot B Front of computer Slot...
User Guide
Page 57
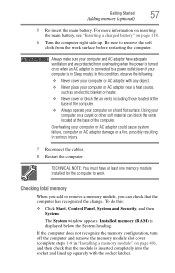
... one memory module installed for the computer to work surface before restarting the computer. Using your computer on a hard flat surface. Getting Started 57 Adding memory (optional) 5 Re-insert the main battery. In this : ❖ Click Start, Control Panel, System and Security, and then System. Always make sure your computer is displayed below the System heading. The System window appears. Installed memory (RAM) is in Sleep mode). Be sure to a power outlet...
... one memory module installed for the computer to work surface before restarting the computer. Using your computer on a hard flat surface. Getting Started 57 Adding memory (optional) 5 Re-insert the main battery. In this : ❖ Click Start, Control Panel, System and Security, and then System. Always make sure your computer is displayed below the System heading. The System window appears. Installed memory (RAM) is in Sleep mode). Be sure to a power outlet...
User Guide
Page 141
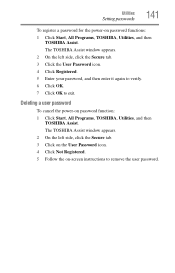
... the User Password icon. 4 Click Registered. 5 Enter your password, and then enter it again to verify. 6 Click OK. 7 Click OK to remove the user password. Deleting a user password To cancel the power-on password functions: 1 Click Start, All Programs, TOSHIBA, Utilities, and then TOSHIBA Assist. The TOSHIBA Assist window appears. 2 On the left side, click the Secure tab. 3 Click on the User Password icon. 4 Click Not Registered. 5 Follow the on-screen instructions to...
... the User Password icon. 4 Click Registered. 5 Enter your password, and then enter it again to verify. 6 Click OK. 7 Click OK to remove the user password. Deleting a user password To cancel the power-on password functions: 1 Click Start, All Programs, TOSHIBA, Utilities, and then TOSHIBA Assist. The TOSHIBA Assist window appears. 2 On the left side, click the Secure tab. 3 Click on the User Password icon. 4 Click Not Registered. 5 Follow the on-screen instructions to...
User Guide
Page 154
... the computer's internal storage drive. The collected information includes device operation time and number of actuations or status changes (e.g.: number of power button and Fn key combination uses, and AC adaptor, battery, LCD, fan, HDD, sound volume, wireless communication switch, docking and USB information), date of residence (e.g., European Union). Subject to install the updates if you wish. The collected information is used to identify and provide a notification of your TOSHIBA computer. Additionally, TOSHIBA may affect...
... the computer's internal storage drive. The collected information includes device operation time and number of actuations or status changes (e.g.: number of power button and Fn key combination uses, and AC adaptor, battery, LCD, fan, HDD, sound volume, wireless communication switch, docking and USB information), date of residence (e.g., European Union). Subject to install the updates if you wish. The collected information is used to identify and provide a notification of your TOSHIBA computer. Additionally, TOSHIBA may affect...
User Guide
Page 163
... the specifications do not match, locate and use the options in some way such as installing a new program or adding a device. Unless a hardware device has failed, problems usually occur when you are familiar with your work routine, you may have to change the system in the Startup menu to start properly, you can easily detect if the operating system is not working correctly. Using Startup options to fix problems If the operating system...
... the specifications do not match, locate and use the options in some way such as installing a new program or adding a device. Unless a hardware device has failed, problems usually occur when you are familiar with your work routine, you may have to change the system in the Startup menu to start properly, you can easily detect if the operating system is not working correctly. Using Startup options to fix problems If the operating system...
User Guide
Page 166
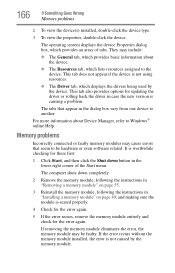
... lists resources assigned to Windows® online Help. Memory problems Incorrectly connected or faulty memory modules may be hardware or even software related. If removing the memory module eliminates the error, the memory module may cause errors that appear in case the new version is not using resources. ❖ The Driver tab, which provides an array of the Start menu. The tabs that seem to another. The computer shuts down button in "Installing a memory module...
... lists resources assigned to Windows® online Help. Memory problems Incorrectly connected or faulty memory modules may be hardware or even software related. If removing the memory module eliminates the error, the memory module may cause errors that appear in case the new version is not using resources. ❖ The Driver tab, which provides an array of the Start menu. The tabs that seem to another. The computer shuts down button in "Installing a memory module...
User Guide
Page 169
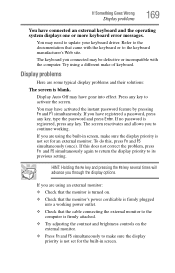
... computer. The keyboard you are using the built-in screen, make sure the display priority is not set for the built-in screen. If you connected may need to the computer is firmly attached. ❖ Try adjusting the contrast and brightness controls on . ❖ Check that the monitor's power cord/cable is firmly plugged into effect. Refer to the documentation that the cable connecting the external monitor to update your keyboard driver.
... computer. The keyboard you are using the built-in screen, make sure the display priority is not set for the built-in screen. If you connected may need to the computer is firmly attached. ❖ Try adjusting the contrast and brightness controls on . ❖ Check that the monitor's power cord/cable is firmly plugged into effect. Refer to the documentation that the cable connecting the external monitor to update your keyboard driver.
User Guide
Page 179
... the internal storage drive fails. An external hard drive is required. For more help ensure safe and easy installation of the external optical disc drives that are a few tips to help , click Start, Help and Support, and search for your web browser). ❖ Create a restore point (refer to "Saving system configuration with restore points" on its internal storage drive. No additional software is recommended in the drive. 2 Click Start. 3 Click Control Panel. 4 Click...
... the internal storage drive fails. An external hard drive is required. For more help ensure safe and easy installation of the external optical disc drives that are a few tips to help , click Start, Help and Support, and search for your web browser). ❖ Create a restore point (refer to "Saving system configuration with restore points" on its internal storage drive. No additional software is recommended in the drive. 2 Click Start. 3 Click Control Panel. 4 Click...
User Guide
Page 209
209 Glossary H hard disk - The primary (or only) hard disk in digital format, providing better picture quality than diskettes and are removable. HDMI - Hibernation - hot swapping - interlaced - internal device - Hard disks hold much more information than analog signal. HDMI-CEC (HDMI Consumer Electronics Control) - A feature of many Toshiba computers that can set system options or control system parameters, such as the battery save mode. (2) A key or combination of keys that holds 1.44 MB of...
209 Glossary H hard disk - The primary (or only) hard disk in digital format, providing better picture quality than diskettes and are removable. HDMI - Hibernation - hot swapping - interlaced - internal device - Hard disks hold much more information than analog signal. HDMI-CEC (HDMI Consumer Electronics Control) - A feature of many Toshiba computers that can set system options or control system parameters, such as the battery save mode. (2) A key or combination of keys that holds 1.44 MB of...
User Guide
Page 216
... charge indicator light 44, 110 charge not lasting 168 charging 45, 108 conserving power 113 disposal 121 installing 116, 118 low charge 112 maintaining 120 monitoring power 44, 110 216 not charging 167 notifications 113 power plan 191 power plan hot key 115 real-time clock (RTC) 107, 109 remaining power 112 removing 117 safety precautions 119 BIOS Setup see TOSHIBA Hardware Setup button power 47, 67 start 125 C Call2Recycle™ battery 122 changing main battery 116 character keys...
... charge indicator light 44, 110 charge not lasting 168 charging 45, 108 conserving power 113 disposal 121 installing 116, 118 low charge 112 maintaining 120 monitoring power 44, 110 216 not charging 167 notifications 113 power plan 191 power plan hot key 115 real-time clock (RTC) 107, 109 remaining power 112 removing 117 safety precautions 119 BIOS Setup see TOSHIBA Hardware Setup button power 47, 67 start 125 C Call2Recycle™ battery 122 changing main battery 116 character keys...
User Guide
Page 217
.../trouble accessing a drive 171 running slow 171 diskette drive cannot insert a diskette 172 cannot read a diskette 172 display does not look normal/flickers 170 external monitor not working 170 display device connecting 76 external 76 display output settings 77 display panel opening 46 display problems screen is blank 169 display, external adjusting 78 disposal information 26 disposing of used batteries 121 E EasyGuard® 106 ENERGY STAR® 34 error messages non-system disk or disk error 161 problem with display settings/ current settings...
.../trouble accessing a drive 171 running slow 171 diskette drive cannot insert a diskette 172 cannot read a diskette 172 display does not look normal/flickers 170 external monitor not working 170 display device connecting 76 external 76 display output settings 77 display panel opening 46 display problems screen is blank 169 display, external adjusting 78 disposal information 26 disposing of used batteries 121 E EasyGuard® 106 ENERGY STAR® 34 error messages non-system disk or disk error 161 problem with display settings/ current settings...
User Guide
Page 218
218 Index H HDMI™ Out Port 76 headphones using 128 Help and Support Windows® operating system 165 Hibernation mode 81 configuring 85 hot key 193 starting again from 88 hot key disabling or enabling TouchPad™ 197 disabling or enabling wireless devices 196 display brightness 195 Hibernation mode 193 keyboard overlays 199 Lock (Instant security) 190 Output (Display switch) 194 power plan 191 Sleep mode 192 volume mute 189 Zoom (Display resolution) 198 zooming in 199 zooming out 199 Hot Key Cards 185 Hot key functions 189 hot key power plan...
218 Index H HDMI™ Out Port 76 headphones using 128 Help and Support Windows® operating system 165 Hibernation mode 81 configuring 85 hot key 193 starting again from 88 hot key disabling or enabling TouchPad™ 197 disabling or enabling wireless devices 196 display brightness 195 Hibernation mode 193 keyboard overlays 199 Lock (Instant security) 190 Output (Display switch) 194 power plan 191 Sleep mode 192 volume mute 189 Zoom (Display resolution) 198 zooming in 199 zooming out 199 Hot Key Cards 185 Hot key functions 189 hot key power plan...
User Guide
Page 219
... monitor problems monitor not working 169 mouse installing 78 mouse utility 145 N networking wireless 126 notification area 125 O optical disc drive problems 172 troubleshooting 172 other documentation 38 overlay keys 97 P password deleting a supervisor 140 disabling a user 141 setting a user 140 supervisor set up 139 types 138 passwords instant, using 138 setting 138 port RGB 76 power computer will not start 160 connecting cable to AC adaptor 44 cord/cable 44 cord/cable connectors 200 energy-saving features 105 problem solving 167 turning on...
... monitor problems monitor not working 169 mouse installing 78 mouse utility 145 N networking wireless 126 notification area 125 O optical disc drive problems 172 troubleshooting 172 other documentation 38 overlay keys 97 P password deleting a supervisor 140 disabling a user 141 setting a user 140 supervisor set up 139 types 138 passwords instant, using 138 setting 138 port RGB 76 power computer will not start 160 connecting cable to AC adaptor 44 cord/cable 44 cord/cable connectors 200 energy-saving features 105 problem solving 167 turning on...
User Guide
Page 221
... the power 47 U USB Sleep and Charge cannot use 181 USB Sleep and Charge Utility 148 USB Wakeup function does not work 181 USB-compatible printer 79 user password, disabling 141 user password, setting 140 using Memory card reader 129 using a file extension 102 Utilities 131 V video cables 76 video display device connecting 76 video projector adjusting display 78 W warranty standard limited warranty 38 Web Camera using 128 Web sites 182 Wi-Fi® wireless networking 126 Windows® Explorer 99 Windows® operating system Help and Support 165 problem solving 163 Windows® operating...
... the power 47 U USB Sleep and Charge cannot use 181 USB Sleep and Charge Utility 148 USB Wakeup function does not work 181 USB-compatible printer 79 user password, disabling 141 user password, setting 140 using Memory card reader 129 using a file extension 102 Utilities 131 V video cables 76 video display device connecting 76 video projector adjusting display 78 W warranty standard limited warranty 38 Web Camera using 128 Web sites 182 Wi-Fi® wireless networking 126 Windows® Explorer 99 Windows® operating system Help and Support 165 problem solving 163 Windows® operating...

Resource Guide
Page 29
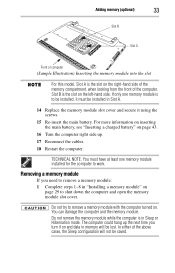
... computer has been running recently, the memory module(s) may also be hot. Avoid touching the cover, the module(s), and the surrounding area before replacing it must be hot. Installing a memory module with the computer's power on , begin at step1; If the computer is in Sleep or Hibernation mode, data will need a small Phillips screwdriver for this model, Slot A is the slot on the right-hand side of the...
... computer has been running recently, the memory module(s) may also be hot. Avoid touching the cover, the module(s), and the surrounding area before replacing it must be hot. Installing a memory module with the computer's power on , begin at step1; If the computer is in Sleep or Hibernation mode, data will need a small Phillips screwdriver for this model, Slot A is the slot on the right-hand side of the...
Resource Guide
Page 33
... the main battery, see "Inserting a charged battery" on page 43. 16 Turn the computer right side up the next time you need to work. Do not try to shut down the computer and open the memory module slot cover. TECHNICAL NOTE: You must be installed in Slot A. 14 Replace the memory module slot cover and secure it on and data in memory will not be lost. Slot B is the slot on...
... the main battery, see "Inserting a charged battery" on page 43. 16 Turn the computer right side up the next time you need to work. Do not try to shut down the computer and open the memory module slot cover. TECHNICAL NOTE: You must be installed in Slot A. 14 Replace the memory module slot cover and secure it on and data in memory will not be lost. Slot B is the slot on...
Resource Guide
Page 48
... manufactured using the built-in screen. If you turn on battery power, the screen will deteriorate. Over a period of time, and depending on the usage of the computer, the brightness of thin-film transistors (TFT) and is operated on your computer. Any small bright dots that the cable connecting the external monitor to the computer is firmly attached. ❖ Try adjusting the contrast and brightness controls...
... manufactured using the built-in screen. If you turn on battery power, the screen will deteriorate. Over a period of time, and depending on the usage of the computer, the brightness of thin-film transistors (TFT) and is operated on your computer. Any small bright dots that the cable connecting the external monitor to the computer is firmly attached. ❖ Try adjusting the contrast and brightness controls...


