

User Guide
Page 2
... RESULTING THEREFROM. "Critical applications" means life support systems, medical applications, connections to implanted medical devices, commercial transportation, nuclear facilities or systems or any "critical applications." TOSHIBA AMERICA INFORMATION SYSTEMS ("TOSHIBA"), ITS AFFILIATES AND SUPPLIERS DO NOT WARRANT THAT OPERATION OF THE PRODUCT WILL BE UNINTERRUPTED OR ERROR FREE. 2 Models: Satellite Pro® M10/M15 Series ReWritable CD/DVD Drives The computer system you may include...
... RESULTING THEREFROM. "Critical applications" means life support systems, medical applications, connections to implanted medical devices, commercial transportation, nuclear facilities or systems or any "critical applications." TOSHIBA AMERICA INFORMATION SYSTEMS ("TOSHIBA"), ITS AFFILIATES AND SUPPLIERS DO NOT WARRANT THAT OPERATION OF THE PRODUCT WILL BE UNINTERRUPTED OR ERROR FREE. 2 Models: Satellite Pro® M10/M15 Series ReWritable CD/DVD Drives The computer system you may include...
User Guide
Page 5
... with the FCC. 5 Type of service Your modem is prohibited. When you should be given the opportunity to provide you have any changes necessary to the telephone network. Disconnection If you are ever needed on standard-device telephone lines. Connection to telephone company-provided coin service (central office implemented systems) is designed to be used on your modem, they...
... with the FCC. 5 Type of service Your modem is prohibited. When you should be given the opportunity to provide you have any changes necessary to the telephone network. Disconnection If you are ever needed on standard-device telephone lines. Connection to telephone company-provided coin service (central office implemented systems) is designed to be used on your modem, they...

User Guide
Page 20
... Adding memory 52 Installing a memory module 52 Removing a memory module 55 Turning on the computer 57 Opening the display panel 57 Turning on the power 57 Using the AccuPoint II® pointing device 58 Using the TouchPad 59 Scrolling with the TouchPad 60 Control buttons 60 Disabling or enabling the Dual Point Device 61 Setting up your software 62 Registering your computer with Toshiba 63 Setting up other devices 63 Turning off the computer 63 Closing the display panel 64 Using external display devices 65 Connecting the display device...
... Adding memory 52 Installing a memory module 52 Removing a memory module 55 Turning on the computer 57 Opening the display panel 57 Turning on the power 57 Using the AccuPoint II® pointing device 58 Using the TouchPad 59 Scrolling with the TouchPad 60 Control buttons 60 Disabling or enabling the Dual Point Device 61 Setting up your software 62 Registering your computer with Toshiba 63 Setting up other devices 63 Turning off the computer 63 Closing the display panel 64 Using external display devices 65 Connecting the display device...
User Guide
Page 22
... battery power 110 Battery Notice 110 Safety Precautions 111 Maximizing battery life 112 Charging the batteries 113 Monitoring battery power 113 What to do when the battery alarm sounds 116 Changing batteries 117 Disposing of used batteries 119 Conserving power 119 Power usage modes in Windows XP 120 Using a hot key to set the power usage mode 121 Additional options for power 122 Chapter 5: Expansion Options 123 Devices for office computing 123 Connecting external (optional) devices 124 Using an external keyboard 125 Using a mouse 125 Connecting a USB mouse 125 Using...
... battery power 110 Battery Notice 110 Safety Precautions 111 Maximizing battery life 112 Charging the batteries 113 Monitoring battery power 113 What to do when the battery alarm sounds 116 Changing batteries 117 Disposing of used batteries 119 Conserving power 119 Power usage modes in Windows XP 120 Using a hot key to set the power usage mode 121 Additional options for power 122 Chapter 5: Expansion Options 123 Devices for office computing 123 Connecting external (optional) devices 124 Using an external keyboard 125 Using a mouse 125 Connecting a USB mouse 125 Using...
User Guide
Page 24
... 163 Starting Fn-esse 163 Using the keyboard or pointing device to assign keys 165 Viewing existing key assignments 166 Changing or removing existing key assignments ...... 167 Toshiba Console 167 Customizing Your Computer 168 Network 169 Security 169 Power Management 169 Mouse utility 172 Hotkey utility 172 Mobile Extension Service 173 Slim SelectBay® Service 173 Toshiba Hardware Settings 173 Mobile Extension 175 Toshiba Power Saver utility 177 Enabling Hibernation 177 Setting user passwords 178 Using an instant password 179 Setting a user password 180 Disabling a user...
... 163 Starting Fn-esse 163 Using the keyboard or pointing device to assign keys 165 Viewing existing key assignments 166 Changing or removing existing key assignments ...... 167 Toshiba Console 167 Customizing Your Computer 168 Network 169 Security 169 Power Management 169 Mouse utility 172 Hotkey utility 172 Mobile Extension Service 173 Slim SelectBay® Service 173 Toshiba Hardware Settings 173 Mobile Extension 175 Toshiba Power Saver utility 177 Enabling Hibernation 177 Setting user passwords 178 Using an instant password 179 Setting a user password 180 Disabling a user...

User Guide
Page 33
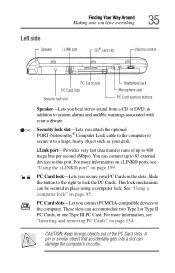
USB 2.0 allows "hot swapping" of peripherals, which means that components may be plugged and unplugged while the computer is a peripheral expansion standard that supports a data-transfer rate of up to an external video device such as keyboards, pointing devices, and monitors. Parallel port-Lets you connect an external monitor or projector. Back Finding Your Way Around Making sure you have a single standard for cabling and connectors...
USB 2.0 allows "hot swapping" of peripherals, which means that components may be plugged and unplugged while the computer is a peripheral expansion standard that supports a data-transfer rate of up to an external video device such as keyboards, pointing devices, and monitors. Parallel port-Lets you connect an external monitor or projector. Back Finding Your Way Around Making sure you have a single standard for cabling and connectors...
User Guide
Page 35
... connect up to lock the PC Cards. PC Card slots-Let you attach the optional PORT-Noteworthy® Computer Lock cable to the computer to secure it to a large, heavy object such as your software. You can damage the computer's circuitry. Finding Your Way Around Making sure you have everything 35 Left side Speaker i.LINK port SD® card slot Volume control PC Card slots PC Card lock Security lock slot Headphone jack Microphone jack...
... connect up to lock the PC Cards. PC Card slots-Let you attach the optional PORT-Noteworthy® Computer Lock cable to the computer to secure it to a large, heavy object such as your software. You can damage the computer's circuitry. Finding Your Way Around Making sure you have everything 35 Left side Speaker i.LINK port SD® card slot Volume control PC Card slots PC Card lock Security lock slot Headphone jack Microphone jack...
User Guide
Page 39
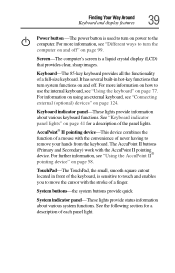
... located in hot-key functions that provides clear, sharp images. See "Keyboard indicator panel lights" on page 99. See the following section for a description of a finger. System buttons-the system buttons provide quick System indicator panel-These lights provide status information about various keyboard functions. For more information on how to use the internal keyboard, see "Connecting external (optional) devices" on power to the computer. Finding Your Way Around Keyboard and display features 39 Power button -The power button is used to turn...
... located in hot-key functions that provides clear, sharp images. See "Keyboard indicator panel lights" on page 99. See the following section for a description of a finger. System buttons-the system buttons provide quick System indicator panel-These lights provide status information about various keyboard functions. For more information on how to use the internal keyboard, see "Connecting external (optional) devices" on power to the computer. Finding Your Way Around Keyboard and display features 39 Power button -The power button is used to turn...
User Guide
Page 53
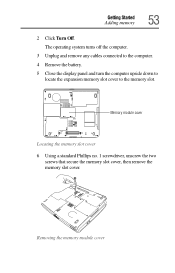
Memory module cover Locating the memory slot cover 6 Using a standard Phillips no. 1 screwdriver, unscrew the two screws that secure the memory slot cover, then remove the memory slot cover. The operating system turns off the computer. 3 Unplug and remove any cables connected to the computer. 4 Remove the battery. 5 Close the display panel and turn the computer upside down to locate the expansion memory slot cover to the memory slot. Removing the memory module cover Getting Started Adding memory 53 2 Click Turn Off.
Memory module cover Locating the memory slot cover 6 Using a standard Phillips no. 1 screwdriver, unscrew the two screws that secure the memory slot cover, then remove the memory slot cover. The operating system turns off the computer. 3 Unplug and remove any cables connected to the computer. 4 Remove the battery. 5 Close the display panel and turn the computer upside down to locate the expansion memory slot cover to the memory slot. Removing the memory module cover Getting Started Adding memory 53 2 Click Turn Off.
User Guide
Page 55
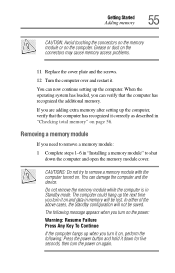
... the following message appears when you can damage the computer and the device. If you are adding extra memory after setting up the next time you need to remove a memory module: 1 Complete steps 1-6 in Standby mode. Removing a memory module If you turn the power on the power: Warning: Resume Failure Press Any Key To Continue If the computer hangs up the computer. CAUTIONS: Do not...
... the following message appears when you can damage the computer and the device. If you are adding extra memory after setting up the next time you need to remove a memory module: 1 Complete steps 1-6 in Standby mode. Removing a memory module If you turn the power on the power: Warning: Resume Failure Press Any Key To Continue If the computer hangs up the computer. CAUTIONS: Do not...
User Guide
Page 116
... "Toshiba Power Saver utility" on Batteries option. 4 Click the Details... Before your computer runs out of battery power, save your data and take the necessary steps to save your computer. ❖ Shut down . button. 5 Select the Alarms tab and adjust the settings to suit your remaining charge frequently if you may take one . To change the default alarm settings: 1 Open the Start menu, click Control Panel then Performance and Maintenance...
... "Toshiba Power Saver utility" on Batteries option. 4 Click the Details... Before your computer runs out of battery power, save your data and take the necessary steps to save your computer. ❖ Shut down . button. 5 Select the Alarms tab and adjust the settings to suit your remaining charge frequently if you may take one . To change the default alarm settings: 1 Open the Start menu, click Control Panel then Performance and Maintenance...
User Guide
Page 206
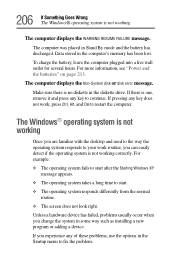
... disk error message. Unless a hardware device has failed, problems usually occur when you can easily detect if the operating system is not working The computer displays the WARNING RESUME FAILURE message. Make sure there is one, remove it and press any key does not work routine, you change the system in the computer's memory has been lost. If pressing any key to fix the problem. To charge the battery...
... disk error message. Unless a hardware device has failed, problems usually occur when you can easily detect if the operating system is not working The computer displays the WARNING RESUME FAILURE message. Make sure there is one, remove it and press any key does not work routine, you change the system in the computer's memory has been lost. If pressing any key to fix the problem. To charge the battery...
User Guide
Page 215
... Wrong Resolving a hardware conflict Check the power options using the hard disk more keyboard error messages. Is your computer. You have registered a password, press If you have connected an external keyboard and the operating system displays one or more ? Is the display power set to turn off automatically? Keyboard problems If, when you have gone into effect. If the numeric keypad or cursor control light is on . If you type, strange things happen...
... Wrong Resolving a hardware conflict Check the power options using the hard disk more keyboard error messages. Is your computer. You have registered a password, press If you have connected an external keyboard and the operating system displays one or more ? Is the display power set to turn off automatically? Keyboard problems If, when you have gone into effect. If the numeric keypad or cursor control light is on . If you type, strange things happen...
User Guide
Page 216
... dialog box allows you to make sure the display priority is not set for the built-in screen. The Settings tab allows you to continue working power outlet. ❖ Check that the cable connecting the external monitor to the computer is firmly attached. ❖ Try adjusting the contrast and brightness controls on . ❖ Check that the monitor's power cable is turned on the external monitor. ❖ Press Fn and F5...
... dialog box allows you to make sure the display priority is not set for the built-in screen. The Settings tab allows you to continue working power outlet. ❖ Check that the cable connecting the external monitor to the computer is firmly attached. ❖ Try adjusting the contrast and brightness controls on . ❖ Check that the monitor's power cable is turned on the external monitor. ❖ Press Fn and F5...
User Guide
Page 225
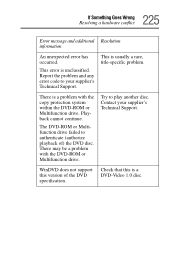
Contact your supplier's Technical Support. This error is a problem with the DVD-ROM or Multifunction drive. There is unclassified. Report the problem and any error code to authenticate (authorize playback of the DVD specification. Check that this version of ) the DVD disc. The DVD-ROM or Multifunction drive failed to your supplier's Technical Support. 225 If Something Goes Wrong Resolving a hardware conflict Error message and additional Resolution information An unexpected...
Contact your supplier's Technical Support. This error is a problem with the DVD-ROM or Multifunction drive. There is unclassified. Report the problem and any error code to authenticate (authorize playback of the DVD specification. Check that this version of ) the DVD disc. The DVD-ROM or Multifunction drive failed to your supplier's Technical Support. 225 If Something Goes Wrong Resolving a hardware conflict Error message and additional Resolution information An unexpected...
User Guide
Page 246
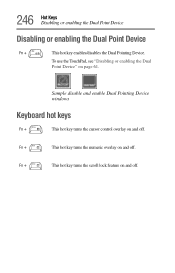
Sample disable and enable Dual Pointing Device windows Keyboard hot keys Fn + This hot key turns the cursor control overlay on and off. Fn + This hot key turns the numeric overlay on and off . 246 Hot Keys Disabling or enabling the Dual Point Device Disabling or enabling the Dual Point Device Fn + This hot key enables/disables the Dual Pointing Device. Fn + This hot key turns the scroll lock feature on page 61. To use the TouchPad, see "Disabling or enabling the Dual Point Device" on and off .
Sample disable and enable Dual Pointing Device windows Keyboard hot keys Fn + This hot key turns the cursor control overlay on and off. Fn + This hot key turns the numeric overlay on and off . 246 Hot Keys Disabling or enabling the Dual Point Device Disabling or enabling the Dual Point Device Fn + This hot key enables/disables the Dual Pointing Device. Fn + This hot key turns the scroll lock feature on page 61. To use the TouchPad, see "Disabling or enabling the Dual Point Device" on and off .

User Guide
Page 264
...-system disk or disk error message 206 not accessing disk drives 205 precautions 47 setting up 52 turning off 63 warning resume failure message 206 computer placement 45 computer setup 48 computer-friendly environment 43 computing tips 75 configuring hard drive passwords 184 connecting to a power source 49 connection set up 139 control buttons 60 cooling vent 34 copyright 16 CPU fan 34 critical applications 2 Ctrl keys 78 cursor control light 41 D desktop creating new icon...
...-system disk or disk error message 206 not accessing disk drives 205 precautions 47 setting up 52 turning off 63 warning resume failure message 206 computer placement 45 computer setup 48 computer-friendly environment 43 computing tips 75 configuring hard drive passwords 184 connecting to a power source 49 connection set up 139 control buttons 60 cooling vent 34 copyright 16 CPU fan 34 critical applications 2 Ctrl keys 78 cursor control light 41 D desktop creating new icon...

User Guide
Page 265
... external monitor not working 217 LCD 39 screen is blank 215 display device connecting 65 external 65 video 65 display features 37 display latch 32 display modes hot key 244 display output settings 67 display panel closing 64 opening 32, 37 display panel, closed, front 32 display panel, open, front 37 display, external adjusting 68 disposal information 18 DMA (Direct Memory Access) 210 double-click 60 DVD-ROM drive problems 220 troubleshooting 212 DVD-ROM or Multifunction drive can't access disc 220 opening 90 DVD-ROM/Multifunction drive drive tray won't open 220 problems 220 troubleshooting...
... external monitor not working 217 LCD 39 screen is blank 215 display device connecting 65 external 65 video 65 display features 37 display latch 32 display modes hot key 244 display output settings 67 display panel closing 64 opening 32, 37 display panel, closed, front 32 display panel, open, front 37 display, external adjusting 68 disposal information 18 DMA (Direct Memory Access) 210 double-click 60 DVD-ROM drive problems 220 troubleshooting 212 DVD-ROM or Multifunction drive can't access disc 220 opening 90 DVD-ROM/Multifunction drive drive tray won't open 220 problems 220 troubleshooting...
User Guide
Page 268
... problem solving 232 resetting port to default settings 137 upgrading 137 modem port 34 module battery 37 memory 37 modules Wi-Fi Mini PC 131 monitor 33, 65 connecting 65, 67 external connecting 124 not working 216 mouse installing 70 serial 70 using 125 N network 169 accessing 139 Dial-Up Networking Wizard 139 network port 34 networking wireless 139 numlock light 41 O office computing 123 on/off light 40 opening the display panel 57 optional devices 123 LapLink cable 136 other documentation 30 overlay keys 79 P panel, keyboard indicator...
... problem solving 232 resetting port to default settings 137 upgrading 137 modem port 34 module battery 37 memory 37 modules Wi-Fi Mini PC 131 monitor 33, 65 connecting 65, 67 external connecting 124 not working 216 mouse installing 70 serial 70 using 125 N network 169 accessing 139 Dial-Up Networking Wizard 139 network port 34 networking wireless 139 numlock light 41 O office computing 123 on/off light 40 opening the display panel 57 optional devices 123 LapLink cable 136 other documentation 30 overlay keys 79 P panel, keyboard indicator...
User Guide
Page 271
... setting hard disk drive passwords 184 security lock slot 35 selecting a place to work 43 SelectServ 30 service options 30 setting up adding memory 52 computer 52 setting up a connection 139 setting up your computer 48 shutting down more quickly 101 Slim SelectBay removing module 152 Slim SelectBay indicator light 41 Slim SelectBay modules 150 Slim SelectBay release 37 Slim SelectBay slot 37 slot PC Card 35 SD card 36 Slim SelectBay 37 sound problem solving 227 sound...
... setting hard disk drive passwords 184 security lock slot 35 selecting a place to work 43 SelectServ 30 service options 30 setting up adding memory 52 computer 52 setting up a connection 139 setting up your computer 48 shutting down more quickly 101 Slim SelectBay removing module 152 Slim SelectBay indicator light 41 Slim SelectBay modules 150 Slim SelectBay release 37 Slim SelectBay slot 37 slot PC Card 35 SD card 36 Slim SelectBay 37 sound problem solving 227 sound...


