

User Guide
Page 2
... TO ANY TROUBLE, FAILURE OR MALFUNCTION OF THE HARD DISK DRIVE OR OTHER STORAGE DEVICES AND THE DATA CANNOT BE RECOVERED, TOSHIBA SHALL NOT BE LIABLE FOR ANY DAMAGE OR LOSS OF DATA, OR ANY OTHER DAMAGE RESULTING THEREFROM. 2 Models: Satellite Pro® M10/M15 Series ReWritable CD/DVD Drives The computer ... HAS BEEN SUCCESSFULLY COPIED OR TRANSFERRED. "Critical applications" means life support systems, medical applications, connections to persons or loss of all set-up and usage instructions in the applicable user guides and/or manuals enclosed. If you fail to do so, this product may lose...
... TO ANY TROUBLE, FAILURE OR MALFUNCTION OF THE HARD DISK DRIVE OR OTHER STORAGE DEVICES AND THE DATA CANNOT BE RECOVERED, TOSHIBA SHALL NOT BE LIABLE FOR ANY DAMAGE OR LOSS OF DATA, OR ANY OTHER DAMAGE RESULTING THEREFROM. 2 Models: Satellite Pro® M10/M15 Series ReWritable CD/DVD Drives The computer ... HAS BEEN SUCCESSFULLY COPIED OR TRANSFERRED. "Critical applications" means life support systems, medical applications, connections to persons or loss of all set-up and usage instructions in the applicable user guides and/or manuals enclosed. If you fail to do so, this product may lose...
User Guide
Page 5
... company and let them to make changes in writing, to allow you to make any questions about your telephone line, as how many pieces of equipment you are ever needed on standard-device telephone lines. In order to do this, it , the telephone company will be notified as soon as possible. 5 Type of service Your modem is subject...
... company and let them to make changes in writing, to allow you to make any questions about your telephone line, as how many pieces of equipment you are ever needed on standard-device telephone lines. In order to do this, it , the telephone company will be notified as soon as possible. 5 Type of service Your modem is subject...

User Guide
Page 20
... Started 43 Selecting a place to work 43 Creating a computer-friendly environment 43 Keeping yourself comfortable 44 Other precautions 47 Setting up your computer 48 Connecting to a power source 49 Adding memory 52 Installing a memory module 52 Removing a memory module 55 Turning on the computer 57 Opening the display panel 57 Turning on the power 57 Using the AccuPoint II® pointing device 58 Using the TouchPad 59 Scrolling with the TouchPad 60 Control buttons 60 Disabling or enabling the...
... Started 43 Selecting a place to work 43 Creating a computer-friendly environment 43 Keeping yourself comfortable 44 Other precautions 47 Setting up your computer 48 Connecting to a power source 49 Adding memory 52 Installing a memory module 52 Removing a memory module 55 Turning on the computer 57 Opening the display panel 57 Turning on the power 57 Using the AccuPoint II® pointing device 58 Using the TouchPad 59 Scrolling with the TouchPad 60 Control buttons 60 Disabling or enabling the...
User Guide
Page 22
... battery power 110 Battery Notice 110 Safety Precautions 111 Maximizing battery life 112 Charging the batteries 113 Monitoring battery power 113 What to do when the battery alarm sounds 116 Changing batteries 117 Disposing of used batteries 119 Conserving power 119 Power usage modes in Windows XP 120 Using a hot key to set the power usage mode 121 Additional options for power 122 Chapter 5: Expansion Options 123 Devices for office computing 123 Connecting external (optional) devices 124 Using an external keyboard 125 Using a mouse 125 Connecting a USB mouse 125 Using...
... battery power 110 Battery Notice 110 Safety Precautions 111 Maximizing battery life 112 Charging the batteries 113 Monitoring battery power 113 What to do when the battery alarm sounds 116 Changing batteries 117 Disposing of used batteries 119 Conserving power 119 Power usage modes in Windows XP 120 Using a hot key to set the power usage mode 121 Additional options for power 122 Chapter 5: Expansion Options 123 Devices for office computing 123 Connecting external (optional) devices 124 Using an external keyboard 125 Using a mouse 125 Connecting a USB mouse 125 Using...
User Guide
Page 24
... 163 Starting Fn-esse 163 Using the keyboard or pointing device to assign keys 165 Viewing existing key assignments 166 Changing or removing existing key assignments ...... 167 Toshiba Console 167 Customizing Your Computer 168 Network 169 Security 169 Power Management 169 Mouse utility 172 Hotkey utility 172 Mobile Extension Service 173 Slim SelectBay® Service 173 Toshiba Hardware Settings 173 Mobile Extension 175 Toshiba Power Saver utility 177 Enabling Hibernation 177 Setting user passwords 178 Using an instant password 179 Setting a user password 180 Disabling a user...
... 163 Starting Fn-esse 163 Using the keyboard or pointing device to assign keys 165 Viewing existing key assignments 166 Changing or removing existing key assignments ...... 167 Toshiba Console 167 Customizing Your Computer 168 Network 169 Security 169 Power Management 169 Mouse utility 172 Hotkey utility 172 Mobile Extension Service 173 Slim SelectBay® Service 173 Toshiba Hardware Settings 173 Mobile Extension 175 Toshiba Power Saver utility 177 Enabling Hibernation 177 Setting user passwords 178 Using an instant password 179 Setting a user password 180 Disabling a user...

User Guide
Page 33
... expansion standard that supports a data-transfer rate of up to an external video device such as keyboards, pointing devices, and monitors. Back Finding Your Way Around Making sure you have a single standard for USB 2.0 peripherals. RGB (monitor) port-Lets you connect your computer to 480 Mbps for peripherals such as a standard television set. Cooling vents Network port Modem port USB 2.0 ports-The USB (Universal Serial Bus) ports provide a connection for cabling and connectors.
... expansion standard that supports a data-transfer rate of up to an external video device such as keyboards, pointing devices, and monitors. Back Finding Your Way Around Making sure you have a single standard for USB 2.0 peripherals. RGB (monitor) port-Lets you connect your computer to 480 Mbps for peripherals such as a standard television set. Cooling vents Network port Modem port USB 2.0 ports-The USB (Universal Serial Bus) ports provide a connection for cabling and connectors.
User Guide
Page 35
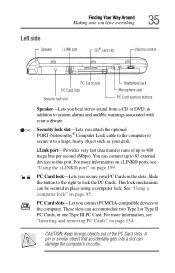
... you have everything 35 Left side Speaker i.LINK port SD® card slot Volume control PC Card slots PC Card lock Security lock slot Headphone jack Microphone jack PC Card ejection buttons Speaker-Lets you connect PCMCIA-compatible devices to the computer. You can be secured in addition to system alarms and audible warnings associated with your software. PC Card slots-Let you hear stereo sound from a CD or DVD, in place using a computer lock.
... you have everything 35 Left side Speaker i.LINK port SD® card slot Volume control PC Card slots PC Card lock Security lock slot Headphone jack Microphone jack PC Card ejection buttons Speaker-Lets you connect PCMCIA-compatible devices to the computer. You can be secured in addition to system alarms and audible warnings associated with your software. PC Card slots-Let you hear stereo sound from a CD or DVD, in place using a computer lock.
User Guide
Page 39
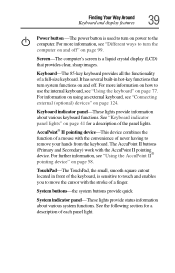
... clear, sharp images. For more information on how to use the internal keyboard, see "Different ways to turn on power to the computer. For more information, see "Using the keyboard" on page 77. For information on using an external keyboard, see "Using the AccuPoint II® pointing device" on page 58. Keyboard indicator panel-These lights provide information about various system functions. Screen-The computer's screen is sensitive to touch and enables...
... clear, sharp images. For more information on how to use the internal keyboard, see "Different ways to turn on power to the computer. For more information, see "Using the keyboard" on page 77. For information on using an external keyboard, see "Using the AccuPoint II® pointing device" on page 58. Keyboard indicator panel-These lights provide information about various system functions. Screen-The computer's screen is sensitive to touch and enables...
User Guide
Page 52
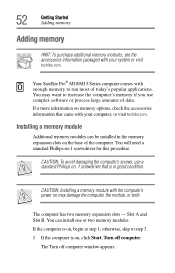
Your Satellite Pro® M10/M15 Series computer comes with the computer's power on the base of the computer. You can be installed in good condition. For more information on memory options, check the accessories information that is on , click Start, Turn off computer window appears. CAUTION: To avoid damaging the computer's screws, use complex software or process large amounts of today's popular applications...
Your Satellite Pro® M10/M15 Series computer comes with the computer's power on the base of the computer. You can be installed in good condition. For more information on memory options, check the accessories information that is on , click Start, Turn off computer window appears. CAUTION: To avoid damaging the computer's screws, use complex software or process large amounts of today's popular applications...
User Guide
Page 53
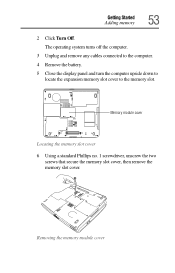
Removing the memory module cover Getting Started Adding memory 53 2 Click Turn Off. Memory module cover Locating the memory slot cover 6 Using a standard Phillips no. 1 screwdriver, unscrew the two screws that secure the memory slot cover, then remove the memory slot cover. The operating system turns off the computer. 3 Unplug and remove any cables connected to the computer. 4 Remove the battery. 5 Close the display panel and turn the computer upside down to locate the expansion memory slot cover to the memory slot.
Removing the memory module cover Getting Started Adding memory 53 2 Click Turn Off. Memory module cover Locating the memory slot cover 6 Using a standard Phillips no. 1 screwdriver, unscrew the two screws that secure the memory slot cover, then remove the memory slot cover. The operating system turns off the computer. 3 Unplug and remove any cables connected to the computer. 4 Remove the battery. 5 Close the display panel and turn the computer upside down to locate the expansion memory slot cover to the memory slot.
User Guide
Page 55
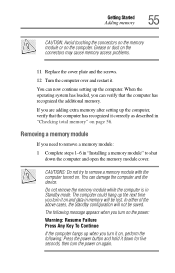
... it correctly as described in "Checking total memory" on the connectors may cause memory access problems. 11 Replace the cover plate and the screws. 12 Turn the computer over and restart it down the computer and open the memory module cover. CAUTIONS: Do not try to remove a memory module: 1 Complete steps 1-6 in Standby mode. The following : Press the power button and hold it . The computer could hang...
... it correctly as described in "Checking total memory" on the connectors may cause memory access problems. 11 Replace the cover plate and the screws. 12 Turn the computer over and restart it down the computer and open the memory module cover. CAUTIONS: Do not try to remove a memory module: 1 Complete steps 1-6 in Standby mode. The following : Press the power button and hold it . The computer could hang...
User Guide
Page 116
... when the battery alarm sounds Your Satellite Pro® M10/M15 Series computer can be configured to warn you of a low battery charge condition so you may take one of battery power, save your system shuts down your remaining charge frequently if you're working in the Control Panel. For more quickly at low temperatures. To change the default alarm settings: 1 Open the Start menu, click Control Panel then Performance and Maintenance. 2 Click the Toshiba Power Saver...
... when the battery alarm sounds Your Satellite Pro® M10/M15 Series computer can be configured to warn you of a low battery charge condition so you may take one of battery power, save your system shuts down your remaining charge frequently if you're working in the Control Panel. For more quickly at low temperatures. To change the default alarm settings: 1 Open the Start menu, click Control Panel then Performance and Maintenance. 2 Click the Toshiba Power Saver...
User Guide
Page 206
... was placed in the computer's memory has been lost. If pressing any of these problems, use the options in some way such as installing a new program or adding a device. The Windows® operating system is not working correctly. The computer displays the Non-System disk or disk error message. Data stored in Stand By mode and the battery has discharged. To charge the battery, leave the computer plugged...
... was placed in the computer's memory has been lost. If pressing any of these problems, use the options in some way such as installing a new program or adding a device. The Windows® operating system is not working correctly. The computer displays the Non-System disk or disk error message. Data stored in Stand By mode and the battery has discharged. To charge the battery, leave the computer plugged...
User Guide
Page 215
... the battery fully charged to turn off automatically? A keypad overlay may have connected an external keyboard and the operating system displays one or more ? Is the display power set to begin with your software using the hard disk more keyboard error messages. If the numeric keypad or cursor control light is blank. Press any of the keys. All these conditions affect how long the charge lasts. You have gone into effect. Display problems...
... the battery fully charged to turn off automatically? A keypad overlay may have connected an external keyboard and the operating system displays one or more ? Is the display power set to begin with your software using the hard disk more keyboard error messages. If the numeric keypad or cursor control light is blank. Press any of the keys. All these conditions affect how long the charge lasts. You have gone into effect. Display problems...
User Guide
Page 216
.... The built-in screen. This opens the Display Properties dialog box. A window with the secondary button. The screen reactivates and allows you are using an external monitor: ❖ Check that the monitor is turned on. ❖ Check that the monitor's power cable is firmly plugged into a working . If you to advance through the display options. You can change the number of the desktop with the secondary control button, then clicking Properties...
.... The built-in screen. This opens the Display Properties dialog box. A window with the secondary button. The screen reactivates and allows you are using an external monitor: ❖ Check that the monitor is turned on. ❖ Check that the monitor's power cable is firmly plugged into a working . If you to advance through the display options. You can change the number of the desktop with the secondary control button, then clicking Properties...
User Guide
Page 246
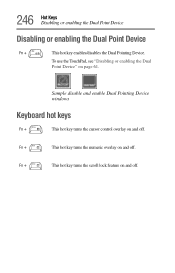
246 Hot Keys Disabling or enabling the Dual Point Device Disabling or enabling the Dual Point Device Fn + This hot key enables/disables the Dual Pointing Device. Sample disable and enable Dual Pointing Device windows Keyboard hot keys Fn + This hot key turns the cursor control overlay on and off. Fn + This hot key turns the scroll lock feature on and off . Fn + This hot key turns the numeric overlay on page 61. To use the TouchPad, see "Disabling or enabling the Dual Point Device" on and off .
246 Hot Keys Disabling or enabling the Dual Point Device Disabling or enabling the Dual Point Device Fn + This hot key enables/disables the Dual Pointing Device. Sample disable and enable Dual Pointing Device windows Keyboard hot keys Fn + This hot key turns the cursor control overlay on and off. Fn + This hot key turns the scroll lock feature on and off . Fn + This hot key turns the numeric overlay on page 61. To use the TouchPad, see "Disabling or enabling the Dual Point Device" on and off .

User Guide
Page 264
... unlocking 117 battery alarms 116 battery pack 37 battery power displaying remaining 114 monitoring 113 battery release 36 battery, light 40 Bluetooth modules inserting and removing 157 Bluetooth power switch 32 button power 39, 57 start 135 buttons Internet 42 one-touch TV out 42 TOSHIBA Console 42 TV out 42 C CD creating 147 playing an audio 146 playing using Auto-Run 147 CDs problem solving 220 channels DMA 210 IRQ 210 character keys 77 charging the battery 51 checking device...
... unlocking 117 battery alarms 116 battery pack 37 battery power displaying remaining 114 monitoring 113 battery release 36 battery, light 40 Bluetooth modules inserting and removing 157 Bluetooth power switch 32 button power 39, 57 start 135 buttons Internet 42 one-touch TV out 42 TOSHIBA Console 42 TV out 42 C CD creating 147 playing an audio 146 playing using Auto-Run 147 CDs problem solving 220 channels DMA 210 IRQ 210 character keys 77 charging the battery 51 checking device...

User Guide
Page 265
... 219 missing files/trouble accessing a disk 218 running slow 218 diskette drive can't insert a diskette 219 can't read a diskette 219 connecting 72 external, connecting 72 display doesn't look normal/flickers 216 external monitor not working 217 LCD 39 screen is blank 215 display device connecting 65 external 65 video 65 display features 37 display latch 32 display modes hot key 244 display output settings 67 display panel closing 64 opening 32, 37 display panel, closed, front 32 display panel, open, front 37 display, external adjusting 68 disposal...
... 219 missing files/trouble accessing a disk 218 running slow 218 diskette drive can't insert a diskette 219 can't read a diskette 219 connecting 72 external, connecting 72 display doesn't look normal/flickers 216 external monitor not working 217 LCD 39 screen is blank 215 display device connecting 65 external 65 video 65 display features 37 display latch 32 display modes hot key 244 display output settings 67 display panel closing 64 opening 32, 37 display panel, closed, front 32 display panel, open, front 37 display, external adjusting 68 disposal...
User Guide
Page 268
... problem solving 232 resetting port to default settings 137 upgrading 137 modem port 34 module battery 37 memory 37 modules Wi-Fi Mini PC 131 monitor 33, 65 connecting 65, 67 external connecting 124 not working 216 mouse installing 70 serial 70 using 125 N network 169 accessing 139 Dial-Up Networking Wizard 139 network port 34 networking wireless 139 numlock light 41 O office computing 123 on/off light 40 opening the display panel 57 optional devices 123 LapLink cable 136 other documentation 30 overlay keys 79 P panel, keyboard indicator...
... problem solving 232 resetting port to default settings 137 upgrading 137 modem port 34 module battery 37 memory 37 modules Wi-Fi Mini PC 131 monitor 33, 65 connecting 65, 67 external connecting 124 not working 216 mouse installing 70 serial 70 using 125 N network 169 accessing 139 Dial-Up Networking Wizard 139 network port 34 networking wireless 139 numlock light 41 O office computing 123 on/off light 40 opening the display panel 57 optional devices 123 LapLink cable 136 other documentation 30 overlay keys 79 P panel, keyboard indicator...
User Guide
Page 271
... setting hard disk drive passwords 184 security lock slot 35 selecting a place to work 43 SelectServ 30 service options 30 setting up adding memory 52 computer 52 setting up a connection 139 setting up your computer 48 shutting down more quickly 101 Slim SelectBay removing module 152 Slim SelectBay indicator light 41 Slim SelectBay modules 150 Slim SelectBay release 37 Slim SelectBay slot 37 slot PC Card 35 SD card 36 Slim SelectBay 37 sound problem solving 227 sound...
... setting hard disk drive passwords 184 security lock slot 35 selecting a place to work 43 SelectServ 30 service options 30 setting up adding memory 52 computer 52 setting up a connection 139 setting up your computer 48 shutting down more quickly 101 Slim SelectBay removing module 152 Slim SelectBay indicator light 41 Slim SelectBay modules 150 Slim SelectBay release 37 Slim SelectBay slot 37 slot PC Card 35 SD card 36 Slim SelectBay 37 sound problem solving 227 sound...


