
User Guide
Page 1
Satellite Pro® L640 Series Resource Guide Keep this Resource Guide in for your reference and future use: Model name Part number Serial number If you need assistance: ❖ Toshiba's Support Web site pcsupport.toshiba.com ❖ Toshiba Customer Support Center Calling within the United States (800) 457-7777 Calling from outside the United States (949) 859-4273 Please fill in a convenient place to access important information about your computer...
Satellite Pro® L640 Series Resource Guide Keep this Resource Guide in for your reference and future use: Model name Part number Serial number If you need assistance: ❖ Toshiba's Support Web site pcsupport.toshiba.com ❖ Toshiba Customer Support Center Calling within the United States (800) 457-7777 Calling from outside the United States (949) 859-4273 Please fill in a convenient place to access important information about your computer...
User Guide
Page 2
2 Contents Introduction 10 Setting up your computer and getting started 13 Creating recovery DVDs/media 16 Learning the basics 17 Using the TouchPad 18 Using the optical disc drive 20 Using the Web Camera 24 Using the Memory card reader 24 Moving the computer 26 Mobile computing 26 Taking care of your battery 30 If something goes wrong 32 If you need further assistance 35 Power cord/cable connectors 36 Features and specifications 36
2 Contents Introduction 10 Setting up your computer and getting started 13 Creating recovery DVDs/media 16 Learning the basics 17 Using the TouchPad 18 Using the optical disc drive 20 Using the Web Camera 24 Using the Memory card reader 24 Moving the computer 26 Mobile computing 26 Taking care of your battery 30 If something goes wrong 32 If you need further assistance 35 Power cord/cable connectors 36 Features and specifications 36
User Guide
Page 3
... For your important data, please make periodic back-up copies of all set-up and usage instructions in the applicable user guides and/or manuals enclosed or provided electronically. WHEN ...Model: Satellite Pro® L640 Series Recordable and/or ReWritable Drive(s) and Associated Software Warranty The computer system you may include Recordable and/or ReWritable optical media drive(s) and associated software, among the most advanced data storage technologies available. IF YOUR DATA IS ALTERED OR LOST DUE TO ANY TROUBLE, FAILURE OR MALFUNCTION OF THE HARD DISK DRIVE OR OTHER STORAGE DEVICES...
... For your important data, please make periodic back-up copies of all set-up and usage instructions in the applicable user guides and/or manuals enclosed or provided electronically. WHEN ...Model: Satellite Pro® L640 Series Recordable and/or ReWritable Drive(s) and Associated Software Warranty The computer system you may include Recordable and/or ReWritable optical media drive(s) and associated software, among the most advanced data storage technologies available. IF YOUR DATA IS ALTERED OR LOST DUE TO ANY TROUBLE, FAILURE OR MALFUNCTION OF THE HARD DISK DRIVE OR OTHER STORAGE DEVICES...
User Guide
Page 8
... cause interference. Always contact an authorized Toshiba service provider, if any company, trader or user shall not change the frequency, increase the power or change the features and functions of such products can be exposed to disassemble, adjust or repair an optical disc drive. Location of the label and manufacturing information may vary.) Never attempt to laser light or other safety hazards, resulting in...
... cause interference. Always contact an authorized Toshiba service provider, if any company, trader or user shall not change the frequency, increase the power or change the features and functions of such products can be exposed to disassemble, adjust or repair an optical disc drive. Location of the label and manufacturing information may vary.) Never attempt to laser light or other safety hazards, resulting in...
User Guide
Page 10
... Association. and/or Toshiba Corporation. 10 Introduction Trademarks Satellite Pro is labeled with the power management options preset to a configuration that will provide the most stable operating environment and optimum system performance for energy efficiency. Secure Digital and SD are registered trademarks of this product may not include user manuals or all program functionality. Computer Disposal Information The LCD display lamp in the...
... Association. and/or Toshiba Corporation. 10 Introduction Trademarks Satellite Pro is labeled with the power management options preset to a configuration that will provide the most stable operating environment and optimum system performance for energy efficiency. Secure Digital and SD are registered trademarks of this product may not include user manuals or all program functionality. Computer Disposal Information The LCD display lamp in the...
User Guide
Page 11
... extensive troubleshooting guidelines, see the electronic user's guide preinstalled on the Web at its suppliers' commitment to those models. During 2008, Americans, with the help of ENERGY STAR®, saved about your computer will use between 30% and 60% less energy depending on using power management settings to enter the low-power Sleep mode which restricts use of certain Hazardous Substances in AC power mode. Toshiba requires...
... extensive troubleshooting guidelines, see the electronic user's guide preinstalled on the Web at its suppliers' commitment to those models. During 2008, Americans, with the help of ENERGY STAR®, saved about your computer will use between 30% and 60% less energy depending on using power management settings to enter the low-power Sleep mode which restricts use of certain Hazardous Substances in AC power mode. Toshiba requires...
User Guide
Page 13
... and getting started 13 Setting up your computer and getting started The Toshiba Instruction Manual for Safety and Comfort, included with your computer, contains helpful information for setting up your work environment and tips for Safety and Comfort" that is designed to provide optimum safety and ease of use, and to avoid scratching or damaging the surface. Turn off the...
... and getting started 13 Setting up your computer and getting started The Toshiba Instruction Manual for Safety and Comfort, included with your computer, contains helpful information for setting up your work environment and tips for Safety and Comfort" that is designed to provide optimum safety and ease of use, and to avoid scratching or damaging the surface. Turn off the...
User Guide
Page 14
... connect the computer to a live electrical outlet, or to remove a plug from a socket. Always confirm that may have been provided with your computer), or use the TOSHIBA AC adaptor that was provided with your computer and the TOSHIBA Battery Charger (that the power plug (and extension cable plug if used on your computer and getting started Your computer's features and specifications...
... connect the computer to a live electrical outlet, or to remove a plug from a socket. Always confirm that may have been provided with your computer), or use the TOSHIBA AC adaptor that was provided with your computer and the TOSHIBA Battery Charger (that the power plug (and extension cable plug if used on your computer and getting started Your computer's features and specifications...
User Guide
Page 16
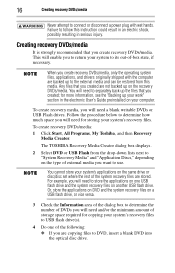
... determine the number of DVDs you will need a blank writable DVDs or USB Flash drives. for storing your system to DVD, insert a blank DVD into the optical disc drive. The TOSHIBA Recovery Media Creator dialog box displays. 2 Select DVD or USB Flash from this instruction could result in an electric shock, possibly resulting in the electronic User's Guide preinstalled on your computer. To create recovery DVDs/media: 1 Click Start, All Programs, My Toshiba, and then Recovery Media Creator. You...
... determine the number of DVDs you will need a blank writable DVDs or USB Flash drives. for storing your system to DVD, insert a blank DVD into the optical disc drive. The TOSHIBA Recovery Media Creator dialog box displays. 2 Select DVD or USB Flash from this instruction could result in an electric shock, possibly resulting in the electronic User's Guide preinstalled on your computer. To create recovery DVDs/media: 1 Click Start, All Programs, My Toshiba, and then Recovery Media Creator. You...
User Guide
Page 17
... files to a USB flash drive, connect a USB flash drive of 3," etc.), so that can be activated. For complete information on recovering your system, please see the "Recovering the Internal Storage Drive" section in the electronic User's Guide preinstalled on your external media to another storage device before executing this procedure, or use blank media. 5 Click the Create button in the TOSHIBA Recovery Media Creator utility dialog box. 6 Follow the on your computer. Your work since you...
... files to a USB flash drive, connect a USB flash drive of 3," etc.), so that can be activated. For complete information on recovering your system, please see the "Recovering the Internal Storage Drive" section in the electronic User's Guide preinstalled on your external media to another storage device before executing this procedure, or use blank media. 5 Click the Create button in the TOSHIBA Recovery Media Creator utility dialog box. 6 Follow the on your computer. Your work since you...

User Guide
Page 18
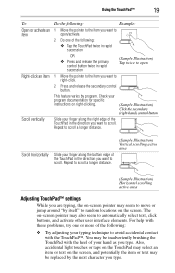
... small, touch-sensitive area in front of the keyboard) and the adjacent control buttons to: ❖ Move the pointer on the screen ❖ Select an item on the screen ❖ Open or activate an item on the screen ❖ Scroll through a document or information TouchPad™ Primary control button Secondary control button (Sample Illustration) The TouchPad and associated control buttons Refer to the table below for specific instructions on -screen Slide...
... small, touch-sensitive area in front of the keyboard) and the adjacent control buttons to: ❖ Move the pointer on the screen ❖ Select an item on the screen ❖ Open or activate an item on the screen ❖ Scroll through a document or information TouchPad™ Primary control button Secondary control button (Sample Illustration) The TouchPad and associated control buttons Refer to the table below for specific instructions on -screen Slide...
User Guide
Page 19
... following : ❖ Try adjusting your program documentation for specific instructions on -screen pointer may be replaced by program. For help with these problems, try one or more of the following : ❖ Tap the TouchPad twice in rapid succession OR ❖ Press and release the primary control button twice in rapid succession (Sample Illustration) Tap twice to open /activate. 2 Do one of...
... following : ❖ Try adjusting your program documentation for specific instructions on -screen pointer may be replaced by program. For help with these problems, try one or more of the following : ❖ Tap the TouchPad twice in rapid succession OR ❖ Press and release the primary control button twice in rapid succession (Sample Illustration) Tap twice to open /activate. 2 Do one of...

User Guide
Page 20
..., use the TouchPad's control buttons and move the pointer by default. The TouchPad settings are accessible through the Mouse Properties option of the other region. For more information, see the "Disabling or enabling the TouchPad™ in the electronic User's Guide. For more information, please visit www.support.toshiba.com, and enter the phrase "Mouse pointer jumps around as two changes. Disabling or enabling the TouchPad™ The TouchPad™ is a popular medium for DVD-ROMs...
..., use the TouchPad's control buttons and move the pointer by default. The TouchPad settings are accessible through the Mouse Properties option of the other region. For more information, see the "Disabling or enabling the TouchPad™ in the electronic User's Guide. For more information, please visit www.support.toshiba.com, and enter the phrase "Mouse pointer jumps around as two changes. Disabling or enabling the TouchPad™ The TouchPad™ is a popular medium for DVD-ROMs...
User Guide
Page 21
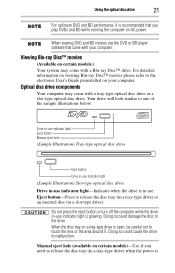
... electronic User's Guide preinstalled on certain models)-Use if you play DVDs and BD while running the computer on AC power. Drive in-use indicator light Eject button Manual eject hole (Sample Illustration) Tray-type optical disc drive Eject button Drive in-use indicator light (Sample Illustration) Slot-type optical disc drive Drive in-use indicator light-Indicates when the drive is in a tray-type drive) when the power is glowing. Do not press the eject button or turn off the computer while the drive in a slot-type drive...
... electronic User's Guide preinstalled on certain models)-Use if you play DVDs and BD while running the computer on AC power. Drive in-use indicator light Eject button Manual eject hole (Sample Illustration) Tray-type optical disc drive Eject button Drive in-use indicator light (Sample Illustration) Slot-type optical disc drive Drive in-use indicator light-Indicates when the drive is in a tray-type drive) when the power is glowing. Do not press the eject button or turn off the computer while the drive in a slot-type drive...

User Guide
Page 24
... manual eject button. For more information on the software, click Start, All Programs, TOSHIBA, Utilities, and then Web Camera Application Help. The Web Camera indicator light glows when the Web Camera is required. Using the Memory card reader (Available on certain models.) The Memory card reader supports the use a pencil to the Internet. Depending on your computer, chat with the computer turned off inside the computer and damage it. 2 Remove the disc from the drive. To use...
... manual eject button. For more information on the software, click Start, All Programs, TOSHIBA, Utilities, and then Web Camera Application Help. The Web Camera indicator light glows when the Web Camera is required. Using the Memory card reader (Available on certain models.) The Memory card reader supports the use a pencil to the Internet. Depending on your computer, chat with the computer turned off inside the computer and damage it. 2 Remove the disc from the drive. To use...
User Guide
Page 25
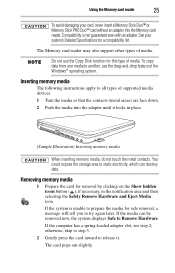
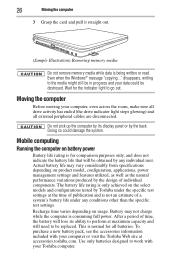
... PRO Duo™ card without an adapter into the adapter until it . Removing memory media 1 Prepare the card for safe removal, a message will tell you to all types of media. Using the Memory card reader 25 To avoid damaging your system's Detailed Specifications for a compatibility list. The Memory card reader may also support other types of supported media devices. 1 Turn the media so that the contacts (metal areas) are face down. 2 Push the media into the Memory card reader. Inserting memory media The following instructions...
... PRO Duo™ card without an adapter into the adapter until it . Removing memory media 1 Prepare the card for safe removal, a message will tell you to all types of media. Using the Memory card reader 25 To avoid damaging your system's Detailed Specifications for a compatibility list. The Memory card reader may also support other types of supported media devices. 1 Turn the media so that the contacts (metal areas) are face down. 2 Push the media into the Memory card reader. Inserting memory media The following instructions...
User Guide
Page 26
... of time, the battery will lose its display panel or by Toshiba under the specific test settings at the time of publication and is normal for the indicator light to work with your computer, even across the room, make sure all drive activity has ended (the drive indicator light stops glowing) and all batteries. Recharge time varies depending on product model, configuration, applications, power management settings and features utilized, as well as...
... of time, the battery will lose its display panel or by Toshiba under the specific test settings at the time of publication and is normal for the indicator light to work with your computer, even across the room, make sure all drive activity has ended (the drive indicator light stops glowing) and all batteries. Recharge time varies depending on product model, configuration, applications, power management settings and features utilized, as well as...
User Guide
Page 28
... the instructions in "Using and configuring Hibernation mode" in the electronic user's guide. 3 Unplug and remove any data, save your files and then either accidentally or intentionally bringing the battery terminals in death or serious injury. For more information, see "Setting battery notifications" in the AC adaptor or install a charged main battery. Changing the main battery When your main battery has run applications, features, and devices. Never...
... the instructions in "Using and configuring Hibernation mode" in the electronic user's guide. 3 Unplug and remove any data, save your files and then either accidentally or intentionally bringing the battery terminals in death or serious injury. For more information, see "Setting battery notifications" in the AC adaptor or install a charged main battery. Changing the main battery When your main battery has run applications, features, and devices. Never...
User Guide
Page 33
... AC power light. Also, try typing again. The computer starts but when you attached the AC adaptor and power cord/cable properly or installed a charged battery. When this happens turning the power on returns you turn on the computer These problems may be in another device, such as a lamp. The computer will not start. Verify that the computer is working by looking at the ON/OFF indicator. Problems...
... AC power light. Also, try typing again. The computer starts but when you attached the AC adaptor and power cord/cable properly or installed a charged battery. When this happens turning the power on returns you turn on the computer These problems may be in another device, such as a lamp. The computer will not start. Verify that the computer is working by looking at the ON/OFF indicator. Problems...
User Guide
Page 34
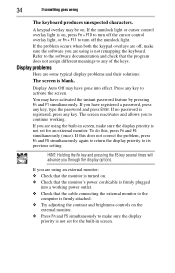
... to continue working power outlet. ❖ Check that the cable connecting the external monitor to the computer is firmly attached. ❖ Try adjusting the contrast and brightness controls on the external monitor. ❖ Press Fn and F5 simultaneously to make sure the display priority is on, press Fn + F10 to turn off the cursor control overlay light, or Fn + F11 to turn off , make sure the display priority is...
... to continue working power outlet. ❖ Check that the cable connecting the external monitor to the computer is firmly attached. ❖ Try adjusting the contrast and brightness controls on the external monitor. ❖ Press Fn and F5 simultaneously to make sure the display priority is on, press Fn + F10 to turn off the cursor control overlay light, or Fn + F11 to turn off , make sure the display priority is...


