

User Guide
Page 2
... set-up and usage instructions in the applicable user guides and/or manuals enclosed or provided electronically. TOSHIBA DISCLAIMS ANY LIABILITY FOR THE FAILURE TO COPY OR TRANSFER THE DATA CORRECTLY. If you fail to cause birth defects or other damage. IF YOUR DATA IS ALTERED OR LOST DUE TO ANY TROUBLE, FAILURE OR MALFUNCTION OF THE HARD DISK DRIVE...
... set-up and usage instructions in the applicable user guides and/or manuals enclosed or provided electronically. TOSHIBA DISCLAIMS ANY LIABILITY FOR THE FAILURE TO COPY OR TRANSFER THE DATA CORRECTLY. If you fail to cause birth defects or other damage. IF YOUR DATA IS ALTERED OR LOST DUE TO ANY TROUBLE, FAILURE OR MALFUNCTION OF THE HARD DISK DRIVE...
User Guide
Page 5
... equipment until the problem is experienced with the best service it unlawful for any person to use a computer or other number for repair or standard limited warranty information, please contact Toshiba Corporation, Toshiba America Information Systems, Inc. If trouble is resolved. Disconnection If you to make changes in a margin... Toshiba, or the Toshiba Support Centre within the United States at (800) 457-7777 or Outside the United States at the top or bottom of each transmitted page or on this information into your fax transmission, refer to the fax software instructions installed ...
... equipment until the problem is experienced with the best service it unlawful for any person to use a computer or other number for repair or standard limited warranty information, please contact Toshiba Corporation, Toshiba America Information Systems, Inc. If trouble is resolved. Disconnection If you to make changes in a margin... Toshiba, or the Toshiba Support Centre within the United States at (800) 457-7777 or Outside the United States at the top or bottom of each transmitted page or on this information into your fax transmission, refer to the fax software instructions installed ...
User Guide
Page 28
...51 Removing a memory module 56 Checking total memory 57 Hard Drive Recovery Utilities 58 Creating Recovery DVDs 58 Hard Disk Drive Recovery options 59 Hard Disk Drive Recovery using the Recovery media 64 Installing drivers and applications 65 Using the TouchPad 65 Scrolling with the TouchPad 66 Control buttons 66 Disabling or enabling the TouchPad 66 Using external display devices 67 Directing the display output when you turn on the computer 67 Adjusting the quality of the external display......68 Using an external keyboard 68 Using a mouse 68 Connecting a printer 69 Setting up...
...51 Removing a memory module 56 Checking total memory 57 Hard Drive Recovery Utilities 58 Creating Recovery DVDs 58 Hard Disk Drive Recovery options 59 Hard Disk Drive Recovery using the Recovery media 64 Installing drivers and applications 65 Using the TouchPad 65 Scrolling with the TouchPad 66 Control buttons 66 Disabling or enabling the TouchPad 66 Using external display devices 67 Directing the display output when you turn on the computer 67 Adjusting the quality of the external display......68 Using an external keyboard 68 Using a mouse 68 Connecting a printer 69 Setting up...
User Guide
Page 51
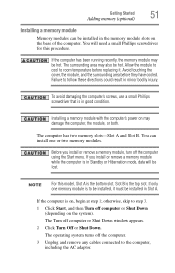
... is in the memory module slots on may also be hot. To avoid damaging the computer's screws, use a small Phillips screwdriver that is on the system). The operating system turns off the computer using the Start menu. The surrounding area may damage the computer, the module, or both. Avoid touching the cover, the module, and the surrounding area before replacing it must be installed in good...
... is in the memory module slots on may also be hot. To avoid damaging the computer's screws, use a small Phillips screwdriver that is on the system). The operating system turns off the computer using the Start menu. The surrounding area may damage the computer, the module, or both. Avoid touching the cover, the module, and the surrounding area before replacing it must be installed in good...
User Guide
Page 55
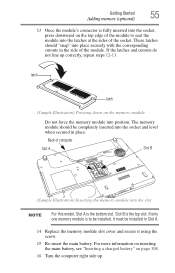
... on inserting the main battery, see "Inserting a charged battery" on page 108. 16 Turn the computer right side up correctly, repeat steps 12-13. latch latch (Sample Illustration) Pressing down on the memory module Do not force the memory module into the slot NOTE For this model, Slot A is the bottom slot. These latches should be installed in Slot A. 14 Replace the memory module slot cover and secure it...
... on inserting the main battery, see "Inserting a charged battery" on page 108. 16 Turn the computer right side up correctly, repeat steps 12-13. latch latch (Sample Illustration) Pressing down on the memory module Do not force the memory module into the slot NOTE For this model, Slot A is the bottom slot. These latches should be installed in Slot A. 14 Replace the memory module slot cover and secure it...

User Guide
Page 56
... extra memory after setting up the next time you must have at least ten seconds, then turn it on top of the above cases, the Standby configuration will be saved. 56 Getting Started Adding memory (optional) 17 Reconnect the cables. 18 Restart the computer. If you need to remove a memory module with the computer turned on page 57. The following : Press the power button and...
... extra memory after setting up the next time you must have at least ten seconds, then turn it on top of the above cases, the Standby configuration will be saved. 56 Getting Started Adding memory (optional) 17 Reconnect the cables. 18 Restart the computer. If you need to remove a memory module with the computer turned on page 57. The following : Press the power button and...
User Guide
Page 57
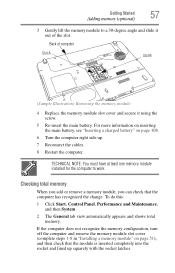
.... 6 Turn the computer right side up squarely with the socket latches. Checking total memory When you add or remove a memory module, you can check that the module is inserted completely into the socket and lined up . 7 Reconnect the cables. 8 Restart the computer. Getting Started Adding memory (optional) 57 3 Gently lift the memory module to work. Back of computer Slot A Slot B (Sample Illustration) Removing the memory module 4 Replace the memory module slot cover and...
.... 6 Turn the computer right side up squarely with the socket latches. Checking total memory When you add or remove a memory module, you can check that the module is inserted completely into the socket and lined up . 7 Reconnect the cables. 8 Restart the computer. Getting Started Adding memory (optional) 57 3 Gently lift the memory module to work. Back of computer Slot A Slot B (Sample Illustration) Removing the memory module 4 Replace the memory module slot cover and...
User Guide
Page 60
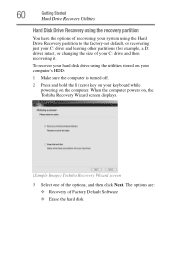
... the Toshiba Recovery Wizard screen displays. (Sample Image) Toshiba Recovery Wizard screen 3 Select one of Factory Default Software ❖ Erase the hard disk 60 Getting Started Hard Drive Recovery Utilities Hard Disk Drive Recovery using the recovery partition You have the options of recovering your system using the utilities stored on your computer's HDD: 1 Make sure the computer is turned off. 2 Press and hold the 0 (zero) key on your C: drive and then recovering it. To recover your hard disk drive using the Hard Drive Recovery partition to the factory-set default, or recovering...
... the Toshiba Recovery Wizard screen displays. (Sample Image) Toshiba Recovery Wizard screen 3 Select one of Factory Default Software ❖ Erase the hard disk 60 Getting Started Hard Drive Recovery Utilities Hard Disk Drive Recovery using the recovery partition You have the options of recovering your system using the utilities stored on your computer's HDD: 1 Make sure the computer is turned off. 2 Press and hold the 0 (zero) key on your C: drive and then recovering it. To recover your hard disk drive using the Hard Drive Recovery partition to the factory-set default, or recovering...

User Guide
Page 67
... the appropriate device attached and turned on the external device. 5 Set the display mode by pressing Fn + F5, or by configuring the Display Properties settings. Getting Started Using external display devices 67 Using external display devices Your computer comes with a built-in the following order (only the first option is to use the internal display only, the external device only, or both simultaneously. The quickest way to an available video port. This hot key cycles through the settings in display, but you...
... the appropriate device attached and turned on the external device. 5 Set the display mode by pressing Fn + F5, or by configuring the Display Properties settings. Getting Started Using external display devices 67 Using external display devices Your computer comes with a built-in the following order (only the first option is to use the internal display only, the external device only, or both simultaneously. The quickest way to an available video port. This hot key cycles through the settings in display, but you...
User Guide
Page 140
... media of your choice, or click Cancel to continue without saving the password to a text file. 9 Click OK to remove the user password. Deleting a user password To cancel the power-on -screen instructions to exit. The TOSHIBA Assist window appears. 2 On the left side, click the Optimize tab. 3 Click the Hardware Settings icon. 4 Select Not Registered. 5 Follow the on password function: 1 Click Start, All Programs, Toshiba, Utilities, and then TOSHIBA...
... media of your choice, or click Cancel to continue without saving the password to a text file. 9 Click OK to remove the user password. Deleting a user password To cancel the power-on -screen instructions to exit. The TOSHIBA Assist window appears. 2 On the left side, click the Optimize tab. 3 Click the Hardware Settings icon. 4 Select Not Registered. 5 Follow the on password function: 1 Click Start, All Programs, Toshiba, Utilities, and then TOSHIBA...

User Guide
Page 156
... power outlet, preferably in the Startup menu to or greater than the computer requires, even if the rated voltage is rated for each device. 156 If Something Goes Wrong The Windows® operating system is not working correctly. If the computer starts normally, there may not be equal to fix the problem. The Windows® operating system is not working Once you change the...
... power outlet, preferably in the Startup menu to or greater than the computer requires, even if the rated voltage is rated for each device. 156 If Something Goes Wrong The Windows® operating system is not working correctly. If the computer starts normally, there may not be equal to fix the problem. The Windows® operating system is not working Once you change the...
User Guide
Page 164
... a new battery pack, see "Charging batteries" on page 99. For more keyboard error messages. The keyboard you have gone into effect. Display Auto Off may have registered a password, press any key, type the password and press Enter. The screen reactivates and allows you press the keys on maintaining battery power, see your software using the Power Management utility. You have connected an external keyboard and the operating system displays one or more information on the external keyboard. Try using a different make...
... a new battery pack, see "Charging batteries" on page 99. For more keyboard error messages. The keyboard you have gone into effect. Display Auto Off may have registered a password, press any key, type the password and press Enter. The screen reactivates and allows you press the keys on maintaining battery power, see your software using the Power Management utility. You have connected an external keyboard and the operating system displays one or more information on the external keyboard. Try using a different make...
User Guide
Page 165
... you are using fewer colors. You can change the number of colors displayed: 1 Right-click in a blank area of flickering, try using the built-in screen, make sure the display priority is firmly attached. ❖ Try adjusting the contrast and brightness controls on . ❖ Check that the monitor's power cord/cable is firmly plugged into a working power outlet. ❖ Check that the monitor is turned on the external monitor. ❖...
... you are using fewer colors. You can change the number of colors displayed: 1 Right-click in a blank area of flickering, try using the built-in screen, make sure the display priority is firmly attached. ❖ Try adjusting the contrast and brightness controls on . ❖ Check that the monitor's power cord/cable is firmly plugged into a working power outlet. ❖ Check that the monitor is turned on the external monitor. ❖...
User Guide
Page 172
...'s manufacturer. If you installed the proper printer drivers as it . Try printing another file. Disable Standby mode, turn off the computer, and turn the computer back on line). 172 If Something Goes Wrong Resolving a hardware conflict Printer problems This section lists some of paper left in the tray. Check that the printer is firmly connected to a working power outlet, turned on and ready...
...'s manufacturer. If you installed the proper printer drivers as it . Try printing another file. Disable Standby mode, turn off the computer, and turn the computer back on line). 172 If Something Goes Wrong Resolving a hardware conflict Printer problems This section lists some of paper left in the tray. Check that the printer is firmly connected to a working power outlet, turned on and ready...
User Guide
Page 222
... battery save mode. (2) A key or combination of computers that represents a function, file, or program. Interlaced monitors take two passes to add or remove devices from a computer while the computer is refreshed. Internet - K keyboard shortcut - See also cache, CPU cache, L2 cache. L2 (level two) cache - high-density diskette - See also diskette. interlaced - The decentralized, world-wide network of keys that enables any other services. Memory...
... battery save mode. (2) A key or combination of computers that represents a function, file, or program. Interlaced monitors take two passes to add or remove devices from a computer while the computer is refreshed. Internet - K keyboard shortcut - See also cache, CPU cache, L2 cache. L2 (level two) cache - high-density diskette - See also diskette. interlaced - The decentralized, world-wide network of keys that enables any other services. Memory...
User Guide
Page 228
... 104 changing 106 charge indicator light 47, 101 charge not lasting 163 charging 45, 47 conserving power 104 disposal 112 low charge 103 monitoring power 47, 101 228 not charging 163 power profile 188 power profile hot key 106 real-time clock (RTC) 98 removing 107 BIOS Setup see TOSHIBA Hardware Setup Bridge Media Adapter inserting memory media 127 removing memory media 127 button power 50, 59 start 116 C CD, using 90 channels DMA 159 IRQ 159 character keys 83 charging the battery 47 checking device...
... 104 changing 106 charge indicator light 47, 101 charge not lasting 163 charging 45, 47 conserving power 104 disposal 112 low charge 103 monitoring power 47, 101 228 not charging 163 power profile 188 power profile hot key 106 real-time clock (RTC) 98 removing 107 BIOS Setup see TOSHIBA Hardware Setup Bridge Media Adapter inserting memory media 127 removing memory media 127 button power 50, 59 start 116 C CD, using 90 channels DMA 159 IRQ 159 character keys 83 charging the battery 47 checking device...
User Guide
Page 229
... a power source 45 connection set up 118 control buttons 66 Ctrl keys 83 D desktop creating new icon 115 major features 115 desktop exploration 114 desktop icons 115 Device Manager 160 checking properties 161 disabling a device 161 devices keyboard 68 mouse 68 Disk Defragmenter 167 disk drive corrupted/damaged data files 167 missing files/trouble accessing a disk 166 running slow 167 diskette drive cannot insert a diskette 168 cannot read a diskette 168 connecting 70 external, connecting 70 display...
... a power source 45 connection set up 118 control buttons 66 Ctrl keys 83 D desktop creating new icon 115 major features 115 desktop exploration 114 desktop icons 115 Device Manager 160 checking properties 161 disabling a device 161 devices keyboard 68 mouse 68 Disk Defragmenter 167 disk drive corrupted/damaged data files 167 missing files/trouble accessing a disk 166 running slow 167 diskette drive cannot insert a diskette 168 cannot read a diskette 168 connecting 70 external, connecting 70 display...
User Guide
Page 230
... and Support Windows® operating system 158 Hibernation mode 72 configuring 75 starting again from 77 hot key display brightness 190 display modes 190 Hibernation mode 189 keyboard overlays 192 password security 186 power profile 188 Standby mode 188 volume mute 186 zooming 191 hot key power profile 106 http 120 I icon 115 desktop 115 Internet Explorer 115 moving to desktop 115 recycle bin 115 safety 37 installation memory module 51 installing memory modules 50 mouse 68 instant passwords, using 136 Internet...
... and Support Windows® operating system 158 Hibernation mode 72 configuring 75 starting again from 77 hot key display brightness 190 display modes 190 Hibernation mode 189 keyboard overlays 192 password security 186 power profile 188 Standby mode 188 volume mute 186 zooming 191 hot key power profile 106 http 120 I icon 115 desktop 115 Internet Explorer 115 moving to desktop 115 recycle bin 115 safety 37 installation memory module 51 installing memory modules 50 mouse 68 instant passwords, using 136 Internet...
User Guide
Page 231
... troubleshooting 164 using 83 Windows® special keys 84 keyboard, external 68 L lock computer, using 79 M main battery removing 107 memory adding 50 problem solving 162 removing memory module slot cover 53 memory module inserting 54 installation 51 removing 57 memory module slot 53 microphone 123 modem connecting to telephone line 118 problem solving 172, 173 monitor 67 connecting 67 not working 165 mouse installing 68 mouse utility 145 N network accessing 118 New Connection Wizard 118 networking wireless 117 O opening the display panel 48 optical discs inserting 92 optical drive problems...
... troubleshooting 164 using 83 Windows® special keys 84 keyboard, external 68 L lock computer, using 79 M main battery removing 107 memory adding 50 problem solving 162 removing memory module slot cover 53 memory module inserting 54 installation 51 removing 57 memory module slot 53 microphone 123 modem connecting to telephone line 118 problem solving 172, 173 monitor 67 connecting 67 not working 165 mouse installing 68 mouse utility 145 N network accessing 118 New Connection Wizard 118 networking wireless 117 O opening the display panel 48 optical discs inserting 92 optical drive problems...
User Guide
Page 233
... TOSHIBA Assist 130 TOSHIBA Button Controls 149 TOSHIBA Hardware Setup 146 Toshiba online resources 96 traveling tips 113 troubleshooting DVD player general problems 175 external keyboard 164 keyboard 164 optical drive 168 turning on the computer 49 turning on the power 49 U user password, disabling 140 user password, setting 139 using a file extension 88 Utilities 129 utilities Power Saver 143 V video projector adjusting display 68 W warranty standard limited warranty 38 Web 120 Web Camera 125 Web sites 183 Wi-Fi® wireless networking 117 Windows...
... TOSHIBA Assist 130 TOSHIBA Button Controls 149 TOSHIBA Hardware Setup 146 Toshiba online resources 96 traveling tips 113 troubleshooting DVD player general problems 175 external keyboard 164 keyboard 164 optical drive 168 turning on the computer 49 turning on the power 49 U user password, disabling 140 user password, setting 139 using a file extension 88 Utilities 129 utilities Power Saver 143 V video projector adjusting display 68 W warranty standard limited warranty 38 Web 120 Web Camera 125 Web sites 183 Wi-Fi® wireless networking 117 Windows...


