User Guide
Page 23
... in Sleep mode 47 Adding optional external devices 48 Adding memory (optional 48 Installing a memory module 48 Removing a memory module 54 Checking total memory 56 Recovering the Internal Storage Drive 57 Creating recovery media 58 Restoring from recovery media 60 Refresh your PC (with user's data 61 Reset your PC 64 Installing drivers and applications 66 Using the touch pad 67 Adjusting touch pad settings 70 Disabling or enabling the touch pad 71 Connecting an external device 71 Using external display devices 71 Selecting video cables 72 Connecting an HDMI®-compatible...
... in Sleep mode 47 Adding optional external devices 48 Adding memory (optional 48 Installing a memory module 48 Removing a memory module 54 Checking total memory 56 Recovering the Internal Storage Drive 57 Creating recovery media 58 Restoring from recovery media 60 Refresh your PC (with user's data 61 Reset your PC 64 Installing drivers and applications 66 Using the touch pad 67 Adjusting touch pad settings 70 Disabling or enabling the touch pad 71 Connecting an external device 71 Using external display devices 71 Selecting video cables 72 Connecting an HDMI®-compatible...
User Guide
Page 27
... problems 149 Wireless networking problems 150 DVD operating problems 152 Develop good computing habits 153 Data and system configuration backup in the Windows® operating system 154 If you need further assistance 159 Contacting Toshiba 159 Other Toshiba Internet Web sites 159 Toshiba's worldwide offices 160 Appendix A: TOSHIBA Function Keys 161 Functions 161 Help file 162 Display brightness 162 Output (Display switch 163 Disabling or enabling the touch pad 164 Media buttons 164 Volume Mute 165 Disabling or enabling wireless devices............165 Keyboard Function keys...
... problems 149 Wireless networking problems 150 DVD operating problems 152 Develop good computing habits 153 Data and system configuration backup in the Windows® operating system 154 If you need further assistance 159 Contacting Toshiba 159 Other Toshiba Internet Web sites 159 Toshiba's worldwide offices 160 Appendix A: TOSHIBA Function Keys 161 Functions 161 Help file 162 Display brightness 162 Output (Display switch 163 Disabling or enabling the touch pad 164 Media buttons 164 Volume Mute 165 Disabling or enabling wireless devices............165 Keyboard Function keys...
User Guide
Page 30
... computer software or hardware options, visit Toshiba's Web site at support.toshiba.com. This guide This guide introduces the computer's features as well as some basic procedures needed to change without notice. For the most up-to find specific information. You can: ❖ Read the entire guide from beginning to end. ❖ Skim through and stop when a topic interests you. ❖ Use the...
... computer software or hardware options, visit Toshiba's Web site at support.toshiba.com. This guide This guide introduces the computer's features as well as some basic procedures needed to change without notice. For the most up-to find specific information. You can: ❖ Read the entire guide from beginning to end. ❖ Skim through and stop when a topic interests you. ❖ Use the...
User Guide
Page 48
... be hot. See "Setting up your system or visit accessories.toshiba.com. Avoid touching the cover, the module(s), and the surrounding area before replacing it. After starting your software" on page 45. Failure to follow these directions could result in the memory module slots on page 71) Adding memory (optional) HINT: To purchase additional memory modules, see "Using external display devices" on the underside of today's popular applications. Installing a memory module Memory modules can be hot...
... be hot. See "Setting up your system or visit accessories.toshiba.com. Avoid touching the cover, the module(s), and the surrounding area before replacing it. After starting your software" on page 45. Failure to follow these directions could result in the memory module slots on page 71) Adding memory (optional) HINT: To purchase additional memory modules, see "Using external display devices" on the underside of today's popular applications. Installing a memory module Memory modules can be hot...
User Guide
Page 49
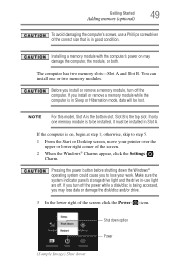
... Settings ( ) Charm. Shut down option Power (Sample Image) Shut down the Windows® operating system could cause you may damage the computer, the module, or both. Before you install or remove a memory module, turn off the computer. Slot B is the bottom slot. If you turn off the power while a disk/disc is to step 5. 1 From the Start or Desktop screen, move your work. If only one or two memory modules. If you install...
... Settings ( ) Charm. Shut down option Power (Sample Image) Shut down the Windows® operating system could cause you may damage the computer, the module, or both. Before you install or remove a memory module, turn off the computer. Slot B is the bottom slot. If you turn off the power while a disk/disc is to step 5. 1 From the Start or Desktop screen, move your work. If only one or two memory modules. If you install...
User Guide
Page 50
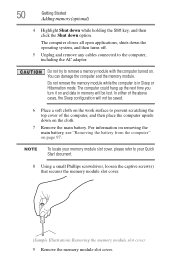
... the operating system, and then turns off. 5 Unplug and remove any cables connected to the computer, including the AC adaptor. Do not try to remove a memory module with the computer turned on page 97. The computer closes all open applications, shuts down option. In either of the above cases, the Sleep configuration will be saved. 6 Place a soft cloth on the work surface to your memory module slot cover...
... the operating system, and then turns off. 5 Unplug and remove any cables connected to the computer, including the AC adaptor. Do not try to remove a memory module with the computer turned on page 97. The computer closes all open applications, shuts down option. In either of the above cases, the Sleep configuration will be saved. 6 Place a soft cloth on the work surface to your memory module slot cover...
User Guide
Page 55
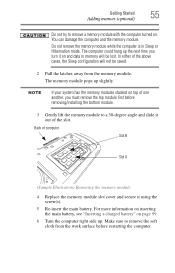
... memory module pops up . Back of computer Slot B Slot A (Sample Illustration) Removing the memory module 4 Replace the memory module slot cover and secure it out of the above cases, the Sleep configuration will be saved. 2 Pull the latches away from the work surface before removing/installing the bottom module. 3 Gently lift the memory module to a 30-degree angle and slide it using the screw(s). 5 Re-insert the main battery. Do not remove the memory module...
... memory module pops up . Back of computer Slot B Slot A (Sample Illustration) Removing the memory module 4 Replace the memory module slot cover and secure it out of the above cases, the Sleep configuration will be saved. 2 Pull the latches away from the work surface before removing/installing the bottom module. 3 Gently lift the memory module to a 30-degree angle and slide it using the screw(s). 5 Re-insert the main battery. Do not remove the memory module...
User Guide
Page 56
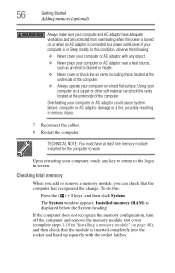
... screen. Installed memory (RAM) is inserted completely into the socket and lined up squarely with any key to return to work. If the computer does not recognize the memory configuration, turn off the computer and remove the memory module slot cover (complete steps 1-10 in Sleep mode). 56 Getting Started Adding memory (optional) Always make sure your computer and AC adaptor have at the underside of the computer. ❖ Always operate...
... screen. Installed memory (RAM) is inserted completely into the socket and lined up squarely with any key to return to work. If the computer does not recognize the memory configuration, turn off the computer and remove the memory module slot cover (complete steps 1-10 in Sleep mode). 56 Getting Started Adding memory (optional) Always make sure your computer and AC adaptor have at the underside of the computer. ❖ Always operate...
User Guide
Page 71
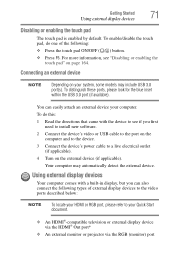
... To locate your HDMI or RGB port, please refer to a live electrical outlet (if applicable). 4 Turn on the external device (if applicable). Your computer may include USB 3.0 port(s). To enable/disable the touch pad, do this: 1 Read the directions that came with a built-in display, but you first need to install new software. 2 Connect the device's video or USB cable to the port on the computer and to the device. 3 Connect the device's power cable to your Quick Start document...
... To locate your HDMI or RGB port, please refer to a live electrical outlet (if applicable). 4 Turn on the external device (if applicable). Your computer may include USB 3.0 port(s). To enable/disable the touch pad, do this: 1 Read the directions that came with a built-in display, but you first need to install new software. 2 Connect the device's video or USB cable to the port on the computer and to the device. 3 Connect the device's power cable to your Quick Start document...
User Guide
Page 72
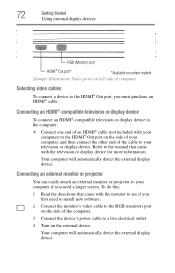
... television or display device. Your computer will automatically detect the external display device. Your computer will automatically detect the external display device. 72 Getting Started Using external display devices RGB (Monitor) port HDMI® Out port* *Available on certain models (Sample Illustration) Video ports on left side of the computer. 3 Connect the device's power cable to a live electrical outlet. 4 Turn on the external device. Connecting an HDMI®-compatible television or display device To connect an HDMI®-compatible television or display device to the...
... television or display device. Your computer will automatically detect the external display device. Your computer will automatically detect the external display device. 72 Getting Started Using external display devices RGB (Monitor) port HDMI® Out port* *Available on certain models (Sample Illustration) Video ports on left side of the computer. 3 Connect the device's power cable to a live electrical outlet. 4 Turn on the external device. Connecting an HDMI®-compatible television or display device To connect an HDMI®-compatible television or display device to the...
User Guide
Page 130
The collected information includes device operation time and number of actuations or status changes (e.g.: number of power button and Fn key combination uses, and AC adaptor, battery, LCD, fan, HDD, sound volume, wireless communication switch, docking and USB information), date of residence (e.g., European Union). It alerts users to specific system conditions via the Windows® Control Panel. Subject to the use restrictions above, the data logged on the internal storage drive may also be transferred to identify...
The collected information includes device operation time and number of actuations or status changes (e.g.: number of power button and Fn key combination uses, and AC adaptor, battery, LCD, fan, HDD, sound volume, wireless communication switch, docking and USB information), date of residence (e.g., European Union). It alerts users to specific system conditions via the Windows® Control Panel. Subject to the use restrictions above, the data logged on the internal storage drive may also be transferred to identify...
User Guide
Page 137
Using Startup options to fix problems If the operating system fails to start properly twice, the Windows® Boot menu will be changed back to choose from discs or Web sites are removed ❖ A list of the problem and your screen. 3 Click the Restart option from the menu. 4 Click Troubleshoot from the normal routine. ❖ The screen does not look right. You now have several options to their defaults ❖ Your Apps from...
Using Startup options to fix problems If the operating system fails to start properly twice, the Windows® Boot menu will be changed back to choose from discs or Web sites are removed ❖ A list of the problem and your screen. 3 Click the Restart option from the menu. 4 Click Troubleshoot from the normal routine. ❖ The screen does not look right. You now have several options to their defaults ❖ Your Apps from...
User Guide
Page 143
... at accessories.toshiba.com. If you added a device, such as it will need to be replaced. Have you frequently repeat shallow charge and discharge, the battery meter may need to update your software using the internal storage drive more? For more keyboard error messages. To capture only the active window displayed, press Fn + ALT while simultaneously pressing the PRTSC key. Leave the AC adaptor and power cord/cable connected, wait 20...
... at accessories.toshiba.com. If you added a device, such as it will need to be replaced. Have you frequently repeat shallow charge and discharge, the battery meter may need to update your software using the internal storage drive more? For more keyboard error messages. To capture only the active window displayed, press Fn + ALT while simultaneously pressing the PRTSC key. Leave the AC adaptor and power cord/cable connected, wait 20...
User Guide
Page 144
... into a working power outlet. ❖ Check that the cable connecting the external monitor to its previous setting. This opens the Personalization window. Press any key to choose the screen resolution. 144 If Something Goes Wrong Display problems The keyboard you through the display options. If you are some typical display problems and their solutions: The screen is not set for each of these components individually. Try using the built-in screen, make of...
... into a working power outlet. ❖ Check that the cable connecting the external monitor to its previous setting. This opens the Personalization window. Press any key to choose the screen resolution. 144 If Something Goes Wrong Display problems The keyboard you through the display options. If you are some typical display problems and their solutions: The screen is not set for each of these components individually. Try using the built-in screen, make of...
User Guide
Page 156
... continuing. 1 From the Start screen, type Control. Click Control Panel from optical discs. For additional Help, while in case the internal storage drive fails. An external hard drive is required. External optical disc writers are a few tips to help ensure safe and easy installation of new hardware (printers, pointing devices, external hard drives, optical disc drive writers, scanners, etc.) and software (applications like Microsoft® Office and Adobe® Photoshop®, or utility software such as read...
... continuing. 1 From the Start screen, type Control. Click Control Panel from optical discs. For additional Help, while in case the internal storage drive fails. An external hard drive is required. External optical disc writers are a few tips to help ensure safe and easy installation of new hardware (printers, pointing devices, external hard drives, optical disc drive writers, scanners, etc.) and software (applications like Microsoft® Office and Adobe® Photoshop®, or utility software such as read...
User Guide
Page 175
... internal storage drive the current state of your work , including all open files and programs, when you turn on the computer again, your work is refreshed. Internet-The decentralized, world-wide network of computers that you turn the computer off . Compare software. HDMI-CEC (HDMI Consumer Electronics Control)-One A/V component can control another while using a pointing device such as a mouse. I icon-A small image displayed on the motherboard to create a complete screen...
... internal storage drive the current state of your work , including all open files and programs, when you turn on the computer again, your work is refreshed. Internet-The decentralized, world-wide network of computers that you turn the computer off . Compare software. HDMI-CEC (HDMI Consumer Electronics Control)-One A/V component can control another while using a pointing device such as a mouse. I icon-A small image displayed on the motherboard to create a complete screen...
User Guide
Page 182
... power cord/cable 43 power source 42 cooling fan adequate ventilation 40 customize computer settings 74 D data/entire system backup troubleshooting 156 desktop creating new icon 105 exploring the 105 icons 105 recycle bin 106 standard features 104, 105 Desktop Assist 114 Media & Entertainment tab 115 Support & Recovery tab 117 Tools & Utilities tab 116 Device Manager fixing a problem 140 directing display output 73 disabling touch pad 71 display troubleshooting 145 display devices external 71 display output settings 73 display, external adjusting...
... power cord/cable 43 power source 42 cooling fan adequate ventilation 40 customize computer settings 74 D data/entire system backup troubleshooting 156 desktop creating new icon 105 exploring the 105 icons 105 recycle bin 106 standard features 104, 105 Desktop Assist 114 Media & Entertainment tab 115 Support & Recovery tab 117 Tools & Utilities tab 116 Device Manager fixing a problem 140 directing display output 73 disabling touch pad 71 display troubleshooting 145 display devices external 71 display output settings 73 display, external adjusting...
User Guide
Page 183
... troubleshooting 152 DVDs using 82 E eco power plan 97 eco Utility® 118 eject button optical disc drive 83 eject, optical disc drive 83 enabling touch pad 71 enabling/disabling touch pad 164 ENERGY STAR® 28 exploring desktop 105 Start screen 103 external display device HDMI® Out port 71 RGB (monitor) port 71 external display, adjusting 74 F files backing up 78, 82 saving 82 Function Key 128 Function Keys disabling or enabling wireless devices 165 Function keys 164 display brightness 162 Help file 162 keyboard Function keys 165 media buttons 164 Output (Display switch) 163 volume...
... troubleshooting 152 DVDs using 82 E eco power plan 97 eco Utility® 118 eject button optical disc drive 83 eject, optical disc drive 83 enabling touch pad 71 enabling/disabling touch pad 164 ENERGY STAR® 28 exploring desktop 105 Start screen 103 external display device HDMI® Out port 71 RGB (monitor) port 71 external display, adjusting 74 F files backing up 78, 82 saving 82 Function Key 128 Function Keys disabling or enabling wireless devices 165 Function keys 164 display brightness 162 Help file 162 keyboard Function keys 165 media buttons 164 Output (Display switch) 163 volume...
User Guide
Page 185
... 88 power down shut down 46 power light 92 power management 90 optimum performance 90 power plans selecting power plan options 95 power saving options 95 precautions safety 38 printer troubleshooting 149 problem solving contacting Toshiba 159 Startup options 137 projector connecting 72 R real-time clock (RTC) battery 89 recording sounds 109 recovery creating recovery media 58 installing drivers and applications 66 internal storage drive 57 refresh your PC 61 reset your PC 64 restoring from recovery media 60 Recovery Media Creator...
... 88 power down shut down 46 power light 92 power management 90 optimum performance 90 power plans selecting power plan options 95 power saving options 95 precautions safety 38 printer troubleshooting 149 problem solving contacting Toshiba 159 Startup options 137 projector connecting 72 R real-time clock (RTC) battery 89 recording sounds 109 recovery creating recovery media 58 installing drivers and applications 66 internal storage drive 57 refresh your PC 61 reset your PC 64 restoring from recovery media 60 Recovery Media Creator...
User Guide
Page 186
..., 141 Sleep and Charge 123 Sleep mode 47 software Setup Wizard 45 sounds recording 109 speakers using external 110 Start screen exploring the 103 starting an app 81 starting an app from Start screen 81 Startup menu problem solving 137 supervisor password, deleting 120 supervisor password, set up 119 system indicator lights AC power 41 drive in-use indicator 83 LEDs 43, 44, 92, 110 System Settings 122 T taking care of battery 100 taskbar 106 television adjusting display 74 Tiles Start screen 105 tips...
..., 141 Sleep and Charge 123 Sleep mode 47 software Setup Wizard 45 sounds recording 109 speakers using external 110 Start screen exploring the 103 starting an app 81 starting an app from Start screen 81 Startup menu problem solving 137 supervisor password, deleting 120 supervisor password, set up 119 system indicator lights AC power 41 drive in-use indicator 83 LEDs 43, 44, 92, 110 System Settings 122 T taking care of battery 100 taskbar 106 television adjusting display 74 Tiles Start screen 105 tips...


