

Users Manual AU/NZ
Page 2
... errors, omissions or discrepancies between the computer and the manual. Reverse engineering or disassembly is intended for accuracy. However, succeeding computers and manuals are accurate for the TOSHIBA Satellite P500 / Satellite P505 / Satellite P507, Qosmio X505, Qosmio X500, Qosmio G60, Satellite P500D / Satellite P505D / Satellite P507D Series Portable Personal Computer at coffee shops or hotels for personal use or use the screen mode switching functions (e.g. Any other limited viewing uses...
... errors, omissions or discrepancies between the computer and the manual. Reverse engineering or disassembly is intended for accuracy. However, succeeding computers and manuals are accurate for the TOSHIBA Satellite P500 / Satellite P505 / Satellite P507, Qosmio X505, Qosmio X500, Qosmio G60, Satellite P500D / Satellite P505D / Satellite P507D Series Portable Personal Computer at coffee shops or hotels for personal use or use the screen mode switching functions (e.g. Any other limited viewing uses...

Users Manual AU/NZ
Page 8
... it may cause harm to the telephone network. Type of a standard jack called the USOC RJ11C. If problems arise If any of your telephone equipment is not operating properly, you should immediately remove it may temporarily discontinue service. Connection to party lines service is prohibited. In the event repairs are ready to install or use the modem, call the telephone company and...
... it may cause harm to the telephone network. Type of a standard jack called the USOC RJ11C. If problems arise If any of your telephone equipment is not operating properly, you should immediately remove it may temporarily discontinue service. Connection to party lines service is prohibited. In the event repairs are ready to install or use the modem, call the telephone company and...
Users Manual AU/NZ
Page 29
... Accessing HW Setup 7-1 HW Setup Window 7-1 Chapter 8 Optional Devices ExpressCard 8-2 Inserting an ExpressCard 8-2 Removing an ExpressCard 8-3 SD/SDHC/MMC/MEMORY STICK / MEMORY STICK PRO/xD Memory cards 8-4 Installing a memory card 8-5 Removing a memory card 8-5 Memory card care 8-6 Memory expansion 8-7 Installing a memory module 8-7 Removing a memory module 8-10 Additional battery pack 8-11 Additional AC adaptor 8-11 External monitor 8-12 HDMI 8-12 Setting for display video on HDMI 8-13 Settings for audio on HDMI 8-13 i.LINK (IEEE1394 8-13 Precautions 8-14 Connecting...
... Accessing HW Setup 7-1 HW Setup Window 7-1 Chapter 8 Optional Devices ExpressCard 8-2 Inserting an ExpressCard 8-2 Removing an ExpressCard 8-3 SD/SDHC/MMC/MEMORY STICK / MEMORY STICK PRO/xD Memory cards 8-4 Installing a memory card 8-5 Removing a memory card 8-5 Memory card care 8-6 Memory expansion 8-7 Installing a memory module 8-7 Removing a memory module 8-10 Additional battery pack 8-11 Additional AC adaptor 8-11 External monitor 8-12 HDMI 8-12 Setting for display video on HDMI 8-13 Settings for audio on HDMI 8-13 i.LINK (IEEE1394 8-13 Precautions 8-14 Connecting...

Users Manual AU/NZ
Page 31
... read over the Specifications section of the TOSHIBA Satellite P500 / Satellite P505 / Satellite P507, Qosmio X505, Qosmio X500, Qosmio G60, Satellite P500D / Satellite P505D / Satellite P507D Series Series computer. Chapter 3, Getting Started, provides a quick overview of the computer and briefly explains how they function. Be sure to look over the Introduction and The Grand Tour chapters to begin using optional devices and troubleshooting. Manual contents This manual is organized, then...
... read over the Specifications section of the TOSHIBA Satellite P500 / Satellite P505 / Satellite P507, Qosmio X505, Qosmio X500, Qosmio G60, Satellite P500D / Satellite P505D / Satellite P507D Series Series computer. Chapter 3, Getting Started, provides a quick overview of the computer and briefly explains how they function. Be sure to look over the Introduction and The Grand Tour chapters to begin using optional devices and troubleshooting. Manual contents This manual is organized, then...

Users Manual AU/NZ
Page 35
...TOSHIBA USB Sleep and Charge Utility ■ TOSHIBA eco Utility ■ Online Manual Other software may be preinstalled dependant on the model purchased. Documentation ■ TOSHIBA Satellite P500 / Satellite P505 / Satellite P507, Qosmio X505, Qosmio X500, Qosmio G60, Satellite P500D / Satellite P505D / Satellite P507D Series Series Personal Computer User Information Guide ■ International Limited Warranty (ILW) Instruction (This instruction is preinstalled: ■ Windows® 7 ■ Microsoft Internet Explorer ■ TOSHIBA Value Added Package ■ TOSHIBA Hardware Setup...
...TOSHIBA USB Sleep and Charge Utility ■ TOSHIBA eco Utility ■ Online Manual Other software may be preinstalled dependant on the model purchased. Documentation ■ TOSHIBA Satellite P500 / Satellite P505 / Satellite P507, Qosmio X505, Qosmio X500, Qosmio G60, Satellite P500D / Satellite P505D / Satellite P507D Series Series Personal Computer User Information Guide ■ International Limited Warranty (ILW) Instruction (This instruction is preinstalled: ■ Windows® 7 ■ Microsoft Internet Explorer ■ TOSHIBA Value Added Package ■ TOSHIBA Hardware Setup...
Users Manual AU/NZ
Page 42
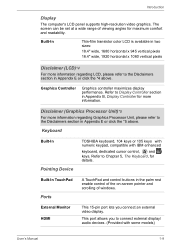
... you to the Disclaimers section in Appendix B, Display Controller for maximum comfort and readability. Keyboard Built-In Pointing Device Built-In TouchPad Ports External Monitor HDMI TOSHIBA keyboard, 104 keys or 105 keys with numeric keypad, compatible with some models) User's Manual 1-9 This port allows you connect an external video display. Introduction Display The computer's LCD panel supports high-resolution video graphics. Built-In Thin-film transistor color LCD is available in two sizes: 18.4" wide, 1680...
... you to the Disclaimers section in Appendix B, Display Controller for maximum comfort and readability. Keyboard Built-In Pointing Device Built-In TouchPad Ports External Monitor HDMI TOSHIBA keyboard, 104 keys or 105 keys with numeric keypad, compatible with some models) User's Manual 1-9 This port allows you connect an external video display. Introduction Display The computer's LCD panel supports high-resolution video graphics. Built-In Thin-film transistor color LCD is available in two sizes: 18.4" wide, 1680...
Users Manual AU/NZ
Page 43
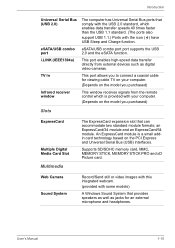
... USB Sleep and Charge function. an ExpressCard/34 module and an ExpressCard/54 module. An ExpressCard module is provided with some models) A Windows Sound System that provides speakers as well as digital video cameras. Supports SD/SDHC memory card, MMC, MEMORY STICK, MEMORY STICK PRO and xD Picture card. Web Camera Sound System Record/Send still or video images with this integrated webcam. (provided with your computer. (Depends on the model you to connect a coaxial cable...
... USB Sleep and Charge function. an ExpressCard/34 module and an ExpressCard/54 module. An ExpressCard module is provided with some models) A Windows Sound System that provides speakers as well as digital video cameras. Supports SD/SDHC memory card, MMC, MEMORY STICK, MEMORY STICK PRO and xD Picture card. Web Camera Sound System Record/Send still or video images with this integrated webcam. (provided with your computer. (Depends on the model you to connect a coaxial cable...
Users Manual AU/NZ
Page 52
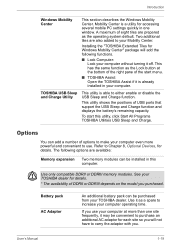
... USB ports that support the USB Sleep and Charge function and displays the battery's remaining capacity. User's Manual 1-19 Two additional tiles are also added to either enable or disable the USB Sleep and Charge function. Introduction Windows Mobility Center This section describes the Windows Mobility Center. Installing the "TOSHIBA Extended Tiles for details. This utility shows the positions of options to use your computer even more than one window. Use only compatible DDRII or DDRIII memory modules...
... USB ports that support the USB Sleep and Charge function and displays the battery's remaining capacity. User's Manual 1-19 Two additional tiles are also added to either enable or disable the USB Sleep and Charge function. Introduction Windows Mobility Center This section describes the Windows Mobility Center. Installing the "TOSHIBA Extended Tiles for details. This utility shows the positions of options to use your computer even more than one window. Use only compatible DDRII or DDRIII memory modules...
Users Manual AU/NZ
Page 83
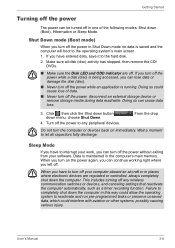
... off. If you can turn off the power to the hard disk. 2. Turn off the power, disconnect an external storage device or remove storage media during data read/write. Click then click the Shut down button down (Boot), Hibernation or Sleep Mode. Wait a moment to the operating system's main screen. 1. Sleep Mode If you have entered data, save it to any wireless communication switches or devices, and canceling settings that reactivate the computer...
... off. If you can turn off the power to the hard disk. 2. Turn off the power, disconnect an external storage device or remove storage media during data read/write. Click then click the Shut down button down (Boot), Hibernation or Sleep Mode. Wait a moment to the operating system's main screen. 1. Sleep Mode If you have entered data, save it to any wireless communication switches or devices, and canceling settings that reactivate the computer...
Users Manual AU/NZ
Page 89
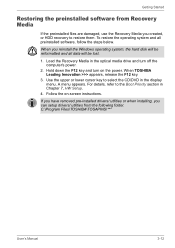
... Windows operating system, the hard disk will be lost. 1. Load the Recovery Media in Chapter 7, HW Setup. 4. Hold down the F12 key and turn off the computer's power. 2. Follow the on the power. For details, refer to select the CD/DVD in the display menu. Use the upper or lower cursor key to the Boot Priority section in the optical media drive and turn on -screen instructions. A menu appears. Getting Started Restoring the preinstalled software from Recovery Media...
... Windows operating system, the hard disk will be lost. 1. Load the Recovery Media in Chapter 7, HW Setup. 4. Hold down the F12 key and turn off the computer's power. 2. Follow the on the power. For details, refer to select the CD/DVD in the display menu. Use the upper or lower cursor key to the Boot Priority section in the optical media drive and turn on -screen instructions. A menu appears. Getting Started Restoring the preinstalled software from Recovery Media...
Users Manual AU/NZ
Page 155
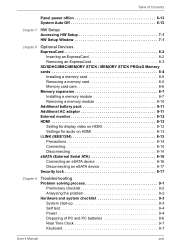
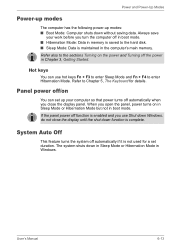
Panel power off/on You can use Shut down Windows, do not close the display panel. Refer to Chapter 5, The Keyboard for a set up modes: ■ Boot Mode: Computer shuts down in Sleep Mode or Hibernation Mode in Windows. If the panel power off function is enabled and you use hot keys Fn + F3 to enter Sleep Mode and Fn + F4 to enter Hibernation Mode. User's Manual 6-13 When you open the panel, power turns on the power and Turning off the power in Chapter 3, Getting Started. The...
Panel power off/on You can use Shut down Windows, do not close the display panel. Refer to Chapter 5, The Keyboard for a set up modes: ■ Boot Mode: Computer shuts down in Sleep Mode or Hibernation Mode in Windows. If the panel power off function is enabled and you use hot keys Fn + F3 to enter Sleep Mode and Fn + F4 to enter Hibernation Mode. User's Manual 6-13 When you open the panel, power turns on the power and Turning off the power in Chapter 3, Getting Started. The...
Users Manual AU/NZ
Page 166
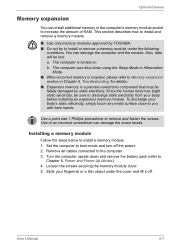
... install and remove a memory module. ■ Use only memory modules approved by static electricity. b. Use a point size 1 Phillips screwdriver to install a memory module. 1. Remove all cables connected to the computer. 3. User's Manual 8-7 a. The computer was shut down and remove the battery pack (refer to Chapter 6, Power and Power-Up Modes). 4. Use of RAM. Turn the computer upside down using the Sleep Mode or Hibernation Mode. ■ When incorrect memory is inserted, please refer to Memory expansion section in the computer's memory module...
... install and remove a memory module. ■ Use only memory modules approved by static electricity. b. Use a point size 1 Phillips screwdriver to install a memory module. 1. Remove all cables connected to the computer. 3. User's Manual 8-7 a. The computer was shut down and remove the battery pack (refer to Chapter 6, Power and Power-Up Modes). 4. Use of RAM. Turn the computer upside down using the Sleep Mode or Hibernation Mode. ■ When incorrect memory is inserted, please refer to Memory expansion section in the computer's memory module...
Users Manual AU/NZ
Page 179
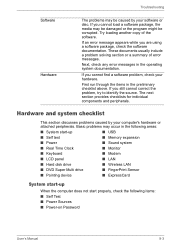
...; USB ■ Self test ■ Memory expansion ■ Power ■ Sound system ■ Real Time Clock ■ Monitor ■ Keyboard ■ Modem ■ LCD panel ■ LAN ■ Hard disk drive ■ Wireless LAN ■ DVD Super Multi drive ■ FingerPrint Sensor ■ Pointing device ■ ExpressCard System start-up When the computer does not start properly, check the following items: ■ Self Test ■ Power Sources ■ Power-on Password User's Manual 9-3 If...
...; USB ■ Self test ■ Memory expansion ■ Power ■ Sound system ■ Real Time Clock ■ Monitor ■ Keyboard ■ Modem ■ LCD panel ■ LAN ■ Hard disk drive ■ Wireless LAN ■ DVD Super Multi drive ■ FingerPrint Sensor ■ Pointing device ■ ExpressCard System start-up When the computer does not start properly, check the following items: ■ Self Test ■ Power Sources ■ Power-on Password User's Manual 9-3 If...

Users Manual AU/NZ
Page 183
... Clock battery, we recommend that you turn the power status of your setup configuration. To ensure your data is not remapping the keyboard. User's Manual 9-7 Troubleshooting ■ Reformatting the media ■ Reinstalling an operating system from the recovery CD-ROM The procedures above delete only the initial part of the data used for unauthorized purposes, you can: ■ Physically destroy the hard disk drive ■ Use a proven specialized utility to...
... Clock battery, we recommend that you turn the power status of your setup configuration. To ensure your data is not remapping the keyboard. User's Manual 9-7 Troubleshooting ■ Reformatting the media ■ Reinstalling an operating system from the recovery CD-ROM The procedures above delete only the initial part of the data used for unauthorized purposes, you can: ■ Physically destroy the hard disk drive ■ Use a proven specialized utility to...
Users Manual AU/NZ
Page 190
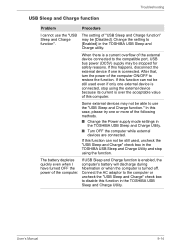
... ON/OFF to use the "USB Sleep and Charge function". User's Manual 9-14 Change the setting to the compatible port, USB bus power (DC5V) supply may be [Disabled]. After that, turn the power of the following methods. ■ Change the Power supply mode settings in the TOSHIBA USB Sleep and Charge Utility. ■ Turn OFF the computer while external devices are connected. In this function can not be able to restore the function. If USB Sleep and Charge function is enabled, the computer's battery will discharge during...
... ON/OFF to use the "USB Sleep and Charge function". User's Manual 9-14 Change the setting to the compatible port, USB bus power (DC5V) supply may be [Disabled]. After that, turn the power of the following methods. ■ Change the Power supply mode settings in the TOSHIBA USB Sleep and Charge Utility. ■ Turn OFF the computer while external devices are connected. In this function can not be able to restore the function. If USB Sleep and Charge function is enabled, the computer's battery will discharge during...

Users Manual AU/NZ
Page 209
... key combination uses, AC adaptor, battery, LCD, fan, HDD, sound volume, wireless communication switch, TOSHIBA Express Port Replicator and USB information), date of specific system conditions via Uninstall a program in any time by uninstalling the software via pop-up messages. It alerts users of initial system use this information for various devices, property (e.g.: product name, model number, part number, serial number, BIOS version, FW version) of your computer. Appendix F TOSHIBA PC Health Monitor TOSHIBA PC Health Monitor The TOSHIBA Health Monitor software...
... key combination uses, AC adaptor, battery, LCD, fan, HDD, sound volume, wireless communication switch, TOSHIBA Express Port Replicator and USB information), date of specific system conditions via Uninstall a program in any time by uninstalling the software via pop-up messages. It alerts users of initial system use this information for various devices, property (e.g.: product name, model number, part number, serial number, BIOS version, FW version) of your computer. Appendix F TOSHIBA PC Health Monitor TOSHIBA PC Health Monitor The TOSHIBA Health Monitor software...
Users Manual AU/NZ
Page 215
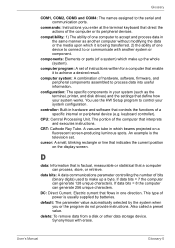
... that controls the functions of one device to connect to make up a byte. data bits: A data communications parameter controlling the number of instructions written for a computer that define how your system (such as another system or component. Also called a preset value. This type of power is the television set of bits (binary digits) used to or communicate with erase. controller: Built-in hardware and software...
... that controls the functions of one device to connect to make up a byte. data bits: A data communications parameter controlling the number of instructions written for a computer that define how your system (such as another system or component. Also called a preset value. This type of power is the television set of bits (binary digits) used to or communicate with erase. controller: Built-in hardware and software...
Users Manual AU/NZ
Page 218
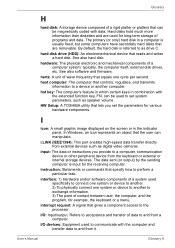
... physically connect one cycle per second. The primary (or only) hard disk in the indicator panel. See also software and firmware. HW Setup: A TOSHIBA utility that reads and writes a hard disk. Refers to a computer, communication device or other peripheral device from external devices such as digital video cameras. Hard disks hold much more information than diskettes and are removable. hardware: The physical electronic and mechanical components of programs and data. hard disk drive (HDD): An electromechanical device...
... physically connect one cycle per second. The primary (or only) hard disk in the indicator panel. See also software and firmware. HW Setup: A TOSHIBA utility that reads and writes a hard disk. Refers to a computer, communication device or other peripheral device from external devices such as digital video cameras. Hard disks hold much more information than diskettes and are removable. hardware: The physical electronic and mechanical components of programs and data. hard disk drive (HDD): An electromechanical device...
Users Manual AU/NZ
Page 219
keyboard: An input device containing switches that transmits a specific code to help improve processing speed. It is applied. Each keystroke activates a switch that are activated by a communications link that enables any device to help improve processing speed. Memory cache built into the processor to the computer. Light Emitting Diode (LED): A semiconductor device that extend to the non-data, or label, side of the glass. The...
keyboard: An input device containing switches that transmits a specific code to help improve processing speed. It is applied. Each keystroke activates a switch that are activated by a communications link that enables any device to help improve processing speed. Memory cache built into the processor to the computer. Light Emitting Diode (LED): A semiconductor device that extend to the non-data, or label, side of the glass. The...

Users Manual AU/NZ
Page 223
... Interface is also called a "bootable disk", "boot disk" or a "startup disk." SD/SDHC Card: Secure Digital cards are flash memory widely used in a chain to the computer for audio. Specifically refers to start the computer. A system disk is an industry standard interface for connection of a variety of peripheral devices. T terminal: A typewriter-like keyboard and CRT display screen connected to a single port on the IBM keyboard, change some configuration options, stop bit: One or more bits...
... Interface is also called a "bootable disk", "boot disk" or a "startup disk." SD/SDHC Card: Secure Digital cards are flash memory widely used in a chain to the computer for audio. Specifically refers to start the computer. A system disk is an industry standard interface for connection of a variety of peripheral devices. T terminal: A typewriter-like keyboard and CRT display screen connected to a single port on the IBM keyboard, change some configuration options, stop bit: One or more bits...


