User Manual
Page 5
... Telephone Consumer Protection Act of 1991 makes it unlawful for which charges exceed local or long-distance transmission charges.) In order to program this information into your right to file a complaint with this change. If these changes might affect your service or the operation of your fax transmission, refer to the fax software instructions installed on the first page of the...
... Telephone Consumer Protection Act of 1991 makes it unlawful for which charges exceed local or long-distance transmission charges.) In order to program this information into your right to file a complaint with this change. If these changes might affect your service or the operation of your fax transmission, refer to the fax software instructions installed on the first page of the...

User Manual
Page 28
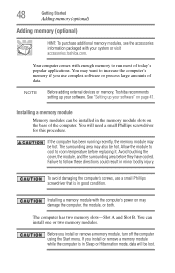
...Opening the display panel 46 Your computer's features and specifications ....47 Turning on the power 47 Adding memory (optional 48 Installing a memory module 48 Removing a memory module 54 Checking total memory 55 Hard Drive Recovery Utilities 56 Creating Recovery CDs/DVDs 57 Hard Disk Drive Recovery options 58 Hard Disk Drive Recovery using the Recovery media 63 Installing drivers and applications 64 Using the TouchPad 64 Scrolling with the TouchPad 65 Control buttons 65 Disabling or enabling the TouchPad 65 Using the Dual Mode Pad 66 Using Dual Mode 66 Using external display...
...Opening the display panel 46 Your computer's features and specifications ....47 Turning on the power 47 Adding memory (optional 48 Installing a memory module 48 Removing a memory module 54 Checking total memory 55 Hard Drive Recovery Utilities 56 Creating Recovery CDs/DVDs 57 Hard Disk Drive Recovery options 58 Hard Disk Drive Recovery using the Recovery media 63 Installing drivers and applications 64 Using the TouchPad 64 Scrolling with the TouchPad 65 Control buttons 65 Disabling or enabling the TouchPad 65 Using the Dual Mode Pad 66 Using Dual Mode 66 Using external display...
User Manual
Page 48
... both. Avoid touching the cover, the module, and the surrounding area before replacing it. You can be lost. If you install or remove a memory module while the computer is in the memory module slots on page 41. You may be hot. Failure to increase the computer's memory if you install or remove a memory module, turn off the computer using the Start menu. To avoid damaging the computer's screws, use complex software or process...
... both. Avoid touching the cover, the module, and the surrounding area before replacing it. You can be lost. If you install or remove a memory module while the computer is in the memory module slots on page 41. You may be hot. Failure to increase the computer's memory if you install or remove a memory module, turn off the computer using the Start menu. To avoid damaging the computer's screws, use complex software or process...

User Manual
Page 53
...-insert the main battery. Back of computer Slot A Slot B (Sample Illustration) Inserting the memory module into the slot NOTE For this model, Slot B is the top slot. If you can now continue setting up . 17 Reconnect the cables. 18 Restart the computer. Getting Started 53 Adding memory (optional) Do not force the memory module into the socket and level when secured in slot A. 14 Replace the memory module slot cover and secure...
...-insert the main battery. Back of computer Slot A Slot B (Sample Illustration) Inserting the memory module into the slot NOTE For this model, Slot B is the top slot. If you can now continue setting up . 17 Reconnect the cables. 18 Restart the computer. Getting Started 53 Adding memory (optional) Do not force the memory module into the socket and level when secured in slot A. 14 Replace the memory module slot cover and secure...

User Manual
Page 55
Back of computer Slot A Slot B (Sample Illustration) Removing the memory module 4 Replace the memory module slot cover and secure it out of the slot. TECHNICAL NOTE: You must have at least one memory module installed for the computer to a 30-degree angle and slide it using the screw. 5 Re-insert the main battery. For more information on inserting the main battery, see "Inserting a charged battery" on page 118. 6 Turn the computer...
Back of computer Slot A Slot B (Sample Illustration) Removing the memory module 4 Replace the memory module slot cover and secure it out of the slot. TECHNICAL NOTE: You must have at least one memory module installed for the computer to a 30-degree angle and slide it using the screw. 5 Re-insert the main battery. For more information on inserting the main battery, see "Inserting a charged battery" on page 118. 6 Turn the computer...
User Manual
Page 56
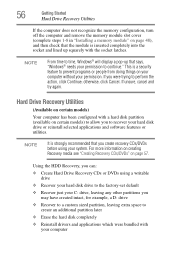
... your computer 56 Getting Started Hard Drive Recovery Utilities If the computer does not recognize the memory configuration, turn off the computer and remove the memory module slot cover (complete steps 1-8 in "Installing a memory module" on page 48), and then check that the module is inserted completely into the socket and lined up that you create recovery CDs/DVDs before using a writable drive ❖ Recover your hard disk drive to the factory-set default ❖ Recover just your permission to...
... your computer 56 Getting Started Hard Drive Recovery Utilities If the computer does not recognize the memory configuration, turn off the computer and remove the memory module slot cover (complete steps 1-8 in "Installing a memory module" on page 48), and then check that the module is inserted completely into the socket and lined up that you create recovery CDs/DVDs before using a writable drive ❖ Recover your hard disk drive to the factory-set default ❖ Recover just your permission to...
User Manual
Page 59
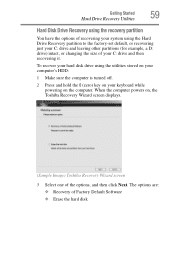
...drive using the Hard Drive Recovery partition to the factory-set default, or recovering just your C: drive and leaving other partitions (for example, a D: drive) intact, or changing the size of Factory Default Software ❖ Erase the hard disk Getting Started 59 Hard Drive Recovery Utilities Hard Disk Drive Recovery using the recovery partition You have the options of recovering your system using the utilities stored on your computer's HDD: 1 Make sure the computer is turned off. 2 Press and hold the 0 (zero) key on your keyboard while powering on , the Toshiba Recovery Wizard screen...
...drive using the Hard Drive Recovery partition to the factory-set default, or recovering just your C: drive and leaving other partitions (for example, a D: drive) intact, or changing the size of Factory Default Software ❖ Erase the hard disk Getting Started 59 Hard Drive Recovery Utilities Hard Disk Drive Recovery using the recovery partition You have the options of recovering your system using the utilities stored on your computer's HDD: 1 Make sure the computer is turned off. 2 Press and hold the 0 (zero) key on your keyboard while powering on , the Toshiba Recovery Wizard screen...
User Manual
Page 69
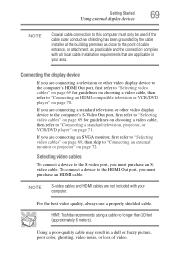
... use a properly shielded cable. HINT: Toshiba recommends using a cable no longer than 20 feet (approximately 6 meters). Connecting the display device If you must purchase an Svideo cable. Getting Started 69 Using external display devices NOTE Coaxial cable connection to this computer must only be used if the cable outer conductive shielding has been grounded by the cable installer at the building premises as close to the point of video. NOTE S-video cables and HDMI cables...
... use a properly shielded cable. HINT: Toshiba recommends using a cable no longer than 20 feet (approximately 6 meters). Connecting the display device If you must purchase an Svideo cable. Getting Started 69 Using external display devices NOTE Coaxial cable connection to this computer must only be used if the cable outer conductive shielding has been grounded by the cable installer at the building premises as close to the point of video. NOTE S-video cables and HDMI cables...
User Manual
Page 70
...'s built-in two ways: ❖ Using the headphone jack on the side of the computer-This lets you connect directly to headphones, powered speakers, or a stereo system that device's speakers, or when you use a TV or other external display device you can connect the sound to your computer. You can use that supports input from your television. You need a cable (not included with your computer...
...'s built-in two ways: ❖ Using the headphone jack on the side of the computer-This lets you connect directly to headphones, powered speakers, or a stereo system that device's speakers, or when you use a TV or other external display device you can connect the sound to your computer. You can use that supports input from your television. You need a cable (not included with your computer...

User Manual
Page 71
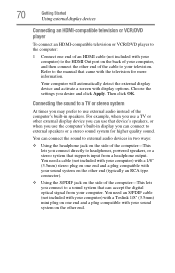
... on the Windows® Desktop and click Personalize. 2 Click Display Settings. The Display Settings dialog box appears. (Sample Image) Settings Tab Adjusting the Display Properties When using the S-video display port, the desktop shown on your computer) to the external video device. Getting Started 71 Using external display devices Connecting a standard television, projector, or VCR/DVD player To connect a standard television, projector, or VCR/DVD player: 1 Connect one end of the computer. 3 Turn on the external video device. Then...
... on the Windows® Desktop and click Personalize. 2 Click Display Settings. The Display Settings dialog box appears. (Sample Image) Settings Tab Adjusting the Display Properties When using the S-video display port, the desktop shown on your computer) to the external video device. Getting Started 71 Using external display devices Connecting a standard television, projector, or VCR/DVD player To connect a standard television, projector, or VCR/DVD player: 1 Connect one end of the computer. 3 Turn on the external video device. Then...
User Manual
Page 158
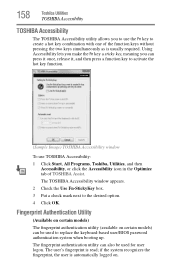
... utility can press it once, release it, and then press a function key to replace the keyboard-based user/BIOS password authentication system when booting up. if the system recognizes the fingerprint, the user is automatically logged on certain models) can be used to activate the hot key function. (Sample Image) TOSHIBA Accessibility window To use the Fn key to the desired option. 4 Click OK. 158 Toshiba Utilities TOSHIBA Accessibility TOSHIBA Accessibility The TOSHIBA Accessibility utility allows you can also be used for user...
... utility can press it once, release it, and then press a function key to replace the keyboard-based user/BIOS password authentication system when booting up. if the system recognizes the fingerprint, the user is automatically logged on certain models) can be used to activate the hot key function. (Sample Image) TOSHIBA Accessibility window To use the Fn key to the desired option. 4 Click OK. 158 Toshiba Utilities TOSHIBA Accessibility TOSHIBA Accessibility The TOSHIBA Accessibility utility allows you can also be used for user...
User Manual
Page 177
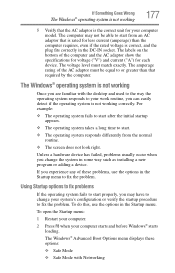
... Windows® Advanced Boot Options menu displays these problems, use the options in the DC-IN socket. The voltage level must be able to fix the problem. To do this, use the options in some way such as installing a new program or adding a device. The Windows® operating system is not working Once you experience any of these options: ❖ Safe Mode ❖ Safe Mode with the desktop and used to the way the operating...
... Windows® Advanced Boot Options menu displays these problems, use the options in the DC-IN socket. The voltage level must be able to fix the problem. To do this, use the options in some way such as installing a new program or adding a device. The Windows® operating system is not working Once you experience any of these options: ❖ Safe Mode ❖ Safe Mode with the desktop and used to the way the operating...

User Manual
Page 181
... Lock button in case the new version is causing a problem. The computer shuts down completely. 3 Remove the memory module, following the instructions in "Removing a memory module" on page 54. 4 Reinstall the memory module, following the instructions in "Installing a memory module" on page 48, and making sure the module is worthwhile checking for updating the driver or rolling back the driver in the lower-right part of the Start menu. For more information about Device Manager, refer to work...
... Lock button in case the new version is causing a problem. The computer shuts down completely. 3 Remove the memory module, following the instructions in "Removing a memory module" on page 54. 4 Reinstall the memory module, following the instructions in "Installing a memory module" on page 48, and making sure the module is worthwhile checking for updating the driver or rolling back the driver in the lower-right part of the Start menu. For more information about Device Manager, refer to work...

User Manual
Page 184
... window. If you to its previous setting. Press any key. You may have registered a password, press any key, type the password and press Enter. The screen reactivates and allows you are using the built-in screen. To do this does not correct the problem, press Fn and F5 simultaneously again to return the display priority to continue working power outlet. ❖ Check that the monitor's power cord/cable...
... window. If you to its previous setting. Press any key. You may have registered a password, press any key, type the password and press Enter. The screen reactivates and allows you are using the built-in screen. To do this does not correct the problem, press Fn and F5 simultaneously again to return the display priority to continue working power outlet. ❖ Check that the monitor's power cord/cable...
User Manual
Page 191
... paper left in the instructions that the printer is firmly connected to the computer's modem port and the telephone line jack. Some printers will not print. Many programs display information on page 75 or in the tray. Contact the software manufacturer for any problem with the printer. Make sure the printer cable is online, and then turn off the printer...
... paper left in the instructions that the printer is firmly connected to the computer's modem port and the telephone line jack. Some printers will not print. Many programs display information on page 75 or in the tray. Contact the software manufacturer for any problem with the printer. Make sure the printer cable is online, and then turn off the printer...
User Manual
Page 230
.... Memory cache installed on the motherboard to interact with the Fn key can set system options or control system parameters, such as the battery save mode. (2) A key or combination of keys that you use to the surface of computers that represents a function, file, or program. Internet - The decentralized, world-wide network of the display, creating light and dark pixels. See also cache, CPU cache, L2 cache. A group of keys that activates a memory...
.... Memory cache installed on the motherboard to interact with the Fn key can set system options or control system parameters, such as the battery save mode. (2) A key or combination of keys that you use to the surface of computers that represents a function, file, or program. Internet - The decentralized, world-wide network of the display, creating light and dark pixels. See also cache, CPU cache, L2 cache. A group of keys that activates a memory...
User Manual
Page 236
... Cards 207 Using 208 audio files 133 audio features 133 B backing up files 88 battery changing 116 charge indicator light 44, 109 charge not lasting 183 charging 43, 45 conserving power 113 disposal 121 low charge 111 monitoring power 44, 109 236 not charging 182 notification 112 power plan 212 power plan hot key 115 real-time clock (RTC) 106 removing 116 BIOS Setup see Toshiba Hardware Setup Bridge Media Adapter inserting memory media 137 removing memory media 137 button power 47, 57 start 125 C CD creating...
... Cards 207 Using 208 audio files 133 audio features 133 B backing up files 88 battery changing 116 charge indicator light 44, 109 charge not lasting 183 charging 43, 45 conserving power 113 disposal 121 low charge 111 monitoring power 44, 109 236 not charging 182 notification 112 power plan 212 power plan hot key 115 real-time clock (RTC) 106 removing 116 BIOS Setup see Toshiba Hardware Setup Bridge Media Adapter inserting memory media 137 removing memory media 137 button power 47, 57 start 125 C CD creating...

User Manual
Page 237
.../trouble accessing a disk 186 running slow 186 diskette drive cannot insert a diskette 187 cannot read a diskette 187 connecting 76 external, connecting 76 display does not look normal/flickers 184 external monitor not working 185 screen is blank 184 display device connecting 69 external 68 display output settings 72 display, external adjusting 74 disposal information 26 disposing of used batteries 121 double-click 65 DVD creating 102 DVD player general problems 195 DVD, using 97 E environment computer-friendly 38 error messages device driver...
.../trouble accessing a disk 186 running slow 186 diskette drive cannot insert a diskette 187 cannot read a diskette 187 connecting 76 external, connecting 76 display does not look normal/flickers 184 external monitor not working 185 screen is blank 184 display device connecting 69 external 68 display output settings 72 display, external adjusting 74 disposal information 26 disposing of used batteries 121 double-click 65 DVD creating 102 DVD player general problems 195 DVD, using 97 E environment computer-friendly 38 error messages device driver...
User Manual
Page 239
..., using 87 M main battery removing 116 memory adding 48 problem solving 181 removing expansion slot cover 50 memory module inserting 51 installation 48 removing 55 microphone 133 modem connecting to telephone line 127 determining COM port 126 problem solving 191, 192 resetting port to default settings 126 upgrading 126 monitor 68 connecting 69, 72 not working 184 mouse installing 74 serial 74 mouse utility 152 N network accessing 128 Dial-Up Networking Wizard 128 networking wireless 130 Notification Area 125 O opening the display panel 46 optical drive problems 187 troubleshooting 187...
..., using 87 M main battery removing 116 memory adding 48 problem solving 181 removing expansion slot cover 50 memory module inserting 51 installation 48 removing 55 microphone 133 modem connecting to telephone line 127 determining COM port 126 problem solving 191, 192 resetting port to default settings 126 upgrading 126 monitor 68 connecting 69, 72 not working 184 mouse installing 74 serial 74 mouse utility 152 N network accessing 128 Dial-Up Networking Wizard 128 networking wireless 130 Notification Area 125 O opening the display panel 46 optical drive problems 187 troubleshooting 187...
User Manual
Page 241
..., set up 147 S-video port cable selection 69 T Taskbar 125 telephone line connecting to modem 127 television adjusting display 74 connecting 69 Toshiba registering computer 42 worldwide offices 203 TOSHIBA Assist 140 Toshiba Hardware Setup 153 Toshiba online resources 104 Toshiba utilities 139 traveling tips 122 troubleshooting DVD player general problems 195 external keyboard 183 keyboard 183 optical drive 187 turning on the computer 47 turning on the power 47 U user password, disabling 149 user password, setting 148 using a file extension 95 V video cables 69 video display device connecting...
..., set up 147 S-video port cable selection 69 T Taskbar 125 telephone line connecting to modem 127 television adjusting display 74 connecting 69 Toshiba registering computer 42 worldwide offices 203 TOSHIBA Assist 140 Toshiba Hardware Setup 153 Toshiba online resources 104 Toshiba utilities 139 traveling tips 122 troubleshooting DVD player general problems 195 external keyboard 183 keyboard 183 optical drive 187 turning on the computer 47 turning on the power 47 U user password, disabling 149 user password, setting 148 using a file extension 95 V video cables 69 video display device connecting...


